


【第六节】: 【Lagent & AgentLego 智能体应用搭建】
1、Agent 理论及 Lagent&AgentLego 开源产品介绍
2、Lagent 调用已有 Arxiv 论文搜索工具实战
3、Lagent 新增自定义工具实战(以查询天气的工具为例)
4、AgentLego 新增 MagicMaker 文生图工具实战
【视频地址】:https://www.bilibili.com/video/BV1Xt4217728/
【课程文档】:https://github.com/InternLM/Tutorial/tree/camp2/agent
【课程作业】:https://github.com/InternLM/Tutorial/blob/camp2/agent/homework.md
【操作平台】:https://studio.intern-ai.org.cn/console/instance/
【lagent文档】: https://github.com/InternLM/Tutorial/blob/camp2/agent/lagent.md
【agentlego文档】:https://github.com/InternLM/Tutorial/blob/camp2/agent/agentlego.md
【lagent自定义工具】: https://lagent.readthedocs.io/zh-cn/latest/tutorials/action.html
【agentlego自定义工具】: https://agentlego.readthedocs.io/zh-cn/latest/modules/tool.html
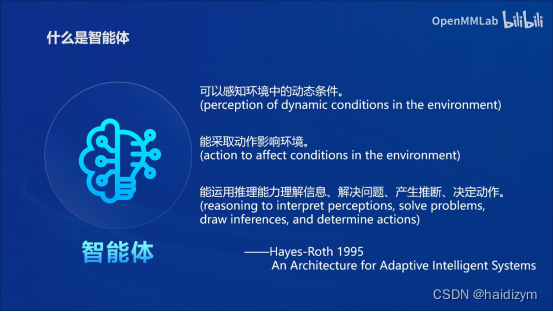
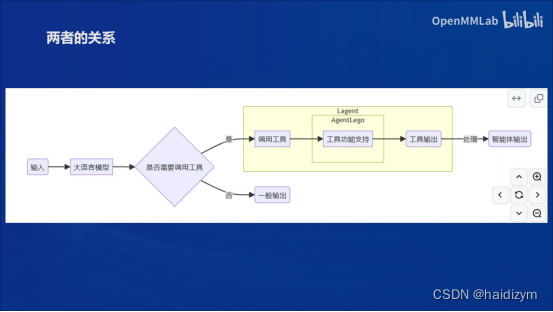
agent理论
大语言模型的局限性:幻觉、时效性,可靠性
智能体定义:感知、决策、行动
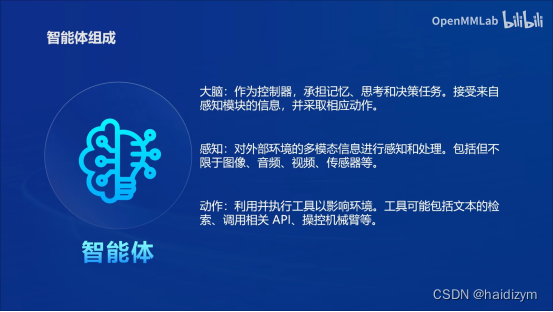
智能体组成:感知、大脑、动作
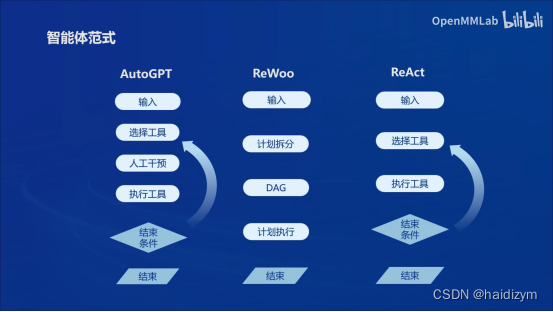
智能体类型:ReAct(选择工具),ReWoo(计划拆分),AutoGPT(人工干预)
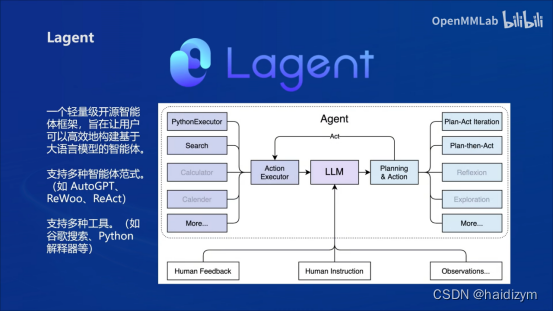
Lagent&AgentLego开源框架
Lagent一个轻量级开源智能体框架,旨在让用户可以高效地构建基于大语言模型的智能体。支持多种智能体范式(ReAct,ReWoo,AutoGPT),支持多种工具(如谷歌搜索、python解释器等)
AgentLego一个多模态工具包,旨在像乐高积木,可以快速简便地拓展自定义工具,从而组装出自己的智能体。支持多个智能体框架(如lagent,LangChain,Transformers Agents),提供大量视觉、多模态领域前沿算法

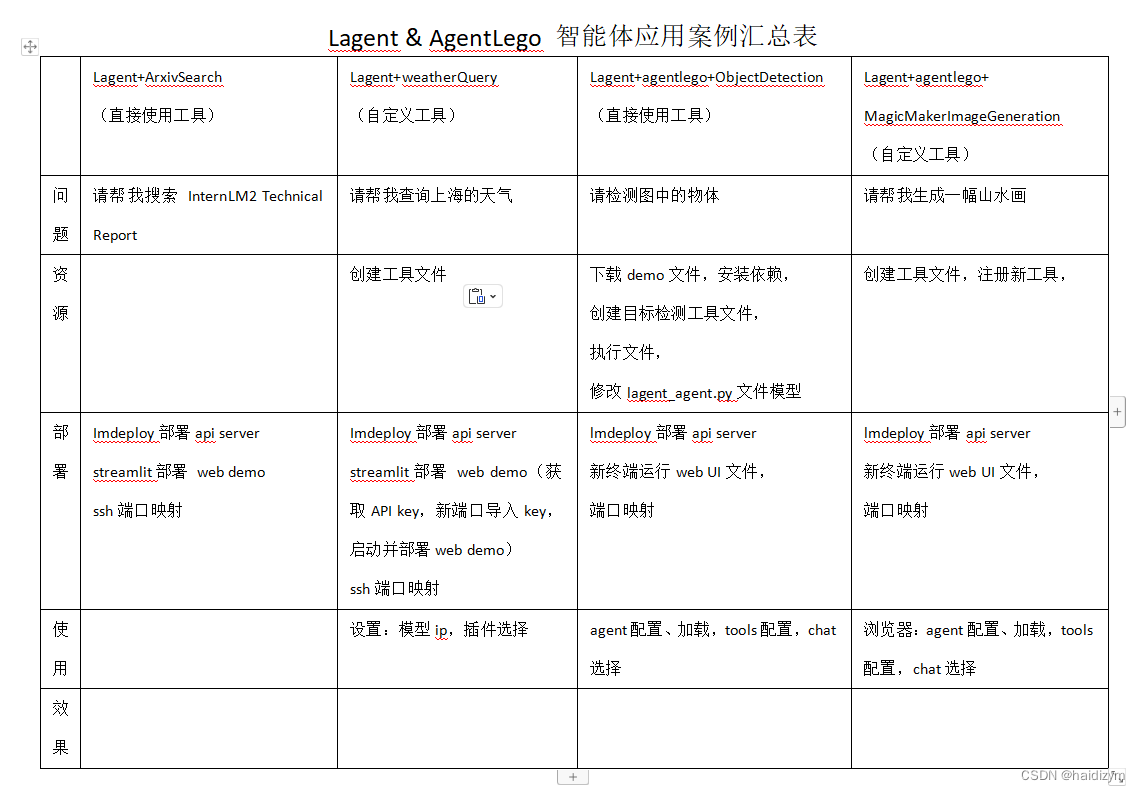
Lagent & AgentLego 智能体应用案例汇总表
总环境配置:
mkdir -p /root/agent
studio-conda -t agent -o pytorch-2.1.2
cd /root/agent
conda activate agent
git clone https://gitee.com/internlm/lagent.git
cd lagent && git checkout 581d9fb && pip install -e . && cd ..
git clone https://gitee.com/internlm/agentlego.git
cd agentlego && git checkout 7769e0d && pip install -e . && cd ..
conda activate agent
pip install lmdeploy==0.3.0
cd /root/agent
git clone -b camp2 https://gitee.com/internlm/Tutorial.git
案例1:Lagent+ArxivSearch
问题:
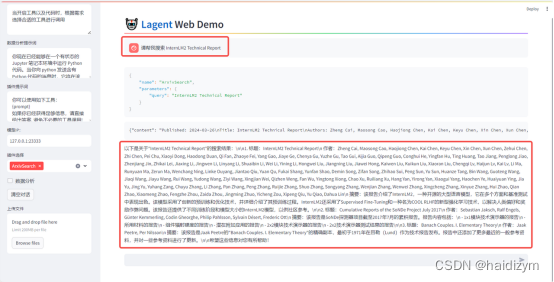
请帮我搜索 InternLM2 Technical Report
资源:
部署:
#vscode terminal:Imdeploy的api server
conda activate agent
lmdeploy serve api_server /root/share/new_models/Shanghai_AI_Laboratory/internlm2-chat-7b \
                            --server-name 127.0.0.1 \
                            --model-name internlm2-chat-7b \
                            --cache-max-entry-count 0.1
#new vscode terminal:streamlit web demo
conda activate agent
cd /root/agent/lagent/examples
streamlit run internlm2_agent_web_demo.py --server.address 127.0.0.1 --server.port 7860
#终端映射powershell
ssh -CNg -L 7860:127.0.0.1:7860 -L 23333:127.0.0.1:23333 root@ssh.intern-ai.org.cn -p 你的 ssh 端口号
使用:
浏览器: http://localhost:7860
Web页面设置:
模型IP:127.0.0.1:23333
插件选择:ArxivSearch
效果:
案例2:Lagent+WeatherQuery
问题:
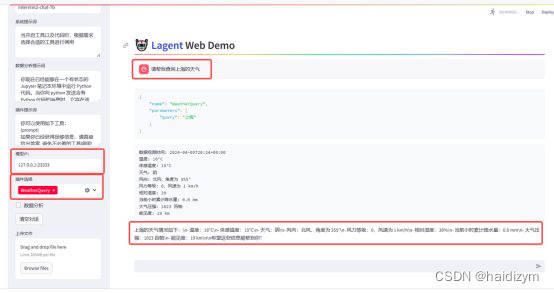
请帮我查询上海的天气
资源:
#自定义天气查询工具touch /root/agent/lagent/lagent/actions/weather.py
import json
import os
import requests
from typing import Optional, Type

from lagent.actions.base_action import BaseAction, tool_api
from lagent.actions.parser import BaseParser, JsonParser
from lagent.schema import ActionReturn, ActionStatusCode

class WeatherQuery(BaseAction):
    """Weather plugin for querying weather information."""

    def __init__(self,
                 key: Optional[str] = None,
                 description: Optional[dict] = None,
                 parser: Type[BaseParser] = JsonParser,
                 enable: bool = True) -> None:
        super().__init__(description, parser, enable)
        key = os.environ.get('WEATHER_API_KEY', key)
        if key is None:
            raise ValueError(
                'Please set Weather API key either in the environment '
                'as WEATHER_API_KEY or pass it as `key`')
        self.key = key
        self.location_query_url = 'https://geoapi.qweather.com/v2/city/lookup'
        self.weather_query_url = 'https://devapi.qweather.com/v7/weather/now'

    @tool_api
    def run(self, query: str) -> ActionReturn:
        """一个天气查询API。可以根据城市名查询天气信息。

        Args:
            query (:class:`str`): The city name to query.
        """
        tool_return = ActionReturn(type=self.name)
        status_code, response = self._search(query)
        if status_code == -1:
            tool_return.errmsg = response
            tool_return.state = ActionStatusCode.HTTP_ERROR
        elif status_code == 200:
            parsed_res = self._parse_results(response)
            tool_return.result = [dict(type='text', content=str(parsed_res))]
            tool_return.state = ActionStatusCode.SUCCESS
        else:
            tool_return.errmsg = str(status_code)
            tool_return.state = ActionStatusCode.API_ERROR
        return tool_return

    def _parse_results(self, results: dict) -> str:
        """Parse the weather results from QWeather API.

        Args:
            results (dict): The weather content from QWeather API
                in json format.

        Returns:
            str: The parsed weather results.
        """
        now = results['now']
        data = [
            f'数据观测时间: {now["obsTime"]}',
            f'温度: {now["temp"]}°C',
            f'体感温度: {now["feelsLike"]}°C',
            f'天气: {now["text"]}',
            f'风向: {now["windDir"]},角度为 {now["wind360"]}°',
            f'风力等级: {now["windScale"]},风速为 {now["windSpeed"]} km/h',
            f'相对湿度: {now["humidity"]}',
            f'当前小时累计降水量: {now["precip"]} mm',
            f'大气压强: {now["pressure"]} 百帕',
            f'能见度: {now["vis"]} km',
        ]
        return '\n'.join(data)

    def _search(self, query: str):
        # get city_code
        try:
            city_code_response = requests.get(
                self.location_query_url,
                params={'key': self.key, 'location': query}
            )
        except Exception as e:
            return -1, str(e)
        if city_code_response.status_code != 200:
            return city_code_response.status_code, city_code_response.json()
        city_code_response = city_code_response.json()
        if len(city_code_response['location']) == 0:
            return -1, '未查询到城市'
        city_code = city_code_response['location'][0]['id']
        # get weather
        try:
            weather_response = requests.get(
                self.weather_query_url,
                params={'key': self.key, 'location': city_code}
            )
        except Exception as e:
            return -1, str(e)
        return weather_response.status_code, weather_response.json()
#获取天气查询API key: https://dev.qweather.com/docs/api/
部署:
#vscode terminal:Imdeploy的api serve
conda activate agent
lmdeploy serve api_server /root/share/new_models/Shanghai_AI_Laboratory/internlm2-chat-7b \
                            --server-name 127.0.0.1 \
                            --model-name internlm2-chat-7b \
                            --cache-max-entry-count 0.1
#new vscode terminal:启动并部署web demo
export WEATHER_API_KEY=在2.2节获取的API KEY
# 比如 export WEATHER_API_KEY=1234567890abcdef
conda activate agent
cd /root/agent/Tutorial/agent
streamlit run internlm2_weather_web_demo.py --server.address 127.0.0.1 --server.port 7860
#终端映射powershell
ssh -CNg -L 7860:127.0.0.1:7860 -L 23333:127.0.0.1:23333 root@ssh.intern-ai.org.cn -p 你的 ssh 端口号
使用:
浏览器: http://localhost:7860
Web页面设置:
模型IP:127.0.0.1:23333
插件选择:WeatherQuery
效果:
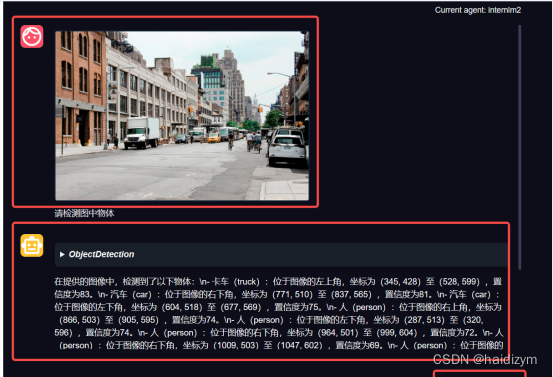
案例3:Lagent+agentlego+ObjectDetection
问题:
请检测图中的物体
资源:
cd /root/agent
wget http://download.openmmlab.com/agentlego/road.jpg
conda activate agent
pip install openmim==0.3.9
mim install mmdet==3.3.0
#新建目标检测工具文件:touch /root/agent/direct_use.py
import re

import cv2
from agentlego.apis import load_tool

# load tool
tool = load_tool('ObjectDetection', device='cuda')

# apply tool
visualization = tool('/root/agent/road.jpg')
print(visualization)

# visualize
image = cv2.imread('/root/agent/road.jpg')

preds = visualization.split('\n')
pattern = r'(\w+) \((\d+), (\d+), (\d+), (\d+)\), score (\d+)'

for pred in preds:
    name, x1, y1, x2, y2, score = re.match(pattern, pred).groups()
    x1, y1, x2, y2, score = int(x1), int(y1), int(x2), int(y2), int(score)
    cv2.rectangle(image, (x1, y1), (x2, y2), (0, 255, 0), 1)
    cv2.putText(image, f'{name} {score}', (x1, y1), cv2.FONT_HERSHEY_SIMPLEX, 0.8, (0, 255, 0), 1)

cv2.imwrite('/root/agent/road_detection_direct.jpg', image)
#修改相关文件:/root/agent/agentlego/webui/modules/agents/lagent_agent.py 文件的第 105行位置,将 internlm2-chat-20b 修改为 internlm2-chat-7b,
def llm_internlm2_lmdeploy(cfg):
    url = cfg['url'].strip()
    llm = LMDeployClient(
-         model_name='internlm2-chat-20b',
+         model_name='internlm2-chat-7b',
        url=url,
        meta_template=INTERNLM2_META,
        top_p=0.8,
        top_k=100,
        temperature=cfg.get('temperature', 0.7),
        repetition_penalty=1.0,
        stop_words=['<|im_end|>'])
    return llm
部署:
#vscode terminal:Imdeploy的api serve
conda activate agent
lmdeploy serve api_server /root/share/new_models/Shanghai_AI_Laboratory/internlm2-chat-7b \
                            --server-name 127.0.0.1 \
                            --model-name internlm2-chat-7b \
                            --cache-max-entry-count 0.1
#new vscode terminal:启动 AgentLego WebUI
conda activate agent
cd /root/agent/agentlego/webui
python one_click.py
#终端映射powershell
ssh -CNg -L 7860:127.0.0.1:7860 -L 23333:127.0.0.1:23333 root@ssh.intern-ai.org.cn -p 你的 ssh 端口号
使用:
浏览器: http://localhost:7860
agent配置、加载,tools配置,chat选择
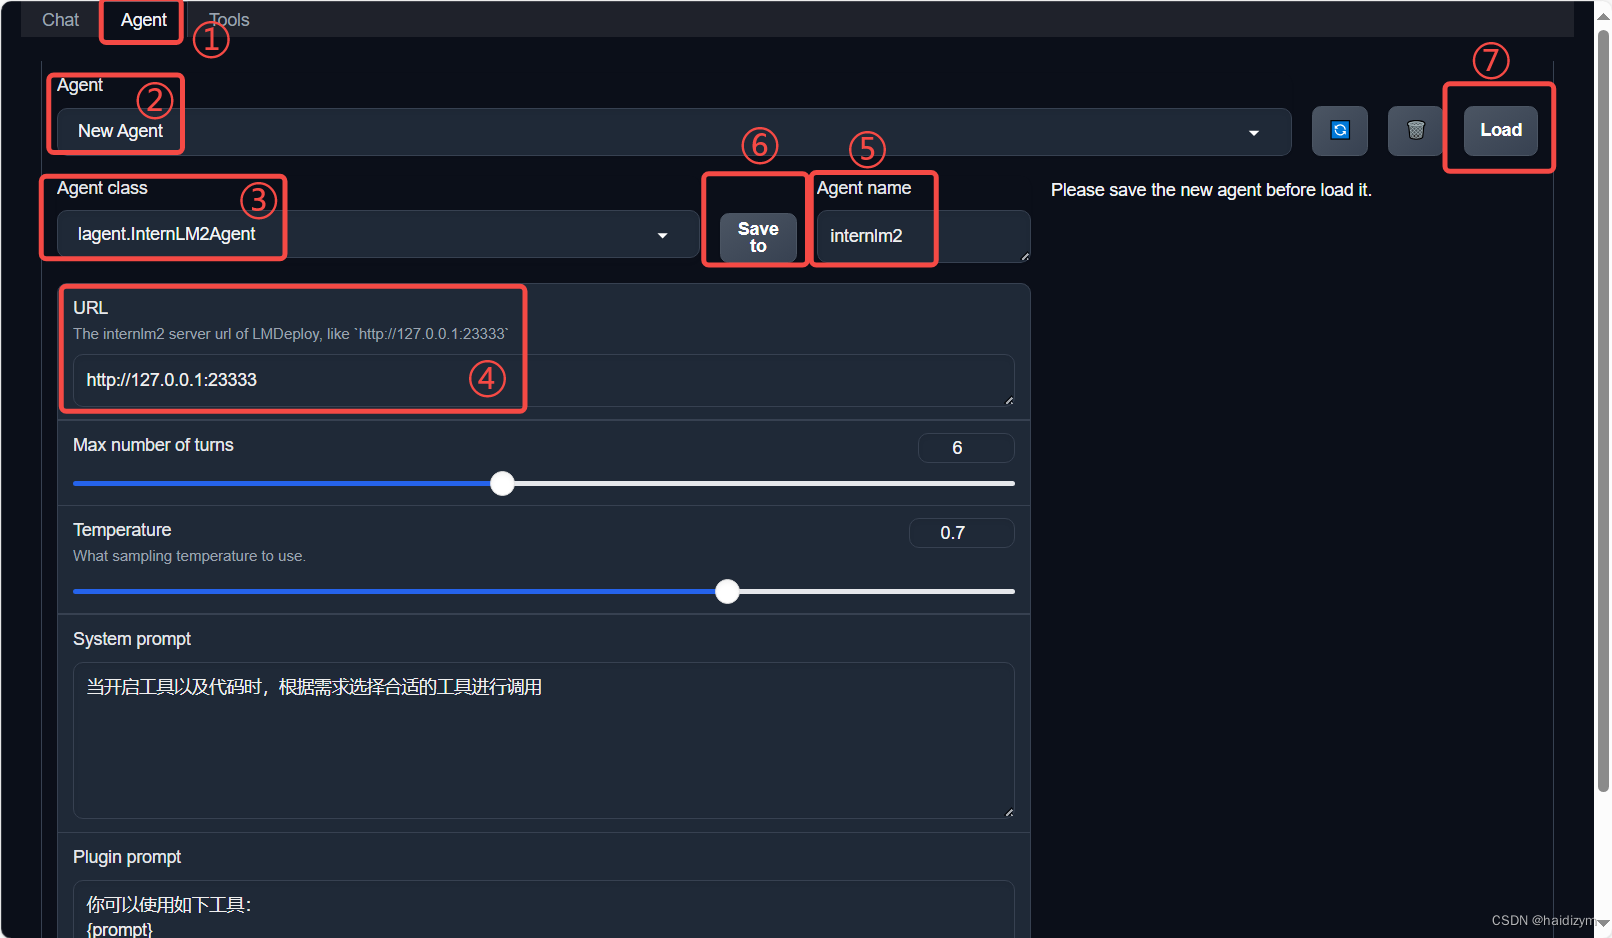
点击上方 Agent 进入 Agent 配置页面。(如①所示)
点击 Agent 下方框,选择 New Agent。(如②所示)
选择 Agent Class 为 lagent.InternLM2Agent。(如③所示)
输入模型 URL 为 http://127.0.0.1:23333 。(如④所示)
输入 Agent name,自定义即可,图中输入了 internlm2。(如⑤所示)
点击 save to 以保存配置,这样在下次使用时只需在第2步时选择 Agent 为 internlm2 后点击 load 以加载就可以了。(如⑥所示)
点击 load 以加载配置。(如⑦所示)
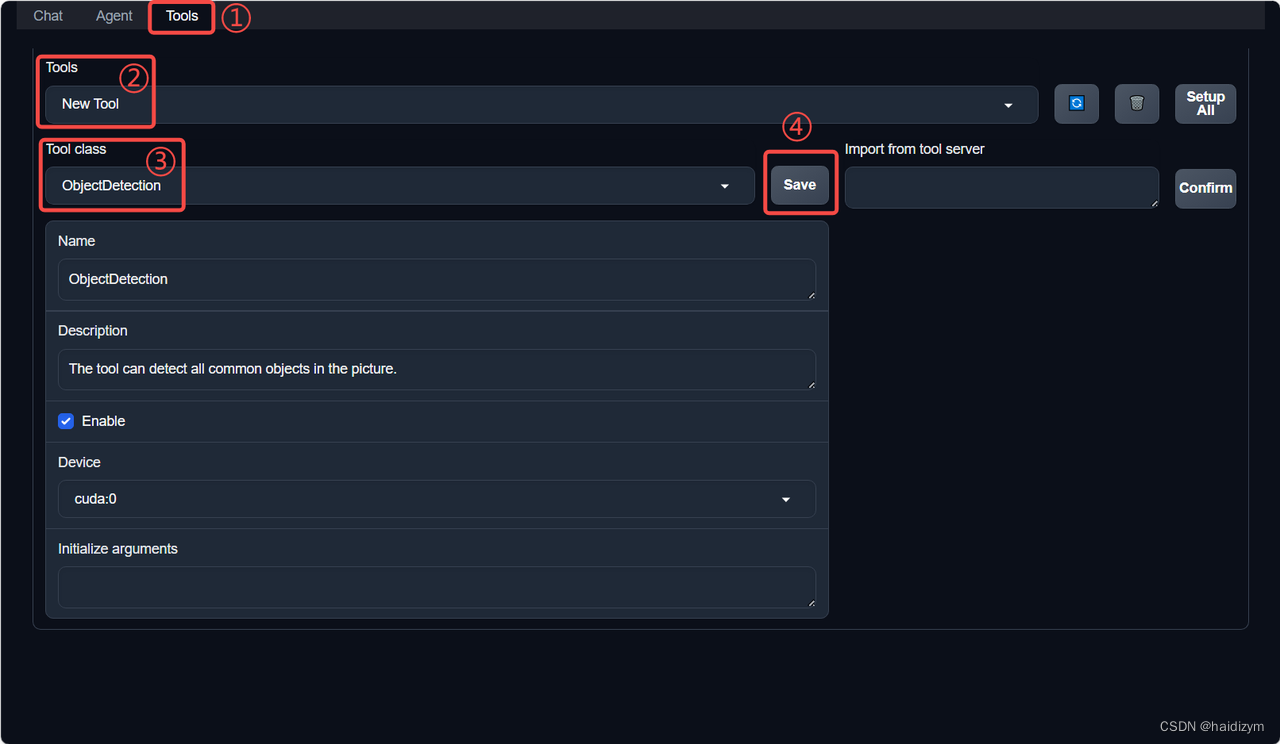
点击上方 Tools 页面进入工具配置页面。(如①所示)
点击 Tools 下方框,选择 New Tool 以加载新工具。(如②所示)
选择 Tool Class 为 ObjectDetection。(如③所示)
点击 save 以保存配置。(如④所示)
等待工具加载完成后,点击上方 Chat 以进入对话页面。在页面下方选择工具部分只选择 ObjectDetection 工具,如下图所示。为了确保调用工具的成功率,请在使用时确保仅有这一个工具启用。

效果:
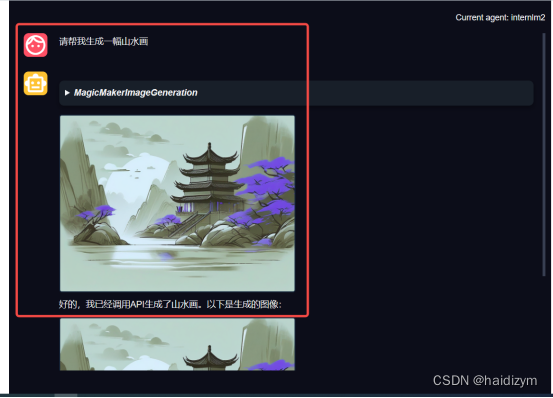
案例4:Lagent+agentlego+ MagicMakerImageGeneration
问题:
请帮我生成一幅山水画
资源:
#新建目标检测工具文件:
#touch /root/agent/agentlego/agentlego/tools/magicmaker_image_generation.py
import json
import requests

import numpy as np

from agentlego.types import Annotated, ImageIO, Info
from agentlego.utils import require
from .base import BaseTool


class MagicMakerImageGeneration(BaseTool):

    default_desc = ('This tool can call the api of magicmaker to '
                    'generate an image according to the given keywords.')

    styles_option = [
        'dongman',  # 动漫
        'guofeng',  # 国风
        'xieshi',   # 写实
        'youhua',   # 油画
        'manghe',   # 盲盒
    ]
    aspect_ratio_options = [
        '16:9', '4:3', '3:2', '1:1',
        '2:3', '3:4', '9:16'
    ]

    @require('opencv-python')
    def __init__(self,
                 style='guofeng',
                 aspect_ratio='4:3'):
        super().__init__()
        if style in self.styles_option:
            self.style = style
        else:
            raise ValueError(f'The style must be one of {self.styles_option}')

        if aspect_ratio in self.aspect_ratio_options:
            self.aspect_ratio = aspect_ratio
        else:
            raise ValueError(f'The aspect ratio must be one of {aspect_ratio}')

    def apply(self,
              keywords: Annotated[str,
                                  Info('A series of Chinese keywords separated by comma.')]
        ) -> ImageIO:
        import cv2
        response = requests.post(
            url='https://magicmaker.openxlab.org.cn/gw/edit-anything/api/v1/bff/sd/generate',
            data=json.dumps({
                "official": True,
                "prompt": keywords,
                "style": self.style,
                "poseT": False,
                "aspectRatio": self.aspect_ratio
            }),
            headers={'content-type': 'application/json'}
        )
        image_url = response.json()['data']['imgUrl']
        image_response = requests.get(image_url)
        image = cv2.imdecode(np.frombuffer(image_response.content, np.uint8), cv2.IMREAD_COLOR)
        return ImageIO(image)
#注册新工具,修改 /root/agent/agentlego/agentlego/tools/__init__.py 文件,将我们的工具注册在工具列表中。
from .base import BaseTool
from .calculator import Calculator
from .func import make_tool
from .image_canny import CannyTextToImage, ImageToCanny
from .image_depth import DepthTextToImage, ImageToDepth
from .image_editing import ImageExpansion, ImageStylization, ObjectRemove, ObjectReplace
from .image_pose import HumanBodyPose, HumanFaceLandmark, PoseToImage
from .image_scribble import ImageToScribble, ScribbleTextToImage
from .image_text import ImageDescription, TextToImage
from .imagebind import AudioImageToImage, AudioTextToImage, AudioToImage, ThermalToImage
from .object_detection import ObjectDetection, TextToBbox
from .ocr import OCR
from .scholar import *  # noqa: F401, F403
from .search import BingSearch, GoogleSearch
from .segmentation import SegmentAnything, SegmentObject, SemanticSegmentation
from .speech_text import SpeechToText, TextToSpeech
from .translation import Translation
from .vqa import VQA
+ from .magicmaker_image_generation import MagicMakerImageGeneration

__all__ = [
    'CannyTextToImage', 'ImageToCanny', 'DepthTextToImage', 'ImageToDepth',
    'ImageExpansion', 'ObjectRemove', 'ObjectReplace', 'HumanFaceLandmark',
    'HumanBodyPose', 'PoseToImage', 'ImageToScribble', 'ScribbleTextToImage',
    'ImageDescription', 'TextToImage', 'VQA', 'ObjectDetection', 'TextToBbox', 'OCR',
    'SegmentObject', 'SegmentAnything', 'SemanticSegmentation', 'ImageStylization',
    'AudioToImage', 'ThermalToImage', 'AudioImageToImage', 'AudioTextToImage',
    'SpeechToText', 'TextToSpeech', 'Translation', 'GoogleSearch', 'Calculator',
-     'BaseTool', 'make_tool', 'BingSearch'
+     'BaseTool', 'make_tool', 'BingSearch', 'MagicMakerImageGeneration'
]
部署:
#vscode terminal:Imdeploy的api serve
conda activate agent
lmdeploy serve api_server /root/share/new_models/Shanghai_AI_Laboratory/internlm2-chat-7b \
                            --server-name 127.0.0.1 \
                            --model-name internlm2-chat-7b \
                            --cache-max-entry-count 0.1
#new vscode terminal:启动 AgentLego WebUI
conda activate agent
cd /root/agent/agentlego/webui
python one_click.py
#终端映射powershell
ssh -CNg -L 7860:127.0.0.1:7860 -L 23333:127.0.0.1:23333 root@ssh.intern-ai.org.cn -p 你的 ssh 端口号
使用:
浏览器: http://localhost:7860
agent配置、加载,tools配置,chat选择
效果:
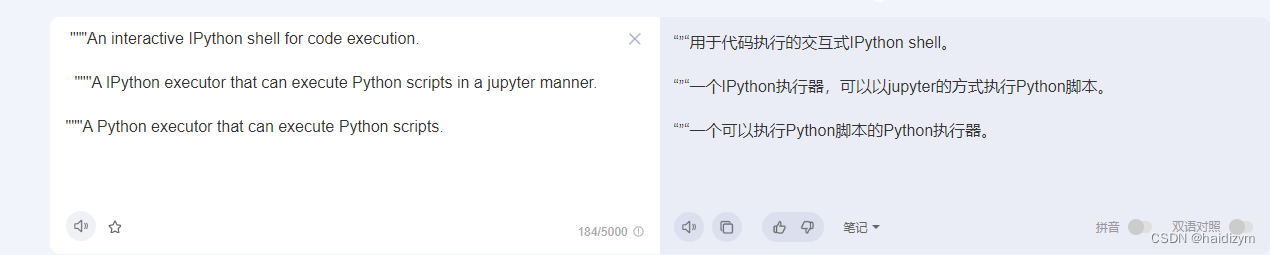
附加:使用iPythoninterpreter
https://github.com/InternLM/lagent/blob/main/lagent/actions/ipython_interpreter.py
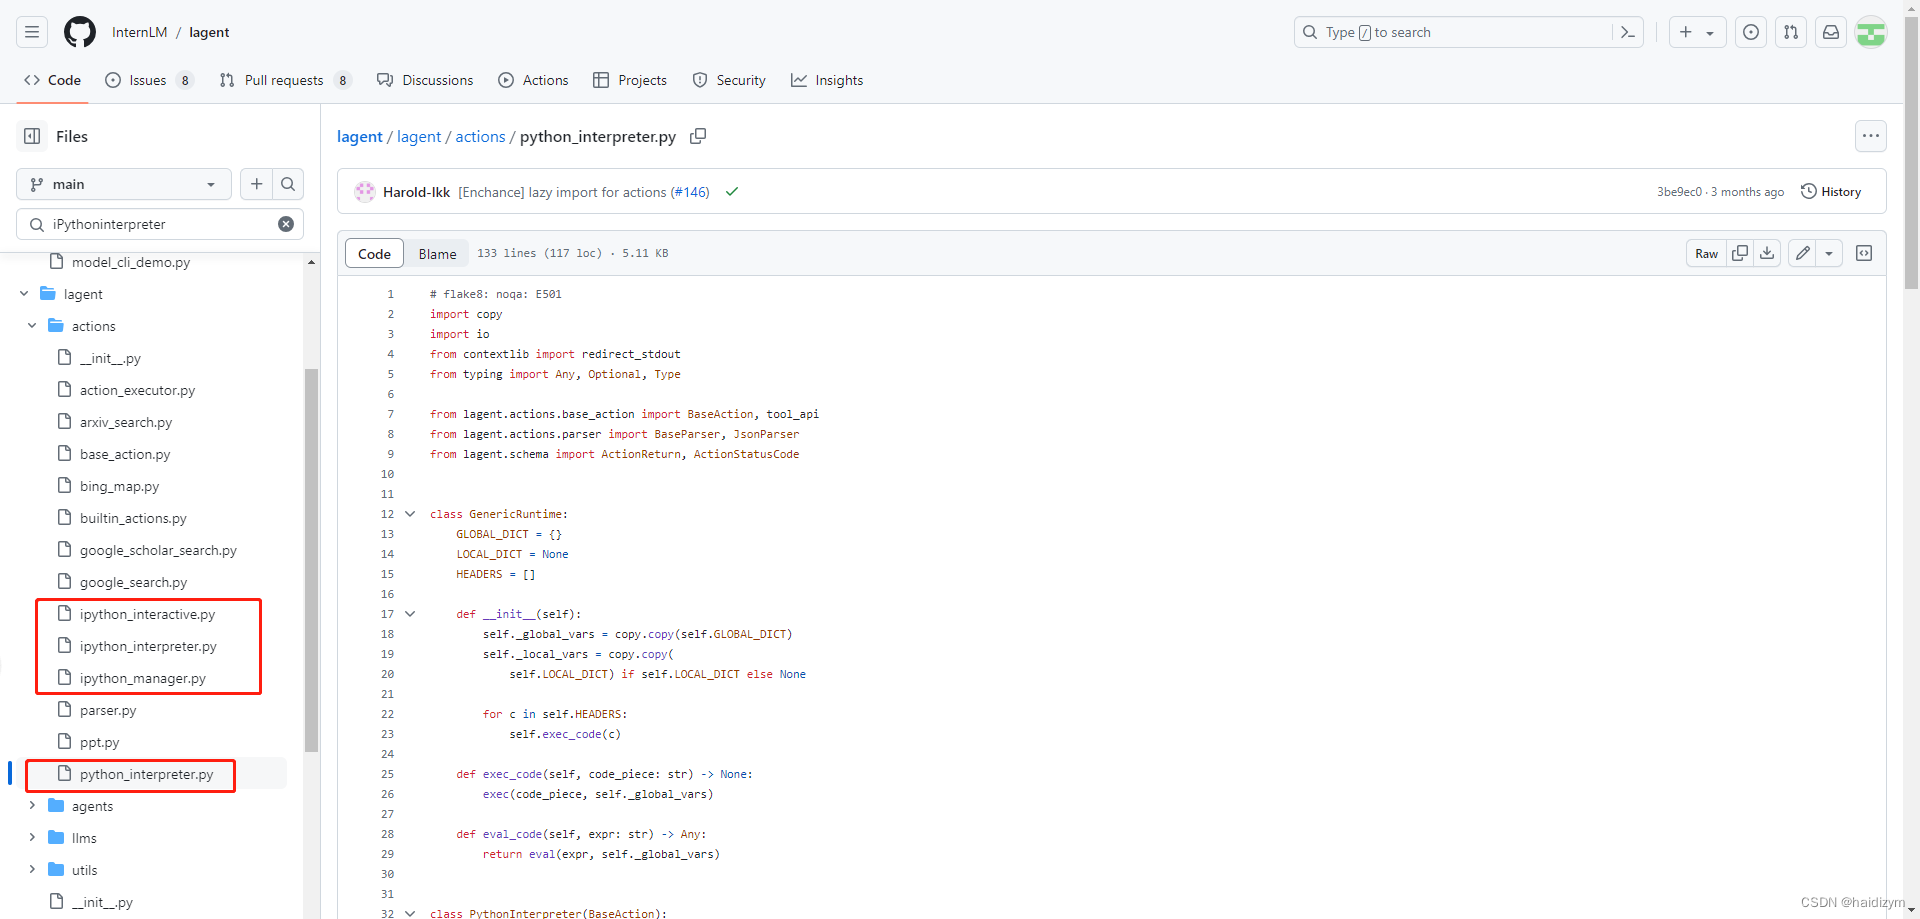
有人研究过这4个工具定义文件功能有什么不同吗?
ipythoninteraactive
ipythoninterpreter
ipythonmanager(暂时不知)
pythoninterpreter

这里加插件,然后model部分改成你要的
备注:来自网址https://boiled-ginger-cbc.notion.site/Lagent-80ac842782f54171a6443db3e385e846
看看本次实验使用了哪些 包
import copy
import os
import streamlit as st
from streamlit.logger import get_logger
# 这里应该可以可以总共支持多少的 actions
from lagent.actions import ActionExecutor, GoogleSearch, PythonInterpreter
from lagent.agents.react import ReAct
'''
ReAct 使用到的地方 -- 看上去就是初始化要用的 model 和 action
def initialize_chatbot(self, model, plugin_action):
"""Initialize the chatbot with the given model and plugin actions."""
return ReAct(
llm=model, action_executor=ActionExecutor(actions=plugin_action))
'''
# 这就是字面意思 -- GPT的API
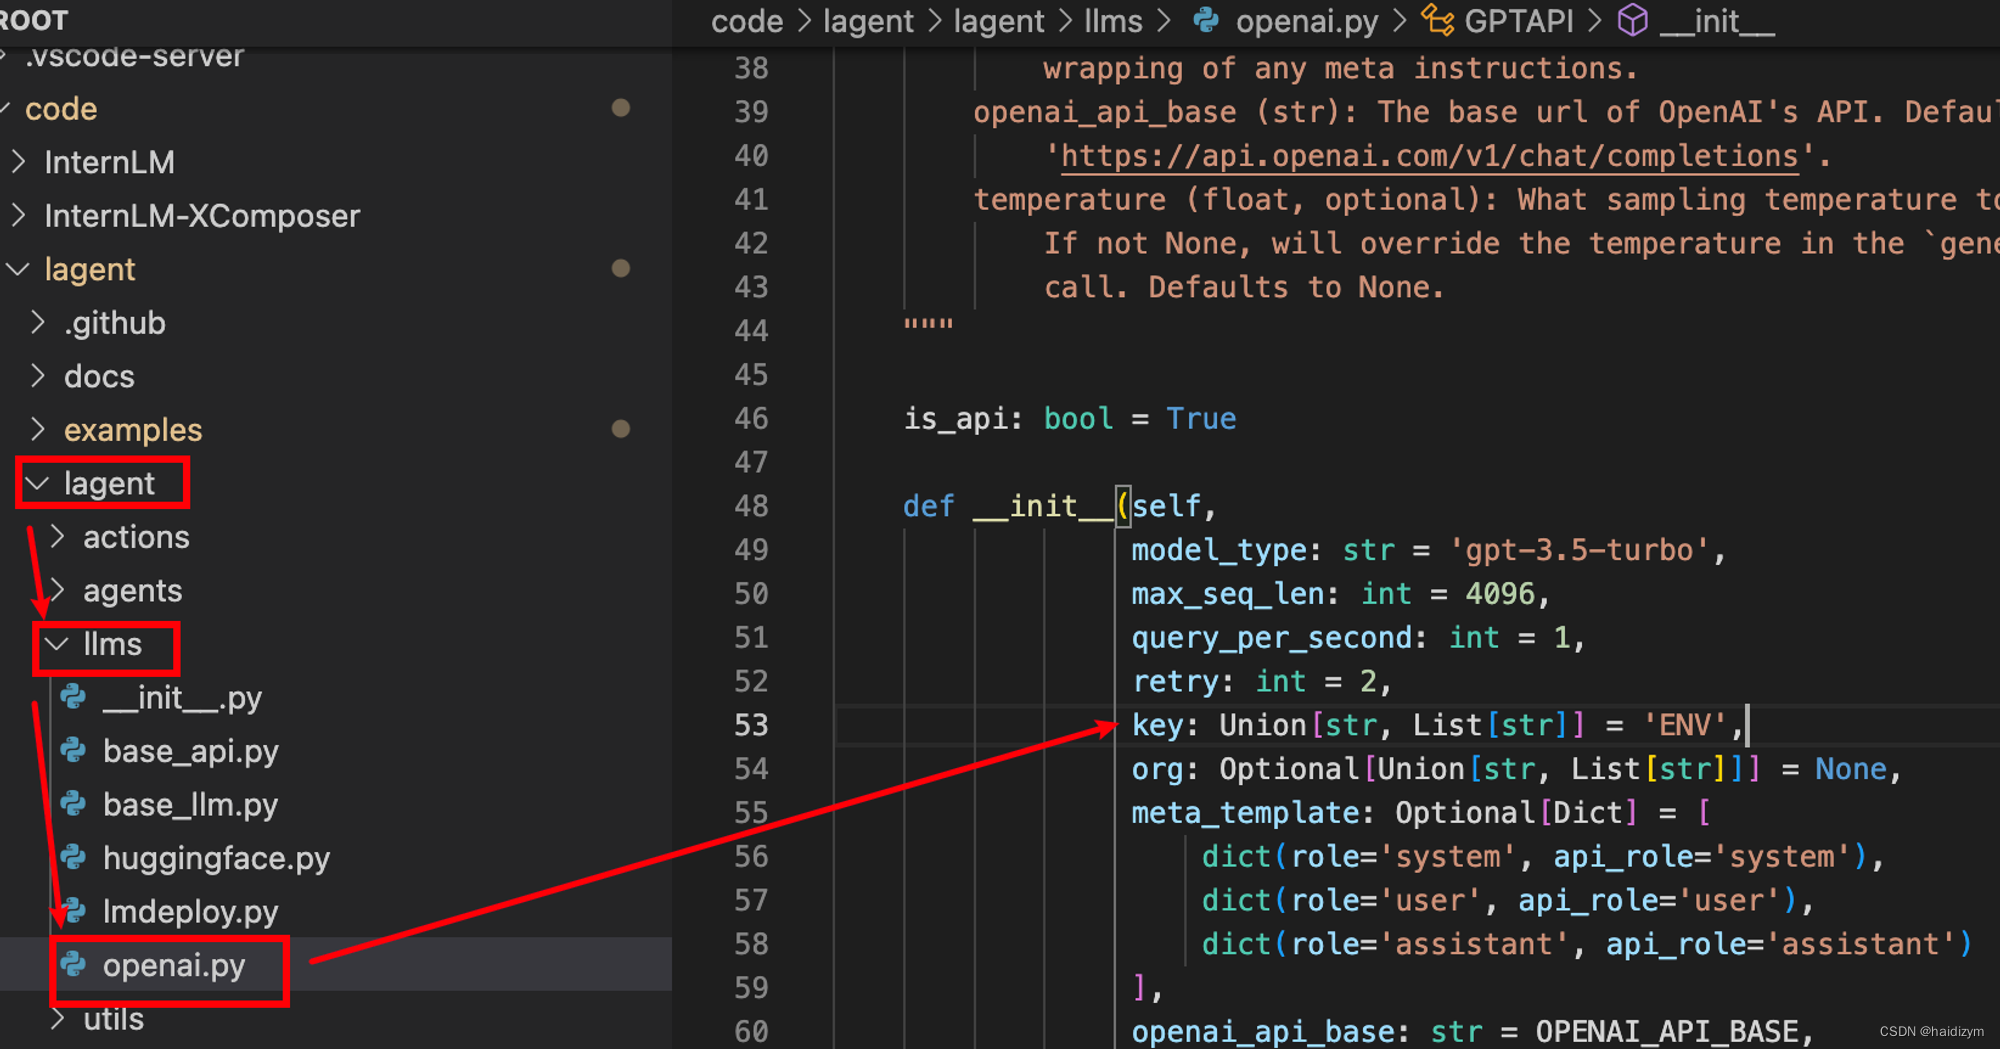
from lagent.llms import GPTAPI
'''
看下使用到的地方 -- 这里就是初始化 model 有多少个选择的地方 -- 没有看到输入 api key 的地方
想要增加 model 看这里
def init_model(self, option):
"""Initialize the model based on the selected option."""
if option not in st.session_state['model_map']:
if option.startswith('gpt'):
st.session_state['model_map'][option] = GPTAPI(
model_type=option)
else:
st.session_state['model_map'][option] = HFTransformerCasualLM(
'/root/model/Shanghai_AI_Laboratory/internlm-chat-7b')
return st.session_state['model_map'][option]
'''
# 加载 hf 上的 model 的方式
from lagent.llms.huggingface import HFTransformerCasualLM
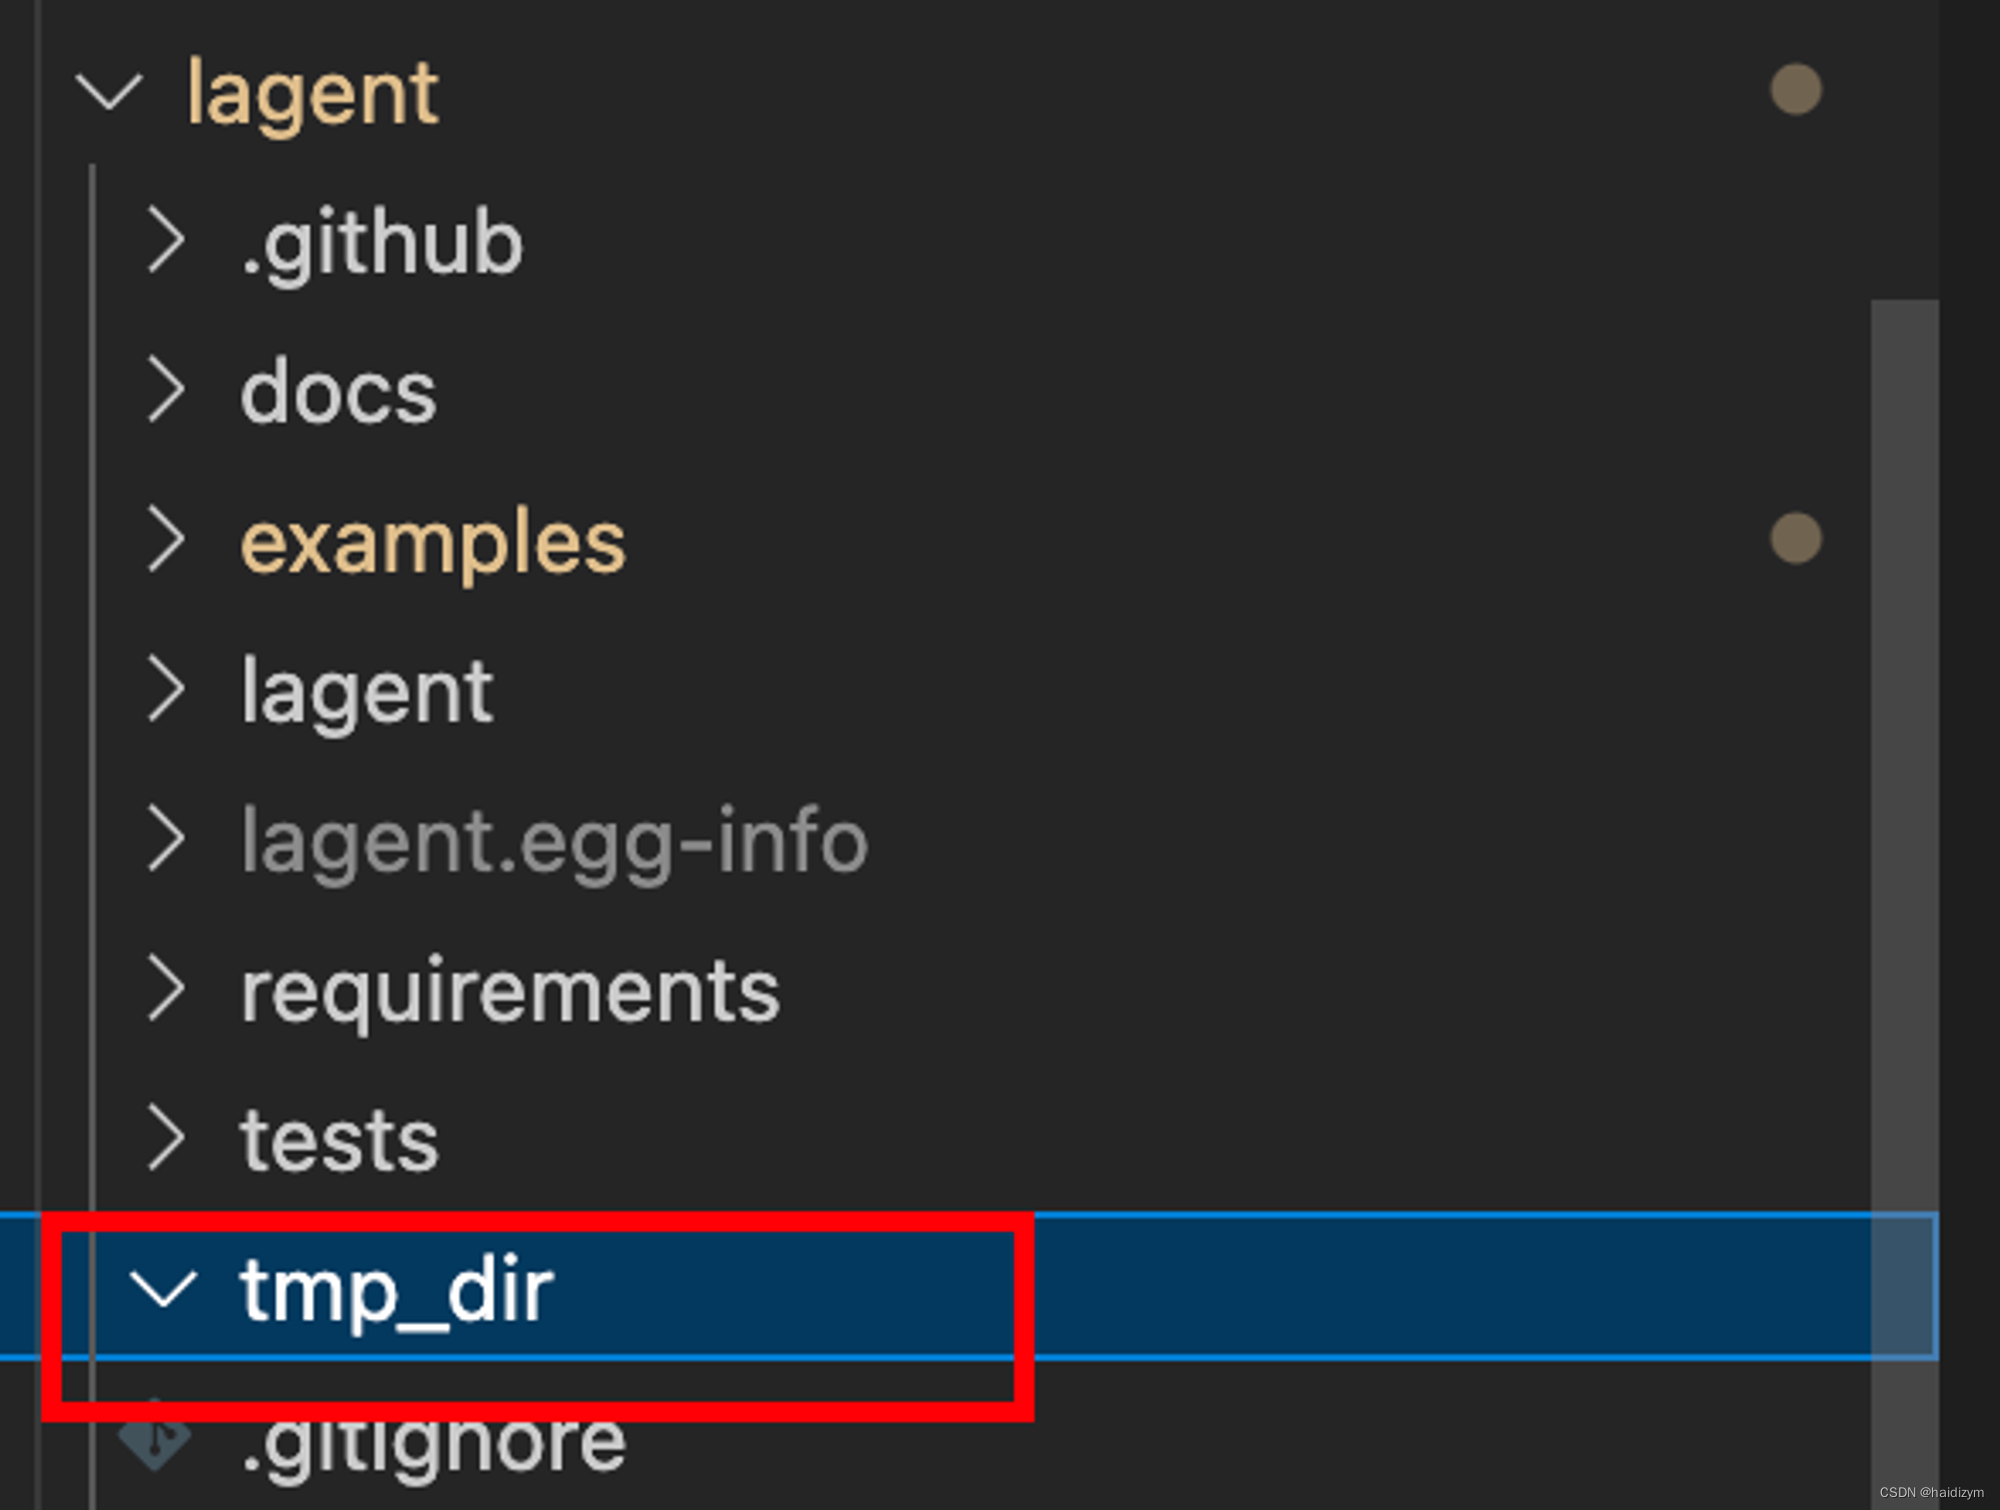
在当前代码的父目录下初始化一个 tmp_dir 的文件夹,然后调用 main 函数
if __name__ == '__main__':
    root_dir = os.path.dirname(os.path.dirname(os.path.abspath(__file__)))
    root_dir = os.path.join(root_dir, 'tmp_dir')
    os.makedirs(root_dir, exist_ok=True)
    main()
我们也能看到它哈,但是是空的,估计有一些要保存什么东西的指令才会保存吧
ok 进入 main 函数
def main():
# 初始化日志
logger = get_logger(__name__)
# Initialize Streamlit UI and setup sidebar
# 初始化Streamlit UI
if 'ui' not in st.session_state:
session_state = SessionState() # 初始化一个会话状态
session_state.init_state()
st.session_state['ui'] = StreamlitUI(session_state) # 初始UI
else:
# 设置 UI 参数:这里可以修改 显示title 和图片
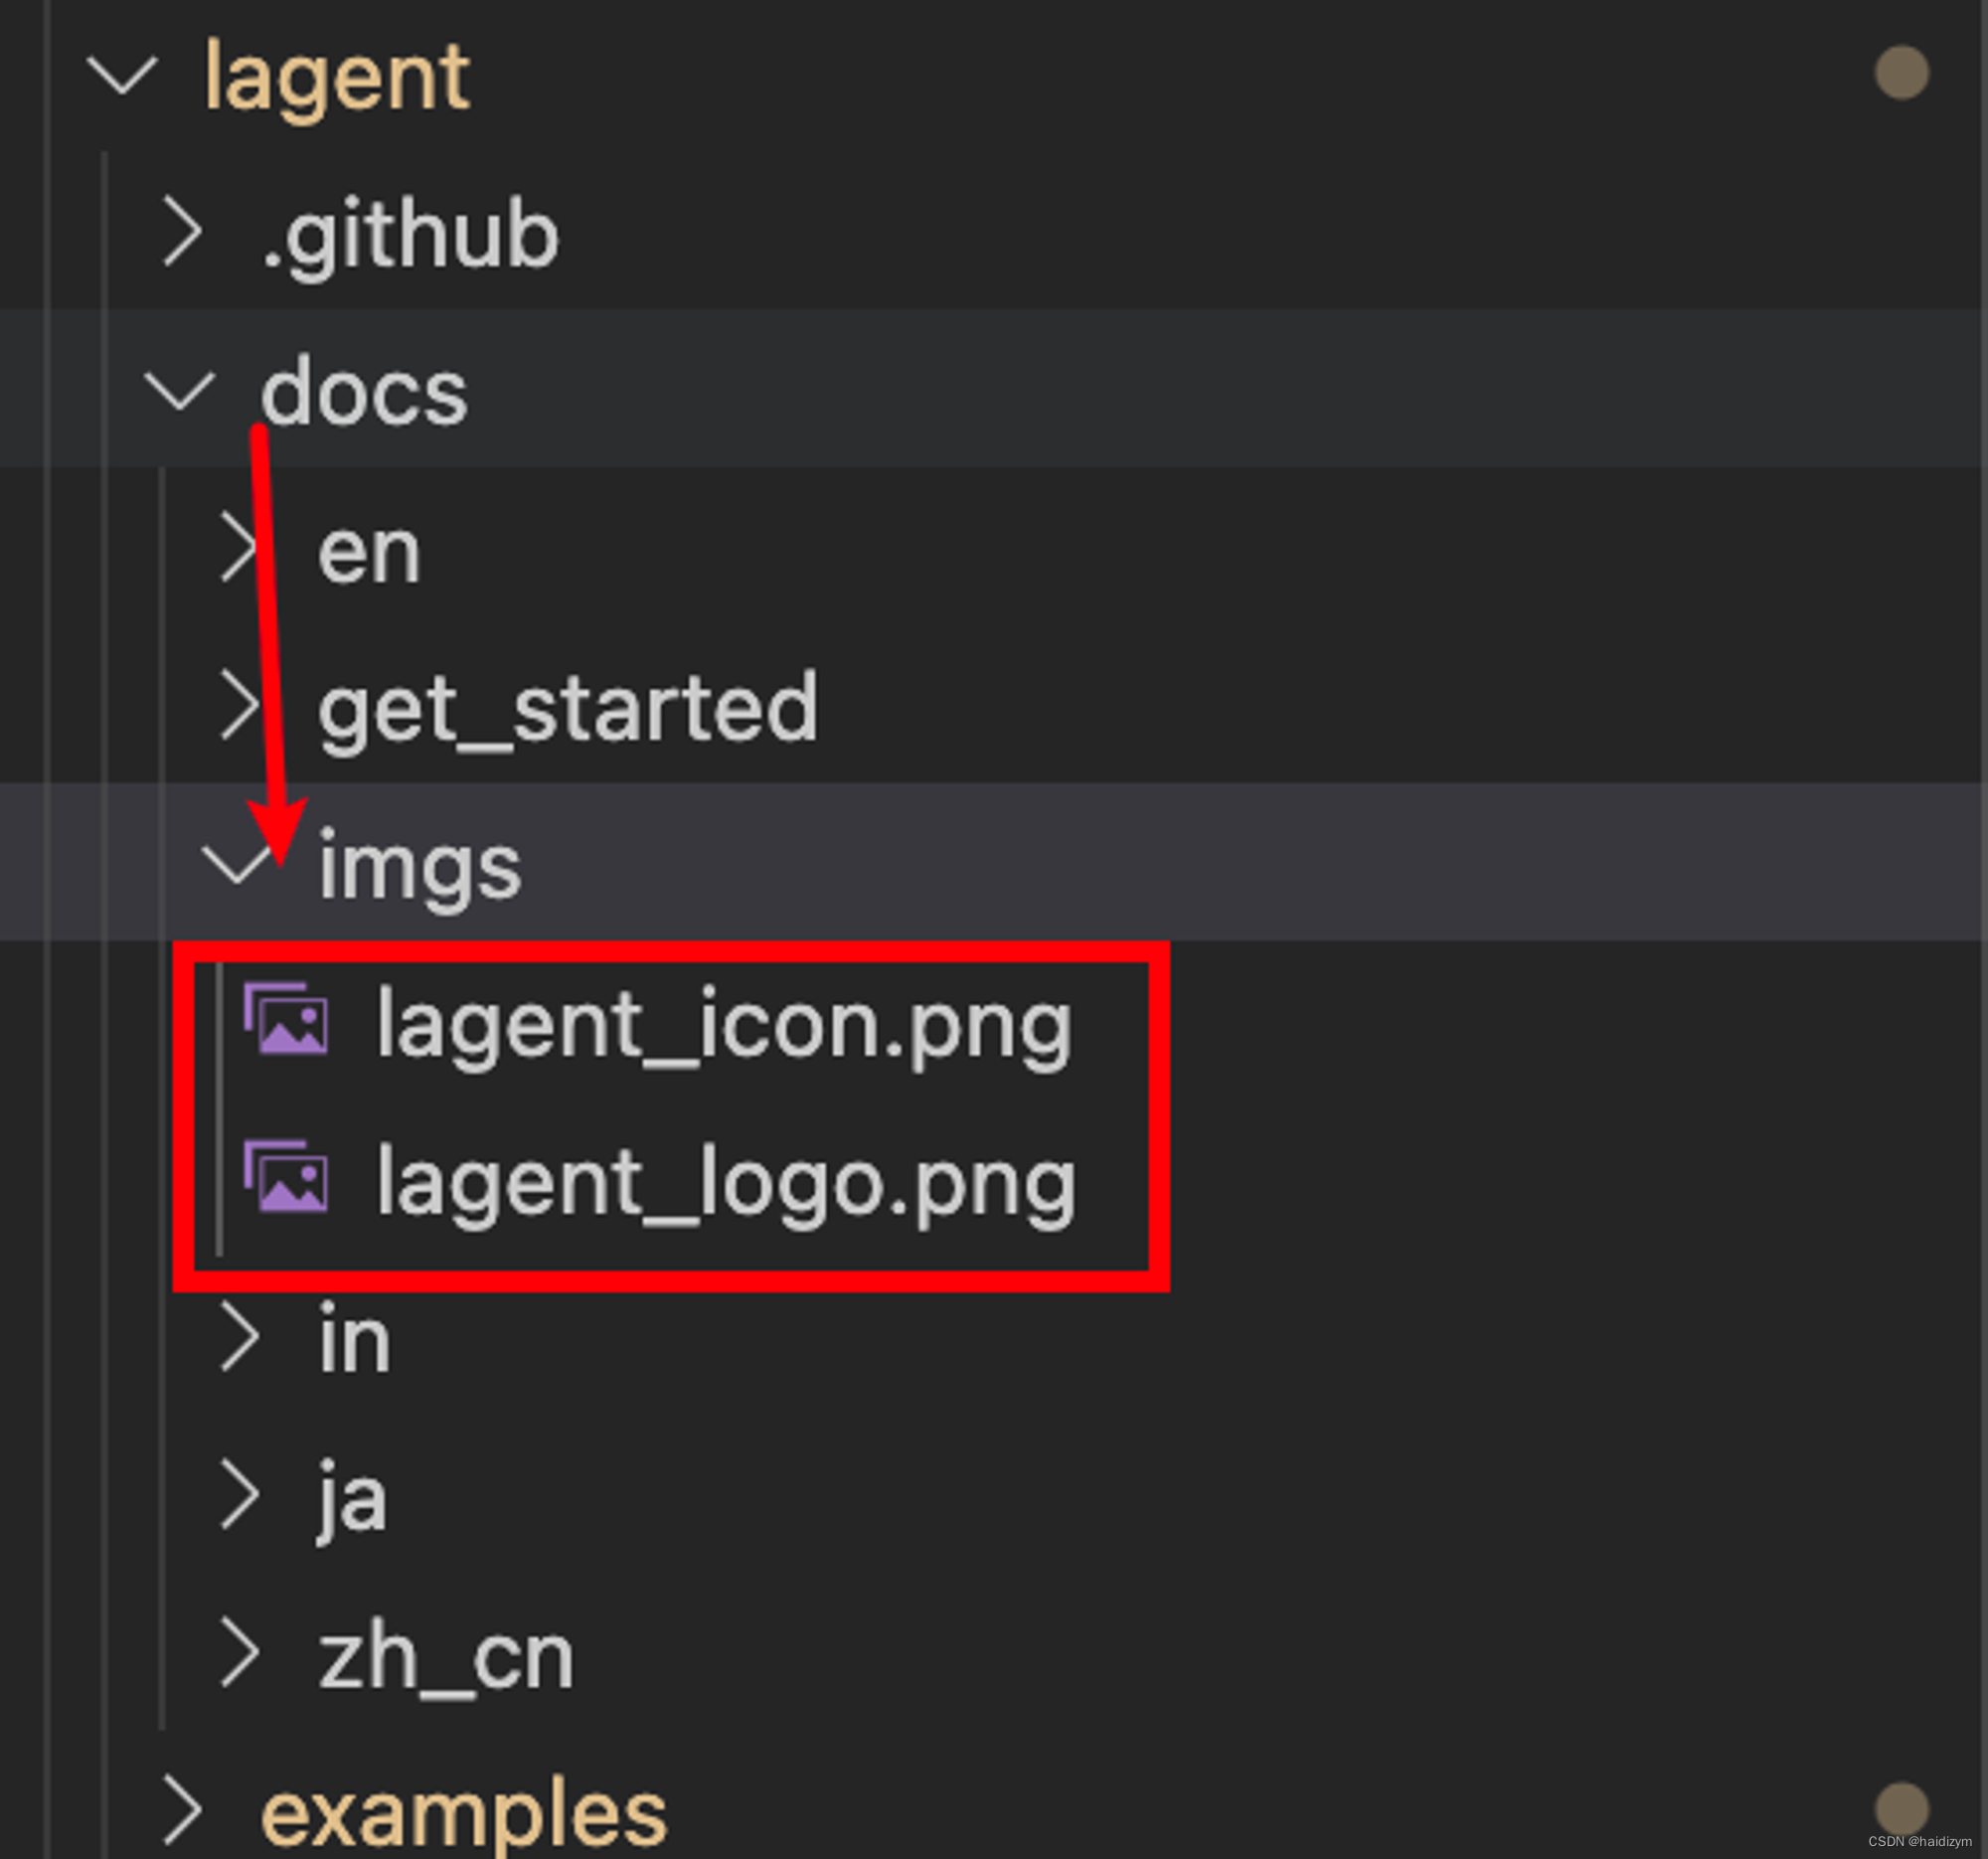
st.set_page_config(
layout='wide',
page_title='lagent-web',
page_icon='./docs/imgs/lagent_icon.png')
# st.header(':robot_face: :blue[Lagent] Web Demo ', divider='rainbow')
# 获取 UI 中的设置:选择了什么模型、插件、上传文件
# -- 这里没有循环调用,重新选择后可能需要刷新一下网页
model_name, model, plugin_action, uploaded_file = st.session_state[
'ui'].setup_sidebar()
# Initialize chatbot if it is not already initialized
# or if the model has changed
# 修改模型这里要重新加载
if 'chatbot' not in st.session_state or model != st.session_state[
'chatbot']._llm:
st.session_state['chatbot'] = st.session_state[
'ui'].initialize_chatbot(model, plugin_action)
# 获取 user 和 assistant 的对话,并且显示到界面
for prompt, agent_return in zip(st.session_state['user'],
st.session_state['assistant']):
st.session_state['ui'].render_user(prompt)
st.session_state['ui'].render_assistant(agent_return)
# User input form at the bottom (this part will be at the bottom)
# with st.form(key='my_form', clear_on_submit=True):
# ":=" 是一个赋值运算符,
# `st.chat_input('')` 是一个函数调用,它会创建一个文本框,并等待用户在文本框中输入值。
# 所以这句话是 检测是否用户有输入
if user_input := st.chat_input(''):
st.session_state['ui'].render_user(user_input)
st.session_state['user'].append(user_input)
# Add file uploader to sidebar
# 如果有上传的文件:则读取 -- 支持图像、视频、音频
if uploaded_file:
file_bytes = uploaded_file.read()
file_type = uploaded_file.type
if 'image' in file_type:
st.image(file_bytes, caption='Uploaded Image')
elif 'video' in file_type:
st.video(file_bytes, caption='Uploaded Video')
elif 'audio' in file_type:
st.audio(file_bytes, caption='Uploaded Audio')
# Save the file to a temporary location and get the path
# 上传文件才保存 -- 所以咱们的 tmpdir 是空
file_path = os.path.join(root_dir, uploaded_file.name)
with open(file_path, 'wb') as tmpfile:
tmpfile.write(file_bytes)
st.write(f'File saved at: {file_path}')
# 修改 prompt
user_input = '我上传了一个图像,路径为: {file_path}. {user_input}'.format(
file_path=file_path, user_input=user_input)
# 这里就是和 Model 交互了
agent_return = st.session_state['chatbot'].chat(user_input)
st.session_state['assistant'].append(copy.deepcopy(agent_return))
logger.info(agent_return.inner_steps)
st.session_state['ui'].render_assistant(agent_return)
修改图片的话,在这个路径下放自己的图就可以。
OK 这基本就是主要的 脉络了 里面两个重点 类 的实现 SessionState, StreamlitUI
 if 'ui' not in st.session_state:
      session_state = SessionState() # 初始化一个会话状态
      session_state.init_state()
      st.session_state['ui'] = StreamlitUI(session_state) # 初始UI
可以自己打开看看
我关心的部分都在 import 环节看到了 这里暂时不做展开,有空再搞
把简单的先搞了: 唔 感觉没啥说的 — 就是建立和清除状态
- assistant
- user
- action_list: 这里可以增加动作
- model_map: 这里可以增加模型
- plugin_actions: 这是干啥的
class SessionState:

    def init_state(self):
        """Initialize session state variables."""
        st.session_state['assistant'] = []
        st.session_state['user'] = []

        #action_list = [PythonInterpreter(), GoogleSearch()]
        action_list = [PythonInterpreter()]
        st.session_state['plugin_map'] = {
            action.name: action
            for action in action_list
        }
        st.session_state['model_map'] = {}
        st.session_state['model_selected'] = None
        st.session_state['plugin_actions'] = set()

    def clear_state(self):
        """Clear the existing session state."""
        st.session_state['assistant'] = []
        st.session_state['user'] = []
        st.session_state['model_selected'] = None
        if 'chatbot' in st.session_state:
            st.session_state['chatbot']._session_history = []
这里做个尝试:
- 让 gpt api 可以跑起来:
我觉得在环境变量里添加 api key 应该就可以,我手里恰好有个 Key
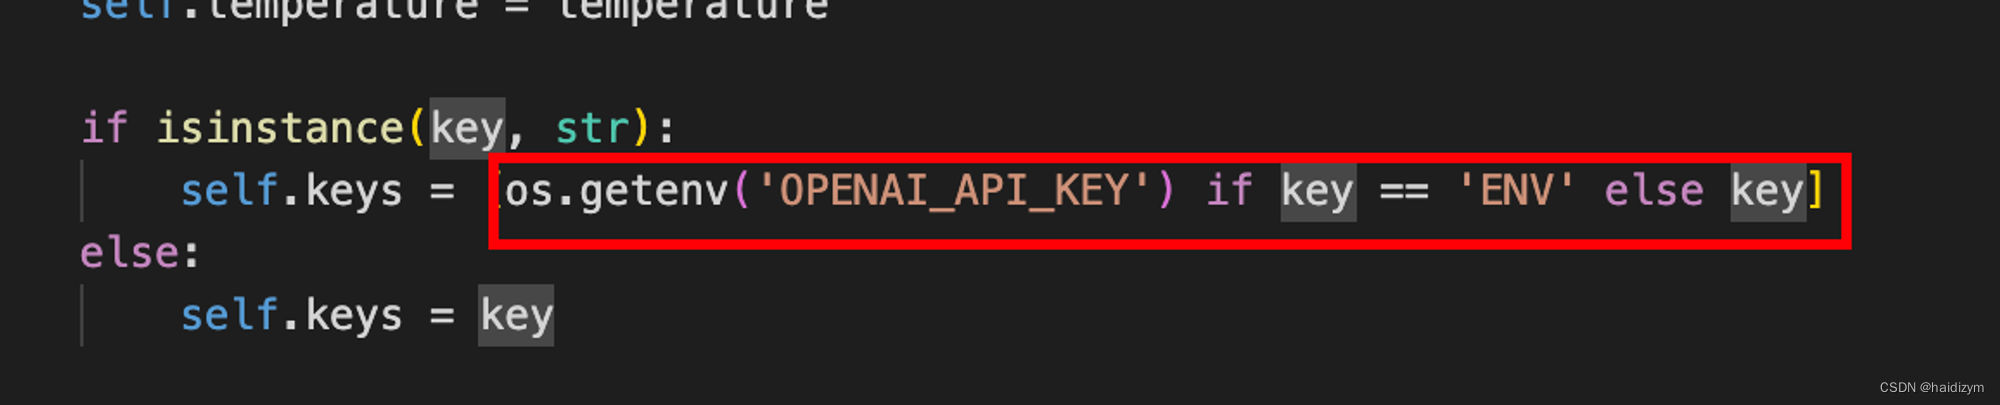
嘶 看这个意思是从 环境变量获得 API key 呀
pytho 代码里看下
>>> import os
>>> os.getenv('OPENAI_API_KEY')
是正确的
那就是 api key 用不了 — 在我自己的平台测试 api key 可以正常使用。
在公司提供的平台不能访问,应该是没有代理的原因吧 — 是的


 390
390

 被折叠的 条评论
为什么被折叠?
被折叠的 条评论
为什么被折叠?
 到【灌水乐园】发言


