


更新 2021-09-27
最新结果可以查看 :
- MLPerf论文:MLPerf Training Benchmark
- https://github.com/mlcommons/training
- https://github.com/mlcommons/inference
1. MLPerf 介绍
MLPerf是一套用于测量和提高机器学习软硬件性能的通用基准,主要用来测量训练和推理不同神经网络所需要的时间。MLPerf测试集包含了不同领域的Benchmark子项,主要包括图像分类、物体识别、翻译、推荐、语音识别、情感分析以及强化学习。
下表显示了MLPerf不同领域的benchmark:
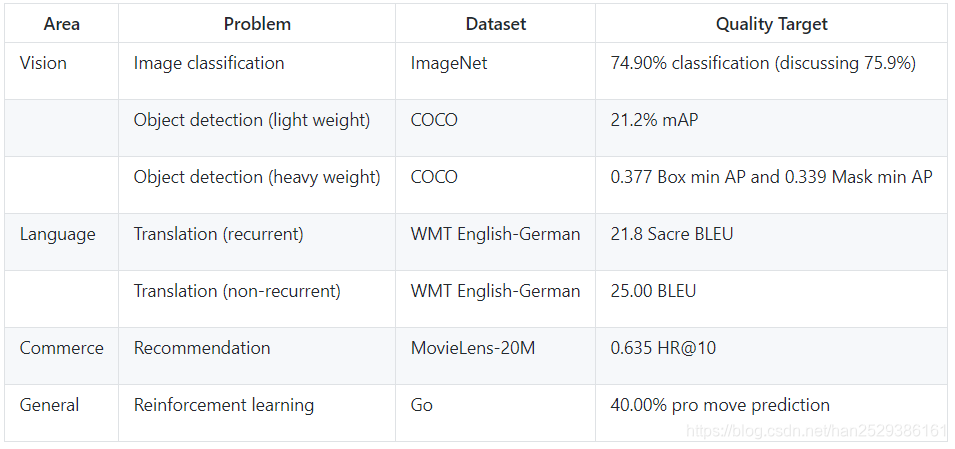
参考链接:MLPerf官网: https://mlperf.org
2. MLPerf 思路
MLPerf的想法有两个来源,一个是哈佛大学的Fathom项目;另一个是斯坦福的DAWNBench。MLPerf借鉴了前者在评价中使用的多种不同的机器学习任务,以保证Benchmark具有足够的代表性;同时借鉴了后者使用的对比评价指标,保证公平性。
MLperf按照不同的领域问题设置了不同的Benchmark,对于MLPerf Training测试,每个Benchmark的评价标准是:在特定数据集上训练一个模型使其达到Quality Target时的Clock time。由于机器学习任务的训练时间有很大差异,因此,MLPerf 的最终训练结果是由指定次数的基准测试时间平均得出的,其中会去掉最低和最高的数字,一般是运行5次取平均值,Train测试时间包含了模型构建,数据预处理,训练以及质量测试等时间。
对于MLPerf Inference测试,每个Benchmark的评价标准是:在特定数据集上测量模型的推理性能,包括Latency和吞吐量。
3. MLPerf Training
3.1 Training Division
MLPerf training可以分为封闭模型分区(Closed Model Division)和开放模型分区(Open Model Division)。其中封闭模型分区要求使用相同模型和优化器,并限制batch大小或学习率等超参数的值,它旨在硬件和软件系统的公平比较。而开放模型分区只会限制使用相同的数据解决相同的问题,其它模型或平台都不会限制,它旨在推进ML模型和优化的创新。
3.1.1 Closed Model Division
MLPerf为每个领域的Benchmark测试都提供了参考实例,封闭模型分区要求使用与参考实例相同的预处理,模型,训练方法进行测试。
Closed Model Division具体要求如下:
- 预处理必须采用与参考实例相同的预处理步骤,图像必须与参考实现中的大小相同。
- 权重和偏差必须使用与参考实例相同的常数或随机值分布进行初始化。
- 损失函数必须使用与参考实例相同的损失函数。
- 优化器必须使用与参考实例相同的优化器。
- RL环境也需要与参考实例相同,参数相同。
- 超参数是可以自己选择的。
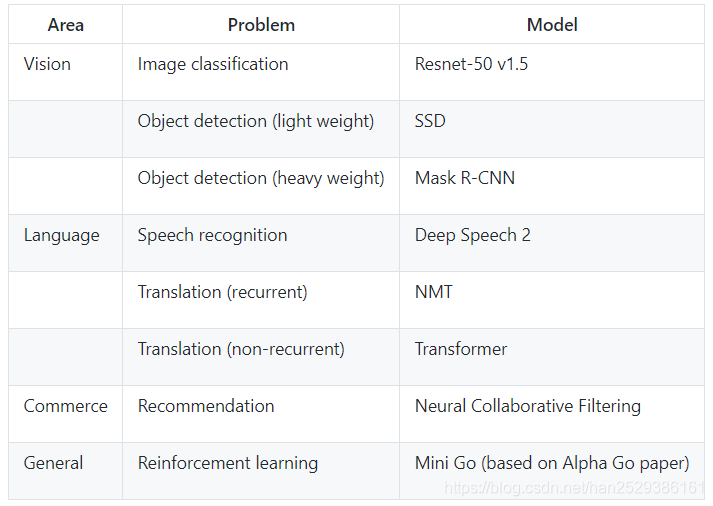
Closed Division可以使用的Model如下:
3.1.2 Open Model Division
开放模型分区要求使用相同的数据集解决相同的问题,允许使用任意预处理,模型或训练方法。它旨在推进ML模型和优化的创新。目前,全球MLPerf测试的参与者都一致地集中在封闭分区,开放分区还没有MLPerf测试的提交结果。
3.2 MLPerf Training Result
和DAWNBench的类似,MLPerf Result被定义为将模型训练到目标质量的Clock时间,这个时间包括模型构建,数据预处理,训练以及质量测试等时间,它通常是数小时或数天。MLPerf也提供了一个参考基准,该基准是MLPerf使用一块 Pascal P100显卡在未进行任何优化情况下的测试结果。
参考链接:MLPerf Results地址: https://mlperf.org/results/
下表为封闭分区的参考基准和各大厂商的测试结果。
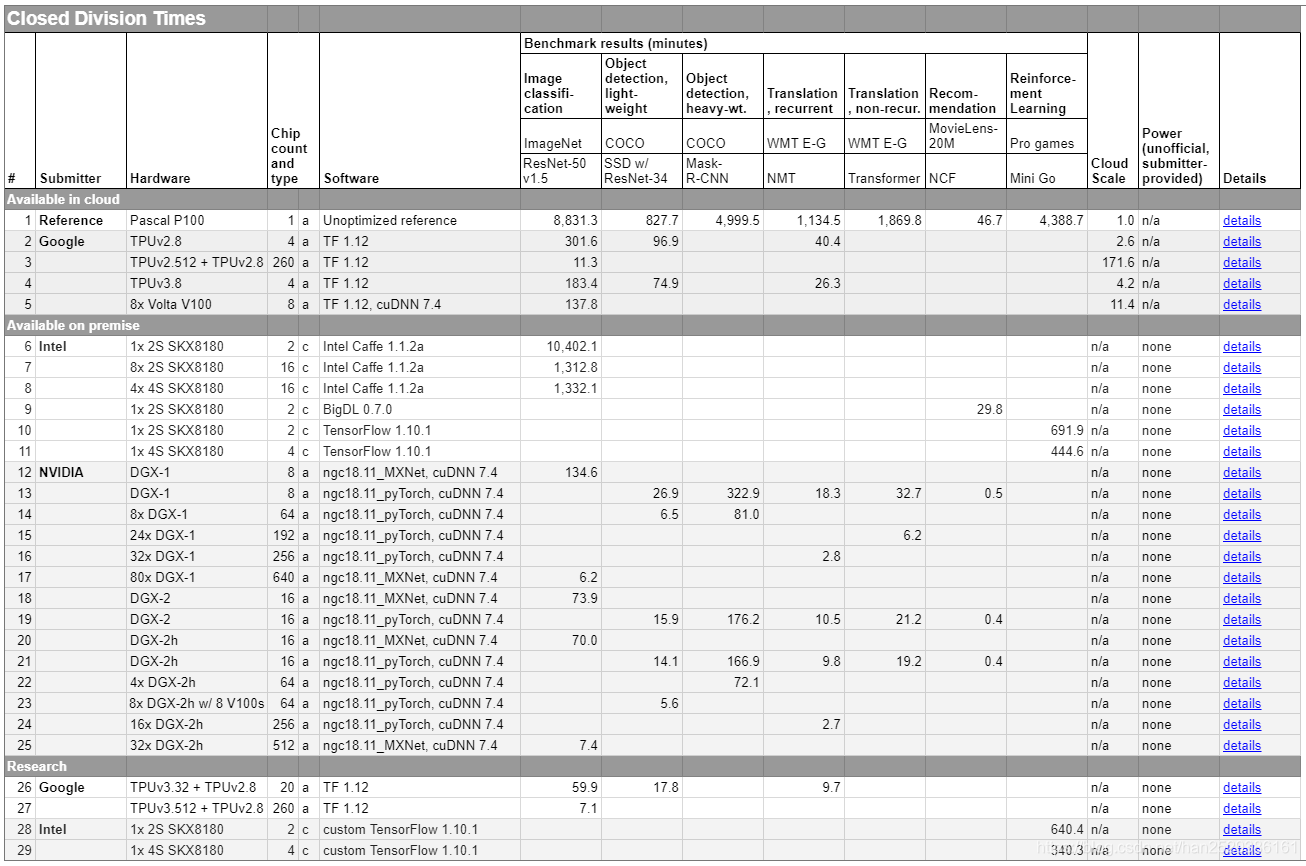
MLperf 的结果首先按照 Division 分类,然后按照 Category 分类。结果表格中的每一行都是由单个提交者使用相同软件堆栈和硬件平台生成的一组结果。每行包含以下信息:
| 名称 | 说明 |
|---|---|
| Submitter | 提交结果的组织 |
| Hardware | 使用的 ML 硬件类型,例如加速器或高性能 CPU。 |
| Chip Count and Type | 使用的ML硬件芯片的数量,以及它们是加速器还是CPU。 |
| Software | 使用的 ML 框架和主要 ML 硬件库。 |
| Benchmark result | 在各个基准测试中将模型训练到目标质量的时间。 |
| Cloud Scale | Cloud Scale源自几家主要云提供商的定价,并提供相对系统size/cost的粗略指标。参考单个Pascal P100系统的云规模为1,云规模为4的系统大约需要四倍的成本。 |
| Power | 可用内部部署系统的信息。由于标准化功率测量的复杂性,此版本 MLPerf 只允许自愿报告任意非官方功率信息。 |
| Details | 链接到提交的元数据。 |
另一种结果输出是:加速比(Speedups)。加速比是当前测试结果和使用一块Pascal P100显卡在未进行任何优化情况下的测试结果的比值。即当前测试结果和参考基准的比值。因此,MLPerf 的Speedups结果若是10,则表示被测试系统的训练速度是在一块Pascal P100上训练同一个模型速度的10倍,训练时间是其 1/10。
下表为封闭分区的参考基准和各大厂商的Speedups结果。
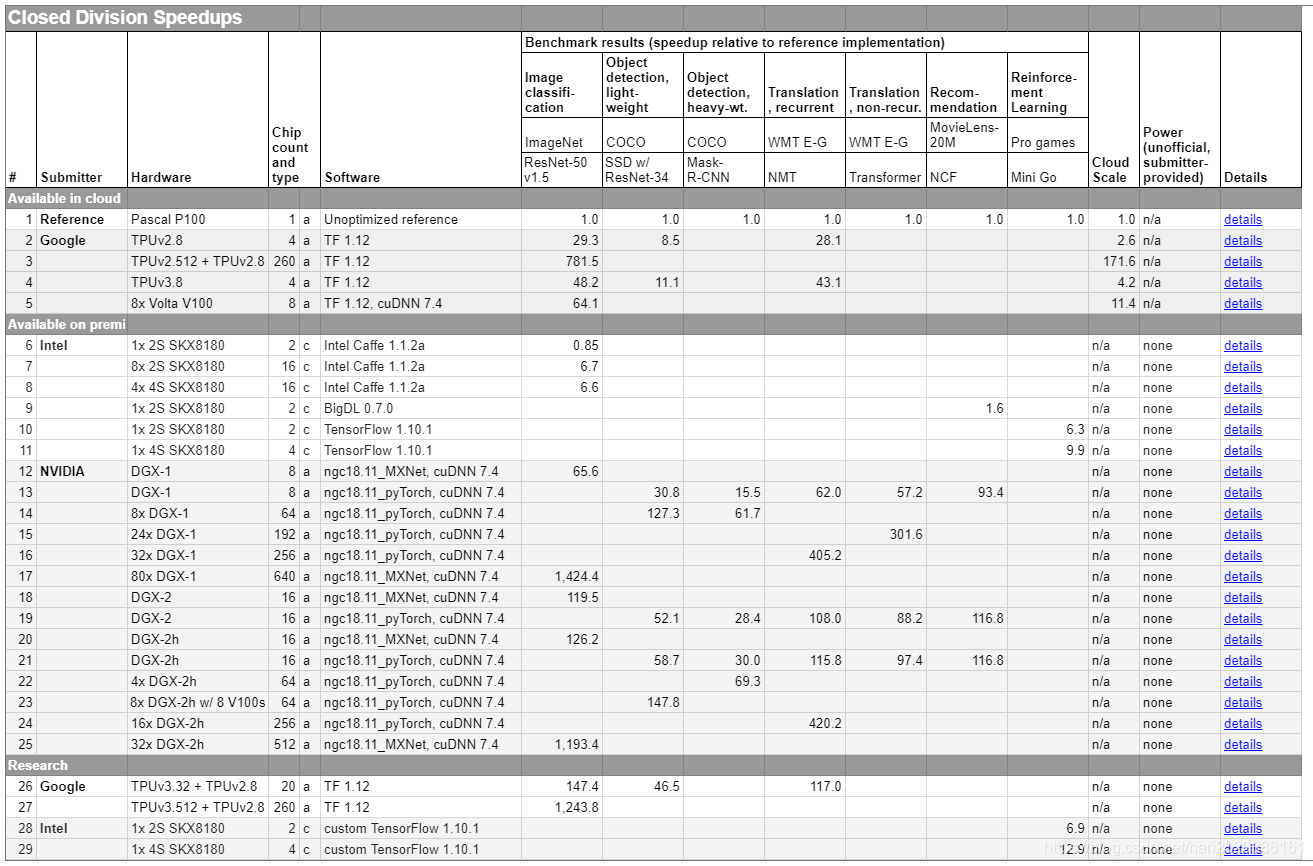
参考基准为单个Pascal P100,在各种基准测试上的分数都为 1(参考值)。谷歌使用的硬件为4个TPUv2.8,云规模为 2.6,在图像分类任务的 ImageNet 数据集上训练 ResNet-50 v1.5 的相对训练加速比为29.3。TPUv3.8 的效率非常高,平均单个芯片的加速比为12,且云价格还和单块Pascal P100差不多。
土豪英伟达展示了大规模 GPU 并行的效果,它们使用80个DGX-1(260 块 V100)在 ImageNet 数据集上实现了 1424.4 的加速比。
对于MLPerf Result,即使是多次测试结果取平均值也无法消除所有误差。MLPerf图像处理基准测试结果大约有+/- 2.5%的浮动范围,而其他MLPerf基准测试则有+/-5%误差。
3.3 MLPerf Training Benchmark
MLPerf为每个Benchmark子项都提供了参考实现。其中包括:
- image_classification - Resnet-50 v1 applied to Imagenet.
- object_detection - Mask R-CNN applied to COCO.
- single_stage_detector - SSD applied to COCO 2017.
- speech_recognition - DeepSpeech2 applied to Librispeech.
- translation - Transformer applied to WMT English-German.
- recommendation - Neural Collaborative Filtering applied to MovieLens 20 Million (ml-20m).
- sentiment_analysis - Seq-CNN applied to IMDB dataset.
- reinforcement - Mini-go applied to predicting pro game moves.
这些参考实现都已经在以下环境上进行了测试,测试出的结果作为MLPerf Results的参考基准。
- 16 CPUs, one Nvidia P100.
- Ubuntu 16.04, including docker with nvidia support.
- 600GB of disk (though many benchmarks do require less disk).
- Either CPython 2 or CPython 3, depending on benchmark (see Dockerfiles for details).
每个Benchmark将一直运行,直到达到目标质量,然后训练终止,并统计时间结果。下面分别介绍MLPerf Training的每一个Benchmark。
参考链接:github地址: https://github.com/mlperf/training
3.3.1 image classification
image_classification Benchmark使用resnet v1.5模型进行图像分类,实现副本来源于https://github.com/tensorflow/models/tree/master/official/resnet.
1) 环境构建
# 安装nvidia-docker
1. wget https://github.com/NVIDIA/nvidia-docker/releases/download/v1.0.1/nvidia-docker-1.0.1-1.x86_64.rpm
2. rpm -ivh nvidia-docker-1.0.1-1.x86_64.rpm
3. sudo systemctl restart nvidia-docker
2)准备Dataset
使用此脚本将ImageNet数据集转换为TFRecords,或者直接从ImageNet或从image-net.org下载的.tar文件创建TFRecod数据集。
3)运行Benchmark
cd image_classification/tensorflow/
IMAGE=`sudo docker build . | tail -n 1 | awk '{print $3}'`
SEED=2
NOW=`date "+%F-%T"`
sudo nvidia-docker run -v /home/PSR/DataSet/imagenet/ILSVRC2012:/imn -it $IMAGE "./run_and_time.sh" $SEED | tee benchmark-$NOW.log
3.3.2 object_detection
object_detection使用Mask R-CNN with ResNet50 backbone进行模型训练,参考链接为https://github.com/mlperf/training/tree/master/object_detection。
1) 环境配置
# 1. Checkout the MLPerf repository
mkdir -p mlperf
cd mlperf
git clone https://github.com/mlperf/training.git
#2. Install CUDA and Docker
source training/install_cuda_docker.sh
#3. Build the docker image for the object detection task
cd training/object_detection/
nvidia-docker build . -t mlperf/object_detection
#4. Run docker container and install code
nvidia-docker run -v .:/workspace -t -i --rm --ipc=host mlperf/object_detection "cd mlperf/training/object_detection && ./install.sh"
2)准备Dataset
source download_dataset.sh
3)运行Benchmark
nvidia-docker run -v .:/workspace -t -i --rm --ipc=host mlperf/object_detection "cd mlperf/training/object_detection && ./run_and_time.sh"
4. MLPerf Inference
MLPerf最初定位的时候并没有把自己限制在Training系统的评估上,而是希望MLPerf也能够覆盖Inference系统的评估。对于Training的评估,MLPerf已经提供了一个相对完备和公平的方法,软硬件厂商通过运行MLPerf的Training Benchmark测试集,比较将模型训练到特定精度时所花费的时间和成本。在MLPerf Training V0.5发布一年后,MLPerf发布了Inference V0.5版本,此版本增加了对ML Inference性能的评估。ML Inference目前还在不断迭代开发中。
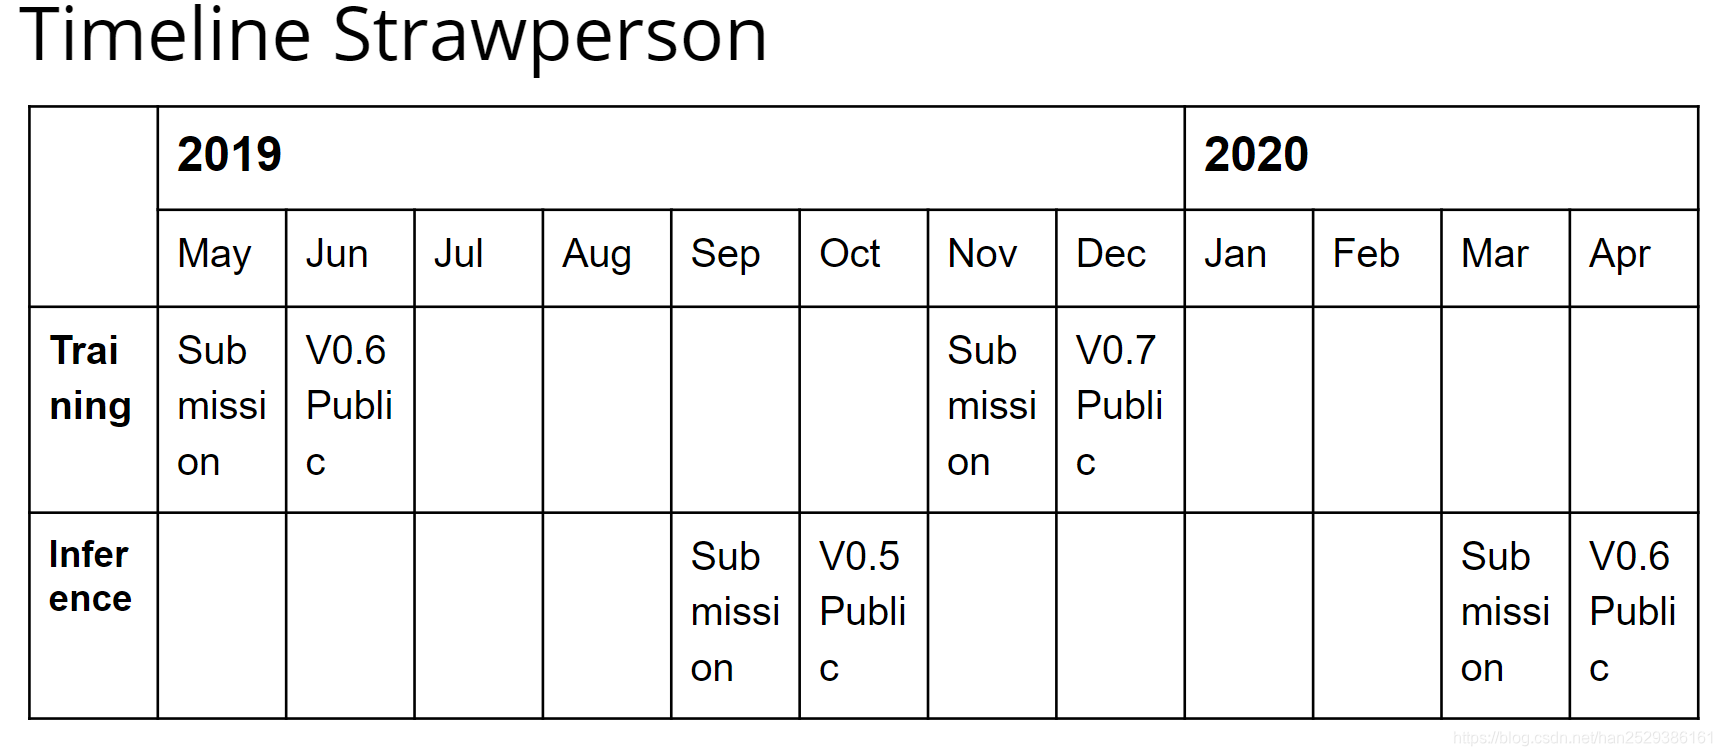
下图是MLPerf预定的时间表,2019年Inference比赛提交结果的截止时间是9月6号。MLPerf公布结果的时间是10月4号。
在MLPerf Inference中,主要分为三个部分:
- Load Generator:MLPerf使用负载生成器(LoadGen),生成不同的测试场景,对Inference进行测试。
- Cloud:MLPerf专为Cloud场景设计的一系列Benchamrk,Cloud场景下的各种Inference Benchmark包括: 图像分类(resnet50-v1.5、mobilenet-v1)、物体检测(ssd-mobilenet 、ssd-resnet34)、Language Modeling(lstm)、翻译(gmnt)、语音识别(DeepSpeech2)、情感分析(Seq2CNN)等。
- Edge:MLPerf专为Edge场景设计的一系列Benchamrk,包括:人脸识别(Sphereface20)、object classification(mobilenet、Shufflenet)、object detection(SSD-MobileNet)、object segmentation(MaskRCNN2GO)、语音识别(DeepSpeech2)、翻译(gmnt)等,Edge Benchmark侧重于小型model场景。
4.1 Load Generator
Load Generator是MLPerf的负载生成器,用于启动和控制Inference Benchmark测试。MLPerf Inference有三个基本概念: SUT、Sample和query。
- SUT表示被测系统。
- Sample是运行inference的单位,例如一个image或sentence。
- query是一组进行Inference的N个样本。例如单个query包含8个image。
为了能够对各种推理平台和用例进行代表性测试,MLPerf定义了四种不同的推理场景,如下表所述。
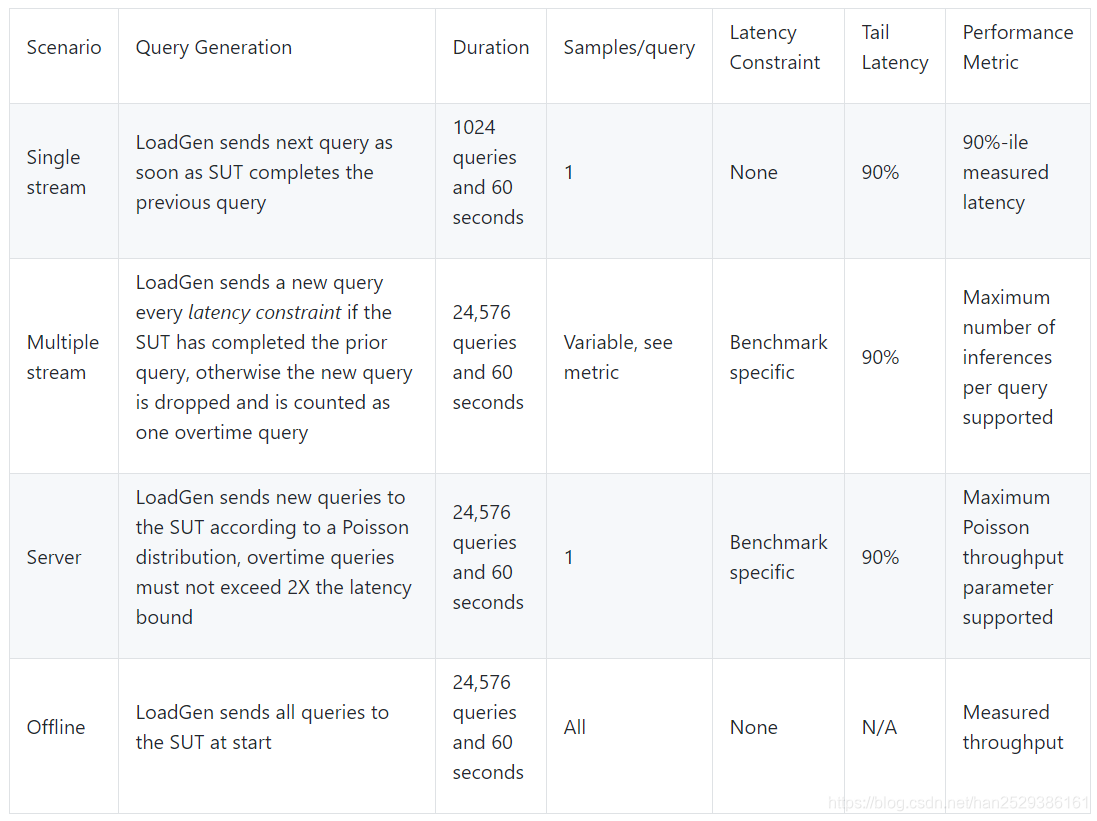
SINGLE STREAM:LoadGen运行单次测试来测量90th percentile Latency。每次query只包含1个Sample,可以理解为batchsize=1。LoadGen在处理完上一个query后再发送下一个query,直到超过设定的query数 并且 达到设定的测试时间。query数量和测试时间的双重要求旨在能够同时适配大型和小型推理系统。
注意,最后衡量的结果是Tail Latency而不是average Latency。
MULTI-STREAM:LoadGen运行多次测试来测量系统能够支持的最大stream数,每次测试都会评估特定数量的stream,对于特定数量的Stream,LoadGen生成query,每个query中的Sample的数量等于stream的数量,查询中的所有Sample将在内存中连续分配。 LoadGen将使用二分法来查找最大stream数,然后测试5次来验证最大stream的稳定性。
SERVER:LoadGen运行多次测试来确定系统的吞吐量。对于SERVER测试,用户给出期望的QPS值,Inference系统使用QPS的泊松分布来生成query,进行吞吐量测试,这里是模拟Server的应用场景。
OFFLINE:LoadGen运行单次测试来测量系统吞吐量。在测试开始,LoadGen立即发送所有query给Inference系统,该模式是模拟离线场景。
每次运行LoadGen都会使用四种模式之一来评估系统的性能,最后提交的结果可以是{models, scenarios}的任意组合。
在Inference测试中,LoadGen主要负责以下事情:
- 根据测试某个场景生成query
- 跟踪query的Latency
- 验证结果的准确性
- 计算最终的metric
这里Latency被定义为从LoadGen将query传递到SUT(system under test),到Inference完成并收到回复的时间。
整个Load Generator的运行流程如下:
- LoadGen发送SUT信号(System Under Test)。
- SUT启动并发出信号准备就绪。
- LoadGen启动时钟并开始生成query。
- 一旦超过设定的query数并且达到测试时间,LoadGen就会停止生成query。
- LoadGen等待所有query完成。
- LoadGen计算最终metric。
需要注意的是,在LoadGen中禁止缓存任何query、query参数或中间结果。
4.2 Cloud
MLPerf Inference计划为Cloud环境提供6个领域的Benchmark,如下表所示:
| 领域 | 模型 | 数据集 |
|---|---|---|
| image classification | resnet50-v1.5、mobilenet-v1 | imagenet |
| object detection | ssd-mobilenet 、ssd-resnet34 | coco |
| 语言模型 | lstm | wmt11 |
| 翻译 | gmnt | wmt16 |
| 语音识别 | DeepSpeech2 | OpenSLR |
| 情感分析 | Seq2CNN | sentiment IMDB |
Inference还在持续开发中,目前已经实现的Benchmark如下表所示:
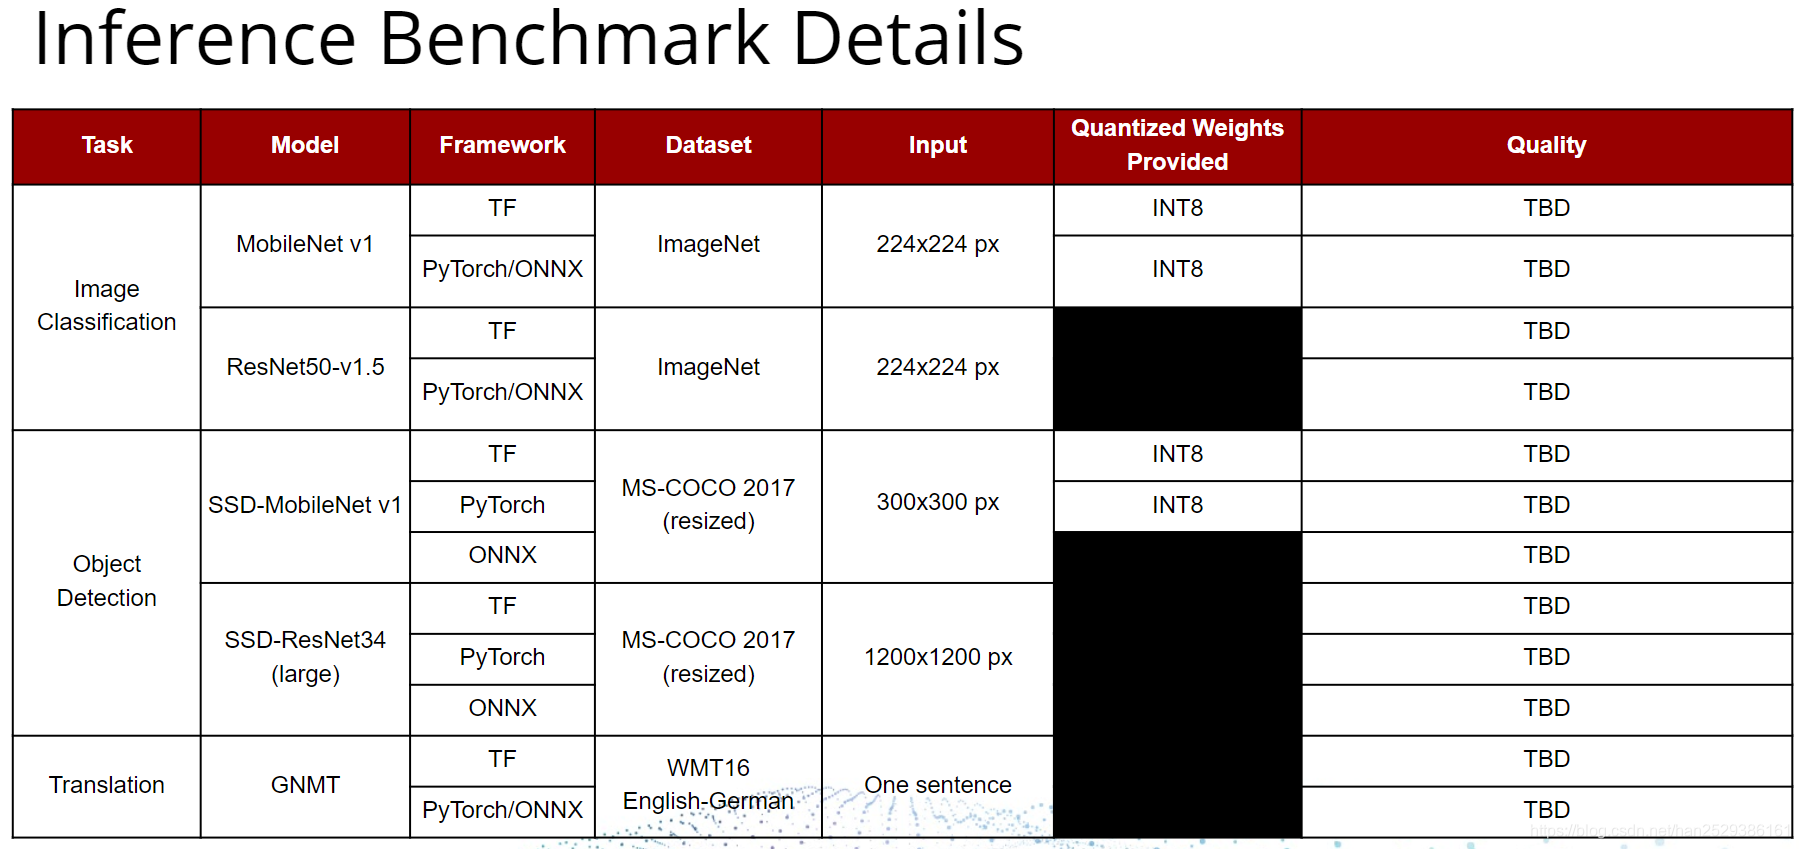
注: TBD(待定),Quality和latency targets仍在待定状态。
MLPerf Infernce为每个Benchmark都提供了云参考系统和参考实现,云参考系统是Google Compute Platform n1-highmem-16(16个vCPU,104GB内存)实例。MLPerf Inference的所有参考实现都在云参考系统上运行。
4.2.1 image classification 和 object detection
Cloud image_classification 目录下包含了image classification 和 object detection的Benchmark,使用resnet v1.5模型和mobilenet-v1模型进行图像分类,使用ssd-resnet34模型和ssd-mobilenet模型进行物体检测。分别对应了移动端和Host端的Inference测试。链接地址为:https://github.com/mlperf/inference/tree/master/cloud/image_classification
image classification支持的模型如下表所示:

Running the benchmark
1)准备Dataset
你可以到网站上去下载数据集
| dataset | download link |
|---|---|
| imagenet2012 (validation) | http://image-net.org/challenges/LSVRC/2012/ |
| coco (validation) | http://images.cocodataset.org/zips/val2017.zip |
你也可以使用ck 工具下载数据集。
ImageNet 2012 validation dataset:
#ImageNet 2012 validation dataset
$ ck install package --tags=image-classification,dataset,imagenet,val,original,full
$ ck install package --tags=image-classification,dataset,imagenet,aux
#Copy the labels next to the images:
$ ck locate env --tags=image-classification,dataset,imagenet,val,original,full
/home/dvdt/CK-TOOLS/dataset-imagenet-ilsvrc2012-val
$ ck locate env --tags=image-classification,dataset,imagenet,aux
/home/dvdt/CK-TOOLS/dataset-imagenet-ilsvrc2012-aux
$ cp `ck locate env --tags=aux`/val.txt `ck locate env --tags=val`/val_map.txt
```bash
COCO 2017 validation dataset:
```bash
#COCO 2017 validation dataset:
$ ck install package --tags=object-detection,dataset,coco,2017,val,original
$ ck locate env --tags=object-detection,dataset,coco,2017,val,original
/home/dvdt/CK-TOOLS/dataset-coco-2017-val
2) 环境构建
在没有使用Docker环境运行Benchmark测试时,执行以下步骤。
1. pip install tensorflow or pip install tensorflow-gpu
2. cd ../../loadgen; CFLAGS="-std=c++14" python setup.py develop; cd ../cloud/image_classification
3. python setup.py develop
当使用Docker环境时,直接运行:
Run as Docker container
./run_and_time.sh backend model device

backend is one of [tf|onnxruntime|pytorch|tflite]
model is one of [resnet50|mobilenet|ssd-mobilenet|ssd-resnet34]
device is one of [cpu|gpu]
For example:

./run_and_time.sh tf resnet50 gpu
./run_and_time.sh会直接build Docker环境并且运行Benchmark。
3)运行Benchmark
1.在local和docker环境都需要设置2个环境变量
export MODEL_DIR=YourModelFileLocation
export DATA_DIR=YourImageNetLocation

2. 运行脚本
./run_local.sh backend model device

backend is one of [tf|onnxruntime|pytorch|tflite]
model is one of [resnet50|mobilenet|ssd-mobilenet|ssd-resnet34]
device is one of [cpu|gpu]

For example:
./run_local.sh onnxruntime mobilenet gpu --accuracy
如果你想使用server模式,可以尝试:
./run_local.sh tf resnet50 gpu --count 100 --time 60 --scenario Server --qps 200 --max-latency 0.2
如果要调试准确性问题,请尝试:
./run_local.sh tf ssd-mobilenet gpu --accuracy --count 100 --time 60 --scenario Server --qps 100 --max-latency 0.2
main.py的参数列表如下:
usage: main.py [-h]
[–dataset {imagenet,imagenet_mobilenet,coco,coco-300,coco-1200,coco-1200-onnx,coco-1200-pt,coco-1200-tf}]
–dataset-path DATASET_PATH [–dataset-list DATASET_LIST]
[–data-format {NCHW,NHWC}]
[–profile {defaults,resnet50-tf,resnet50-onnxruntime,mobilenet-tf,mobilenet-onnxruntime,ssd-mobilenet-tf,ssd-mobilenet-onnxruntime,ssd-resnet34-tf,ssd-resnet34-pytorch,ssd-resnet34-onnxruntime}]
[–scenario list of SingleStream,MultiStream,Server,Offline]
[–mode {Performance,Accuracy,Submission}]
[–queries-single QUERIES_SINGLE]
[–queries-offline QUERIES_OFFLINE]
[–queries-multi QUERIES_MULTI] [–max-batchsize MAX_BATCHSIZE]
–model MODEL [–output OUTPUT] [–inputs INPUTS]
[–outputs OUTPUTS] [–backend BACKEND] [–threads THREADS]
[–time TIME] [–count COUNT] [–qps QPS]
[–max-latency MAX_LATENCY]
[–cache CACHE]
[–accuracy]
参数说明:
| 参数 | 说明 |
|---|---|
--dataset | 使用指定的数据集。目前我们只支持ImageNet。 |
--dataset-path | 数据集路径。 |
--data-format {NCHW,NHWC} | 模型的数据格式。 |
--scenario {SingleStream,MultiStream,Server,Offline} | 逗号分隔的基准模式列表。 |
--model MODEL | Model文件。 |
--inputs INPUTS | 如果模型格式未提供输入名称,则以逗号分隔输入名称列表。这是tensorflow所必需的,因为图表没有指定输入。 |
--outputs OUTPUTS | 如果模型格式未提供输出名称,则以逗号分隔输出名称列表。 |
--output OUTPUT] | JSON文件输出的位置。 |
--backend BACKEND | 使用哪个backend。目前支持的是tensorflow,onnxruntime,pytorch和tflite。 |
--threads THREADS | 要使用的工作线程数(默认值:系统中的处理器数)。 |
--count COUNT | 我们使用的数据集的图像数量(默认值:使用数据集中的所有图像)。 |
--qps QPS | 期望的Query per Second。 |
--max-latency MAX_LATENCY | 以逗号分隔的列表,我们尝试在99百分位数中达到的延迟(以秒为单位)(deault:0.01,0.05,0.100)。 |
--mode {Performance,Accuracy,Submission} | 我们想要运行的loadgen模式(默认值:性能)。 |
--queries-single QUERIES_SINGLE | 用于SingleStream场景的查询(默认值:1024)。 |
--queries-offline QUERIES_OFFLINE | 用于Offline场景的查询(默认值:24576)。 |
--queries-multi QUERIES_MULTI | 用于MultiStream场景的查询(默认值:24576)。 |
--max-batchsize MAX_BATCHSIZE | 最大的batchsize大小(默认值:128)。 |
4) Run Result
INFO:main:Namespace(accuracy=True, backend='onnxruntime', cache=0, count=None, data_format=None, dataset='imagenet_mobilenet', dataset_list=None, dataset_path='/home/gs/inference/cloud/image_classification/fake_imagenet', inputs=None, max_batchsize=128, max_latency=[0.2], mode='Performance', model='/home/gs/inference/cloud/image_classification/mobilenet_v1_1.0_224.onnx', output='/home/gs/inference/cloud/image_classification/output/mobilenet-onnxruntime-cpu/results.json', outputs=['MobilenetV1/Predictions/Reshape_1:0'], profile='mobilenet-onnxruntime', qps=10, queries_multi=24576, queries_offline=20, queries_single=1024, scenario=[TestScenario.SingleStream], threads=8, time=10)

INFO:imagenet:loaded 8 images, cache=0, took=0.0sec
INFO:main:starting accuracy pass on 8 items
Accuracy qps=48.12, mean=0.019353, time=0.17, acc=87.50, queries=8, tiles=50.0:0.0152,80.0:0.0198,90.0:0.0278,95.0:0.0366,99.0:0.0436,99.9:0.0451

INFO:main:starting TestScenario.SingleStream, latency=1.0
TestScenario.SingleStream-1.0 qps=65.80, mean=0.015138, time=10.05, acc=0.00, queries=661, tiles=50.0:0.0143,80.0:0.0167,90.0:0.0178,95.0:0.0199,99.0:0.0302,99.9:0.0522
4.2.2 translation gnmt
MLPerf Inference使用GNMT模型进行机器翻译,培训GNMT模型和生成数据集的步骤参考train_gnmt.txt。基本上,他们遵循MLPerf Training代码。
安装环境依赖
# GPU
pip install --user tensorflow-gpu
**在完整的数据集上运行GNMT: **
$ cd /path/to/gnmt/tensorflow/
# 更改权限并下载预先训练的模型和数据集:
$ chmod +x ./download_trained_model.sh
$ ./download_trained_model.sh
$ chmod +x ./download_dataset.sh
$ ./download_dataset.sh
# verify the dataset
$ chmod +x ./verify_dataset.sh
$ ./verify_dataset.sh
# 使用特定batchsize评估性能。
$ python run_task.py --run=performance --batch_size=32
$ python run_task.py --run=accuracy
通过LoadGen运行GNMT:
1)按照说明从https://github.com/mlperf/inference/blob/master/loadgen/README.md安装LoadGen。
2)运行测试
python loadgen_gnmt.py --store_translation
这将在performance模式(默认–mode选项)中调用SingleStream场景(默认–scenario选项),此外,还会将翻译的每个句子的输出存储在单独的文件中。
可以通过更改“–scenario”选项来运行其他场景。可以使用“–mode Accuracy”选项启用精度跟踪。
要测试Accuracy,请运行以下命令:
python loadgen_gnmt.py --mode Accuracy
python process_accuracy.py
4.3 Edge
MLPerf Inference计划为Edge环境提供6个领域的Benchmark,如下表所示:
| 领域 | 模型 | 数据集 |
|---|---|---|
| 人脸识别 | Sphereface20 | LFW |
| object classification | mobilenet 、Shufflenet | imagenet |
| object detection | ssd-mobilenet | coco |
| object segmentation | MaskRCNN2GO | COCO 2014 minival |
| 语音识别 | DeepSpeech2 | OpenSLR |
| 翻译 | gmnt | wmt16 |
4.3.1 人脸识别
MLPerf Inference Edge的人脸识别测试选择Sphereface-20作为基准模型,它是一个基于20层残差的卷积神经网络。基于TensorflowLite实现。
1. 准备环境
1)Cloning mlperf/inference版本库, 进入inference目录
$ git clone https://github.com/mlperf/inference.git
$ cd inference
2)使用tensorflow docker镜像
$ docker pull tensorflow/tensorflow:nightly-devel-py3
3)运行docker镜像,将sphereface目录挂载到docker:/mnt目录中。
docker run -it -w /mnt -v ${PWD}/edge/face_identification/sphereface20:/mnt -e HOST_PERMS="$(id -u):$(id -g)" tensorflow/tensorflow:nightly-devel-py3 bash
- 在docker镜像中,准备环境(安装包和设置环境路径)
$ ./prepare_env.sh
2. 准备数据集
1)我们使用CASIS-WebFace作为训练数据集,使用LFW数据集作为测试数据集。
在docker image中,下载LFW数据集进行测试:
$ ./dataset/download_lfw.sh
2)在下载的/tmp/dataset/paris.txt文件中,有6,000个测试对。 我们选择前600对,即set1作为基准。
3. TFLite model inference
1)你可以使用以下脚本运行整个推理步骤。
$ ./inference_sphereface.sh
4. Results
下表是模型信息,包括参数数量和GMAC(Giga Multiply-and-Accumulate)
| Parameters | GMAC |
|---|---|
| 2.16 * 10^7 | 1.75 |
下表记录了测试过程所花费的时间。
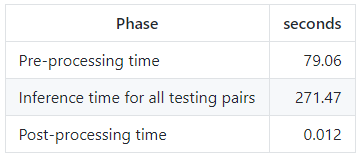
下表记录了Sphererface20模型的平均推断时间和精度。

4.3.2 object classification
MLPerf Inference - Object Classification的实现模型有两个,一个模型是MobileNet,另一个是fackbook的Shufflenet模型。
Object Classification - MobileNet
参考链接:https://github.com/mlperf/inference/tree/master/edge/object_classification/mobilenets
1. 准备数据集
1)Pull CK 版本库
$ ck pull repo:ck-mlperf
注意: Transitive dependencies include repo:ck-tensorflow.
2)安装a small dataset (500 images)
$ ck install package:imagenet-2012-val-min
注意: ImageNet dataset descriptions are in repo:ck-env.
3)安装the full dataset (50,000 images)
$ ck install package:imagenet-2012-val
注意:如果您已将ImageNet验证数据集下载到目录中,例如$ HOME / ilsvrc2012-val /,您可以按如下方式检测它:
$ ck detect soft:dataset.imagenet.val --full_path=$HOME/ilsvrc2012-val/ILSVRC2012_val_00000001.JPEG
2. 准备环境
1)安装TensorFlow (Python)
$ ck install package:lib-tensorflow-1.13.1-cpu
或者源码安装:
$ ck install package:lib-tensorflow-1.13.1-src-cpu
2)为TensorFlow安装MobileNet模型
要直接安装非量化模型::
$ ck install package --tags=model,tf,mlperf,mobilenet,non-quantized
要直接安装已量化的模型::
$ ck install package --tags=model,tf,mlperf,mobilenet,quantized
3)运行TensorFlow(Python)图像分类client
运行client,对于 non-quantized model:
$ ck run program:image-classification-tf-py
...
*** Dependency 4 = weights (TensorFlow-Python model and weights):
...
    Resolved. CK environment UID = f934f3a3faaf4d73 (version 1_1.0_224_2018_02_22)
...
ILSVRC2012_val_00000001.JPEG - (65) n01751748 sea snake
0.82 - (65) n01751748 sea snake
0.10 - (58) n01737021 water snake
0.04 - (34) n01665541 leatherback turtle, leatherback, leather...
0.01 - (54) n01729322 hognose snake, puff adder, sand viper
0.01 - (57) n01735189 garter snake, grass snake
---------------------------------------

Summary:
-------------------------------
Graph loaded in 0.855126s
All images loaded in 0.001089s
All images classified in 0.116698s
Average classification time: 0.116698s
Accuracy top 1: 1.0 (1 of 1)
Accuracy top 5: 1.0 (1 of 1)
--------------------------------
对于 quantized model:
$ ck run program:image-classification-tf-py
...
*** Dependency 4 = weights (TensorFlow-Python model and weights):
...
    Resolved. CK environment UID = b18ad885d440dc77 (version 1_1.0_224_quant_2018_08_02)
...
ILSVRC2012_val_00000001.JPEG - (65) n01751748 sea snake
0.16 - (60) n01740131 night snake, Hypsiglena torquata
0.10 - (600) n03532672 hook, claw
0.07 - (58) n01737021 water snake
0.05 - (398) n02666196 abacus
0.05 - (79) n01784675 centipede
---------------------------------------

Summary:
-------------------------------
Graph loaded in 1.066851s
All images loaded in 0.001507s
All images classified in 0.178281s
Average classification time: 0.178281s
Accuracy top 1: 0.0 (0 of 1)
Accuracy top 5: 0.0 (0 of 1)
--------------------------------
Object Classification - Shufflenet v1
参考链接:https://github.com/mlperf/inference/tree/master/edge/object_classification/shufflenet/caffe2
Shufflenet v1是FackBook推出的物体分类模型,这里使用 ImageNet 2012 validation dataset作为评估数据集。
测试过程
1)需要从官方imagenet竞赛网站下载imagenet验证数据集,然后解开文件。
2)直接执行(在纯净安装的ubuntu 16.04系统上测试)
run.sh <imagenet dir> [group1|group2|group3|group4|group8]
有五种Shufflenet model被提供,分别对应 group1、group2、group3、group4、group8这五种。模型保存在目录shufflenet / - model / group [x]下。目录中包含以下文件:
- model_dev.svg (svg file to show model structure)
- model_init_dev.svg (svg file to show the init model structure)
- model_init.pb (init model used by Caffe2 with all trained weights and biases)
- model_init.pbtxt (text file showing the weights and biases for all blobs)
- model.pb (model used by Caffe2)
- model.pbtxt (text file showing the model structure)
- model.pkl (model weights in pickle format)
为了在ImageNet验证数据集上运行shufflenet模型,该benchmark创建了一个脚本来简化测试过程。它适用于参考平台,负责安装所有依赖项,构建框架,并调用FAI-PEP来执行基准测试。未来的模型提交者可能需要了解流程,并针对新的硬件平台进行修改。
为了使流程明显,基准测试流程的组件如下所述:
- 可以在Wiki中找到有关imagenet验证数据集的基准测试概述
build.sh构建了Pytorch / Caffe2框架。shufflenet_accuracy_imagenet.json指定整体基准测试流程。imagenet_test_map.py将imagenet验证数据集转换为基准测试过程可使用的格式。convert_image_to_tensor.cc执行图像的预处理(缩放,裁剪,规范化等)并转换为框架可以直接使用的blob。caffe2_benchmark.cc在各种设置中运行模型并输出结果。classification_compare.py将模型输出与黄金值进行比较。- 由于验证数据集很大且无法在一次迭代中处理,因此将分批处理图像。
aggregate_classification_results.py会聚合所有运行结果并形成最终结果。
4.3.3 object detection ssd-mobilenet
该部分与上一节中Object Classification - MobileNet操作相似。
1. 准备数据集
1)Pull CK 版本库
$ ck pull repo:ck-mlperf
注意: Transitive dependencies include repo:ck-tensorflow.
更新所有CK存储库
$ ck pull repo --all
2)安装COCO 2017验证数据集(5,000张图片)
$ ck install package --tags=object-detection,dataset,coco.2017,val,original,full
注意:如果您之前通过CK安装了COCO 2017验证数据集,例如$ HOME / coco /,您可以按如下方式检测它:
$ ck detect soft:dataset.coco.2017.val --full_path=$HOME/coco/val2017/000000000139.jpg
3)预处理COCO 2017验证数据集(前50张图像)
$ ck install package --tags=object-detection,dataset,coco.2017,preprocessed,first.50
预处理COCO 2017验证数据集(所有5,000张图像)
$ ck install package --tags=object-detection,dataset,coco.2017,preprocessed,full
2. 准备环境
1)安装TensorFlow (Python)
$ ck install package:lib-tensorflow-1.13.1-cpu
或者源码安装:
$ ck install package:lib-tensorflow-1.13.1-src-cpu
2)安装SSD-MobileNet Model
要直接安装非量化模型::
$ ck install package --tags=model,tf,object-detection,mlperf,ssd-mobilenet,non-quantized
要直接安装已量化的模型::
$ ck install package --tags=model,tf,object-detection,mlperf,ssd-mobilenet,quantized,finetuned
3)在50张图片上运行TensorFlow (Python) Object Detection client
$ ck run program:object-detection-tf-py --env.CK_BATCH_COUNT=50
...
********************************************************************************
* Process results
********************************************************************************

Convert results to coco ...

Evaluate metrics as coco ...
loading annotations into memory...
Done (t=0.55s)
creating index...
index created!
Loading and preparing results...
DONE (t=0.00s)
creating index...
index created!
Running per image evaluation...
Evaluate annotation type *bbox*
DONE (t=0.12s).
Accumulating evaluation results...
DONE (t=0.22s).
 Average Precision  (AP) @[ IoU=0.50:0.95 | area=   all | maxDets=100 ] = 0.315
 Average Precision  (AP) @[ IoU=0.50      | area=   all | maxDets=100 ] = 0.439
 Average Precision  (AP) @[ IoU=0.75      | area=   all | maxDets=100 ] = 0.331
 Average Precision  (AP) @[ IoU=0.50:0.95 | area= small | maxDets=100 ] = 0.064
 Average Precision  (AP) @[ IoU=0.50:0.95 | area=medium | maxDets=100 ] = 0.184
 Average Precision  (AP) @[ IoU=0.50:0.95 | area= large | maxDets=100 ] = 0.689
 Average Recall     (AR) @[ IoU=0.50:0.95 | area=   all | maxDets=  1 ] = 0.296
 Average Recall     (AR) @[ IoU=0.50:0.95 | area=   all | maxDets= 10 ] = 0.322
 Average Recall     (AR) @[ IoU=0.50:0.95 | area=   all | maxDets=100 ] = 0.323
 Average Recall     (AR) @[ IoU=0.50:0.95 | area= small | maxDets=100 ] = 0.066
 Average Recall     (AR) @[ IoU=0.50:0.95 | area=medium | maxDets=100 ] = 0.187
 Average Recall     (AR) @[ IoU=0.50:0.95 | area= large | maxDets=100 ] = 0.711

Summary:
-------------------------------
Graph loaded in 0.748657s
All images loaded in 12.052568s
All images detected in 1.251245s
Average detection time: 0.025536s
mAP: 0.3148934914889957
Recall: 0.3225293342489256
--------------------------------
3. Benchmark the performance
$ ck benchmark program:object-detection-tf-py \
--repetitions=10 --env.CK_BATCH_SIZE=1 --env.CK_BATCH_COUNT=2 --env.CK_METRIC_TYPE=COCO \
--record --record_repo=local --record_uoa=mlperf-object-detection-ssd-mobilenet-tf-py-performance \
--tags=mlperf,object-detection,ssd-mobilenet,tf-py,performance \
--skip_print_timers --skip_stat_analysis --process_multi_keys
注意:当使用N的批次计数时,程序在N个图像上运行对象检测,但是在计算平均检测时间时不考虑慢速首次运行,例如:
$ ck benchmark program:object-detection-tf-py \
--repetitions=10 --env.CK_BATCH_SIZE=1 --env.CK_BATCH_COUNT=2
...
Graph loaded in 0.7420s

Detect image: 000000000139.jpg (1 of 2)
Detected in 1.9351s

Detect image: 000000000285.jpg (2 of 2)
Detected in 0.0284s
...
Summary:
-------------------------------
Graph loaded in 0.741997s
All images loaded in 0.604377s
All images detected in 0.028387s
Average detection time: 0.028387s
mAP: 0.15445544554455443
Recall: 0.15363636363636363
--------------------------------
4. Benchmark the accuracy
$ ck benchmark program:object-detection-tf-py \
--repetitions=1 --env.CK_BATCH_SIZE=1 --env.CK_BATCH_COUNT=5000 --env.CK_METRIC_TYPE=COCO \
--record --record_repo=local --record_uoa=mlperf-object-detection-ssd-mobilenet-tf-py-accuracy \
--tags=mlperf,object-detection,ssd-mobilenet,tf-py,accuracy \
--skip_print_timers --skip_stat_analysis --process_multi_keys
5. Reference accuracy
1)SSD-MobileNet non-quantized
********************************************************************************
* Process results
********************************************************************************

Convert results to coco ...

Evaluate metrics as coco ...
loading annotations into memory...
Done (t=0.49s)
creating index...
index created!
Loading and preparing results...
DONE (t=0.07s)
creating index...
index created!
Running per image evaluation...
Evaluate annotation type *bbox*
DONE (t=12.46s).
Accumulating evaluation results...
DONE (t=2.09s).
 Average Precision  (AP) @[ IoU=0.50:0.95 | area=   all | maxDets=100 ] = 0.231
 Average Precision  (AP) @[ IoU=0.50      | area=   all | maxDets=100 ] = 0.349
 Average Precision  (AP) @[ IoU=0.75      | area=   all | maxDets=100 ] = 0.252
 Average Precision  (AP) @[ IoU=0.50:0.95 | area= small | maxDets=100 ] = 0.018
 Average Precision  (AP) @[ IoU=0.50:0.95 | area=medium | maxDets=100 ] = 0.166
 Average Precision  (AP) @[ IoU=0.50:0.95 | area= large | maxDets=100 ] = 0.531
 Average Recall     (AR) @[ IoU=0.50:0.95 | area=   all | maxDets=  1 ] = 0.209
 Average Recall     (AR) @[ IoU=0.50:0.95 | area=   all | maxDets= 10 ] = 0.262
 Average Recall     (AR) @[ IoU=0.50:0.95 | area=   all | maxDets=100 ] = 0.263
 Average Recall     (AR) @[ IoU=0.50:0.95 | area= small | maxDets=100 ] = 0.023
 Average Recall     (AR) @[ IoU=0.50:0.95 | area=medium | maxDets=100 ] = 0.190
 Average Recall     (AR) @[ IoU=0.50:0.95 | area= large | maxDets=100 ] = 0.604

Summary:
-------------------------------
Graph loaded in 0.753200s
All images loaded in 1193.981655s
All images detected in 123.461871s
Average detection time: 0.024697s
mAP: 0.23111107753357035
Recall: 0.26304841188725403
--------------------------------
2)SSD-MobileNet quantized
********************************************************************************
* Process results
********************************************************************************

Convert results to coco ...

Evaluate metrics as coco ...
loading annotations into memory...
Done (t=0.48s)
creating index...
index created!
Loading and preparing results...
DONE (t=0.18s)
creating index...
index created!
Running per image evaluation...
Evaluate annotation type *bbox*
DONE (t=12.74s).
Accumulating evaluation results...
DONE (t=2.13s).
 Average Precision  (AP) @[ IoU=0.50:0.95 | area=   all | maxDets=100 ] = 0.236
 Average Precision  (AP) @[ IoU=0.50      | area=   all | maxDets=100 ] = 0.361
 Average Precision  (AP) @[ IoU=0.75      | area=   all | maxDets=100 ] = 0.259
 Average Precision  (AP) @[ IoU=0.50:0.95 | area= small | maxDets=100 ] = 0.019
 Average Precision  (AP) @[ IoU=0.50:0.95 | area=medium | maxDets=100 ] = 0.166
 Average Precision  (AP) @[ IoU=0.50:0.95 | area= large | maxDets=100 ] = 0.546
 Average Recall     (AR) @[ IoU=0.50:0.95 | area=   all | maxDets=  1 ] = 0.212
 Average Recall     (AR) @[ IoU=0.50:0.95 | area=   all | maxDets= 10 ] = 0.268
 Average Recall     (AR) @[ IoU=0.50:0.95 | area=   all | maxDets=100 ] = 0.269
 Average Recall     (AR) @[ IoU=0.50:0.95 | area= small | maxDets=100 ] = 0.025
 Average Recall     (AR) @[ IoU=0.50:0.95 | area=medium | maxDets=100 ] = 0.191
 Average Recall     (AR) @[ IoU=0.50:0.95 | area= large | maxDets=100 ] = 0.618

Summary:
-------------------------------
Graph loaded in 1.091316s
All images loaded in 1150.996266s
All images detected in 122.103661s
Average detection time: 0.024426s
mAP: 0.23594222525632427
Recall: 0.26864982712779556
--------------------------------
4.3.4 translation gnmt
参考链接:https://github.com/mlperf/inference/tree/master/edge/translation/gnmt/tensorflow
该部分请参阅cloud目录中的GNMT代码。代码没有区别。
4.4 Inference Rule
下面是在进行MLPerf Inference Benchmark测试时需要遵守的一些Rule细节。
4.4.1 Inference Division
MLPerf Inference也分为封闭分区(Closed Division)和开放分区(Open Division)。
- 封闭分区需要使用等同于参考实现的预处理,后处理和模型。封闭分区允许校准量化,不允许任何再训练。
- 开放分区只限制使用相同的数据集,它允许使用任意的预处理或后处理和模型,包括再培训。
4.4.2 Data Sets
1)对于每个Benchmak测试,MLPerf 将提供以下数据集:
- accuracy数据集,用于确定提交是否符合质量目标,并用作验证集
- speed/performance 数据集,是用于测量性能,它是accuracy数据集的子集。
对于除GNMT之外的每个Benchmark测试,MLPerf将提供用于量化的calibration数据集,它是用于生成权重的训练数据集的一部分。每个参考实现都应包含一个使用checksum来验证数据集的脚本。每次运行开始时数据集必须保持不变。
2)Pre- and post-processing
所有imaging benchmarks测试都将未剪切的未压缩位图作为输入,NMT采用文本。
4.4.3 Model权重量化
对于Closed分区,MLPerf为参考实现提供了fp32格式的weights和biases。MLPerf为除GNMT之外的每个Benchmark提供了calibration数据集,提交者仅可以使用提供的calibration数据集来进行量化。支持的量化范围为:
- INT8
- INT16
- UINT8
- UINT16
- FP11 (1-bit sign, 5-bit exponent, 5-bit mantissa)
- FP16
- bfloat16
- FP32
注:只能使用基准所有者提供的校准数据集进行校准。允许卷积层为NCHW或NHWC格式。不允许进行其他再培训。
对于Open分区,每次运行必须将权重和偏差初始化为相同的值,允许任何量化方案。
4.4.4 Model实现
规则允许的Model实现:
- 任意框架和运行时:TensorFlow,TensorFlow-lite,ONNX,PyTorch等
- 任意地数据顺序
- 允许输入的权重和内存中表示的权重不同。
- 数学上等效的变换(例如Tanh与Logistic,Relu6与Relu8)
- 用等效的稀疏操作替换密集操作
- Fusing or unfusing operations
- Dynamically switching between one or more batch sizes
- 允许使用混合精度
- 将具有1001个类的ImageNet分类器减少到1000个类
规则不允许的Model实现:
- 替换全部的权重 (Wholesale weight replacement or supplements)
- 丢弃非零的权重元素 (Discarding non-zero weight elements)
- 缓存查询或响应 (Caching queries or responses)
- 合并相同的query (Coalescing identical queries)
5. 参考链接
- https://mlperf.org/
- https://github.com/mlperf
- https://mlperf.org/results/
- https://github.com/mlperf/inference_policies/blob/master/inference_rules.adoc
- https://github.com/mlperf/inference/tree/master/cloud
- https://github.com/mlperf/inference/blob/master/cloud/image_classification/GettingStarted.ipynb
- https://github.com/mlperf/inference/tree/master/edge
- https://github.com/mlperf/inference/tree/master/edge/face_identification/sphereface20/tflite
- https://github.com/mlperf/inference/tree/master/edge/object_classification/mobilenets
- https://github.com/mlperf/inference/tree/master/edge/object_classification/shufflenet/caffe2
- https://github.com/facebook/FAI-PEP/wiki/Run-Imagenet-validate-dataset


 5315
5315

 被折叠的 条评论
为什么被折叠?
被折叠的 条评论
为什么被折叠?
 到【灌水乐园】发言


