


In the previous post, we discussed Unity Remote to lessen the time taken to view constant changes on target platforms. Now, we would like to package game code once to be deployed to multiple devices.
In this post, we use Jenkins: an open source continuous integration tool to perform automated builds.
At the time of this writing, Jenkins is available for Android on PC and both Android / iOS on the Mac.
Let's check it out!
Windows PC
Ensure you have the following pre-requisites installed and setup as per previous post.
Also, ensure you have an SVN client installed on localhost, for example, Tortoise SVN.
Example
As an example, let's upload Angry Bots into source control (SVN) to demonstrate automated builds.
Add the following "PerformBuild.cs" file to the "Editor" folder to help automate the Android build:
Note: upgrade to Unity Pro licence if you would like to programmatically Build the Player Pipeline.
Jenkins
Download Jenkins Binary Installer and run. Restart computer. Navigate to http://localhost:8080.
Manage Plugins
Main dashboard | Click Manage Jenkins | Click Manage Plugins | Click "Available" tab.
Ensure the following plugins are installed: Subversion Plugin and Unity3d plugin.
Restart Plugins
Start | run | services.msc. Scroll down to Jenkins. Right click. Restart.
Configure System
Main dashboard | Click Manage Jenkins | Click Configure System. Enter the following:
Unity3d | Add Unity3d | Unity3d installations
Jenkins Location
Subversion
E-mail Notification
New Item
Main dashboard | Click New Item | Enter Item name: AngryBotsAndroid.
Click radio button next to "Build a free-style software project". Click OK.
Configuration
Source Code Management
Note: you may be prompted to enter SVN source control credentials at this point.
 Credentials | Click Add button | Add SVN source control Username and Password.
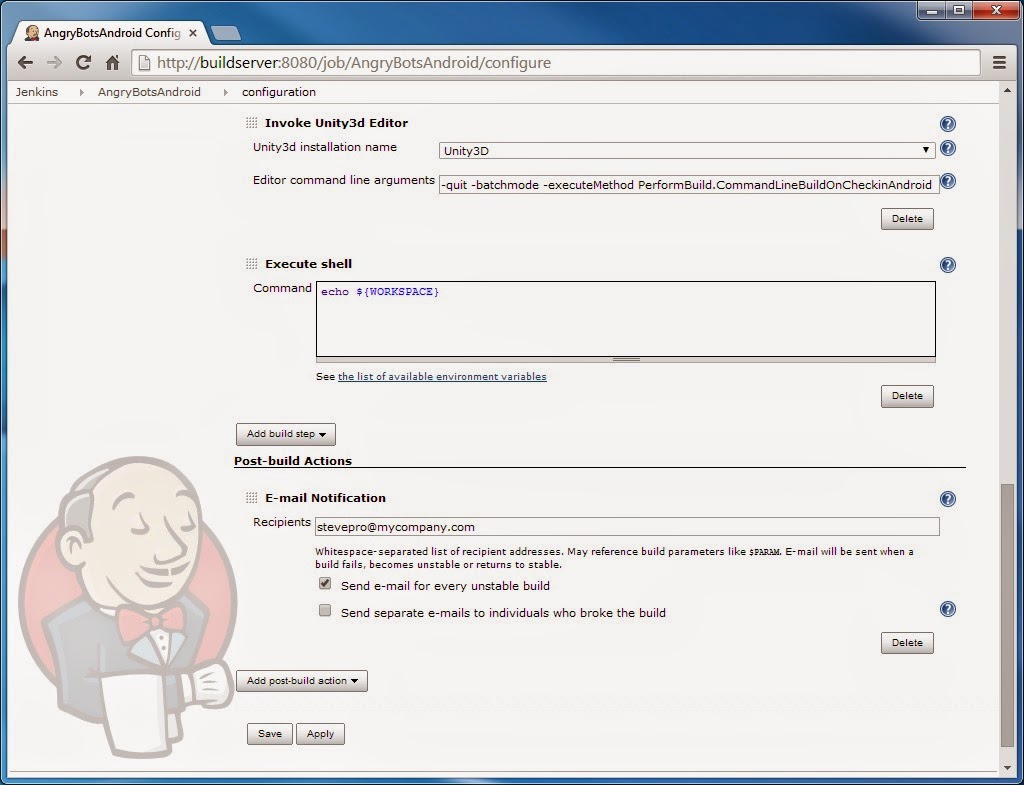
Build | Add build step | Invoke Unity3d Editor
Build | Add build step | Execute shell
Post-build Actions | E-mail Notification
Click Apply button | Click Save button | Click Build Now.

Note: during build job, Unity may prompt you to select Android SDK path. Choose D:\Android\sdk
Deploy
Main dashboard | Click AngryBotsAndroid | Build History | Click DateTime link | Console Output.
Scroll to bottom: note the absolute path to AngryBotsAndroid build job workspace entered there.
For example, it may be C:\Program Files (x86)\Jenkins\jobs\AngryBotsAndroid\workspace
Connect Android device to PC. Launch command prompt, navigate to Android APK file and install:
Start | run | cmd | cd "C:\Program Files (x86)\Jenkins\jobs\AngryBotsAndroid\workspace"
adb install -r AngryBotsAndroid.apk
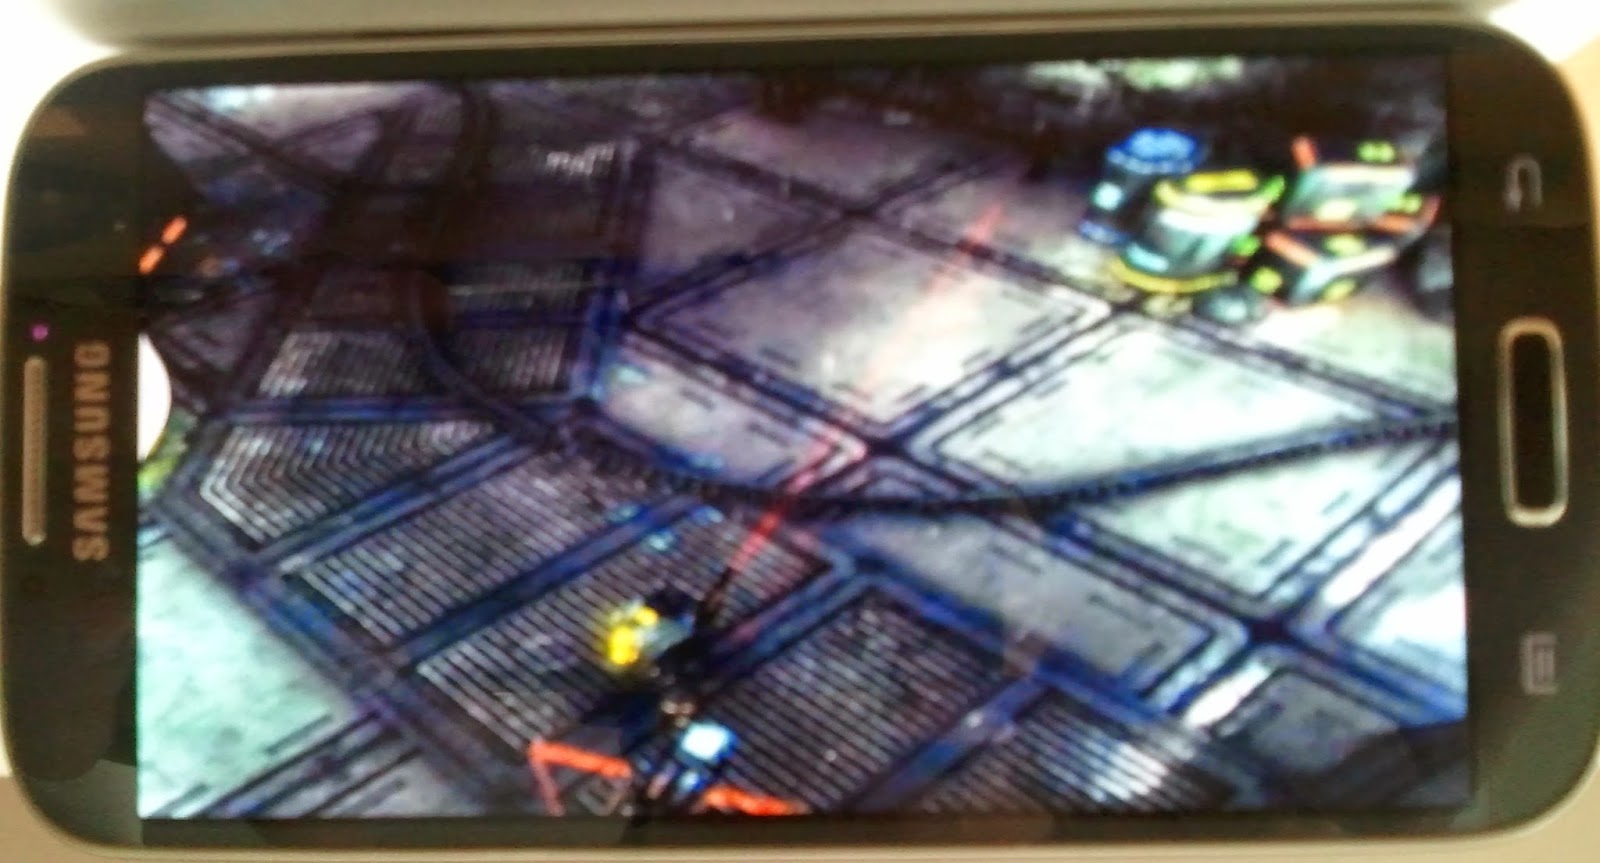
Congratulations! Angry Bots should be installed on your Android device ready to play.
Apple Mac
Ensure you have the following pre-requisites installed and setup as per previous post.
Also, ensure you have an SVN client installed on localhost, for example, svnx for Mac.
In order to deploy code to an iOS device, this post assumes you have an Apple Developer ID.
This post also assumes you have a Provisioning Profile setup via the Apple Developer portal.
Archive
Automated builds may actually benefit from archiving final packaged products to a network file share.
That way, packages can be deployed from mounted network file share on to multiple devices directly.
Mount Drive
For example: there is a Shared/builds folder on ARCHIVE-SERVER for automated builds.
Finder | Go menu | Connect to Server... Enter the following Server Address: smb://username:password@ARCHIVE-SERVER/Shared. Click Connect button.
Launch Terminal window to manually mount drive. Type the following (as root):
sudo su | cd /mnt | mkdir builds | cd builds
mount_smbfs //ARCHIVE-SERVER/Shared/builds /mnt/builds
Root User
Important: Jenkins must run as root user in order to have copy permission to mount drive.
Launch Terminal window to elevate Jenkins privileges as root user. Modify configuration: cd /Library/LaunchDaemons | vi org.jenkins-ci.plist | Find <key>UserName</key>
Change <string>Jenkins</string> TO <string>root</string> | Type !wq to Save.
Example
Update the "PerformBuild.cs" file that exists in the "Editor" folder to help automate the iOS build:
Note: upgrade to Unity Pro licence if you would like to programmatically Build the Player Pipeline.
Jenkins
Download Jenkins Binary Installer and run. Restart computer. Navigate to http://localhost:8080.
Note: if you receive warning "Jenkins.pkg can't be opened because from unidentified developer"
Choose: System Preferences | Security & Privacy | Click "Open anyway" button | Install.
Manage Plugins
Main dashboard | Click Manage Jenkins | Click Manage Plugins | Click "Available" tab.
Ensure the following plugins are installed: Subversion, Unity3d and the Xcode plugin.
Restart Plugins
The Jenkins Installer sets up a launch daemon listening on port 8080 for all incoming requests.
Therefore, launch Terminal window to manually restart daemon. Type the following (as root): Manually stop daemon: sudo launchctl unload /Library/LaunchDaemons/org.jenkins-ci.plist
Manually start daemon: sudo launchctl load /Library/LaunchDaemons/org.jenkins-ci.plist
Configure System
Main dashboard | Click Manage Jenkins | Click Configure System. Enter the following: Configuration
Unity3d | Add Unity3d | Unity3d installations
Xcode Builder
Jenkins Location
Subversion
E-mail Notification
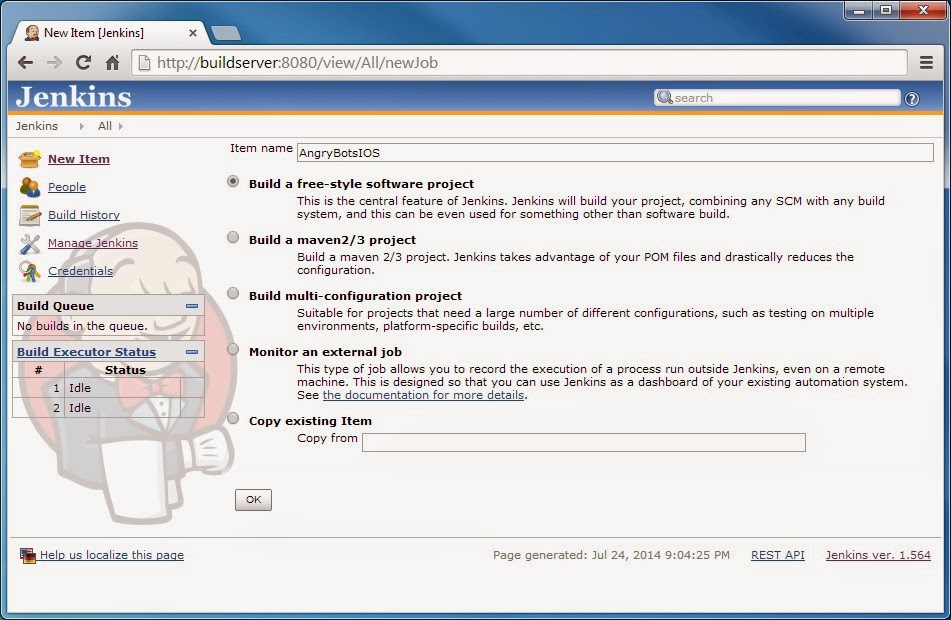
New Item
Main dashboard | Click New Item | Enter Item name: AngryBotsIOS.
Click radio button next to "Build a free-style software project". OK.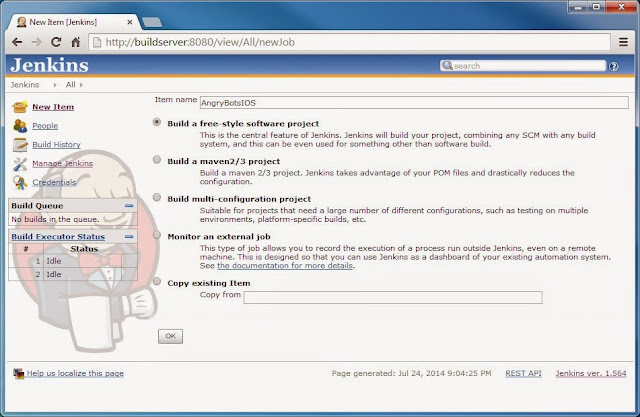
Configuration
Source Code Management
Note: you may be prompted to enter SVN source control credentials at this point.
Credentials | Click Add button | Add SVN source control Username and Password.
Build Triggers
For example, poll build server every 10 minutes for any source code revisions.
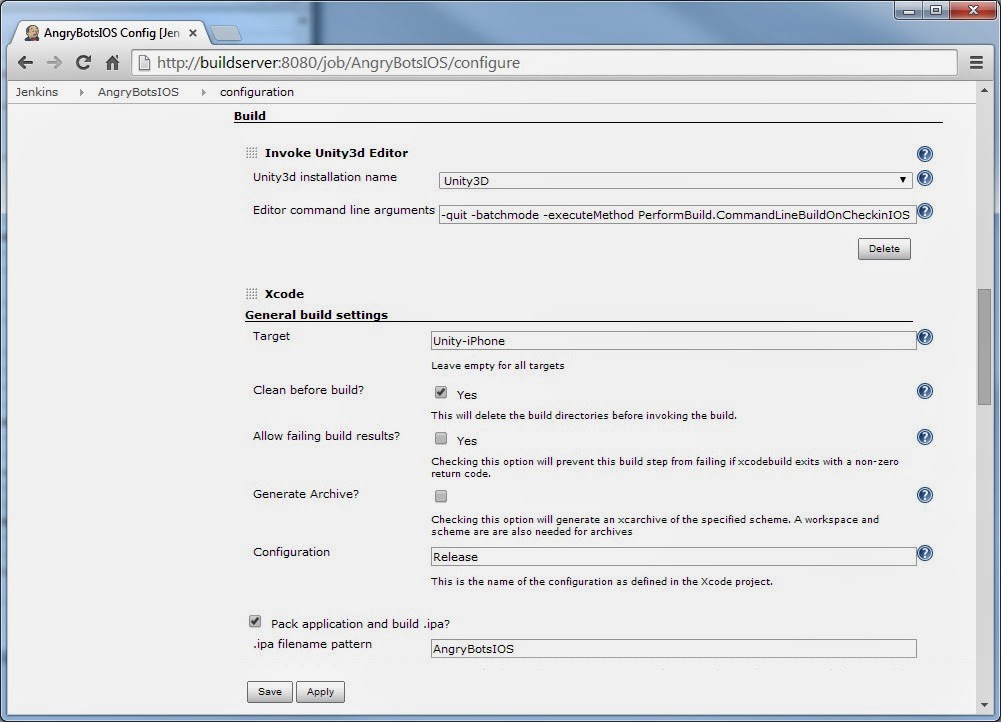
Build | Add build step | Invoke Unity3d Editor
Xcode | General build settings
Xcode | Code signing & OS X keychain options
Note: leave blank if you do not wish to override the code signing identity in project.
Xcode | Advanced Xcode build options
Build | Add build step | Execute shell. Enter the following shell script:
Click Apply button | Click Save Button | Click Build Now.
Errors
iOS automated builds may encounter errors if the build server is not completely setup.
Code Sign Errors
There are no valid certificate/private key pairs in the default keychain
Open "Keychain Access" application. Finder | Applications | Utilities | Keychain Access
Click login tab (top right) | Right click "iPhone Developer YOUR NAME" | Choose Copy
Click System tab | Right click in area | Choose Paste 2 items
Note: you may need to repeat with the "iPhone Distribution YOUR NAME" certificate.
Provisioning profile 'xxxxx-xxxx-xxxx-xxxxx' can't be found
Copy your username mobile device provisioning profile to the shared Jenkins folder:
Launch Terminal window to copy provisioning profile. Type the following (as root):
Copy /Users/username/Library/MobileDevice folder TO /Users/Shared/Jenkins
Copy /Users/username/Library/MobileDevice folder TO /System/Library
FAILED TO establish the default connection to the WindowServer, _CGSDefaultConnection() is NULL
If you encounter this error then Jenkins wants to run as its own private user instead of Mac OS/X.
Create slave node on Jenkins thus the Unity process can connect as Mac OS/X user accordingly:
Main dashboard | Click Manage Jenkins | Click Manage Nodes | New Node

Configure
UnityException: Launching iOS project via Xcode4 failed. Check editor log for details
If you are using Unity 4.3.* and Xcode 5.1.* then you may possibly receive this error.
Manually edit Xcode plugin metadata Info.plist file for Unity and add the missing key:
Launch Terminal window. Type the following (as root):
cd /Applications/Unity/Unity.app/Contents/BuildTargetTools
cd iPhonePlayer/Unity4XC.xcplugin/Contents
vi Info.plist | Search for DVTPlugInCompatibilityUUIDs | Add key:
<string>A2E4D43F-41F4-4FB9-BB94-7177011C9AED</string>
UnityException: Launching iOS project via Xcode4 failed. Check editor log for details
If you are using Unity 4.5.* and Xcode 6.0.* then you may possibly receive this error.
Manually edit Xcode plugin metadata Info.plist file for Unity and add the missing key:
Launch Terminal window. Type the following (as root):
cd /Applications/Unity/Unity.app/Contents/PlaybackEngines
cd iOSSupport/Tools/OSX/Unity4XC.xcplugin/Contents
vi Info.plist | Search for DVTPlugInCompatibilityUUIDs | Add key:
<string>C4A681B0-4A26-480E-93EC-1218098B9AA0</string>
Deploy
After the iOS build is successful, deploy packaged game code once to multiple devices:
Connect an iOS device to your PC | Launch iTunes | Click the top left drop down arrow
Add File to Library...| Navigate to \\ARCHIVE-SERVER\Shared | Double click AngryBotsIOS.ipa Click iPhone button | Click Apps button | Click Install button (next to AngryBots) | Click Apply button.
  Congratulations! Angry Bots should be installed on your iOS device ready to play.
Summary
The only automated build option outstanding here is an Android build deployed on the Mac.
Fortunately, this is simple: clone iOS build job, remove Xcode build step and modify script.
Clone iOS build
Main dashboard | Click New Item | Enter Item name: AngryBotsAndroid.
Click radio button next to "Copy existing Item". Enter "AngryBotsIOS".
Build | Add build step | Invoke Unity3d Editor
Remove Xcode build step
Scroll down to Xcode | General build settings | Click Delete button.
Modify script.
Make the following changes to shell script to accommodate Android packaged game code:
Conclusion
In conclusion, Continuous Integration has many advantages; one of which of course is stability: an automated build process constantly checks state of the code and immediately reports build errors.
The timeliness of this feedback is critical for maintaining stable code. Especially for software being regularly deployed to multiple devices; most of which avail to frequent online mobile store updates!
In this post, we use Jenkins: an open source continuous integration tool to perform automated builds.
At the time of this writing, Jenkins is available for Android on PC and both Android / iOS on the Mac.

Let's check it out!
Windows PC
Ensure you have the following pre-requisites installed and setup as per previous post.
| The Java SDK | Environment Variables |
| Android SDK | USB Drivers |
| Unity 3D |
Example
As an example, let's upload Angry Bots into source control (SVN) to demonstrate automated builds.
Add the following "PerformBuild.cs" file to the "Editor" folder to help automate the Android build:
Note: upgrade to Unity Pro licence if you would like to programmatically Build the Player Pipeline.
- using System;
- using System.Collections.Generic;
- using System.IO;
- using UnityEditor;
- using UnityEngine;
- using Object = UnityEngine.Object;
- public class PerformBuild
- {
- [MenuItem("Automated/Automated Android Build")]
- static void CommandLineBuildOnCheckinAndroid()
- {
- const BuildTarget target = BuildTarget.Android;
- string[] levels = GetBuildScenes();
- const string locationPathName = "AngryBotsAndroid.apk";
- const BuildOptions options = BuildOptions.None;
- DeleteStreamingAssets();
- BuildPipelineBuildAssetBundle(target);
- BuildPipelineBuildPlayer(levels, locationPathName, target, options);
- }
- private static string[] GetBuildScenes()
- {
- List<string> names = new List<string>();
- foreach (EditorBuildSettingsScene e in EditorBuildSettings.scenes)
- {
- if (e == null) { continue; }
- if (e.enabled) { names.Add(e.path); }
- }
- return names.ToArray();
- }
- private static void DeleteStreamingAssets()
- {
- // Delete streaming assets (downloaded from source control).
- string[] filesToDelete = Directory.GetFiles(Application.streamingAssetsPath, "*.unity3d*");
- foreach (string file in filesToDelete)
- {
- File.Delete(file);
- }
- }
- private static void BuildPipelineBuildAssetBundle(BuildTarget buildTarget)
- {
- string[] assetPaths = AssetDatabase.GetAllAssetPaths();
- string pathName = Application.streamingAssetsPath;
- foreach (string f in assetPaths)
- {
- if (!f.Contains("Master Assets")) { continue; }
- Object a = Resources.LoadAssetAtPath(f, typeof(Object));
- if (a == null) { continue; }
- Object[] asset = new Object[1];
- asset[0] = a;
- string assetType = a.GetType().Name;
- if (assetType.Equals("Object")) { continue; }
- string assetName = assetType + "_" + asset[0].name + ".unity3d";
- string fullName = pathName + "/" + assetName;
- const BuildAssetBundleOptions options = BuildAssetBundleOptions.CollectDependencies | BuildAssetBundleOptions.CompleteAssets | BuildAssetBundleOptions.UncompressedAssetBundle;
- BuildPipeline.BuildAssetBundle(a, asset, fullName, options, buildTarget);
- }
- }
- private static void BuildPipelineBuildPlayer(string[] levels, string locationPathName, BuildTarget target, BuildOptions options)
- {
- PlayerSettings.productName = "Angry Bots";
- PlayerSettings.bundleIdentifier = "com.studiosstevepro.angrybots";
- PlayerSettings.bundleVersion = "1.0";
- String error = BuildPipeline.BuildPlayer(levels, locationPathName, target, options);
- if (!String.IsNullOrEmpty(error))
- {
- throw new System.Exception("Build failed: " + error);
- }
- }
- }
Download Jenkins Binary Installer and run. Restart computer. Navigate to http://localhost:8080.
Manage Plugins
Main dashboard | Click Manage Jenkins | Click Manage Plugins | Click "Available" tab.
Ensure the following plugins are installed: Subversion Plugin and Unity3d plugin.
Restart Plugins
Start | run | services.msc. Scroll down to Jenkins. Right click. Restart.
Configure System
Main dashboard | Click Manage Jenkins | Click Configure System. Enter the following:
Unity3d | Add Unity3d | Unity3d installations
| Name | Unity3D |
| Installation directory | C:\Program Files (x86)\Unity\ |
Jenkins Location
| Jenkins URL | http://buildserver:8080 |
| System Admin e-mail address | build@mycompany.com |
Subversion
| Subversion Workspace Version | 1.7 |
E-mail Notification
| SMTP server | smtp@mycompany.com |
New Item
Main dashboard | Click New Item | Enter Item name: AngryBotsAndroid.
Click radio button next to "Build a free-style software project". Click OK.

Configuration
| Project Name | AngryBotsAndroid |
Source Code Management
| Subversion Modules | Checked |
| Repository URL | https://mycompany.com/svn/AngryBots |
| Check-out Strategy | Use 'svn update', with 'svn revert' |
 Credentials | Click Add button | Add SVN source control Username and Password.
 Build | Add build step | Invoke Unity3d Editor
| Unity3d installation name | Unity3D |
| Editor command line arguments: -quit -batchmode -executeMethod PerformBuild.CommandLineBuildOnCheckinAndroid | |
Build | Add build step | Execute shell
| Command | echo ${WORKSPACE} |
Post-build Actions | E-mail Notification
| Recipients | Enter email distribution list |
Click Apply button | Click Save button | Click Build Now.
Note: during build job, Unity may prompt you to select Android SDK path. Choose D:\Android\sdk
Deploy
Main dashboard | Click AngryBotsAndroid | Build History | Click DateTime link | Console Output.
Scroll to bottom: note the absolute path to AngryBotsAndroid build job workspace entered there.
For example, it may be C:\Program Files (x86)\Jenkins\jobs\AngryBotsAndroid\workspace
Connect Android device to PC. Launch command prompt, navigate to Android APK file and install:
Start | run | cmd | cd "C:\Program Files (x86)\Jenkins\jobs\AngryBotsAndroid\workspace"
adb install -r AngryBotsAndroid.apk
Congratulations! Angry Bots should be installed on your Android device ready to play.
Apple Mac
Ensure you have the following pre-requisites installed and setup as per previous post.
| The Java SDK | Environment Variables |
| Android SDK | USB Drivers |
| Unity 3D | Xcode |
In order to deploy code to an iOS device, this post assumes you have an Apple Developer ID.
This post also assumes you have a Provisioning Profile setup via the Apple Developer portal.
Archive
Automated builds may actually benefit from archiving final packaged products to a network file share.
That way, packages can be deployed from mounted network file share on to multiple devices directly.
Mount Drive
For example: there is a Shared/builds folder on ARCHIVE-SERVER for automated builds.
Finder | Go menu | Connect to Server... Enter the following Server Address: smb://username:password@ARCHIVE-SERVER/Shared. Click Connect button.
Launch Terminal window to manually mount drive. Type the following (as root):
sudo su | cd /mnt | mkdir builds | cd builds
mount_smbfs //ARCHIVE-SERVER/Shared/builds /mnt/builds
Root User
Important: Jenkins must run as root user in order to have copy permission to mount drive.
Launch Terminal window to elevate Jenkins privileges as root user. Modify configuration:
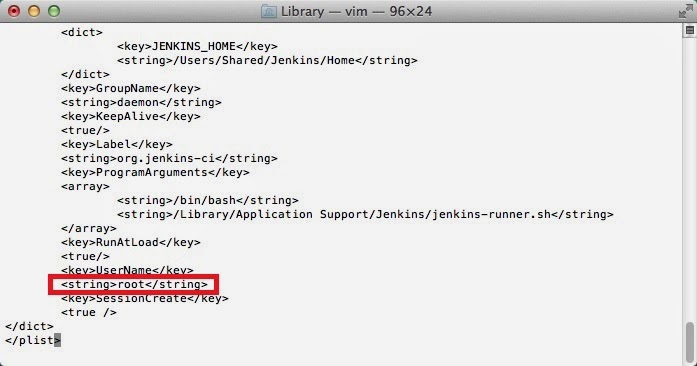 cd /Library/LaunchDaemons | vi org.jenkins-ci.plist | Find <key>UserName</key>
 Change <string>Jenkins</string> TO <string>root</string> | Type !wq to Save.
Example
Update the "PerformBuild.cs" file that exists in the "Editor" folder to help automate the iOS build:
Note: upgrade to Unity Pro licence if you would like to programmatically Build the Player Pipeline.
- public class PerformBuild
- {
- [MenuItem("Automated/Automated iOS Build")]
- static void CommandLineBuildOnCheckinIOS()
- {
- const BuildTarget target = BuildTarget.iPhone;
- string[] levels = GetBuildScenes();
- const string locationPathName = "iOSbuild";
- const BuildOptions options = BuildOptions.None;
- DeleteStreamingAssets();
- BuildPipelineBuildAssetBundle(target);
- BuildPipelineBuildPlayer(levels, locationPathName, target, options);
- }
- // same code as before.
- }
Download Jenkins Binary Installer and run. Restart computer. Navigate to http://localhost:8080.
Note: if you receive warning "Jenkins.pkg can't be opened because from unidentified developer"
Choose: System Preferences | Security & Privacy | Click "Open anyway" button | Install.
Manage Plugins
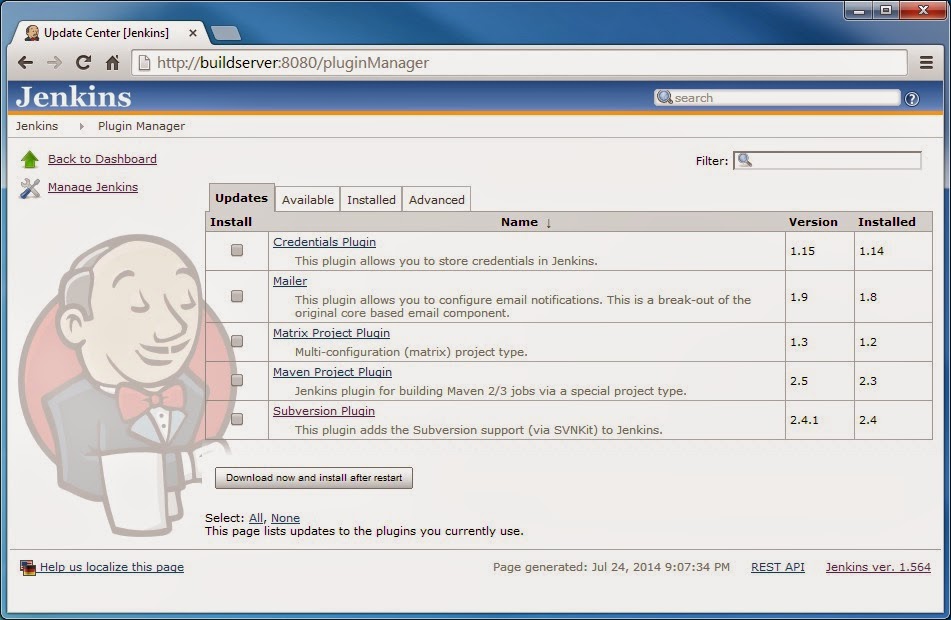
Main dashboard | Click Manage Jenkins | Click Manage Plugins | Click "Available" tab.
Ensure the following plugins are installed: Subversion, Unity3d and the Xcode plugin.
Restart Plugins
The Jenkins Installer sets up a launch daemon listening on port 8080 for all incoming requests.
Therefore, launch Terminal window to manually restart daemon. Type the following (as root):
 Manually stop daemon: sudo launchctl unload /Library/LaunchDaemons/org.jenkins-ci.plist
 Manually start daemon: sudo launchctl load /Library/LaunchDaemons/org.jenkins-ci.plist
Configure System
Main dashboard | Click Manage Jenkins | Click Configure System. Enter the following:
 Configuration
 | Home directory | /Users/Shared/Jenkins/Home |
Unity3d | Add Unity3d | Unity3d installations
| Name | Unity3D |
| Installation directory | /Applications/Unity/Unity.app |
Xcode Builder
| xcodebuild executable path | /usr/bin/xcodebuild |
| agvtool executable path | /usr/bin/agvtool |
| xcrun executable path | /usr/bin/xcrun |
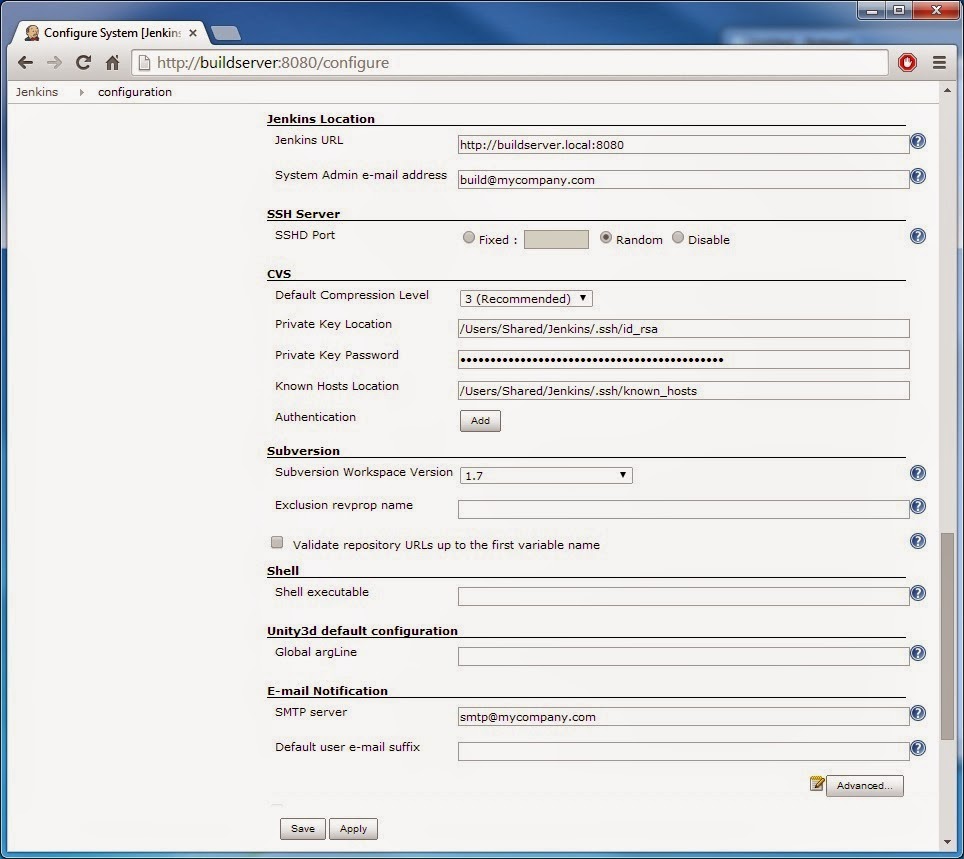
Jenkins Location
| Jenkins URL | http://buildserver:8080 |
| System Admin e-mail address | build@mycompany.com |
Subversion
| Subversion Workspace Version | 1.7 |
E-mail Notification
| SMTP server | smtp@mycompany.com |
New Item
Main dashboard | Click New Item | Enter Item name: AngryBotsIOS.
Click radio button next to "Build a free-style software project". OK.
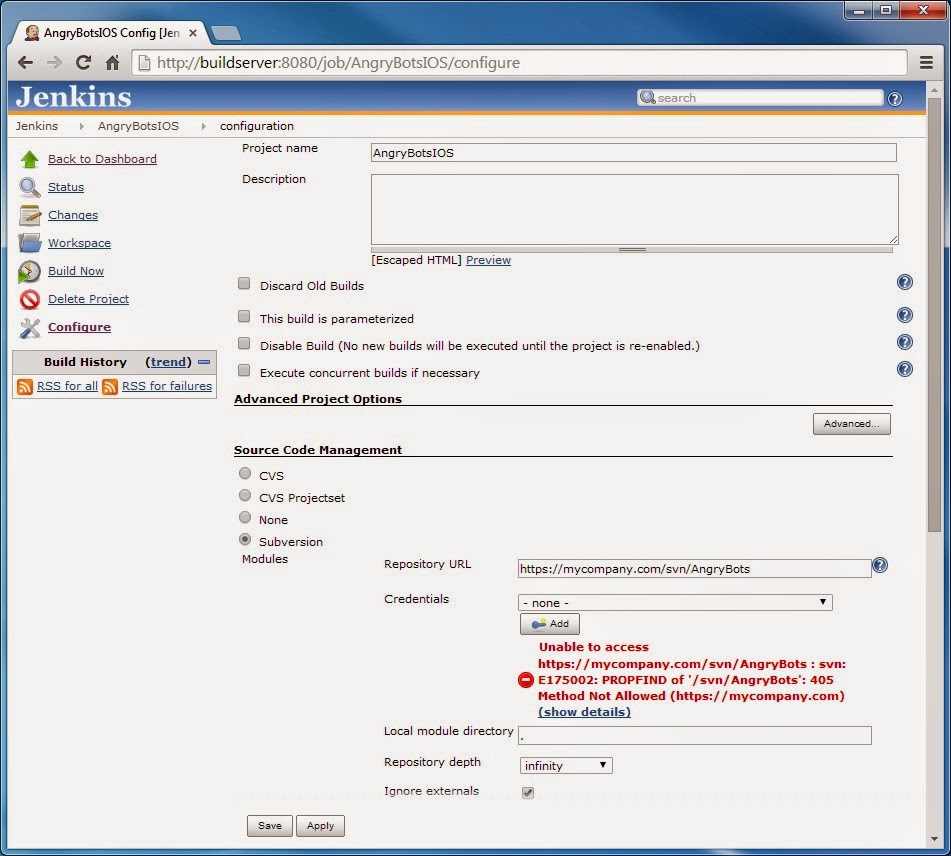
Configuration
| Project Name | AngryBotsIOS |
Source Code Management
| Subversion Modules | Checked |
| Repository URL | https://mycompany.com/svn/AngryBots |
| Check-out Strategy | Use 'svn update', with 'svn revert' |
Credentials | Click Add button | Add SVN source control Username and Password.
Build Triggers
For example, poll build server every 10 minutes for any source code revisions.
| Poll SCM | Checked |
| Schedule | H/10 * * * * |
Build | Add build step | Invoke Unity3d Editor
| Unity3d installation name | Unity3D |
| Editor command line arguments: -quit -batchmode -executeMethod PerformBuild.CommandLineBuildOnCheckinIOS | |
Xcode | General build settings
| Target | Unity-iPhone |
| Clean before build? | Checked |
| Configuration | Release |
| Pack application and build .ipa? | Checked |
| .ipa filename pattern | AngryBotsIOS |
Xcode | Code signing & OS X keychain options
| Code signing & OS X keychain options | iPhone Distribution |
Xcode | Advanced Xcode build options

| Xcode Project Directory | iOSbuild |
| Build output directory | ${WORKSPACE}/output |
Build | Add build step | Execute shell. Enter the following shell script:
- # This is the output IPA file.
- filename="AngryBotsIOS.ipa"
- echo "Copying $filename to /mnt/builds now STARTING..."
- echo "Running as :"
- whoami
- # Navigate to destination.
- cd /mnt/builds
- # Remove current file if exists.
- if [ -f "$filename" ]; then rm "$filename"; fi
- # Copy latest version of file.
- cp ${WORKSPACE}/output/"$filename" .
- # Create archive directory if necessary.
- testdate=${BUILD_ID}
- filedate=`echo "$testdate" | cut -d '_' -f1`
- if [ -d "$filedate" ]; then echo "$filedate" exists; else mkdir "$filedate"; fi
- cd "$filedate"
- # Remove archive file if exists.
- archfile=${SVN_REVISION}_"$filename"
- if [ -f "$archfile" ]; then rm "$archfile"; fi
- # Copy archive version of file.
- cp ${WORKSPACE}/output/"$filename" ./"$archfile"
- echo "Copying $filename to /mnt/builds now COMPLETE..."
- echo Finished
Errors
iOS automated builds may encounter errors if the build server is not completely setup.
Code Sign Errors
There are no valid certificate/private key pairs in the default keychain
Open "Keychain Access" application. Finder | Applications | Utilities | Keychain Access
Click login tab (top right) | Right click "iPhone Developer YOUR NAME" | Choose Copy
Click System tab | Right click in area | Choose Paste 2 items
Note: you may need to repeat with the "iPhone Distribution YOUR NAME" certificate.
Provisioning profile 'xxxxx-xxxx-xxxx-xxxxx' can't be found
Copy your username mobile device provisioning profile to the shared Jenkins folder:
Launch Terminal window to copy provisioning profile. Type the following (as root):
Copy /Users/username/Library/MobileDevice folder TO /Users/Shared/Jenkins
Copy /Users/username/Library/MobileDevice folder TO /System/Library
FAILED TO establish the default connection to the WindowServer, _CGSDefaultConnection() is NULL
If you encounter this error then Jenkins wants to run as its own private user instead of Mac OS/X.
Create slave node on Jenkins thus the Unity process can connect as Mac OS/X user accordingly:
Main dashboard | Click Manage Jenkins | Click Manage Nodes | New Node
| Node name | Unity3D |
| Dumb slave | Checked |

Configure
| Name | Unity3D |
| # of executors | 2 |
| Remote root directory | /Users/username/JenkinsNode |
| Usage | Leave this machine for tied Jobs only |
| Launch method | Launch slave agents via Java Web Start |
| Availability | Keep this slave on-line as much as possible |
UnityException: Launching iOS project via Xcode4 failed. Check editor log for details
If you are using Unity 4.3.* and Xcode 5.1.* then you may possibly receive this error.
Manually edit Xcode plugin metadata Info.plist file for Unity and add the missing key:
Launch Terminal window. Type the following (as root):
cd /Applications/Unity/Unity.app/Contents/BuildTargetTools
cd iPhonePlayer/Unity4XC.xcplugin/Contents
vi Info.plist | Search for DVTPlugInCompatibilityUUIDs | Add key:
<string>A2E4D43F-41F4-4FB9-BB94-7177011C9AED</string>
UnityException: Launching iOS project via Xcode4 failed. Check editor log for details
If you are using Unity 4.5.* and Xcode 6.0.* then you may possibly receive this error.
Manually edit Xcode plugin metadata Info.plist file for Unity and add the missing key:
Launch Terminal window. Type the following (as root):
cd /Applications/Unity/Unity.app/Contents/PlaybackEngines
cd iOSSupport/Tools/OSX/Unity4XC.xcplugin/Contents
vi Info.plist | Search for DVTPlugInCompatibilityUUIDs | Add key:
<string>C4A681B0-4A26-480E-93EC-1218098B9AA0</string>
Deploy
After the iOS build is successful, deploy packaged game code once to multiple devices:
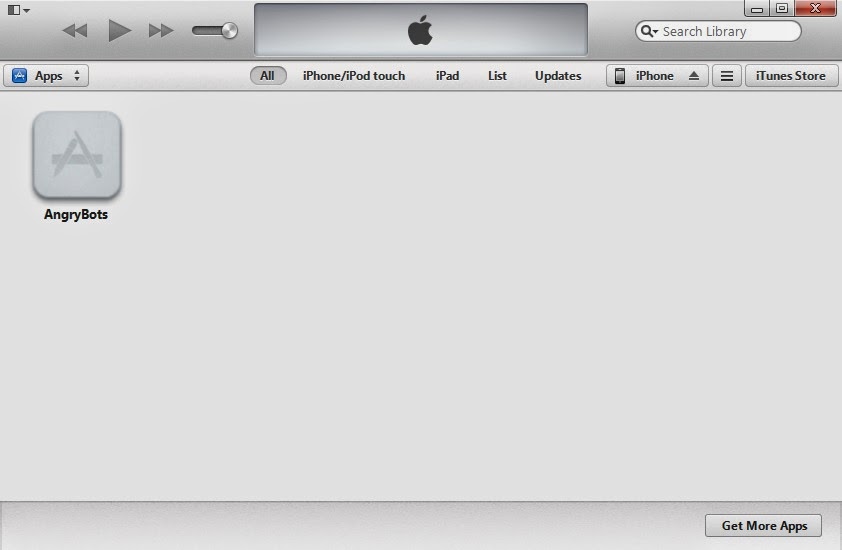
Connect an iOS device to your PC | Launch iTunes | Click the top left drop down arrow
Add File to Library...| Navigate to \\ARCHIVE-SERVER\Shared | Double click AngryBotsIOS.ipa
 Click iPhone button | Click Apps button | Click Install button (next to AngryBots) | Click Apply button.
 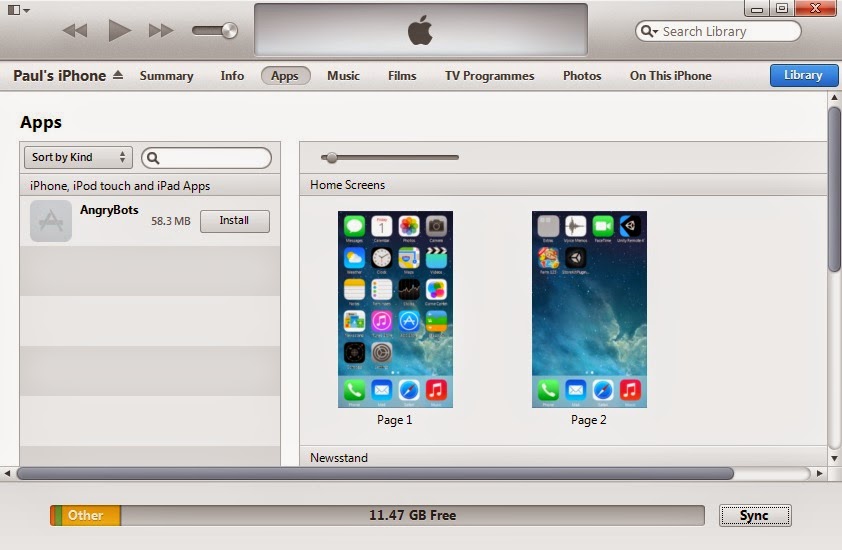 Congratulations! Angry Bots should be installed on your iOS device ready to play.
Summary
The only automated build option outstanding here is an Android build deployed on the Mac.
Fortunately, this is simple: clone iOS build job, remove Xcode build step and modify script.
Clone iOS build
Main dashboard | Click New Item | Enter Item name: AngryBotsAndroid.
Click radio button next to "Copy existing Item". Enter "AngryBotsIOS".
Build | Add build step | Invoke Unity3d Editor
| Unity3d installation name | Unity3D |
| Editor command line arguments: -quit -batchmode -executeMethod PerformBuild.CommandLineBuildOnCheckinAndroid | |
Remove Xcode build step
Scroll down to Xcode | General build settings | Click Delete button.
Modify script.
Make the following changes to shell script to accommodate Android packaged game code:
- # This is the output APK file.
- filename="AngryBotsAndroid.APK"
- echo "Copying $filename to /mnt/builds now STARTING..."
- echo "Running as :"
- whoami
- # Navigate to destination.
- cd /mnt/builds
- # Remove current file if exists.
- if [ -f "$filename" ]; then rm "$filename"; fi
- # Copy latest version of file.
- cp ${WORKSPACE}/"$filename" .
- # Create archive directory if necessary.
- testdate=${BUILD_ID}
- filedate=`echo "$testdate" | cut -d '_' -f1`
- if [ -d "$filedate" ]; then echo "$filedate" exists; else mkdir "$filedate"; fi
- cd "$filedate"
- # Remove archive file if exists.
- archfile=${SVN_REVISION}_"$filename"
- if [ -f "$archfile" ]; then rm "$archfile"; fi
- # Copy archive version of file.
- cp ${WORKSPACE}/"$filename" ./"$archfile"
- echo "Copying $filename to /mnt/builds now COMPLETE..."
- echo Finished
In conclusion, Continuous Integration has many advantages; one of which of course is stability: an automated build process constantly checks state of the code and immediately reports build errors.
The timeliness of this feedback is critical for maintaining stable code. Especially for software being regularly deployed to multiple devices; most of which avail to frequent online mobile store updates!


 92
92

 被折叠的 条评论
为什么被折叠?
被折叠的 条评论
为什么被折叠?
 到【灌水乐园】发言


