


安装包下载
https://desktop.docker.com/win/main/amd64/Docker%20Desktop%20Installer.exe
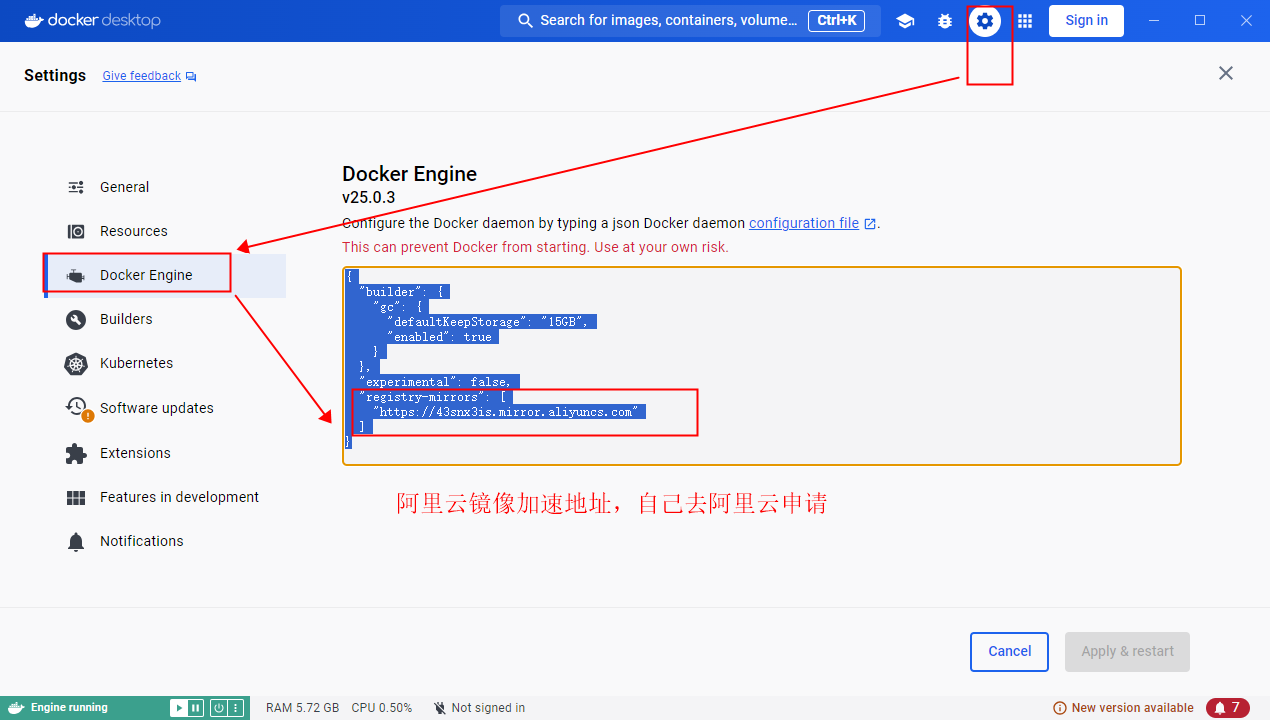
docker应用管理工具,选择性安装
https://www.rainbond.com/docs/quick-start/quick-install
https://www.bilibili.com/video/BV1MZ4y1b7wW/?p=2&spm_id_from=pageDriver&vd_source=b44203991b8ee2e43d764088707392f5
Rabbitmq 安装命令
docker run -d --hostname rabbitmq --name rabbitmq -p 15672:15672 -p 5672:5672 rabbitmq:latest
docker exec -it rabbitmq /bin/bash -c "rabbitmq-plugins enable rabbitmq_management"
1. 运行RabbitMQ容器
docker run -d --name rabbitmq -p 5672:5672 -p 15672:15672 rabbitmq:3-management
2. 进入RabbitMQ容器
docker exec -it rabbitmq bash
3. 使用rabbitmqctl命令创建用户
rabbitmqctl add_user yaya yaya
rabbitmqctl set_user_tags yaya administrator
rabbitmqctl set_permissions -p / yaya ".*" ".*" ".*"
REDIS
docker run -d --name myredis -p 6379:6379 redis --requirepass "123456"
Nginx etc/nginx/conf.d/default.conf, etc/nginx/nginx.conf
server {
    listen       20005;
    server_name  localhost;

    client_max_body_size 100M;

    set $cache max-age=86400;
    location / {
        root   /usr/share/nginx/html;
        #解决页面刷新404问题
        try_files $uri $uri/ @router;
        index  index.html index.htm;

        add_header Access-Control-Allow-Origin *;
        add_header Cache-Control $cache;
        add_header Access-Control-Allow-Methods 'GET, POST, OPTIONS';
        add_header Access-Control-Allow-Headers 'DNT,X-Mx-ReqToken,Keep-Alive,User-Agent,X-Requested-With,If-Modified-Since,Cache-Control,Content-Type,Authorization';

        if ($request_method = 'OPTIONS') {
            return 204;
        }
    }

    # 由于路由的资源不一定是真实的路径,无法找到具体文件
    # 所以需要将请求重写到 index.html 中,然后交给真正的 Vue 路由处理请求资源
    location @router {
        add_header Cache-Control $cache;
        rewrite ^.*$ /index.html last;
    }

    # 关键步骤,这里表示将所有的 http://172.18.1.82:80/api/ 开头的请求都转发到下面 proxy_pass 指定的链接中
    # 为了防止在访问页面时请求就被 Nginx 代理转发,这里需要更具体的配置,才能和前端访问请求区分开
    location /api/ {
        # 后端的真实接口
        proxy_pass http://localhost:8000/;
        proxy_redirect off;
        proxy_set_header Host $host;
        proxy_set_header X-Real-IP $remote_addr;
        proxy_set_header X-Forwarded-For $proxy_add_x_forwarded_for;
        proxy_set_header   Cookie $http_cookie;
        # for Ajax
        #fastcgi_param HTTP_X_REQUESTED_WITH $http_x_requested_with;
        proxy_set_header HTTP-X-REQUESTED-WITH $http_x_requested_with;
        proxy_set_header HTTP_X_REQUESTED_WITH $http_x_requested_with;
        proxy_set_header x-requested-with $http_x_requested_with;
        client_max_body_size 100m;
        client_body_buffer_size 128k;
        proxy_connect_timeout 90;
        proxy_send_timeout 90;
        proxy_read_timeout 90;
        proxy_buffer_size 128k;
        proxy_buffers 32 32k;
        proxy_busy_buffers_size 128k;
        proxy_temp_file_write_size 128k;
    }
}
user  nginx;
worker_processes  auto;

error_log  /var/log/nginx/error.log notice;
pid        /var/run/nginx.pid;


events {
    worker_connections  1024;
}


http {
    include       /etc/nginx/mime.types;
    default_type  application/octet-stream;

    log_format  main  '$remote_addr - $remote_user [$time_local] "$request" '
                      '$status $body_bytes_sent "$http_referer" '
                      '"$http_user_agent" "$http_x_forwarded_for"';

    access_log  /var/log/nginx/access.log  main;

    sendfile        on;
    #tcp_nopush     on;

    keepalive_timeout  65;

    #gzip  on;

    # 开启和关闭gzip模式
    gzip on;
    # gizp压缩起点,文件大于1k才进行压缩
    gzip_min_length 1k;
    # 设置压缩所需要的缓冲区大小,以4k为单位,如果文件为7k则申请2*4k的缓冲区
    gzip_buffers 4 16k;
    # 设置gzip压缩针对的HTTP协议版本
    gzip_http_version 1.0;
    # gzip 压缩级别,1-9,数字越大压缩的越好,也越占用CPU时间
    gzip_comp_level 5;
    # 进行压缩的文件类型
    gzip_types text/plain application/x-javascript text/css application/xml text/javascript application/x    -httpd-php application/javascript application/json;
    # 是否在http header中添加Vary: Accept-Encoding,建议开启
    gzip_vary on;

    include /etc/nginx/conf.d/*.conf;
}
拉去前端文件放Nginx里面
源:/root/home/web
目的:C:\Users\admin\Desktop\yaya_nginx\web
各个文件夹dist解压到dist:比如
C:\Users\admin\Desktop\yaya_nginx\nginx\nginx-erp\dist.zip 压缩文件
C:\Users\admin\Desktop\yaya_nginx\nginx\nginx-erp\dist 文件夹
NGINX批量启动脚本和停止
@echo off
set nginx_path=C:\Users\admin\Desktop\yaya_nginx\nginx

cd "%nginx_path%\nginx-scm
start  "nginx" "%nginx_path%\nginx-scm\nginx.exe"
cd ../nginx-ums
start  "nginx" "%nginx_path%\nginx-ums\nginx.exe"
cd ../nginx-erp
start  "nginx" "%nginx_path%\nginx-erp\nginx.exe"
cd ../nginx-mes
start  "nginx" "%nginx_path%\nginx-mes\nginx.exe"
cd ../nginx-plm
start  "nginx" "%nginx_path%\nginx-plm\nginx.exe"

timeout10

@echo off
taskkill /f /im nginx.exe
exit


 3140
3140

 被折叠的 条评论
为什么被折叠?
被折叠的 条评论
为什么被折叠?
 到【灌水乐园】发言


