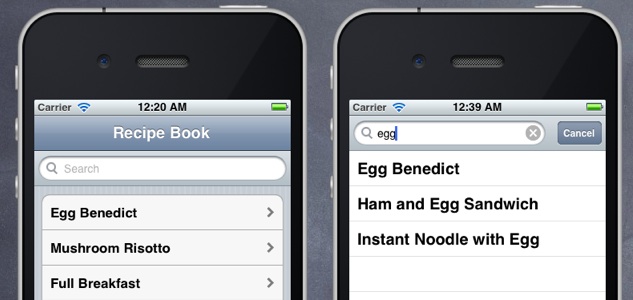
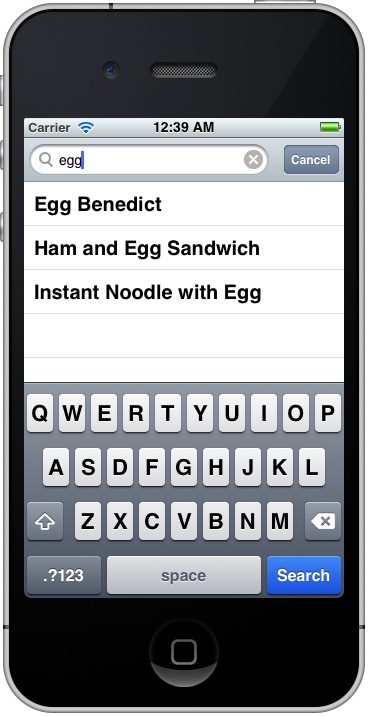
One common questions I got about UITableView is how to implement a search bar for data searching. This tutorial will show how to add a search bar to the Tab Bar project. With the search bar, the app lets users search through the recipe list by specifying a search term.
Well, it’s not difficult to add a search bar but it takes a little bit of extra work. We’ll continue to work on the Xcode project we developed in the previous tutorial. If you haven’t gone through the tutorial, take some time to check it out or you can download the project here.

Understanding Search Display Controller
You can use search display controller (i.e. UISearchDisplayController class) to manage search in your app. A search display controller manages display of a search bar and a table view that displays the results of a search of data.
When a user starts a search, the search display controller will superimpose the search interface over the original view and display the search results. Interestingly, the results are displayed in a table view that’s created by the search display controller.

Search Results Table View vs Table View
Like other view controllers, you can either programmatically create the search display controller or simply add it into your app using Storyboard. In this tutorial, we’ll use the later approach.
Adding a Search Display Controller in Storyboard
In Storyboard, drag and add the “Search Bar and Search Display Controller” right below the navigation bar of Recipe Book View Controller. If you’ve done correctly, you should have a screen similar to the below:

Adding Search Display Controller
Before proceeding, try to run the app and see how it looks. Without implementing any new code, you already have a search bar. Tapping the search bar will bring you to the search interface. Yet, the search won’t give you the correct search result.

Search Bar in Table View App But Not Working Yet
We Did Nothing but Why Search Results Show All Recipes?
As mentioned earlier, the search results are displayed in a table view created by the search display controller. When developing the table view app, we implement the UITableViewDataSource protocol to tell Table View how many rows to display and the data in each row.
Like UITableView, the table view created by the search display controller adopts the same approach. By referring to the official documentation of UISearchDisplayController, here are the available delegates that let you interact with the search result and search bar:
The search results table view’s data source.
This object is responsible for providing the data for the results table.The search results table view’s delegate.
This object is responsible for, amongst other things, responding to the user’s selection of an item in the results table.The search display controller’s delegate.
The delegate conforms to the UISearchDisplayDelegate protocol. It is notified of events such as when the search starts or ends, and when the search interface is displayed or hidden. As a convenience, it may also be told about changes to the search string or search scope, so that the results table view can be reloaded.The search bar’s delegate.
This object is responsible for responding to changes in the search criteria.
Typically, the original view controller is used as the source object for the search results data source and delegate. You do not need to manually link up the data source and delegate with the view controller. As you insert the search bar into the view of Recipe Book View Controller, the appropriate connections to the search display controller are automatically configured. You can press the “control” key and click on the “Search Display Controller” to reveal the connections.

Search Display Controller Connections
Both table views (i.e. the table view in Recipe Book View Controller and the search result table view) shares the same view controller to handle data population. If you refer to the code, these are the two methods being invoked when displaying table data:
|
1
2 3 4 5 6 7 8 9 10 11 12 13 14 15 16 17 18 |
-
(NSInteger
)tableView
:
(UITableView
*
)tableView numberOfRowsInSection
:
(NSInteger
)section
{ return [recipes count ]; } - (UITableViewCell * )tableView : (UITableView * )tableView cellForRowAtIndexPath : ( NSIndexPath * )indexPath { static NSString *simpleTableIdentifier = @ "RecipeCell"; UITableViewCell *cell = [tableView dequeueReusableCellWithIdentifier :simpleTableIdentifier ]; if (cell == nil ) { cell = [ [UITableViewCell alloc ] initWithStyle :UITableViewCellStyleDefault reuseIdentifier :simpleTableIdentifier ]; } cell.textLabel.text = [recipes objectAtIndex :indexPath.row ]; return cell; } |
This explains why the search results show a full list of recipes regardless of your search term.
Implementing Search Filter
Obviously, to make the search works, there are a couple of things we have to implement/change:
- Implement methods to filter the recipe names and return the correct search results
- Change the data source methods to differentiate the table views. If the tableView being passed is the table view of Recipe Book View Controller, we show all recipes. On the other hand, if it’s a search result table view, only the search results are displayed.
First, we’ll show you how to implement the filter. Here we have an array to store all recipes. We create another array to store the search results. Let’s name it as “searchResults”.
Next, add a new method to handle the search filtering. Filtering is one of the common tasks in iOS app. The straightforward way to filter the list of recipes is to loop through all the names and filter the result with the if-statement. There is nothing wrong with such implementation. But iOS SDK offers a better way known as Predicate to handle search queries. By using NSPredicate (which is an object representation of a predicate), you write less code. With just two lines of code, it searches through all recipes and returns the matched results.
|
1
2 3 4 5 6 7 8 |
-
(
void
)filterContentForSearchText
:
(
NSString
*
)searchText scope
:
(
NSString
*
)scope
{ NSPredicate *resultPredicate = [ NSPredicate predicateWithFormat : @ "SELF contains[cd] %@", searchText ]; searchResults = [recipes filteredArrayUsingPredicate :resultPredicate ]; } |
Basically, a predicate is an expression that returns a Boolean value (true or false). You specify the search criteria in the format of NSPredicate and use it to filter data in the array. NSArray provides filteredArrayUsingPredicate: method which returns a new array containing objects that match the specified predicate. The SELF keyword in the predicate “SELF contains[cd] %@” refers to the objects being evaluated (i.e. recipes). The operator “[cd]” means the comparison is case- and diacritic-insensitive.
Implementing Search Display Controller Delegate
Now we’ve created a method to handle the data filtering. But when should it be called? Apparently the filterContentForSearchText: method is invoked when user keys in the search term. The UISearchDisplayController class comes with a shouldReloadTableForSearchString: method which is automatically called every time the search string changes. So add the following method in the RecipeBookViewController.m:
|
1
2 3 4 5 6 7 8 9 10 |
-
(
BOOL
)searchDisplayController
:
(UISearchDisplayController
*
)controller
shouldReloadTableForSearchString : ( NSString * )searchString { [self filterContentForSearchText :searchString scope : [ [self.searchDisplayController.searchBar scopeButtonTitles ] objectAtIndex : [self.searchDisplayController.searchBar selectedScopeButtonIndex ] ] ]; return YES; } |
Display Search Results in searchResultsTableView
As explained earlier, we have to change the data source methods as to differentiate the table views (i.e. the table view in Recipe Book View Controller and the search result table view). It’s pretty easy to differentiate the table view. We simply compare the tableView object against the “searchResultsTableView” of the “searchDisplayController”. If the comparison is positive, we display the search results instead of all recipes. Here are the changes of the two methods:
|
1
2 3 4 5 6 7 8 9 10 11 12 13 14 15 16 17 18 19 20 21 22 23 24 25 26 27 28 29 |
-
(NSInteger
)tableView
:
(UITableView
*
)tableView numberOfRowsInSection
:
(NSInteger
)section
{ if (tableView == self.searchDisplayController.searchResultsTableView ) { return [searchResults count ]; } else { return [recipes count ]; } } - (UITableViewCell * )tableView : (UITableView * )tableView cellForRowAtIndexPath : ( NSIndexPath * )indexPath { static NSString *simpleTableIdentifier = @ "RecipeCell"; UITableViewCell *cell = [tableView dequeueReusableCellWithIdentifier :simpleTableIdentifier ]; if (cell == nil ) { cell = [ [UITableViewCell alloc ] initWithStyle :UITableViewCellStyleDefault reuseIdentifier :simpleTableIdentifier ]; } if (tableView == self.searchDisplayController.searchResultsTableView ) { cell.textLabel.text = [searchResults objectAtIndex :indexPath.row ]; } else { cell.textLabel.text = [recipes objectAtIndex :indexPath.row ]; } return cell; } |
Test the App Again
Once you complete the above changes, test your app again. Now the search bar should work properly!

Handling Row Selection in Search Results
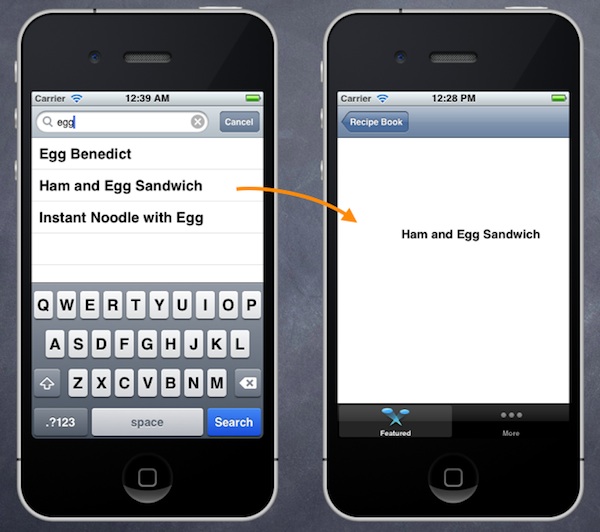
Despite the search works, it doesn’t respond to your row selection. We want to make it work like the recipe table view. When user taps on any of the search results, it’ll transit to the detail view displaying the name of selected recipe.
Earlier, we use Segue to link up the recipe table cell and detail view. (If you forgot how it was done, revisit the Segue tutorial to see how it works.)
Obviously, we have to create another Segue in Storyboard to define the transition between the search result and detail view. The problem is we can’t do that. The search result table view is a private variable of search display controller. It’s impossible to handle the row selection of the search results using Storyboard.
The search display table view, however, lets you interact with the user’s selection of the results table by using a delegate. When the user selects a row, the didSelectRowAtIndexPath: method will be called. Therefore, what we have to do is to implement the method:
|
1
2 3 4 5 6 |
-
(
void
)tableView
:
(UITableView
*
)tableView didSelectRowAtIndexPath
:
(
NSIndexPath
*
)indexPath
{ if (tableView == self.searchDisplayController.searchResultsTableView ) { [self performSegueWithIdentifier : @ "showRecipeDetail" sender : self ]; } } |
We simply invoke the performSegueWithIdentifier: method to manually trigger the “showRecipeDetail” segue. Before proceeding, try to run the app again. When you select any of the search results, the app shows the detail view with a recipe name. But the name is not always correct.
Referring to the prepareForSegue: method, we use the “indexPathForSelectedRow” method to retrieve the indexPath of the selected row. As mentioned earlier, the search results are displayed in a separate table view. But in our original prepareForSegue: method, we always retrieve the selected row from the table view of Recipe Book View Controller. That’s why we got the wrong recipe name in detail view. To make the selection of search results properly, we have to tweak the prepareForSegue: method:
|
1
2 3 4 5 6 7 8 9 10 11 12 13 14 15 16 17 |
-
(
void
)prepareForSegue
:
(UIStoryboardSegue
*
)segue sender
:
(
id
)sender
{
if ( [segue.identifier isEqualToString : @ "showRecipeDetail" ] ) { RecipeDetailViewController *destViewController = segue.destinationViewController; NSIndexPath *indexPath = nil; if ( [self.searchDisplayController isActive ] ) { indexPath = [self.searchDisplayController.searchResultsTableView indexPathForSelectedRow ]; destViewController.recipeName = [searchResults objectAtIndex :indexPath.row ]; } else { indexPath = [self.tableView indexPathForSelectedRow ]; destViewController.recipeName = [recipes objectAtIndex :indexPath.row ]; } } } |
We first determine if the user is using search. When searching, we retrieve the indexPath from searchResultsTableView, which is the table view for search results. Otherwise, we just get the indexPath from the table view of Recipe Book View Controller.
That’s it. Run the app again and the search selection should work as expected.

Tell Us What You Think
Hope you find this tutorial useful. If you like the tutorial and have any ideas about future tutorial, leave us comment and tell us what you think. We need your support to keep publishing free tutorials ![]()
转载:http://www.appcoda.com/how-to-add-search-bar-uitableview/


 2万+
2万+

 被折叠的 条评论
为什么被折叠?


