vue的组件进阶
如何自由切换两个组件呢?我们首先想到的是用v-if。在此介绍其他的方法。
目标是动态组件- 切换组件显示,同一个挂载点要切换不同组件的显示。
<template>
  <div>
      <button @click="comName = 'UserName'">账号密码填写</button>
      <button @click="comName = 'UserInfo'">个人信息填写</button>

      <p>下面显示注册组件-动态切换:</p>
      <div style="border: 1px solid red;">
          <component :is="comName"></component>
      </div>
  </div>
</template>
import UserName from '../components/01/UserName'
import UserInfo from '../components/01/UserInfo'
export default {
    data(){
        return {
            comName: "UserName"
        }
    },
    components: {
        UserName,
        UserInfo
    }
}
对上述代码的解答为通过设置挂载点component,来动态显示要挂载的组件,其中comName的值为要显示的组件名。但是按照这种方法,面临一个问题。频繁的切换会不会导致组件创建和销毁呢?如何避免这个问题呢?
采用组件缓存技术。把vue内置的keep-alive组件把要缓存的组件包起来。扩展两个新的生命周期钩子函数,一个是在组件激活时触发,一个是失去激活时触发
          <keep-alive>
              <component :is="comName"></component>
          </keep-alive>
<script>
export default {
    created(){
        console.log("02-UserName-创建");
    },
    destroyed(){
        console.log("02-UserName-销毁");
    },
    // 组件缓存下 - 多了2个钩子函数
    activated(){
        console.log("02-UserName-激活");
    },
    deactivated(){
        console.log("02-UserName-失去激活");
    }
}
</script>
组件插槽的概念:通过slot标签,让组件内可以接受不同的标签结构显示,其中slot可以用name属性起名字
    <!-- 下拉内容 -->
    <div class="container" v-show="isShow">
     <slot>默认显示的内容</slot>
    </div>
在另外一个组件内使用Pannel关键字来封装标签中的内容。注意的是如果Pannel中没有内容则会显示默认内容。不给组件传标签,slot内容原地显示。给组件内传标签,则slot整体被换掉。
<template>
  <div id="container">
    <div id="app">
      <h3>案例:折叠面板</h3>
      <Pannel>
          <img src="../assets/mm.gif" alt="">
          <span>我是内容</span>
      </Pannel>
      <Pannel>
          <p>寒雨连江夜入吴,</p>
          <p>平明送客楚山孤。</p>
          <p>洛阳亲友如相问,</p>
          <p>一片冰心在玉壶。</p>
      </Pannel>
      <Pannel></Pannel>
    </div>
  </div>
</template>
下面介绍另一种使用插槽的情况。我们在一个组件中,如果有多个slot那么该如何区分呢?
我们给每个slot分别命名。然后在Pannel中我们使用template配合v-slot来区分对应标签内容。
<template>
  <div>
    <!-- 按钮标题 -->
    <div class="title">
      <slot name="title"></slot>
      <span class="btn" @click="isShow = !isShow">
        {{ isShow ? "收起" : "展开" }}
      </span>
    </div>
    <!-- 下拉内容 -->
    <div class="container" v-show="isShow">
     <slot name="content"></slot>
    </div>
  </div>
</template>
就比如我在一个组件中使用了两处插槽,分别命名为title和content,那么我在Pannel组件中使用对应的v-slot或者#就可以声明每个template对应那个具体的slot
      <Pannel>
        <template v-slot:title>
          <h4>芙蓉楼送辛渐</h4>
        </template>
        <template v-slot:content>
          <img src="../assets/mm.gif" alt="">
          <span>我是内容</span>
        </template>
      </Pannel>
接下来介绍一种作用域插槽。当我们不能直接在Pannel中用另外一个组件的变量时,可以采用作用域插槽,要实现的目标是插槽默认内容为无名氏,最后传递来的值为小传同学

子组件内,在slot上绑定属性和子组件内的值;使用组件,传入自定义标签,用template和v-slot;scope变量名自动绑定slot上所有属性和值。因此这个变量是非常关键的设置点
    <div class="container" v-show="isShow">
     <slot :row="defaultObj">{{ defaultObj.defaultOne }}</slot>
    </div>

          <Pannel>
        <!-- 需求: 插槽时, 使用组件内变量 -->
        <!-- scope变量: {row: defaultObj} -->
        <template v-slot="scope">
          <p>{{ scope.row.defaultTwo }}</p>
        </template>
      </Pannel>
下面介绍作用域插槽的使用场景,可以让组件更加灵活的使用于各种场合。比如有一个链接,默认采用组件显示的效果如下

也就是说图片的地址显示的就是文字,现在我有两个业务需求,我想把这个地址高亮或者把这些地址转化为具体的图片,这时候就需要用到作用域插槽。
<slot :row="obj">
<!-- 默认值给上,如果使用组件不自定义标签显示默认文字 -->
{{ obj.headImgUrl}}
</slot>

    <MyTable :arr="list">
        <!-- scope: {row: obj} -->
       <template v-slot="scope">
            <a :href="scope.row.headImgUrl">{{ scope.row.headImgUrl }}</a>
       </template>
    </MyTable>

    <MyTable :arr="list">
       <template v-slot="scope">
            <img style="width: 100px;" :src="scope.row.headImgUrl" alt="">
       </template>
    </MyTable>
自定义指令
vue的内置指令不满足要求,能否自己定义一些指令来使用。

 <input type="text" v-focus>
     directives: {
        focus: {
            inserted(el){
                el.focus()
            }
        }
    }
页面在刷新时开始自动聚焦。那么指令能不能传值呢?
<p v-color="colorStr">修改文字颜色</p>
    data(){
        return {
            colorStr: 'red'
        }
    },
tabbar案例

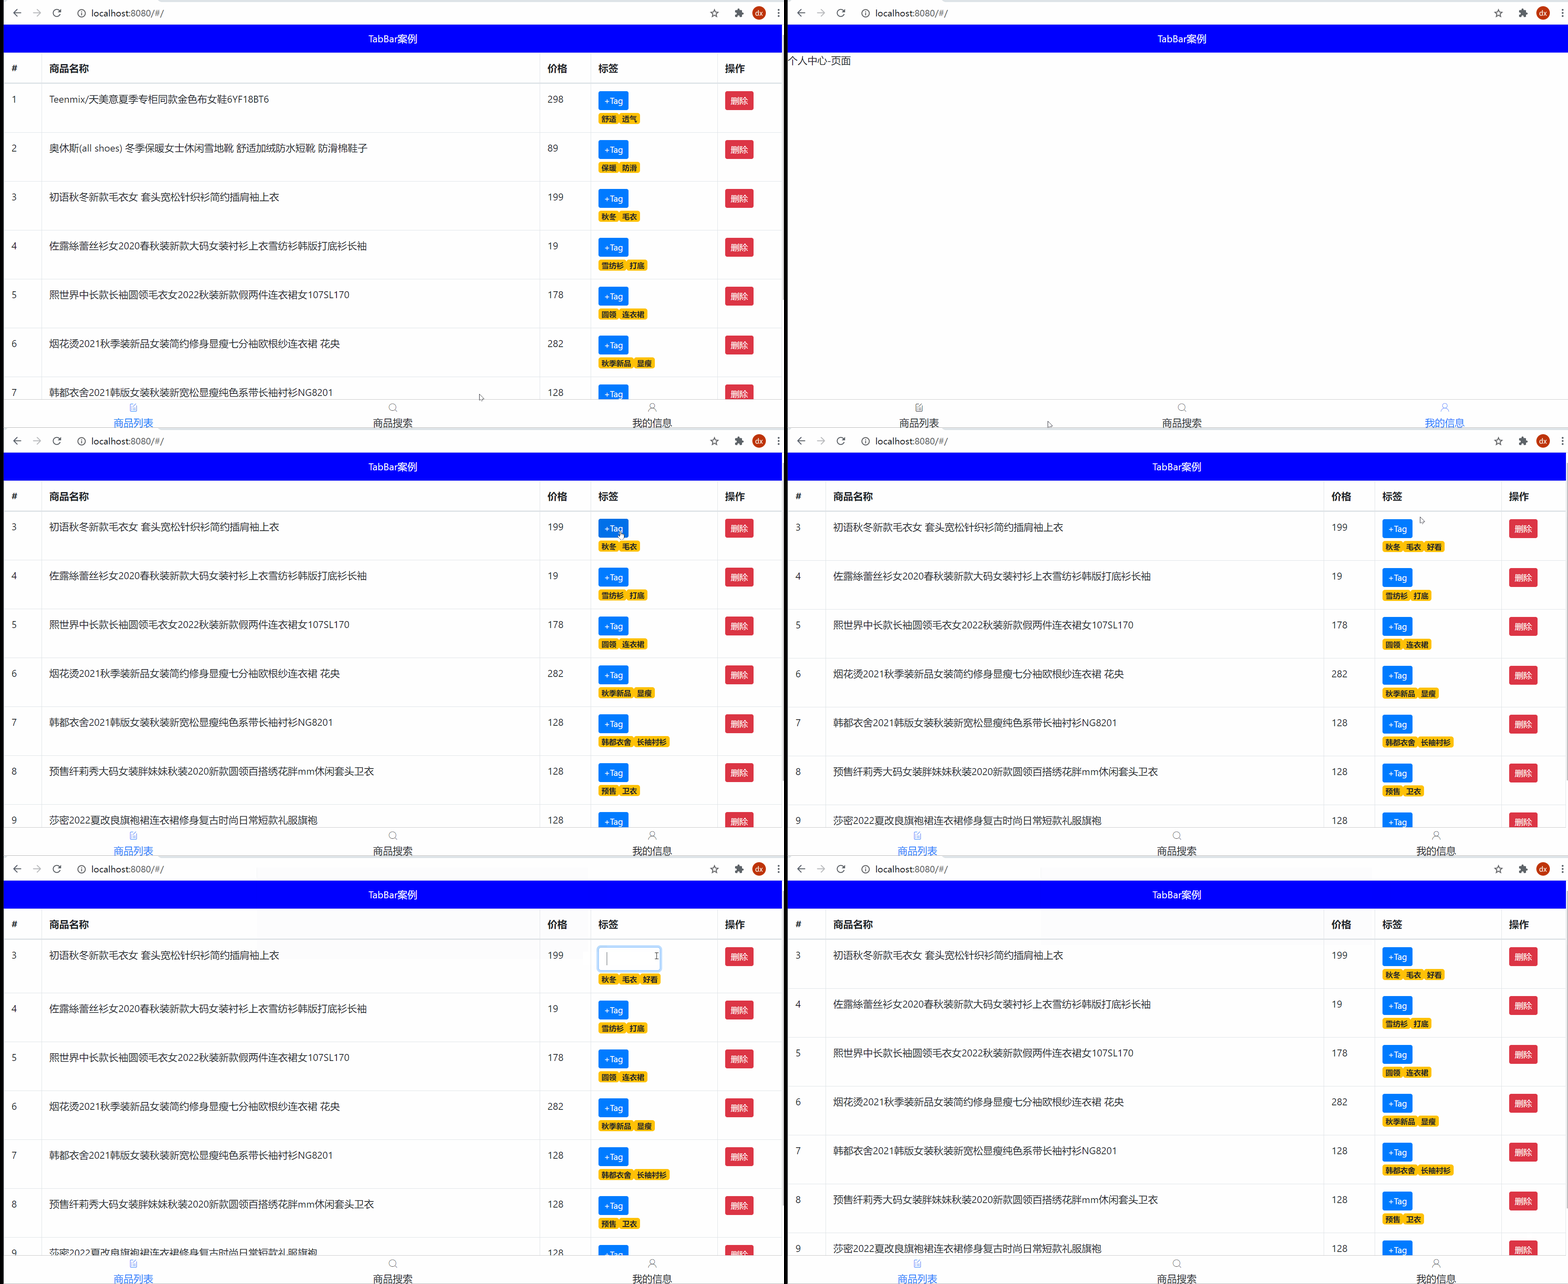
实现如上实例效果。首先来拆分模块。
MyHeader MyTabBar MyTable三个组件。其中设计到MyTable中有三个切换页面,分别是商品列表,商品搜索,我的信息。因此我们可以采用组件插槽的形式。在MyTable中将对应位置的东西空出来,用slot来表示,在剩下三个页面中引入MyTable组件,并且用template来接受。
MyHeader模块思路是设置动态样式,并且用background和fontColor来接受,并且这是从APP模块传递过来的值,因此用props来接收
<template>
  <div class="my-header"
    :style="{backgroundColor: background, color: fontColor}"
  >{{ title }}</div>
</template>
export default {
  props: {
    background: String, // 变量名: 类型校验 (因为外部使用者不知道应该传什么类型, 所以最好给一个检验规则)
    fontColor: {
      type: String, // 修饰变量值的类型必须是字符串类型
      default: "#fff" // 当外部不给fontColor变量赋值, 使用默认值
    },
    title: {
      type: String,
      required: true // 这个变量使用者必须传入值
    }
  }
}
    <MyHeader
      :background="'blue'"
      :fontColor="'white'"
      title="TabBar案例"
    ></MyHeader>
在底部MyTabBar组件中,首先接收从APP中传过来的数据
    <MyTabBar :arr="tabList"
    @changeCom="changeComFn"
    ></MyTabBar>

      tabList: [ // 底部导航的数据
        {
          iconText: "icon-shangpinliebiao",
          text: "商品列表",
          componentName: "MyGoodsList",
        },
        {
          iconText: "icon-sousuo",
          text: "商品搜索",
          componentName: "MyGoodsSearch",
        },
        {
          iconText: "icon-user",
          text: "我的信息",
          componentName: "MyUserInfo",
        },
      ],
其中主要的逻辑思路是
    <div
      class="tab-item"
      v-for="(obj, index) in arr"
      :key="index"
      @click="btn(index, obj)"
      :class="{ current: index === selIndex }"
    >
      <!-- 图标 -->
      <span class="iconfont" :class="obj.iconText"></span>
      <!-- 文字 -->
      <span>{{ obj.text }}</span>
       </div>
用v-for遍历从APP中传过来的数据,并且用index作为Key值。设置点击事件,并且动态设置高亮属性,也就是当前index如果和设置的setIndex相同,则高亮,setIndex默认设置为0.表示第一个高亮。并且在点击事件btn中,改变setIndex的值,并且要实现切换组件的功能,因此通过子传父,把这个组件的名字传递给父亲。
  data() {
    return {
      selIndex: 0, // 默认第一个高亮
    };
  },
  methods: {
    btn(index, theObj) {
      this.selIndex = index; // 点谁, 就把谁的索引值保存起来
      this.$emit("changeCom", theObj.componentName); // 要切换的组件名传App.vue
    },
  },

  methods: {
    changeComFn(cName){

      this.comName = cName; // MyTabBar里选出来的组件名赋予给is属性的comName
      // 导致组件的切换
    }
  }
接下来就是Table模块。采用table>thead>tr>th table>tbody>tr>td的结构来进行表格构造。需要注意的是把th td等具体的内容封装成slot。而不是封装tr
<table class="table table-bordered table-stripped">
    <!-- 表格标题区域 -->
    <thead>
      <tr>
        <slot name="header"></slot>
      </tr>
    </thead>
    <!-- 表格主体区域 -->
    <tbody>
      <tr v-for="obj in arr"
      :key="obj.id"
      >
        <slot name="body" :row="obj"></slot>
      </tr>
    </tbody>
  </table>
在商品页面中,在cretaed周期中发起axios请求,并且将数据保存到list中,传入组件里循环tr展示数据
  data() {
    return {
      list: [] // 所有数据
    };
  },
  created() {
    axios({
      url: "/api/goods",
    }).then((res) => {
      console.log(res);
      this.list = res.data.data;
    });
  },
引入MyTable组件,并且传入list 其中将header命名的插槽用如下内容替换。将bosy插槽用具体数据替换。并且用scope来接收数据。
    <MyTable :arr="list">
      <template #header>
        <th>#</th>
        <th>商品名称</th>
        <th>价格</th>
        <th>标签</th>
        <th>操作</th>
      </template>
      <template #body="scope">
        <td>{{ scope.row.id }}</td>
        <td>{{ scope.row.goods_name }}</td>
        <td>{{ scope.row.goods_price }}</td>
      </template>
      </MyTable>
其中最重要的两个td是 添加标签和删除操作,下面就这两个标签进行详细讲解。
添加标签中存放的是Input button和span。其中采用inputvisible这个变量来控制显示。在button中绑定点击事件,用来改变变量的值,在输入框中绑定鼠标离开事件blur 以及键盘enter确定事件意见键盘esc取消事件。当鼠标离开时就把变量设置为false表示隐藏input标签。当enter键时,触发相关事件,当esc键时,将输入框中的内容清空
          <input
          type="text"
          v-if="scope.row.inputVisible"
          v-focus
          @blur="scope.row.inputVisible = false"
          @keydown.enter="enterFn(scope.row)"
          v-model="scope.row.inputValue"
          @keydown.esc="scope.row.inputValue = ''"
          />
          <button
          v-else
          @click="scope.row.inputVisible = true"
          >+Tag</button>
          <span v-for="(str, ind) in scope.row.tags" :key="ind"
          >
            {{ str }}
          </span>
          //下面为回车事件
      enterFn(obj){ // 回车
      // console.log(obj.inputValue);
      if (obj.inputValue.trim().length === 0) {
        alert('请输入数据')
        return
      }

      obj.tags.push(obj.inputValue) // 表单里的字符串状态tags数组
      obj.inputValue = ""
    }
将输入的内容Push到对象的tags数组中,并且重置输入框中的内容。最后一个删除功能就非常容易
        <td>
          <button
          @click="removeBtn(scope.row.id)"
          >删除</button>
        </td>
      removeBtn(id){
      let index = this.list.findIndex(obj => obj.id === id)
      this.list.splice(index, 1)
    }
只需要把对应id传过去,在方法中找到id对应的index,并且采用splice方法删除这一列数据即可。


 7282
7282


 被折叠的 条评论
为什么被折叠?


