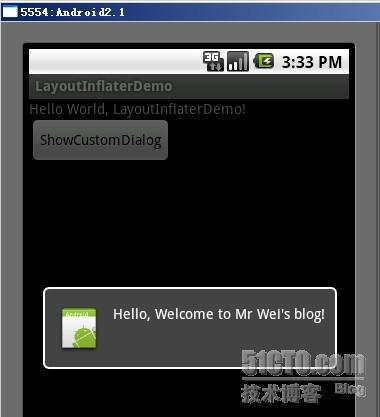
在实际工作中,事先写好的布局文件往往不能满足我们的需求,有时会根据情况在代码中自定义控件,这就需要用到LayoutInflater。
LayoutInflater在Android中是“扩展”的意思,作用类似于findViewById(),不同的是LayoutInflater是用来获得布局文件对象的,而
findViewById()是用来获得具体控件的。LayoutInflater经常在BaseAdapter的getView方法中用到,用来获取整个View并返回。
LayoutInflater的用法有三种:
第一种方法:
- LayoutInflater inflater = LayoutInflater.from(this);
- View layout = inflater.inflate(R.layout.main, null);
第二种方法:
- LayoutInflater inflater = getLayoutInflater();
- View layout = inflater.inflate(R.layout.main, null);
第三种方法:
- LayoutInflater inflater = (LayoutInflater) getSystemService(LAYOUT_INFLATER_SERVICE);
- View layout = inflater.inflate(R.layout.main, null);
第一种方法的本质就是调用第三种方法,而第二种方法和第三种方法有什么区别,我还真不知道,有哪位知道的请留言指教啊!
下面是简单的使用示例:
- public class LayoutInflaterActivity extends Activity {
- private EditText et;
- private Button btn;
- @Override
- public void onCreate(Bundle savedInstanceState) {
- super.onCreate(savedInstanceState);
- // 第一种方法
- LayoutInflater inflater = LayoutInflater.from(this);
- View layout = inflater.inflate(R.layout.main, null);
- // 第二种方法
- // LayoutInflater inflater = getLayoutInflater();
- // View layout = inflater.inflate(R.layout.main, null);
- // 第三种方法
- // LayoutInflater inflater = (LayoutInflater)getSystemService(LAYOUT_INFLATER_SERVICE);
- // View layout = inflater.inflate(R.layout.main, null);
- // 这里是通过事先获得的布局文件来实例化具体控件,并且可以根据情况自定义控件
- et = (EditText) layout.findViewById(R.id.edittext);
- et.setBackgroundColor(Color.YELLOW);
- btn = (Button) layout.findViewById(R.id.btn);
- btn.setBackgroundColor(Color.CYAN);
- // 显示
- setContentView(layout);
- }
- }
另外补充下,getSystemService是Activity中的方法,根据传入的name来取得对应的服务对象,这些服务名称参数都是Context类中的常量:
传入的Name 返回的对象 说明
WINDOW_SERVICE WindowManager 管理打开的窗口程序
LAYOUT_INFLATER_SERVICE LayoutInflater 取得xml里定义的view
ACTIVITY_SERVICE ActivityManager 管理应用程序的系统状态
POWER_SERVICE PowerManger 电源的服务
ALARM_SERVICE AlarmManager 闹钟的服务
NOTIFICATION_SERVICE NotificationManager 状态栏的服务
KEYGUARD_SERVICE KeyguardManager 键盘锁的服务
LOCATION_SERVICE LocationManager 位置的服务,如GPS
SEARCH_SERVICE SearchManager 搜索的服务
VEBRATOR_SERVICE Vebrator 手机震动的服务
CONNECTIVITY_SERVICE Connectivity 网络连接的服务
WIFI_SERVICE WifiManager Wi-Fi服务
TELEPHONY_SERVICE TeleponyManager 电话服务

- view plaincopy to clipboardprint?
- <?xml version="1.0"
- encoding="utf-8"?>
- <LinearLayout
- xmlns:android="http://schemas.android.com/apk/res/android"
- android:orientation="vertical"
- android:layout_width="fill_parent"
- android:layout_height="fill_parent"
- >
- <TextView
- android:layout_width="fill_parent"
- android:layout_height="wrap_content"
- android:text="@string/hello"
- />
- <Button
- android:id="@+id/button"
- android:layout_width="wrap_content"
- android:layout_height="wrap_content"
- android:text="ShowCustomDialog"
- />
- </LinearLayout>
- view plaincopy to clipboardprint?
- <?xml version="1.0"
- encoding="utf-8"?>
- <LinearLayout
- xmlns:android="http://schemas.android.com/apk/res/android"
- android:orientation="horizontal"
- android:layout_width="fill_parent"
- android:layout_height="fill_parent"
- android:padding="10dp"
- >
- <ImageView android:id="@+id/image"
- android:layout_width="wrap_content"
- android:layout_height="fill_parent"
- android:layout_marginRight="10dp"
- />
- <TextView android:id="@+id/text"
- android:layout_width="wrap_content"
- android:layout_height="fill_parent"
- android:textColor="#FFF"
- />
- </LinearLayout>
- view plaincopy to clipboardprint?
- package com.android.tutor;
- import android.app.Activity;
- import android.app.AlertDialog;
- import android.content.Context;
- import android.os.Bundle;
- import android.view.LayoutInflater;
- import android.view.View;
- import android.view.View.OnClickListener;
- import android.widget.Button;
- import android.widget.ImageView;
- import android.widget.TextView;
- public class LayoutInflaterDemo extends Activity implements
- OnClickListener {
- private Button button;
- public void onCreate(Bundle savedInstanceState) {
- super.onCreate(savedInstanceState);
- setContentView(R.layout.main);
- button = (Button)findViewById(R.id.button);
- button.setOnClickListener(this);
- }
- @Override
- public void onClick(View v) {
- showCustomDialog();
- }
- public void showCustomDialog()
- {
- AlertDialog.Builder builder;
- AlertDialog alertDialog;
- Context mContext = LayoutInflaterDemo.this;
- //下面俩种方法都可以
- LayoutInflater inflater = getLayoutInflater();
- LayoutInflater inflater = (LayoutInflater)
- mContext.getSystemService(LAYOUT_INFLATER_SERVICE);
- View layout = inflater.inflate(R.layout.custom_dialog,null);
- TextView text = (TextView) layout.findViewById(R.id.text);
- text.setText("Hello, Welcome to Mr Wei's blog!");
- ImageView image = (ImageView) layout.findViewById(R.id.image);
- image.setImageResource(R.drawable.icon);
- builder = new AlertDialog.Builder(mContext);
- builder.setView(layout);
- alertDialog = builder.create();
- alertDialog.show();
- }
- }
LayoutInflater用法
LayoutInflater是一个用来实例化XML布局为View对象
应用程序运行时会预先加载资源中的布局文件,如果layout布局中的资源比较多,会影响性能,所以可以选择LayoutInflater方式用的时候加载,这样减轻了应用程序运行时很多负担
public View inflate (int resource, ViewGroup root)
从指定的XML资源中填充一个新的视图
参数resource:将要加载的XML布局id,例如R.layout.list_item
参数root:父视图,可选项,一般为Null
public static LayoutInflater from (Context context)
从给定的context获取LayoutInflater
可以通过如下三种方式获取LayoutInflater
第一种:
        LayoutInflater inflater = (LayoutInflater)context.getSystemService(Context.LAYOUT_INFLATER_SERVICE);
        View myView = inflater.inflate(R.layout.main, null);
第二种:与第一种方法相同,即from方法封装了getSystemService(...)等
        LayoutInflater inflater = LayoutInflater.from(context);
        View myView = inflater.inflate(R.layout.main, null);
第三种:getLayoutInflater()方法是Activity的方法,归根到底还是第一种方式
        LayoutInflater inflater = getLayoutInflater();
        View myView = inflater.inflate(R.layout.main, null);
所以我们在加载布局的时候可以用setContentView直接设置,然后通过findViewById()来获取控件的id
例如:我们可以用4种方式加载main.xml布局文件,不过LayoutInflater一般多用于ListView等地方,
如BaseAdapter的getView()方法会用到:http://www.cnblogs.com/loulijun/archive/2011/12/28/2305016.html
package com.loulijun.demo6;

import android.app.Activity;
import android.content.Context;
import android.os.Bundle;
import android.view.LayoutInflater;
import android.view.View;
import android.widget.Button;
import android.widget.TextView;

public class Demo6Activity extends Activity {
    private Button btn;
    private TextView tv;
    @Override
    public void onCreate(Bundle savedInstanceState) {
        super.onCreate(savedInstanceState);
        //----------第一种方式----------
//        setContentView(R.layout.main);
//        btn = (Button)findViewById(R.id.btn);
//        tv = (TextView)findViewById(R.id.tv);
        //----------第二种方式----------
//        LayoutInflater inflater = getLayoutInflater();
        //----------第三种方式----------
//        LayoutInflater inflater = LayoutInflater.from(this);
        //----------第四种方式----------
        LayoutInflater inflater = (LayoutInflater)this.getSystemService(
                Context.LAYOUT_INFLATER_SERVICE);
        View view = inflater.inflate(R.layout.main, null);
        setContentView(view);
        btn = (Button)view.findViewById(R.id.btn);
        tv = (TextView)view.findViewById(R.id.tv);
       btn.setOnClickListener(new Button.OnClickListener()
       {

        @Override
        public void onClick(View v) {
            //...
        }

       });
    }
使用setContentView(R.layout.main)设置布局后布局会立刻显示,而使用inflate()方法加载的布局文件得到的是一个View视图对象,在需要的时候再setContentView(view)即可。在Activity中一般只需要setContentView即可,如果是非Acitivity,则需要使用LayoutInflater来动态加载控制控件
MenuInflater用法
MenuInflater是用来加载menu布局文件的,与上面的类似
与LayoutInflater类似,应用程序运行时会预先加载资源中的布局文件,如果Menu布局中的资源比较多,会影响性能,所以可以选择MenuInflater方式用的时候加载,这样减轻了应用程序运行时很多负担
与LayoutInflater相比,MenuInflater用法要简单很多,它只有Activity.getMenuInflater()方法。
例如:
1、在res目录下创建menu文件夹,在里面创建mymenu.xml
<?xml version="1.0" encoding="utf-8"?>
<menu xmlns:android="http://schemas.android.com/apk/res/android" >
    <item
        android:title="打电话"
        android:icon="@android:drawable/ic_menu_call"
        android:id="@+id/action_call"/>
  <item
        android:title="照相"
        android:icon="@android:drawable/ic_menu_camera"
        android:id="@+id/action_camera"/>
  <item
        android:title="添加"
        android:icon="@android:drawable/ic_menu_add"
        android:id="@+id/action_add"/>
  <item
        android:title="删除"
        android:icon="@android:drawable/ic_menu_delete"
        android:id="@+id/action_delete"/>
</menu>
2、重写onCreateOptionsMenu方法和onOptionsItemSelected方法之后,在onCreateOptionsMenu中使用MenuInflater加载布局
package com.loulijun.demo6;

import android.app.Activity;
import android.os.Bundle;
import android.view.Menu;
import android.view.MenuInflater;
import android.view.MenuItem;
import android.widget.Button;
import android.widget.TextView;

public class Demo6Activity extends Activity {
    private Button btn;
    private TextView tv;
    @Override
    public void onCreate(Bundle savedInstanceState) {
        super.onCreate(savedInstanceState);
        setContentView(R.layout.main);
    }
    @Override
    public boolean onCreateOptionsMenu(Menu menu) {
        MenuInflater inflater = getMenuInflater();
        //填充菜单
        inflater.inflate(R.menu.mymenu, menu);
        return super.onCreateOptionsMenu(menu);
    }
    @Override
    public boolean onOptionsItemSelected(MenuItem item) {
        switch(item.getItemId())
        {
        case R.id.action_add:
            //操作
            break;
        case R.id.action_call:
            break;
        case R.id.action_camera:
            break;
        case R.id.action_delete:
            break;
        }
        return super.onOptionsItemSelected(item);
    }

}
运行结果:


 383
383

 被折叠的 条评论
为什么被折叠?


