


1、安装Anaconda。
先安装anaconda
安装完成后添加anaconda到环境变量:sudo gedit ~/.bashrc
在文件最后添加一行
export PATH=/home/ml/anaconda3/bin:$PATH
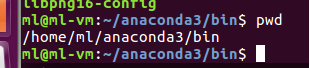
其中红色路径可用pwd命令查看:
重启配置文件生效:source ~/.bashrc
在终端输入:conda list查看配置是否成功。
成功如图所示:

2、
2.1备份源文件:
cd /etc/apt/
然后会显示下面的源文件sources.list
输入命令
sudo cp sources.list sources.list.bak
就是将sources.list备份到sources.list.bak
2.2、sudo gedit sources.list打开文件,将里面的代码替换成下面的代码即可。
清华源
默认注释了源码镜像以提高 apt update 速度,如有需要可自行取消注释
deb https://mirrors.tuna.tsinghua.edu.cn/ubuntu/ xenial main restricted universe multiverse
deb-src https://mirrors.tuna.tsinghua.edu.cn/ubuntu/ xenial main restricted universe multiverse
deb https://mirrors.tuna.tsinghua.edu.cn/ubuntu/ xenial-updates main restricted universe multiverse
deb-src https://mirrors.tuna.tsinghua.edu.cn/ubuntu/ xenial-updates main restricted universe multiverse
deb https://mirrors.tuna.tsinghua.edu.cn/ubuntu/ xenial-backports main restricted universe multiverse
deb-src https://mirrors.tuna.tsinghua.edu.cn/ubuntu/ xenial-backports main restricted universe multiverse
deb https://mirrors.tuna.tsinghua.edu.cn/ubuntu/ xenial-security main restricted universe multiverse
deb-src https://mirrors.tuna.tsinghua.edu.cn/ubuntu/ xenial-security main restricted universe multiverse
预发布软件源,不建议启用
deb https://mirrors.tuna.tsinghua.edu.cn/ubuntu/ xenial-proposed main restricted universe multiverse
deb-src https://mirrors.tuna.tsinghua.edu.cn/ubuntu/ xenial-proposed main restricted universe multiverse
2.3、更新源
sudo apt-get update 更新源 ;sudo apt-get upgrade 更新软件。
3、Ubuntu16.04安装搜狗拼音输入法(中文输入法)
3.1、打开官网http://pinyin.sogou.com/linux,点击自己对应的系统位数安装包,然后下载并安装。
3.2、打开“系统设置system setting“,点击”语言支持 language support“,然后弹出下面的框图,点击”安装install“。


3.3、然后把里面的IBus改为fcitx,然后关掉,然后重启电脑。

3.4、重启电脑后,会看到屏幕右上角有企鹅输入fcitx。

3.5、然后右键点开,选择ConfigureFcitx。

3.6、然后点击弹出的框的左下方的”+“号,添加搜狗输入法,去掉那个只“显示当前语言”的选项,然后搜索框输入sog,你会发现搜狗输入法已经有了,选中输入法即可,然后关闭。

3.7、然后打开一个能输入文字的软件,比如word,输入文字的时候,Ctrl+space组合键进行中英文切换,你会发现屏幕右上方的搜狗输入法图标有了,搜狗输入法安装成功,输入文字正常,但是这个时候,输入法输入中文显示会乱码,没关系,重启电脑或者下次开机就好了。

4、管理不同版本的python:
  安装好Ubuntu系统后,系统已经自动安装好了python2.7和python3;

  安装完anaconda后,anaconda   里面也有上面步骤安装好的python2.7或者python3;
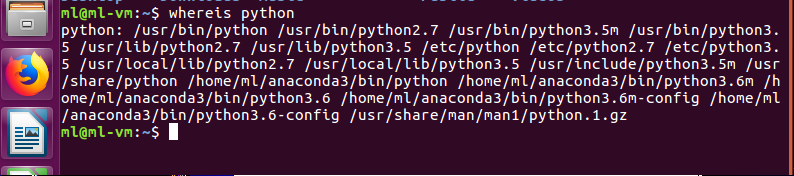
4.1、使用whereis python参看Python路径。
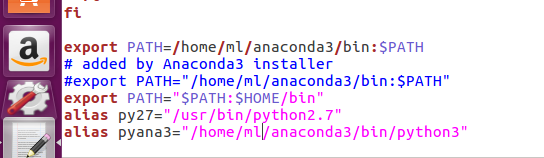
4.2、打开配置文件.bashrc,进行配置:sudo gedit ~/.bashrc
将下面三行添加到末尾,保存退出(注意:此处的路径为前面查找的Python路径,ml改为自己的用户名)
added by Anaconda3 installer
export PATH="/home/ml/anaconda3/bin:
P
A
T
H
"
e
x
p
o
r
t
P
A
T
H
=
"
PATH" export PATH="
PATH"exportPATH="PATH:$HOME/bin"
alias py27="/usr/bin/python2.7"
alias pyana3="/home/ml/anaconda3/bin/python3"
4.3、使上面的配置生效:source ~/.bashrc
4.4、使用方法:以我的配置为例,具体要看你自己刚刚的配置
py27 对应系统自带的python2.7版本;
pyana3 对应anaconda中的python3版本;

5、安装tensorflow
5.1、创建虚拟环境:(至于为什么要用虚拟环境,以后大家就明白了,它可以让我们在虚拟环境里为所欲为而不影响外部配置,现在照做就是了)
conda create -n tf
5.2、激活虚拟环境:(就是进入到这个虚拟环境里面)
source activate tf
PS:如果要退出:输入
source deactivate tf
5.3、下面我们在虚拟环境里安装tensorflow:
激活虚拟环境后,我们开始用conda安装吧!
5.3.1、 先确定自己要安装的tensorflow的版本是CPU的还是GPU的,如何确定呢?
如果你还不知道GPU是啥,那你计算机里肯定没有安装cuda、cudnn 、显卡那些东西,那就安装CPU版本;
如果你之前折腾过cuda安装,那你肯定明白自己要用GPU版本的,不过前提当然是你确定你已经将cuda装好了哈哈哈,不禁笑 了,因为笔者也被cuda折磨过;
5.3.2、安装CPU版本:
conda install tensorflow
5.3.3、安装GPU版本:
conda install tensorflow-gpu
5.3.4、漫长的等待后,看看自己是否安装成功:
在python下导入tensorflow试试:(不报错就成功啦)
import tensorflow as tf


至此,Tensorflow安装配置完成!
参考博客:
https://blog.csdn.net/m0_37864814/article/details/82112029
也可以进行如下验证:
source activate tensorflow #首先激活tensorflow环境
python #启动python环境
验证TensorFlow是否安装成功
import tensorflow as tf
hello = tf.constant(‘Hello, TensorFlow!’)
sess = tf.Session()
print(sess.run(hello))
Hello, TensorFlow! # 恭喜!安装成功!
5.4、配置anaconda:
如果不进行配置,启动spyder等也是不能够运行tensorflow的,因为anaconda中默认anzhaung的spyder等是应用于root的,而非tensorflow。在Terminal中运行命令:
anaconda-navigator #启动anaconda。

在左侧列表中,选择Environment,可看到Anaconda中安装环境为root和tensorflow。选择tf后,边上会出现一个箭头,这时就可以在右边的列表中查看、安装、卸载Tensorflow下的软件及软件包了。
安装的软件可在anaconda->home下查看,同样需要选择应用环境。

5.5、启动Tensorflow开发环境
有两种方法,方法一,通过anaconda启动:
anaconda-navigator
#启动anaconda->home->(Applications on)tensorflow,启动相关开发软件
方法二,通过terminal启动:
source activate tensorflow # 激活Tensorflow环境
python # 或ipython或Spyder启动开发环境


 271
271


 被折叠的 条评论
为什么被折叠?
被折叠的 条评论
为什么被折叠?
 到【灌水乐园】发言


