


【Android】Handler机制详解
本文是在 Carson带你学Android 作者的异步通信 专栏中Handler的基础上学习整理的kotlin版本,并且Android源码部分也更新至最新。
1.使用Handler消息传递机制的原因
![[外链图片转存中...(img-17wGmBth-1666010210163)]](https://img-blog.csdnimg.cn/554f091533824bb1b19eb736059d1e68.jpeg)
2.相关概念
| 概念 | 定义 | 作用 | 备注 |
|---|---|---|---|
| Main Thread | 应用程序初次启动时会自动开启主线程 | 处理与UI相关的操作 | 与子线程的通信媒介为Handler |
| 子线程 | 手动开启的线程 | 执行耗时操作,如加载数据,网络请求以及IO操作 | 与主线程的通信媒介为Handler |
| Message | 线程间通信的基本数据单元 | 存储通信信息 | / |
| Message Queue | 数据结构 | 存储Handler发送的Message | / |
| Handler | 线程之间Message的处理者 | 添加Message到Message Queue;处理Looper分发的Message | / |
| Looper | Message Queue与Handler之间的通信媒介 | 循环取出Message Queue中的Message并分发给对应的Handler | 一个线程只能拥有一个Looper;但一个Looper可以与多个线程的Handler绑定;因此提供了线程间通信的能力 |
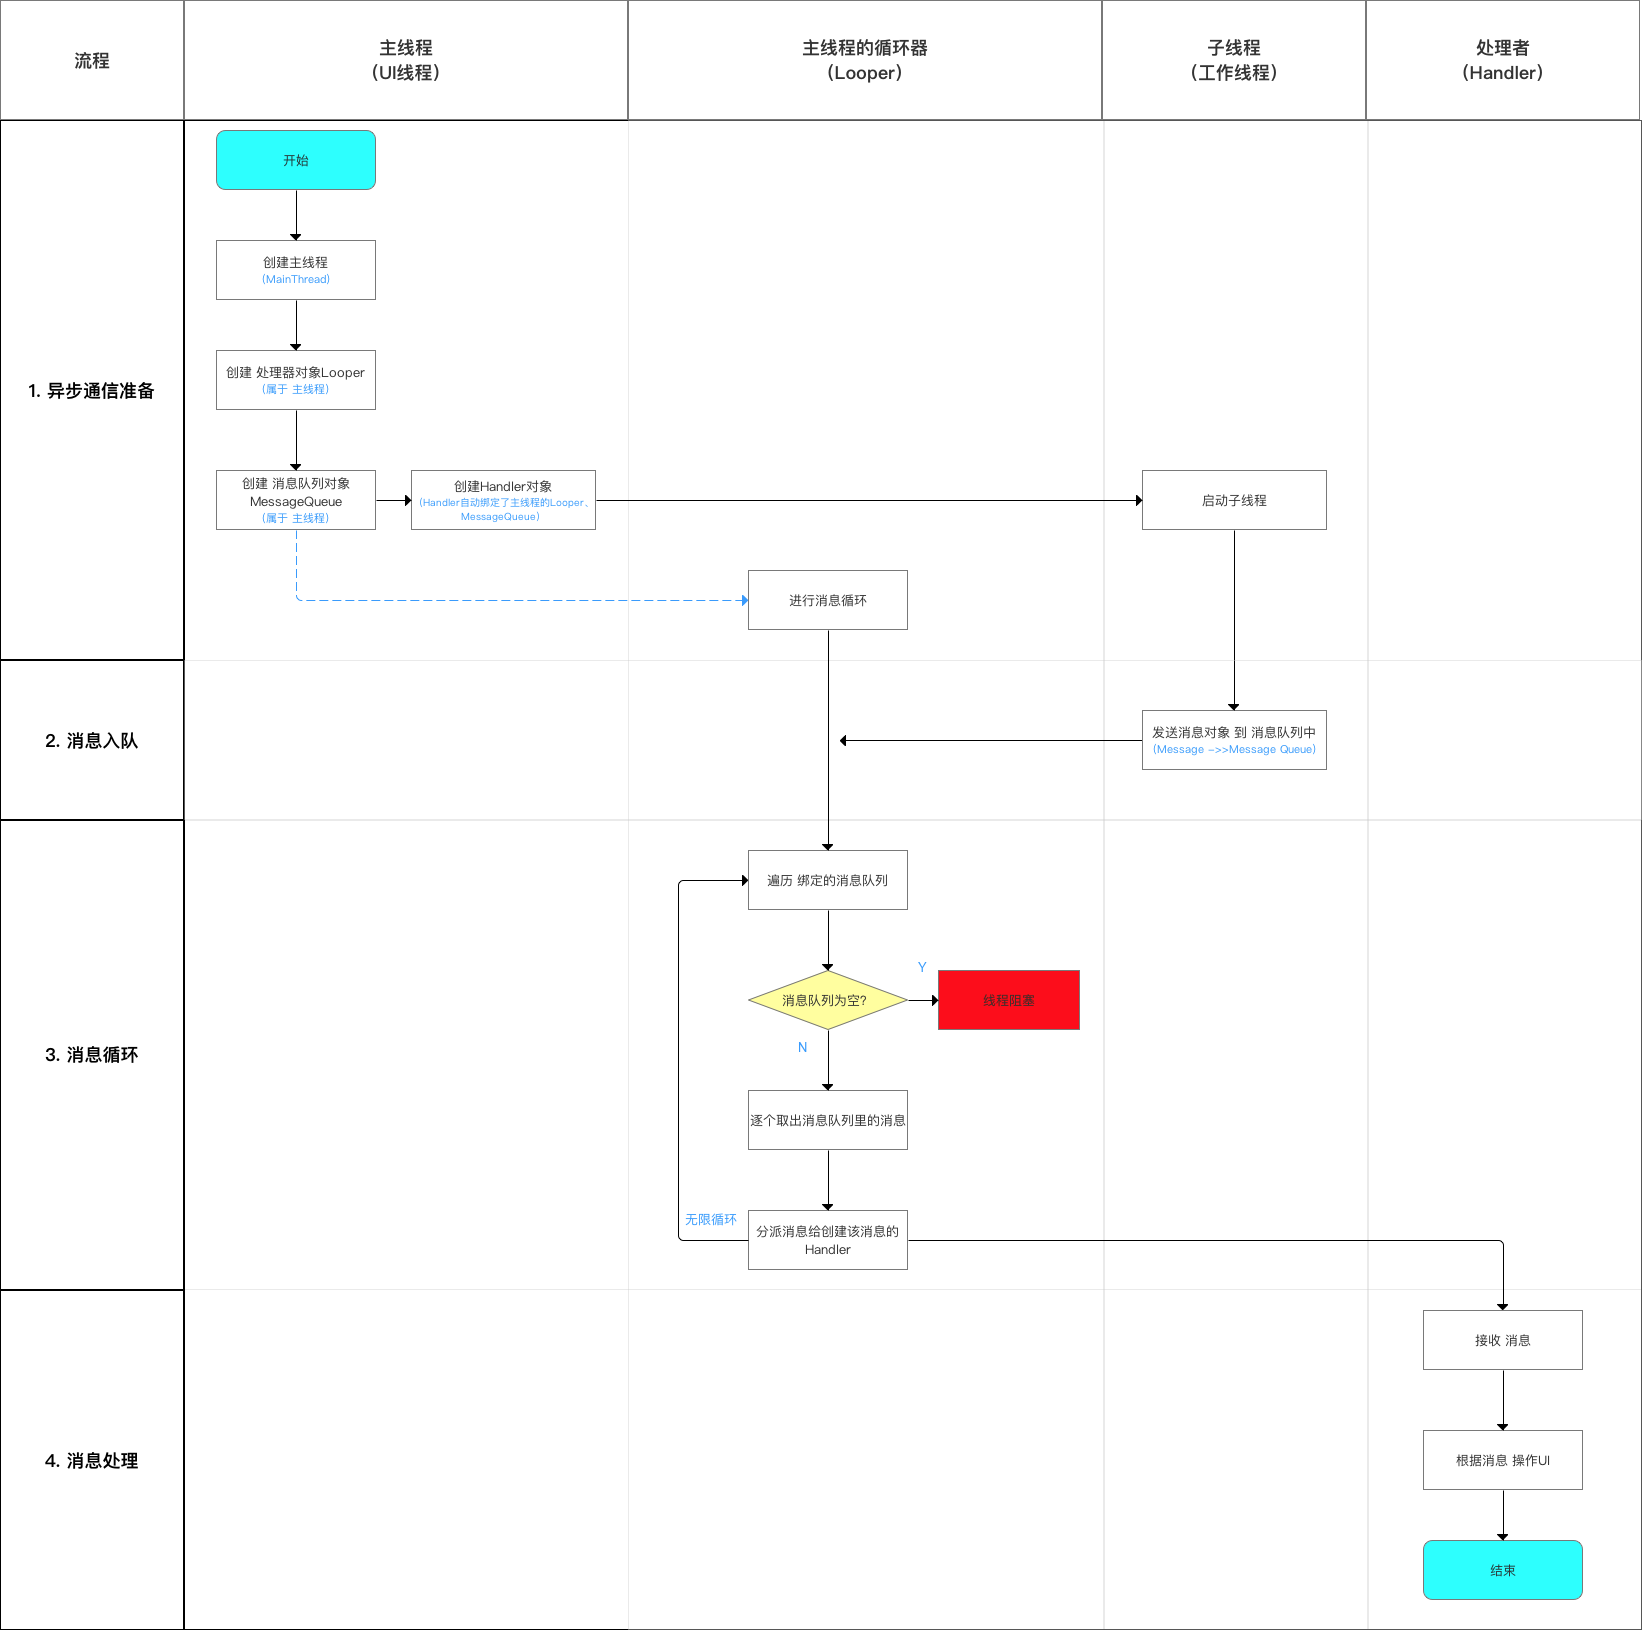
3.工作流程

4.使用方式
1.使用 Handler.sendMessage()
/**
 * 方式1:新建Handler子类
 */
// 步骤1:自定义Handler子类 & 复写handleMessage()方法
class mHandler : Handler() {
  // 通过复写handlerMessage() 从而确定更新UI的操作
  override fun handleMessage(msg: Message) {
    ...// 需执行的UI操作
  }
}

// 步骤2:在主线程中创建Handler实例
private val mhandler = mHandler()

// 步骤3:创建所需的消息对象
val msg = Message.obtain() // 实例化消息对象
msg.what = 1 // 消息标识
msg.obj = "tmp" // 消息内容

// 步骤4:在工作线程中 通过Handler发送消息到消息队列中
// 可通过sendMessage() / post()
// 多线程可采用AsyncTask、继承Thread类、实现Runnable
mHandler.sendMessage(msg)

// 步骤5:开启工作线程(同时启动了Handler)


/**
 * 方式2:匿名内部类
 */
// 步骤1:在主线程中 通过匿名类 创建Handler类对象
val mhandler = object : Handler() {
  // 通过复写handlerMessage()从而确定更新UI的操作
  override fun handleMessage(msg: Message) {
    ...// 需执行的UI操作
  }
}

// 步骤2:创建消息对象

// 步骤3:在工作线程中 通过Handler发送消息到消息队列中

// 步骤4:开启工作线程(同时启动了Handler)
2.使用Handler.post()
// 步骤1:在主线程中创建Handler实例
private val mhandler = mHandler()

// 步骤2:在工作线程中 发送消息到消息队列中 & 指定操作UI内容
// 传入Runnable对象
mHandler.post{
  ...// 需执行的UI操作
}

// 步骤3:开启工作线程(同时启动了Handler)
5.注意点
Thread, Looper 以及 Handler 之间的对应关系如下:
- 1个 Thread 只能绑定 1个 Looper ,但可以有多个 Handler
- 1个 Looper 可绑定多个 Handler
- 1个 Handler 只能绑定1个 Looper
![[外链图片转存中...(img-t6aujji5-1666010210165)]](https://img-blog.csdnimg.cn/c4830c1712724e2e80599e787895b802.jpeg)
6.源码分析
1.使用 Handler.sendMessage()
步骤1:在主线程中通过匿名内部类创建Handler类对象
/**
 * 具体使用
 */
private Handler mhandler = new  Handler(){
  // 通过复写handlerMessage()指定待执行的UI更新操作
  @Override
  public void handleMessage(Message msg) {
    ...// 待执行的UI操作
  }
};

/**
 * 源码分析:Handler的构造方法
 * 作用:初始化Handler对象 & 绑定线程
 * 注:
 *   a. Handler需绑定 线程才能使用;绑定后,Handler的消息处理会在绑定的线程中执行
 *   b. 绑定方式 = 先指定Looper对象,从而绑定了 Looper对象所绑定的线程(因为Looper对象本已绑定了对应线程)
 *   c. 即:指定了Handler对象的 Looper对象 = 绑定到了Looper对象所在的线程
 */
public Handler() {
  this(null, false);
  // ->>分析1
}
/**
 * 分析1:this(null, false) = Handler(null,false)
 */
public Handler(Callback callback, boolean async) {
  	...
    // 1. 指定Looper对象
    mLooper = Looper.myLooper();
    if (mLooper == null) {
      throw new RuntimeException(
        "Can't create handler inside thread that has not called Looper.prepare()");
    }
  // Looper.myLooper()作用:获取当前线程的Looper对象;若线程无Looper对象则抛出异常
  // 即 :若线程中无创建Looper对象,则也无法创建Handler对象
  // 故 若需在子线程中创建Handler对象,则需先创建Looper对象
  // 注:可通过Loop.getMainLooper()可以获得当前进程的主线程的Looper对象

  // 2. 绑定消息队列对象(MessageQueue)
  mQueue = mLooper.mQueue;
  // 获取该Looper对象中保存的消息队列对象(MessageQueue)
  // 至此,保证了handler对象 关联上 Looper对象中MessageQueue
}
当创建Handler对象时,通过构造方法自动关联当前线程的Looper对象以及对应的消息队列对象(MessageQueue),从而自动绑定了创建Handler对象操作的线程
但是在上述使用步骤中,并无创建Looper对象以及对应的消息队列对象(MessageQueue)这一步
步骤1前的隐式操作1:创建循环器对象(Looper)以及消息队列对象(MessageQueue)
/**
 * 源码分析1:Looper.prepare()
 * 作用:为当前线程(子线程) 创建1个循环器对象(Looper),同时也生成了1个消息队列对象(MessageQueue)
 * 注:需在子线程中手动调用该方法
 */
public static void prepare() {
  prepare(true);
}

private static void prepare(boolean quitAllowed) {
  // 1. 判断sThreadLocal是否为null,否则抛出异常
  //即 Looper.prepare()方法不能被调用两次 = 1个线程中只能对应1个Looper实例
  // 注:sThreadLocal = 1个ThreadLocal对象,用于存储线程的变量
  if (sThreadLocal.get() != null) {
    throw new RuntimeException("Only one Looper may be created per thread");
  }
  // 2. 若为初次Looper.prepare(),则创建Looper对象 & 存放在ThreadLocal变量中
  // 注:Looper对象是存放在Thread线程里的
  // 源码分析Looper的构造方法->>分析a
  sThreadLocal.set(new Looper(quitAllowed));
}

/**
 * 分析a:Looper的构造方法
 **/
private Looper(boolean quitAllowed) {
  // 1. 创建1个消息队列对象(MessageQueue)
  // 即 当创建1个Looper实例时,会自动创建一个与之配对的消息队列对象(MessageQueue)
  mQueue = new MessageQueue(quitAllowed);
  mThread = Thread.currentThread();
}

/**
 * 源码分析2:Looper.prepareMainLooper()
 * 作用:为 主线程(UI线程) 创建1个循环器对象(Looper),同时也生成了1个消息队列对象(MessageQueue)
 * 注:该方法在主线程(UI线程)创建时自动调用,即 主线程的Looper对象自动生成,不需手动生成
 */
public static void prepareMainLooper() {
  prepare(false);
  synchronized (Looper.class) {
    if (sMainLooper != null) {
      throw new IllegalStateException("The main Looper has already been prepared.");
    }
    sMainLooper = myLooper();
  }
}
// 在Android应用进程启动时,会默认创建1个主线程(ActivityThread)
// 创建时,会自动调用ActivityThread的1个静态的main()方法 = 应用程序的入口
// main()内则会调用Looper.prepareMainLooper()为主线程生成1个Looper对象

/**
 * 源码分析:main()
 **/
public static void main(String[] args) {
	...
  // 1. 为主线程创建1个Looper对象,同时生成1个消息队列对象(MessageQueue)
  Looper.prepareMainLooper();
  ...
  // 2. 创建主线程
  ActivityThread thread = new ActivityThread();
  ...
  // 3.获取Handler
  if (sMainThreadHandler == null) {
    sMainThreadHandler = thread.getHandler();
  }
	...
  // 4. 开启消息循环
  Looper.loop();

  throw new RuntimeException("Main thread loop unexpectedly exited");
}
创建主线程时,会自动调用ActivityThread的1个静态的main();而main()内则会调用Looper.prepareMainLooper()为主线程生成1 个Looper对象,同时也会生成其对应的MessageQueue对象,即主线程的Looper对象自动生成,不需手动生成;而子线程的Looper对象则需手动通过Looper.prepare()创建。(在子线程若不手动创建Looper对象 则无法生成Handler对象)
生成Looper以及MessageQueue对象后,则会进入消息循环:Looper.loop()。
步骤1前的隐式操作2:消息循环
/**
 * 源码分析: Looper.loop()
 * 作用:消息循环,即从消息队列中获取消息、分发消息到Handler
 * 特别注意:
 *       a. 主线程的消息循环不允许退出,即无限循环
 *       b. 子线程的消息循环允许退出:调用消息队列MessageQueue的quit()
 */
public static void loop() {
  // 1. 获取当前Looper的消息队列
  // myLooper()作用:返回sThreadLocal存储的Looper实例;若me为null 则抛出异常
  // 因此loop()执行前必须执行prepare()来创建1个Looper实例
  final Looper me = myLooper();
  if (me == null) {
    throw new RuntimeException("No Looper; Looper.prepare() wasn't called on this thread.");
  }

  if (me.mInLoop) {
    Slog.w(TAG, "Loop again would have the queued messages be executed"
           + " before this one completed.");
  }
  me.mInLoop = true;
  ...
  // 2. 消息循环
  for (;;) {
    if (!loopOnce(me, ident, thresholdOverride)) {
      return;
    }
  }
}
public static void loop() {
	...
  // 1. 获取当前Looper的消息队列
  final Looper me = myLooper();
  if (me == null) {
    throw new RuntimeException("No Looper; Looper.prepare() wasn't called on this thread.");
  }
  // myLooper()作用:返回sThreadLocal存储的Looper实例;若me为null 则抛出异常
  // 即loop()执行前必须执行prepare(),从而创建1个Looper实例

  final MessageQueue queue = me.mQueue;
  // 获取Looper实例中的消息队列对象(MessageQueue)

  // 2. 消息循环(通过for循环)
  for (;;) {
    // 2.1 从消息队列中取出消息
    Message msg = queue.next();
    if (msg == null) {
      return;
    }
    // next():取出消息队列里的消息
    // 若取出的消息为空,则线程阻塞
    // ->> 分析1

    // 2.2 派发消息到对应的Handler
    msg.target.dispatchMessage(msg);
    // 把消息Message派发给消息对象msg的target属性
    // target属性实际是1个handler对象
    // ->>分析2

    // 3. 释放消息占据的资源
    msg.recycle();
  }
}

private static boolean loopOnce(final Looper me,
                                final long ident, final int thresholdOverride) {
  // 从消息队列中获取消息
  // ->>分析1
  Message msg = me.mQueue.next();
  if (msg == null) {
    // 没有消息表示消息队列正在退出
    return false;
  }
	...
  // 确保observer在处理事务时不会改变
  final Observer observer = sObserver;
  ...
  try {
    // 派发消息到对应的Handler
    // ->>分析2
    msg.target.dispatchMessage(msg);
    ...
  }
  ...
  // 3.释放资源
  msg.recycleUnchecked();
  return true;
}

/**
 * 分析1:queue.next()
 * 定义:MessageQueue中的方法
 * 作用:从消息队列中移出并返回该消息
 */
Message next() {
  // 如果消息循环已经退出并被释放,则在此处返回。如果App试图在不支持的退出后重新启动循环程序,这种情况就会发生。
  final long ptr = mPtr;
  if (ptr == 0) {
    return null;
  }
  ...
  // 该参数用于确定消息队列中是否还有消息,从而决定消息队列应处于出队消息状态 or 等待状态
  int nextPollTimeoutMillis = 0;
  for (;;) {
    if (nextPollTimeoutMillis != 0) {
      Binder.flushPendingCommands();
    }

    // native层方法,若是nextPollTimeoutMillis为-1,此时消息队列处于等待状态
    nativePollOnce(ptr, nextPollTimeoutMillis);

    synchronized (this) {
      final long now = SystemClock.uptimeMillis();
      Message prevMsg = null;
      Message msg = mMessages;
      if (msg != null && msg.target == null) {
        // 按照时间顺序取出下一个消息
        do {
          prevMsg = msg;
          msg = msg.next;
        } while (msg != null && !msg.isAsynchronous());
      }
      if (msg != null) {
        if (now < msg.when) {
          // 下一条消息还没有准备好。设置一个超时以在它准备好时唤醒
          nextPollTimeoutMillis = (int) Math.min(msg.when - now, Integer.MAX_VALUE);
        } else {
          // 取出了消息
          mBlocked = false;
          if (prevMsg != null) {
            prevMsg.next = msg.next;
          } else {
            mMessages = msg.next;
          }
          msg.next = null;
          if (DEBUG) Log.v(TAG, "Returning message: " + msg);
          msg.markInUse();
          return msg;
        }
      } else {
        // 没有更多消息,下次循环时消息队列将处于等待状态
        nextPollTimeoutMillis = -1;
      }

      // 已经处理了所有挂起的消息,就处理退出消息。
      if (mQuitting) {
        dispose();
        return null;
      }
    ...
    // 在调用空闲处理程序时,可能已经传递了一条新消息,因此不必等待,可以返回并再次查看挂起的消息。
    nextPollTimeoutMillis = 0;
  }
}

/**
 * 分析2:dispatchMessage(msg)
 * 定义:Handler中的方法
 * 作用:派发消息到对应的Handler实例 & 根据传入的msg作出对应的操作
 */
public void dispatchMessage(Message msg) {

  // 1. 若msg.callback属性不为空,则代表使用了post(Runnable r)发送消息
  // 则执行handleCallback(msg),即回调Runnable对象里复写的run()
  // 放在“post(Runnable r)”方式时分析
  if (msg.callback != null) {
    handleCallback(msg);
  } else {
    ...
    // 2. 若msg.callback属性为空,则代表使用了sendMessage(Message msg)发送消息
    // 则执行handleMessage(msg),即回调复写的handleMessage(msg) ->> 分析3
    handleMessage(msg);
  }
}

/**
 * 分析3:handleMessage(msg)
 * 注:该方法 = 空方法,在创建Handler实例时复写 = 自定义消息处理方式
 **/
public void handleMessage(Message msg) {
  ... // 创建Handler实例时复写
}
- 消息循环的操作 = 消息出队 + 分发给对应的Handler实例
- 分发给对应的Handler的过程:根据出队消息的归属者通过dispatchMessage(msg)进行分发,最终回调复写的handleMessage(Message msg),从而实现 消息处理 的操作
- 在进行消息分发时(dispatchMessage(msg)),会进行1次发送方式的判断:
- 若msg.callback属性不为空,则代表使用了post(Runnable r)发送消息,则直接回调Runnable对象里复写的run()
- 若msg.callback属性为空,则代表使用了sendMessage(Message msg)发送消息,则回调复写的handleMessage(msg)
步骤2:创建消息对象
/**
 * 具体使用
 */
Message msg = Message.obtain(); // 实例化消息对象
msg.what = 1; // 消息标识
msg.obj = "tmp"; // 消息内容

/**
 * 源码分析:Message.obtain()
 * 作用:创建消息对象
 * 注:创建Message对象可用关键字new 或 Message.obtain()
 */
public static Message obtain() {
  // Message内部维护了1个Message池,用于Message消息对象的复用。使用obtain()可以直接从池内获取
  synchronized (sPoolSync) {
    if (sPool != null) {
      Message m = sPool;
      sPool = m.next;
      m.next = null;
      m.flags = 0; // 清除在使用的标志
      sPoolSize--;
      return m;
    }
    // 使用obtain()”创建“消息对象,可以避免每次都使用new重新分配内存
  }
  // 若池内无消息对象可复用,使用关键字new创建
  return new Message();
}
步骤3:在工作线程中发送消息到消息队列中
/**
 * 具体使用
 */

mHandler.sendMessage(msg);

/**
 * 源码分析:mHandler.sendMessage(msg)
 * 定义:Handler的方法
 * 作用:将消息 发送 到消息队列中(Message ->> MessageQueue)
 */
public final boolean sendMessage(Message msg) {
  return sendMessageDelayed(msg, 0);
  // ->>分析1
}

/**
 * 分析1:sendMessageDelayed(msg, 0)
 **/
public final boolean sendMessageDelayed(Message msg, long delayMillis) {
  if (delayMillis < 0) {
    delayMillis = 0;
  }
  return sendMessageAtTime(msg, SystemClock.uptimeMillis() + delayMillis);
  // ->> 分析2
}

/**
 * 分析2:sendMessageAtTime(msg, SystemClock.uptimeMillis() + delayMillis)
 **/
public boolean sendMessageAtTime(Message msg, long uptimeMillis) {
  // 1. 获取对应的消息队列对象(MessageQueue)
  MessageQueue queue = mQueue;
  if (queue == null) {
    RuntimeException e = new RuntimeException(
      this + " sendMessageAtTime() called with no mQueue");
    Log.w("Looper", e.getMessage(), e);
    return false;
  }
  // 2. 调用了enqueueMessage方法 ->>分析3
  return enqueueMessage(queue, msg, uptimeMillis);
}

/**
 * 分析3:enqueueMessage(queue, msg, uptimeMillis)
 **/
private boolean enqueueMessage(MessageQueue queue, Message msg, long uptimeMillis) {
  // 1. 将msg.target赋值为this
  // 即 把当前的Handler实例对象作为msg的target属性
  msg.target = this;
  // 上面说的Looper的loop()中消息循环时,会从消息队列中取出每个消息msg,然后执行msg.target.dispatchMessage(msg)去处理消息
  // 实际上则是将该消息派发给对应的Handler实例
  ...
  // 2. 调用消息队列的enqueueMessage()
  // 即:Handler发送的消息,最终是保存到消息队列->>分析4
  return queue.enqueueMessage(msg, uptimeMillis);
}

/**
 * 分析4:queue.enqueueMessage(msg, uptimeMillis)
 * 定义:MessageQueue的方法
 * 作用:将消息根据时间放入到消息队列中(Message ->> MessageQueue)
 * 采用单链表实现:提高插入消息、删除消息的效率
 */

boolean enqueueMessage(Message msg, long when) {
  if (msg.target == null) {
    throw new IllegalArgumentException("Message must have a target.");
  }

	synchronized (this) {
    if (msg.isInUse()) {
      throw new IllegalStateException(msg + " This message is already in use.");
    }

    if (mQuitting) {
      IllegalStateException e = new IllegalStateException(
        msg.target + " sending message to a Handler on a dead thread");
      Log.w(TAG, e.getMessage(), e);
      msg.recycle();
      return false;
    }
    msg.markInUse();
    msg.when = when;
    Message p = mMessages;
    boolean needWake;

    // 判断消息队列里有无消息
    // a. 若无,则将当前插入的消息 作为队头 & 若此时消息队列处于等待状态,则唤醒
    if (p == null || when == 0 || when < p.when) {
      msg.next = p;
      mMessages = msg;
      needWake = mBlocked;
    } else {
      needWake = mBlocked && p.target == null && msg.isAsynchronous();
      Message prev;

      // b. 判断消息队列里有消息,则根据 消息(Message)创建的时间 插入到队列中
      for (;;) {
        prev = p;
        p = p.next;
        if (p == null || when < p.when) {
          break;
        }
        if (needWake && p.isAsynchronous()) {
          needWake = false;
        }
      }

      msg.next = p;
      prev.next = msg;
    }
    ...
  }
  return true;
}

// 之后,随着Looper对象的无限消息循环
// 不断从消息队列中取出Handler发送的消息 & 分发到对应Handler
// 最终回调Handler.handleMessage()处理消息
方式2:使用 Handler.post()
步骤1:在主线程中创建Handler实例
/**
 * 具体使用
 */
private Handler mhandler = new  Handler();
// 与方式1的使用不同:此处无复写Handler.handleMessage()

/**
 * 源码分析:Handler的构造方法
 * 作用:
 *     a. 在此之前,主线程创建时隐式创建Looper对象、MessageQueue对象
 *     b. 初始化Handler对象、绑定线程 & 进入消息循环
 * 此处的源码类似方式1
 */
步骤2:在工作线程中 发送消息到消息队列中
/**
 * 具体使用
 * 需传入Runnable对象、复写run()从而指定UI操作
 */
mHandler.post(new Runnable() {
  @Override
  public void run() {
    ...
  }
});

/**
 * 源码分析:Handler.post(Runnable r)
 * 定义:Handler中的方法
 * 作用:定义UI操作、将Runnable对象封装成消息对象 & 发送 到消息队列中(Message ->> MessageQueue)
 * 注:
 *    a. 相比sendMessage(),post()最大的不同在于,更新的UI操作可直接在重写的run()中定义
 *    b. 实际上,Runnable并无创建新线程,而是发送 消息 到消息队列中
 */
public final boolean post(@NonNull Runnable r) {
  return  sendMessageDelayed(getPostMessage(r), 0);
  // getPostMessage(r)->>分析1
  // sendMessageDelayed()->>分析2

}
/**
 * 分析1:getPostMessage(r)
 * 作用:将传入的Runable对象封装成1个消息对象
 **/
private static Message getPostMessage(Runnable r) {
  // 1. 创建1个消息对象(Message)
  Message m = Message.obtain();
  // 2. 将 Runable对象 赋值给message的callback属性
  m.callback = r;
  // 3. 返回该消息对象
  return m;
}
// 从分析2开始,源码 与 sendMessage(Message msg)发送方式相同
步骤1前的隐式操作2:消息循环
/**
 * 源码分析: Looper.loop()
 * 作用:消息循环,即从消息队列中获取消息、分发消息到Handler
 * 特别注意:
 *       a. 主线程的消息循环不允许退出,即无限循环
 *       b. 子线程的消息循环允许退出:调用消息队列MessageQueue的quit()
 */
3.两种方式的异同
方式2 Handler.post()的工作流程:与方式1Handler.sendMessage()类似,区别在于:
- 不需外部创建消息对象,而是内部根据传入的
Runnable对象封装消息对象 - 回调的消息处理方法是:复写
Runnable对象的run()
7.内存泄漏
1.泄漏原因

- 当Handler消息队列还有未处理的消息 / 正在处理消息时,存在引用关系: “未被处理 / 正处理的消息 -> Handler实例 -> 外部类”
- 这将使得外部类无法被GC回收,从而造成内存泄露
2.解决方案
1.静态内部类
- 原理:静态内部类不默认持有外部类的引用,从而使得 “未被处理 / 正处理的消息 -> Handler实例 -> 外部类” 的引用关系不存在。
- 具体方案:将Handler的子类设置成静态内部类。此外,还可使用WeakReference弱引用持有外部类,保证外部类能被回收。因为:弱引用的对象拥有短暂的生命周期,在垃圾回收器线程扫描时,一旦发现了具有弱引用的对象,不管当前内存空间足够与否,都会回收它的内存
2.当外部类结束生命周期时,清空Handler内消息队列
-
原理:不仅使得 “未被处理 / 正处理的消息 -> Handler实例 -> 外部类” 的引用关系不复存在,同时使得 Handler的生命周期(即消息存在的时期)与外部类的生命周期同步
-
具体方案:当外部类(此处以Activity为例)结束生命周期时(此时系统会调用onDestroy()),清除 Handler消息队列里的所有消息(调用removeCallbacksAndMessages(null))
-
具体代码
override fun onDestroy() {
  super.onDestroy()
  // 外部类生命周期结束时,同时清空消息队列 & 结束Handler生命周期
  mHandler.removeCallbacksAndMessages(null)
}
8.Demo
具体代码如下:
- Handler
class MyHandler(binding: ActivityMainBinding) : Handler() {

    private var context: Context
    private var linear: LinearLayout

    init {
        context = binding.root.context
        linear = binding.linear
    }

    override fun handleMessage(msg: Message) {
        when (msg.what) {
            MainActivity.MESSAGE_ADD_NODE -> {
                val button = msg.obj as Button
                linear.addView(button, LinearLayout.LayoutParams(LinearLayout.LayoutParams.WRAP_CONTENT
                    , LinearLayout.LayoutParams.WRAP_CONTENT))
                Toast.makeText(context, "${button.id} button has been added to the page", Toast.LENGTH_SHORT).show()
            }
            MainActivity.MESSAGE_DELETE_NODE -> {
                val button = msg.obj as Button
                Toast.makeText(context, "${button.id} button has been deleted from the page"
                    , Toast.LENGTH_SHORT).show()
                linear.removeView(button)
            }
            MainActivity.MESSAGE_CLEAR_NODE -> {
                linear.removeAllViews()
                Toast.makeText(context, "All button has been deleted from the page", Toast.LENGTH_SHORT).show()
            }
        }
    }
}
- MainActivity
class MainActivity : AppCompatActivity(), OnClickListener {
    companion object {
        const val MESSAGE_ADD_NODE = 0
        const val MESSAGE_DELETE_NODE = 1
        const val MESSAGE_CLEAR_NODE = 2
    }
    private val map = ConcurrentHashMap<Int, Button>()
    private val list = mutableListOf<Int>()
    private lateinit var binding: ActivityMainBinding
    private lateinit var linear: LinearLayout
    private lateinit var mHandler: MyHandler

    override fun onCreate(savedInstanceState: Bundle?) {
        super.onCreate(savedInstanceState)
        binding = ActivityMainBinding.inflate(layoutInflater)
        setContentView(binding.root)
        mHandler = MyHandler(binding)
        linear = binding.linear

        binding.addNode.setOnClickListener(this)
        binding.deleteNode.setOnClickListener(this)
        binding.clearNode.setOnClickListener(this)

        val handler = MyHandler(binding)
        handler.post{linear.removeAllViews()
            Toast.makeText(this, "All button has been deleted from the page", Toast.LENGTH_SHORT).show()}
    }

    override fun onClick(view: View) {
        Thread {
            val msg = Message.obtain()
            when (view.id) {
                R.id.addNode -> {
                    msg.what = MESSAGE_ADD_NODE
                    val button = Button(binding.root.context)
                    val id = Random.nextInt(100000, 999999)
                    button.id = id
                    button.text = id.toString()
                    button.alpha = Random.nextFloat()
                    map[id] = button
                    list.add(id)
                    msg.obj = button
                }
                R.id.deleteNode -> {
                    if (list.size > 0) {
                        msg.what = MESSAGE_DELETE_NODE
                        val index = Random.nextInt(0, map.size)
                        val button = map[list[index]]
                        map.remove(list[index])
                        list.removeAt(index)
                        msg.obj = button
                    } else {
                        return@Thread
                    }
                }
                R.id.clearNode -> msg.what = MESSAGE_CLEAR_NODE
            }
            mHandler.sendMessage(msg)
        }.start()
    }

    override fun onDestroy() {
        super.onDestroy()
        mHandler.removeCallbacksAndMessages(null)
    }
}
- Activity_main.xml
<?xml version="1.0" encoding="utf-8"?>
<LinearLayout xmlns:android="http://schemas.android.com/apk/res/android"
        android:orientation="vertical"
        android:layout_width="match_parent"
        android:layout_height="match_parent">

    <LinearLayout
            android:layout_width="match_parent"
            android:layout_height="wrap_content">

        <Button
                android:id="@+id/addNode"
                android:layout_width="wrap_content"
                android:layout_height="wrap_content"
                android:layout_marginStart="20dp"
                android:textAllCaps="false"
                android:text="@string/add_node" />

        <Button
                android:id="@+id/deleteNode"
                android:layout_width="wrap_content"
                android:layout_height="wrap_content"
                android:layout_marginStart="20dp"
                android:textAllCaps="false"
                android:text="@string/delete_node" />

        <Button
                android:id="@+id/clearNode"
                android:layout_width="wrap_content"
                android:layout_height="wrap_content"
                android:layout_marginStart="20dp"
                android:textAllCaps="false"
                android:text="@string/clear_node" />
    </LinearLayout>

    <LinearLayout
            android:id="@+id/linear"
            android:layout_width="match_parent"
            android:layout_height="match_parent"
            android:orientation="horizontal" />
</LinearLayout>


 1238
1238


 被折叠的 条评论
为什么被折叠?
被折叠的 条评论
为什么被折叠?
 到【灌水乐园】发言


