


View 事件的分发机制 dispatchTouchEvent onInterceptTouchEvent onTouchEvent 案例
事件通常重要的有如下三种:
MotionEvent.ACTION_DOWN 按下View,是所有事件的开始
MotionEvent.ACTION_MOVE 滑动事件
MotionEvent.ACTION_UP 与down对应,表示抬起
事件的响应原理:
在android系统中,最广泛应用的就是监听、回调,进而形成了事件响应的过程。通俗就是说,你出去度假,提前预定过某酒店并注册,你在去那儿时,就能办入往手续,不用重新注册。立刻享用你的房间就行。
首先,我们要熟悉dispatchTouchEvent和onTouchEvent两个方法,话不多说,read the fucking source
看个小例子,我们知道通常来说,Button、ImageView、TextView等控件都是继承父类View来实现的。RelativeLayout、LinearLayout、FrameLayout等布局都是继承父类ViewGroup来实现的,下面选 Button来演示View事件分发,当然我也会切换TextView,来看看它们是否有不同之处:
MainActivity,给EventButton设置了OnTouchListener监听,同时它本身有onTouchEvent,及onDispatchTouchEvent
import android.os.Bundle;
import android.support.v7.app.AppCompatActivity;
import android.util.Log;
import android.view.MotionEvent;
import android.view.View;
import android.widget.Button;

public class MainActivity extends AppCompatActivity {

    private static final String  TAG = MainActivity.class.getSimpleName();

    @Override
    protected void onCreate(Bundle savedInstanceState) {
        super.onCreate(savedInstanceState);
        setContentView(R.layout.activity_main);
        Button v = (Button) findViewById(R.id.btn_event);

        v.setOnTouchListener(new View.OnTouchListener() {
            @Override
            public boolean onTouch(View v, MotionEvent event) {
                int action = event.getAction();
                switch (action) {

                    case MotionEvent.ACTION_DOWN:
                        Log.d(TAG, "onTouch  MotionEvent.ACTION_DOWN");
                        break;
                    case MotionEvent.ACTION_MOVE:
                        Log.d(TAG, "onTouch  MotionEvent.ACTION_MOVE");
                        break;
                    case MotionEvent.ACTION_UP:
                        Log.d(TAG, "onTouch  MotionEvent.ACTION_UP");
                        break;
                    default:
                        break;


                }
                return false;
            }
        });
    }
}
这是一个自定义的button
import android.content.Context;
import android.util.AttributeSet;
import android.util.Log;
import android.view.MotionEvent;
import android.widget.Button;

/**
 * author: star.yu on 2016/8/23 23:24
 * description:
 * e-mail:android_yuxin@163.com
 */
public class EventButton extends Button {

    private static final String TAG = EventButton.class.getSimpleName();

    public EventButton(Context context, AttributeSet attrs) {
        super(context, attrs);
    }


    @Override
    public boolean onTouchEvent(MotionEvent event) {

        int action = event.getAction();
        switch (action){

            case  MotionEvent.ACTION_DOWN:
                Log.d(TAG,"onTouchEvent  MotionEvent.ACTION_DOWN");
                break;
            case MotionEvent.ACTION_MOVE:
                Log.d(TAG,"onTouchEvent  MotionEvent.ACTION_MOVE");
                break;
            case MotionEvent.ACTION_UP:
                Log.d(TAG,"onTouchEvent  MotionEvent.ACTION_UP");
                break;
            default:
                break;
        }
        return super.onTouchEvent(event);
    }

    @Override
    public boolean dispatchTouchEvent(MotionEvent event) {
        int action = event.getAction();
        switch (action) {

            case MotionEvent.ACTION_DOWN:
                Log.d(TAG, "dispatchTouchEvent  MotionEvent.ACTION_DOWN");
                break;
            case MotionEvent.ACTION_MOVE:
                Log.d(TAG, "dispatchTouchEvent  MotionEvent.ACTION_MOVE");
                break;
            case MotionEvent.ACTION_UP:
                Log.d(TAG, "dispatchTouchEvent  MotionEvent.ACTION_UP");
                break;
            default:
                break;
        }
        return super.dispatchTouchEvent(event);
    }
}
布局文件
<?xml version="1.0" encoding="utf-8"?>
<RelativeLayout
    xmlns:android="http://schemas.android.com/apk/res/android"
    android:layout_width="match_parent"
    android:layout_height="match_parent"
    android:paddingBottom="@dimen/activity_vertical_margin"
    android:paddingLeft="@dimen/activity_horizontal_margin"
    android:paddingRight="@dimen/activity_horizontal_margin"
    android:paddingTop="@dimen/activity_vertical_margin"
   >

    <yuxin.isoftstone.com.viewdemo.EventButton
        android:id="@+id/btn_event"
        android:layout_width="150dp"
        android:layout_height="150dp"
        android:layout_centerInParent="true"
        android:text="点我!"/>
</RelativeLayout>
运行在studio,在手机上如图:
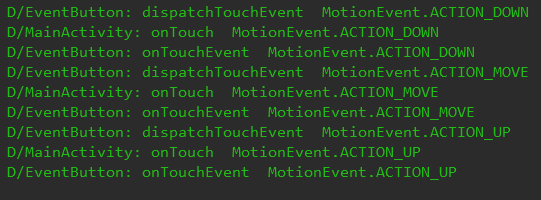
可以看到,执行过程为
dispatchTouchEvent() -> setOnTouchListener() -> onTouchEvent()


 701
701

 被折叠的 条评论
为什么被折叠?
被折叠的 条评论
为什么被折叠?
 到【灌水乐园】发言


