


 本文介绍了使用Flask框架实现Web服务器的过程,涵盖GIS地图展示、三维场景渲染、统计图表生成及后台框架模板等多个方面,提供了丰富的示例代码。
🍺Web服务器系列相关文章编写如下🍺:
- 🎈【Web开发】Node.js实现Web服务器(http模块)🎈
- 🎈【Web开发】Node.js实现Web服务器(express模块)🎈
- 🎈【Web开发】Python实现Web服务器(Flask入门)🎈
- 🎈【Web开发】Python实现Web服务器(Flask测试)🎈
- 🎈【Web开发】Python实现Web服务器(Tornado入门)🎈
- 🎈【Web开发】Python实现Web服务器(Tornado+flask+nginx)🎈
- 🎈【Web开发】Python实现Web服务器(FastAPI)🎈
- 🎈【Web开发】Android手机上基于Termux实现Web服务器(Python、node.js)🎈
文章目录

1、前言
提示:Flask是一个用python语言基于Werkzeug工具箱编写的轻量级web开发框架,它主要面向需求简单,项目周期短的小应用。
Flask是一个使用 Python 编写的轻量级 Web 应用框架。其 WSGI 工具箱采用 Werkzeug ,模板引擎则使用 Jinja2 。Flask使用 BSD 授权。

Flask也被称为 “microframework” ,因为它使用简单的核心,用 extension 增加其他功能。Flask没有默认使用的数据库、窗体验证工具。


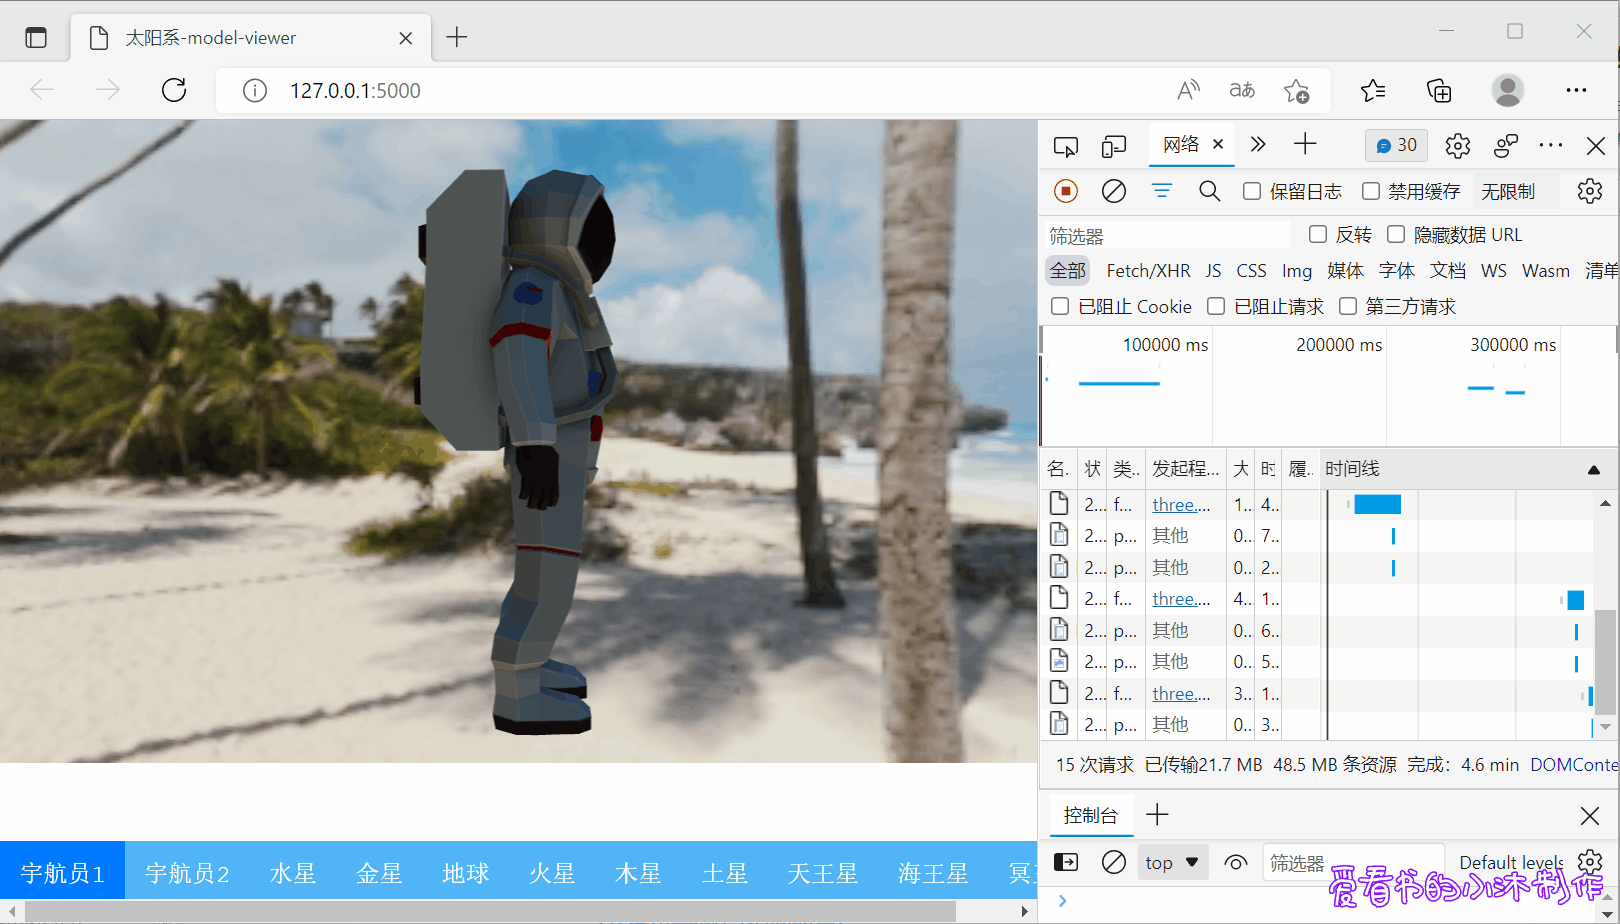
2、Flask测试网页(GIS地图)
2.1 基于model-viewer的太阳系查看的网页
该例子的具体介绍请见作者的另一篇文章,网址如下:
【小沐科普】小沐带您遨游太阳系(model-viewer,trimesh,Python)
这里通过编写python代码,搭建flask的web服务器环境,运行这个网页例子。
- test_solarsystem.py:
#***************************************************************
#   Purpose:   基于model-viewer的太阳系查看的网页(Flask的web服务器)
#   Author:    爱看书的小沐
#   Date:      2022-5-8
#   Languages: python
#   Platform:  python 3.9 win64
#   OS:        Win10 win64
# **************************************************************

from flask import Flask, redirect, url_for, request, render_template, Response
from io import FileIO

app = Flask(__name__)

@app.route('/')
def index():
    return render_template('solar_system.html')

@app.route("/images/<filename>")
def get_image(filename):
    with open("static/images/{}".format(filename), 'rb') as f:
      image = f.read()
    resp = Response(image, mimetype="image/jpg")
    return resp

@app.route("/glb/<filename>")
def get_binary(filename):
    data = FileIO("static/glb/{}".format(filename))
    resp = Response(data, mimetype="application/zip")
    return resp

if __name__ == '__main__':
   app.run(debug = True)


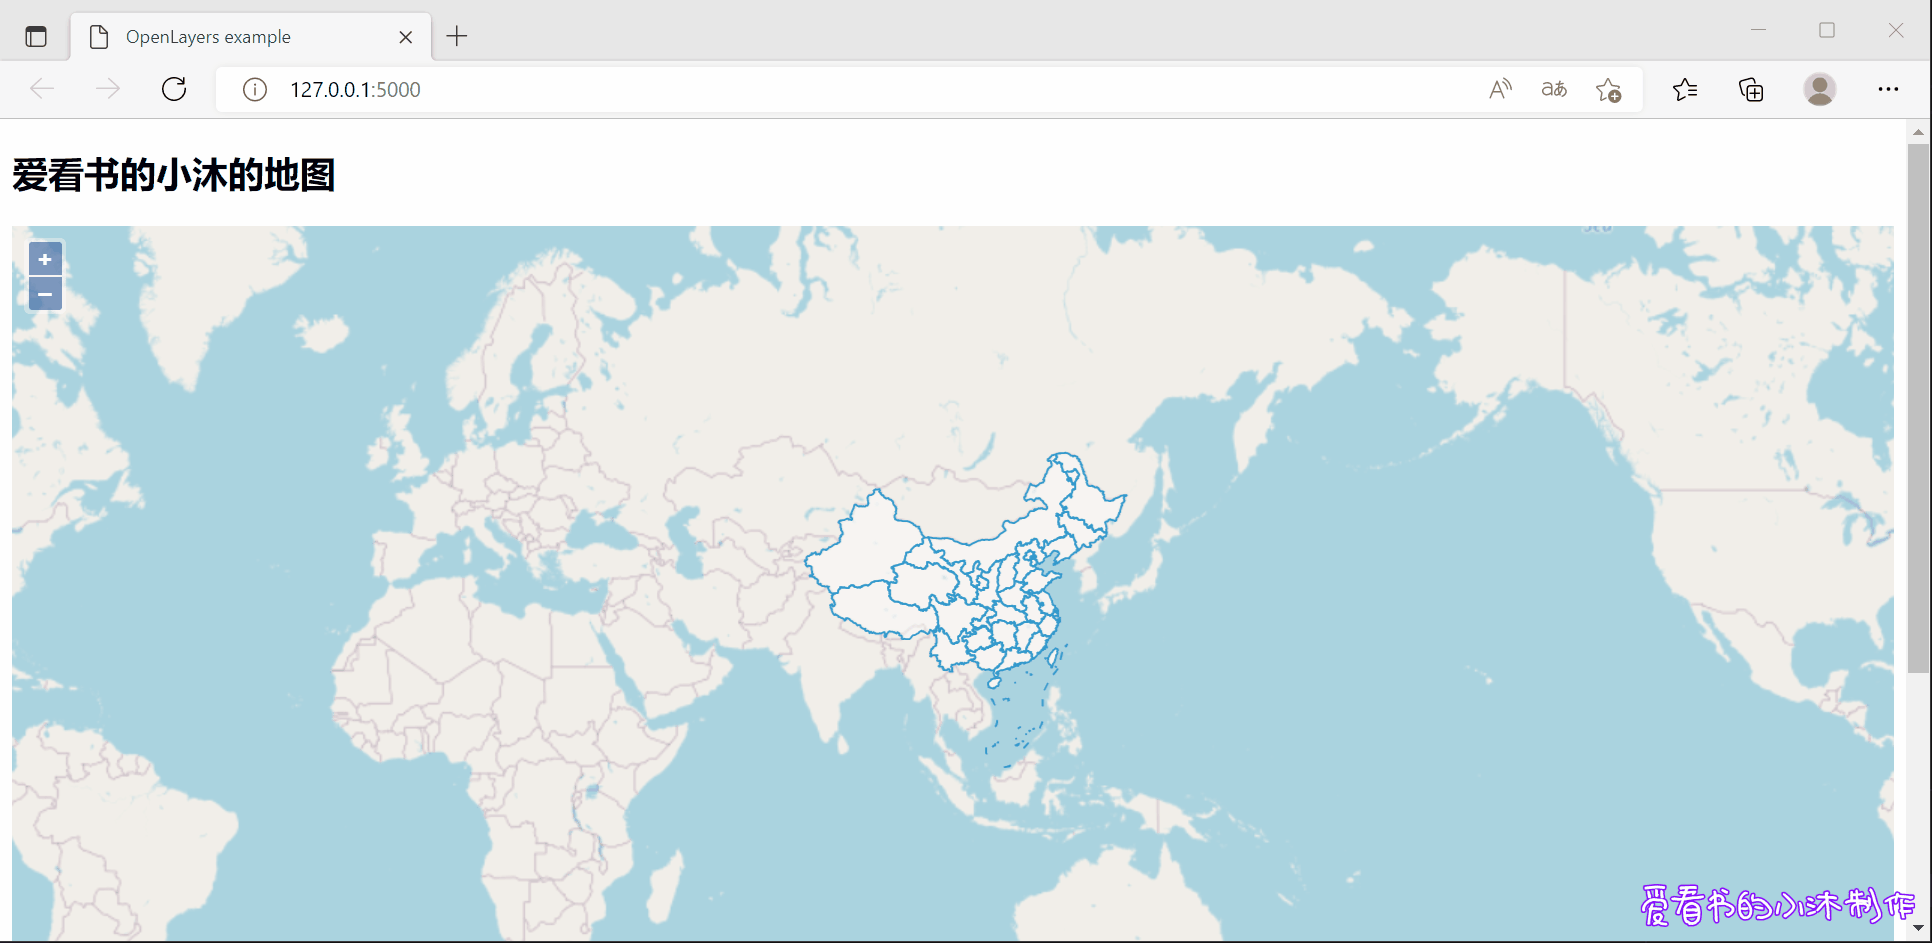
2.2 基于openlayers的在线地图叠加geojson的网页
该例子的具体介绍请见作者的另一篇文章,网址如下:
【GIS开发】OpenLayers入门学习(JavaScript库)
- test_openlayers.py:
#***************************************************************
#   Purpose:   基于openlayers的在线地图叠加geojson的网页(Flask的web服务器)
#   Author:    爱看书的小沐
#   Date:      2022-5-8
#   Languages: python
#   Platform:  python 3.9 win64
#   OS:        Win10 win64
# **************************************************************

from flask import Flask, Response, request
from flask import render_template, make_response, jsonify, send_from_directory,redirect, url_for
from io import FileIO
import os
import mimetypes
from flask_cors import CORS, cross_origin

app = Flask(__name__)
cors = CORS(app)
# CORS(app, supports_credentials=True)
# CORS(app, resources=r'/*')
# CORS(app, resources={r'/*': {'origins': '*'}})
# cors = CORS(app, resources={r"/api/*": {"origins": "*"}})
app = Flask(__name__)

@app.route('/')
def index():
    return render_template('test_openlayers.html')
    # return render_template('test_openlayers2_offlinemap.html')

def get_localfile(directory, path):
    response = make_response(send_from_directory(directory, path.encode('utf-8').decode('utf-8'), as_attachment=False))
    mime_type = mimetypes.guess_type(path)[0]
    if path.endswith(".js") :
       mime_type = "application/javascript"
    response.headers['Content-Type'] = mime_type
    print(directory, path, mime_type)
    return response

@app.route("/<path:path>")
def get_staticfile(path):
    directory = os.getcwd() + "/static/"
    return get_localfile(directory, path)

@app.route("/tile/<path:path>")
def get_tilefile(path):
    directory = "D:/test/maps/"
    return get_localfile(directory, path)

@app.route('/favicon.ico')
def favicon():
    return send_from_directory(os.path.join(app.root_path, 'static'), 'favicon.ico'
        , mimetype='image/vnd.microsoft.icon')

if __name__ == '__main__':
   app.run(debug = True)
- test_openlayers.html:
<!doctype html>
<html lang="en">

<head>
    <meta charset="utf-8">
    <link rel="stylesheet"
        href="https://cdn.jsdelivr.net/gh/openlayers/openlayers.github.io@master/en/v6.13.0/css/ol.css" type="text/css">
    <style>
        .map {
            height: 45rem;
            width: 100%;
        }
    </style>
    <script src="https://cdn.jsdelivr.net/gh/openlayers/openlayers.github.io@master/en/v6.13.0/build/ol.js"></script>
    <title>OpenLayers example</title>
</head>

<body>
    <h2>爱看书的小沐的地图</h2>
    <div id="map" class="map"></div>
    <script type="text/javascript">

        var pointGeoJsonLayer = new ol.layer.Vector({
            title: 'points',
            source: new ol.source.Vector({
                projection: 'EPSG:4326',
                url: 'json/china.json',
                format: new ol.format.GeoJSON()
            })
        });

        var map = new ol.Map({
            target: 'map',
            layers: [
                new ol.layer.Tile({
                    source: new ol.source.OSM()
                }),
                pointGeoJsonLayer
            ],
            view: new ol.View({
                center: ol.proj.fromLonLat([104.1, 21.6]),
                zoom: 3
            })
        });
    </script>
</body>

</html>
运行结果如下:
2.3 基于openlayers的离线地图瓦片的网页
test_openlayers.py: 和2.2 基于openlayers的在线地图叠加geojson的网页相同。
- test_openlayers.html:
<!DOCTYPE html>
<html lang="zh-CN">
<head>
    <meta http-equiv="Content-Type" content="text/html; charset=utf-8" />
    <title>本地瓦片数据测试</title>
    <link rel="stylesheet" href="/openlayers/v6.13.0-dist/ol.css" />
    <style>
        body, html {
            width: 100%;
            height: 100%;
        }
        #map, #info {
            width: 100%;
            height: 100%;
        }
    </style>
    <script src="/openlayers/v6.13.0-dist/ol.js"></script>
</head>

<body>
    <div id="map"></div>
    <script type="text/javascript">
        var map = new ol.Map({
            target: 'map',
            layers: [
                new ol.layer.Tile({
                    source: new ol.source.XYZ({
                        url: "http://127.0.0.1:5000/tile/{z}/{x}/{y}.png",
                        attributions: "test"
                    })
                })
            ],
            view: new ol.View({
                center: ol.proj.fromLonLat([37.41, 8.82]),
                zoom: 4
            }),
            controls: ol.control.defaults().extend([
                new ol.control.FullScreen(),
                new ol.control.MousePosition(),
                new ol.control.OverviewMap(),
                new ol.control.ScaleLine(),
                new ol.control.ZoomSlider(),
                new ol.control.ZoomToExtent()
            ]),
        });
    </script>
</body>
</html>
运行结果如下:

2.4 基于leaflet的在线地图叠加mbtiles的网页
该例子的具体介绍请见作者的另一篇文章,网址如下:
【GIS开发】Leaflet入门学习(Javascript库)
- test_leaflet.py:
#***************************************************************
#   Purpose:   基于leaflet的在线地图叠加mbtiles的网页(Flask的web服务器)
#   Author:    爱看书的小沐
#   Date:      2022-5-8
#   Languages: python
#   Platform:  python 3.9 win64
#   OS:        Win10 win64
# **************************************************************

from flask import Flask, redirect, url_for, request, render_template, Response
from io import FileIO

app = Flask(__name__)

@app.route('/')
def index():
    return render_template('test_leaflet.html')

@app.route("/json/<filename>")
def get_binary(filename):
    data = FileIO("static/json/{}".format(filename))
    resp = Response(data, mimetype="application/json")
    return resp

@app.route("/js/<filename>")
def get_js(filename):
    data = FileIO("static/js/{}".format(filename))
    resp = Response(data, mimetype="application/html")
    return resp

if __name__ == '__main__':
   app.run(debug = True)
- test_leaflet.html:
<!DOCTYPE html>
<html>

<head>
    <title>Leaflet sample</title>
    <link rel="stylesheet" href="https://unpkg.com/leaflet@1.7.1/dist/leaflet.css"
        integrity="sha512-xodZBNTC5n17Xt2atTPuE1HxjVMSvLVW9ocqUKLsCC5CXdbqCmblAshOMAS6/keqq/sMZMZ19scR4PsZChSR7A=="
        crossorigin="" />
    <script src="https://unpkg.com/leaflet@1.7.1/dist/leaflet.js"
        integrity="sha512-XQoYMqMTK8LvdxXYG3nZ448hOEQiglfqkJs1NOQV44cWnUrBc8PkAOcXy20w0vlaXaVUearIOBhiXZ5V3ynxwA=="
        crossorigin="" ></script>

    <!-- https://gitlab.com/IvanSanchez/Leaflet.TileLayer.MBTiles -->>
    <script src="js/Leaflet.TileLayer.MBTiles.js"></script>
    <script src="https://unpkg.com/sql.js@0.3.2/js/sql.js"></script>
</head>

<body>
    <div id="map" style="width: 900px; height: 380px"></div>
    <script>
        var map = new L.Map('map').fitWorld();

        var mb = L.tileLayer.mbTiles('json/world_countries.mbtiles').addTo(map);
        mb.on('databaseloaded', function(ev) {
            console.info('MBTiles DB loaded', ev);
        });
        mb.on('databaseerror', function(ev) {
            console.info('MBTiles DB error', ev);
        });
    </script>
</body>

</html>
运行结果如下:

2.5 基于cesium.js的三维地球显示的网页
Cesium是国外一个基于JavaScript编写的使用WebGL的地图引擎。Cesium支持3D,2D,2.5D形式的地图展示。它提供了基于JavaScript语言的开发包,方便用户快速搭建一款零插件的虚拟地球Web应用,并在性能,精度,渲染质量以及多平台,易用性上都有高质量的保证。
test_cesiumjs.py:
from flask import Flask, Response
from flask import render_template, make_response, jsonify, send_from_directory
from io import FileIO
import os
import mimetypes

app = Flask(__name__)

@app.route('/')
def index():
    return render_template('test_cesium3.html')

@app.route("/Cesium-1.93/Build/Cesium/<path:path>")
def get_cesiumfile(path):
    directory = os.getcwd() + "/static/Cesium-1.93/Build/Cesium/"
    response = make_response(send_from_directory(directory, path.encode('utf-8').decode('utf-8'), as_attachment=False))
    mime_type = mimetypes.guess_type(path)[0]
    if path.endswith(".js") :
       mime_type = "application/javascript"
    response.headers['Content-Type'] = mime_type
    print(directory, path, mime_type)
    return response

@app.route('/favicon.ico')
def favicon():
    return send_from_directory(os.path.join(app.root_path, 'static'), 'favicon.ico'
        , mimetype='image/vnd.microsoft.icon')

if __name__ == '__main__':
   app.run(debug = True)
- test_cesiumjs.html:
<!DOCTYPE html>
<html lang="en">
<head>
  <title>cesium.js example</title>
  <meta charset="utf-8">
  <!-- Include the CesiumJS JavaScript and CSS files -->
  <script src="Cesium-1.93/Build/Cesium/Cesium.js"></script>
  <link href="Cesium-1.93/Build/Cesium/Widgets/widgets.css" rel="stylesheet">
</head>
<body>
  <div id="cesiumContainer"></div>
  <script>
    // Your access token can be found at: https://cesium.com/ion/tokens.
    // This is the default access token from your ion account

    Cesium.Ion.defaultAccessToken = 'eyJhbGciOiJIUzI1NiIsInR5cCI6IkpXVCJ9.eyJqdGkiOiI3ZGQ4ZTc1Yy0xZjY1LTQzYzUtYjhiZi1iYTliZWFkZTVhMjYiLCJpZCI6ODc4MjQsImlhdCI6MTY0ODcyMTAyNH0.hL34d0emYTYCqDlmTq8lpL4UyA_p6W4BOATX9JqDHQs';

    // Initialize the Cesium Viewer in the HTML element with the `cesiumContainer` ID.
    const viewer = new Cesium.Viewer('cesiumContainer', {
      terrainProvider: Cesium.createWorldTerrain()
    });
    // Add Cesium OSM Buildings, a global 3D buildings layer.
    const buildingTileset = viewer.scene.primitives.add(Cesium.createOsmBuildings());
    // Fly the camera to San Francisco at the given longitude, latitude, and height.
    viewer.camera.flyTo({
      destination : Cesium.Cartesian3.fromDegrees(-122.4175, 37.655, 400),
      orientation : {
        heading : Cesium.Math.toRadians(0.0),
        pitch : Cesium.Math.toRadians(-15.0),
      }
    });
  </script>
 </div>
</body>
</html>
- 运行结果:

3、Flask测试网页(三维显示)
3.1 基于three.js的三维场景显示的网页
- test_threejs.py:
#***************************************************************
#   Purpose:   基于three.js的三维场景显示的网页(Flask的web服务器)
#   Author:    爱看书的小沐
#   Date:      2022-5-8
#   Languages: python
#   Platform:  python 3.9 win64
#   OS:        Win10 win64
# **************************************************************
from flask import Flask, render_template, Response
from io import FileIO

app = Flask(__name__)

@app.route('/')
def index():
    return render_template('test_threejs.html')

@app.route("/js/<path:path>")
def get_js(path):
    data = FileIO("static/js/{}".format(path))
    resp = Response(data, mimetype="application/javascript")
    return resp

@app.route("/glb/<filename>")
def get_binary(filename):
    data = FileIO("static/glb/{}".format(filename))
    resp = Response(data, mimetype="application/zip")
    return resp

if __name__ == '__main__':
   app.run(debug = True)
- test_threejs.html:
<!DOCTYPE html>
<html>
<head>
    <meta charset="utf-8">
    <title>My first three.js app</title>
    <style>
        body {margin: 0;}
    </style>
</head>

<body>
    <script src="js/three.js"></script>
    <script src="js/loaders/GLTFLoader.js"></script>
    <script src="js/controls/OrbitControls.js"></script>
    <script>
        /* add scene */
        const scene = new THREE.Scene();
        const camera = new THREE.PerspectiveCamera(45, window.innerWidth / window.innerHeight, 0.1, 1000);
        camera.position.set(1, 1, 5);
        camera.lookAt(new THREE.Vector3(0, 0, 0));

        /* add light */
        scene.add(new THREE.AmbientLight(0x999999)); // 环境光
        let light = new THREE.DirectionalLight(0xdfebff, 0.45);
        light.position.set(100, 600, 400);
        light.position.multiplyScalar(0.3);
        light.shadow.camera.near = 20; // 产生阴影的最近距离
        light.shadow.camera.far = 20000; // 产生阴影的最远距离
        light.shadow.camera.left = -500; // 产生阴影距离位置的最左边位置
        light.shadow.camera.right = 500; // 最右边
        light.shadow.camera.top = 500; // 最上边
        light.shadow.camera.bottom = -500; // 最下面
        light.castShadow = true;
        light.shadow.mapSize = new THREE.Vector2(1024, 1024);
        scene.add(light);
        //var helper = new THREE.DirectionalLightHelper(light, 5);
        //scene.add(helper);

        /* add renderer */
        const renderer = new THREE.WebGLRenderer();
        renderer.setSize(window.innerWidth, window.innerHeight);
        document.body.appendChild(renderer.domElement);

        /* add orbit control */
        let controls = new THREE.OrbitControls(camera, renderer.domElement)
        controls.target.set(0, 0, 0)
        controls.minDistance = 1
        controls.maxDistance = 1000
        //controls.maxPolarAngle = Math.PI / 3
        //controls.minPolarAngle=controls.maxPolarAngle=1.57079
        //controls.minAzimuthAngle = Math.PI;
        //controls.maxAzimuthAngle = Math.PI;
        controls.enableDamping = true;
        controls.update()

        /* add a box model */
        const geometry = new THREE.BoxGeometry();
        const material = new THREE.MeshBasicMaterial({
            color: 0xffff00
        });
        const cube = new THREE.Mesh(geometry, material);
        cube.position.x = 2;
        scene.add(cube);

        /* add a gltf model */
        gltfmodel = null;
        const loader = new THREE.GLTFLoader();
        loader.load('glb/Avocado2.glb', function (gltf) {
            gltfmodel = gltf.scene;
            gltfmodel.position.x = 0;
            gltfmodel.position.y = 0;
            gltfmodel.position.z = 0;
            gltfmodel.scale.set(40, 40, 40);

            gltfmodel.traverse((object) => {
                if (object.isMesh) {
                    console.log(object)
                    object.castShadow = true
                    object.receiveShadow = true
                }
            })
            gltfmodel.receiveShadow = true
            scene.add(gltfmodel)
        }, undefined,
        function (error) {
            console.error(error);
        });

        /* add floor */
        const floorGeometry = new THREE.PlaneGeometry(1000, 1000, 100, 100)
        const floorMaterial = new THREE.MeshPhongMaterial({
            color: 0x808080,
            shininess: 0,
            wireframe: true
        })
        const floor = new THREE.Mesh(floorGeometry, floorMaterial)
        floor.rotation.x = -0.5 * Math.PI
        floor.position.z = -1;
        // 地板接受阴影开启
        floor.receiveShadow = true
        scene.add(floor)

        /* add animation */
        function animate() {
            requestAnimationFrame(animate);
            cube.rotation.x += 0.01;
            cube.rotation.y += 0.01;
            renderer.render(scene, camera);
            update();
        };

        /* 更新 */
        function update() {
            controls.update();
        }

        /* 窗口变动触发的方法 */
        function onWindowResize() {
            camera.aspect = window.innerWidth / window.innerHeight;
            camera.updateProjectionMatrix();
            renderer.setSize(window.innerWidth, window.innerHeight);
        }

        animate();
        window.addEventListener('resize', onWindowResize, false);
    </script>
</body>
</html>
运行结果如下:


3.2 基于babylon.js的三维场景显示的网页
- test_babylon.py:
#***************************************************************
#   Purpose:   基于babylon.js的三维场景显示的网页(Flask的web服务器)
#   Author:    爱看书的小沐
#   Date:      2022-5-8
#   Languages: python
#   Platform:  python 3.9 win64
#   OS:        Win10 win64
# **************************************************************
from flask import Flask, render_template, Response
from io import FileIO

app = Flask(__name__)

@app.route('/')
def index():
    return render_template('test_babylon.html')

@app.route("/js/babylon/<path:path>")
def get_js(path):
    data = FileIO("static/js/babylon/{}".format(path))
    resp = Response(data, mimetype="application/javascript")
    return resp

@app.route("/glb/<filename>")
def get_binary(filename):
    data = FileIO("static/glb/{}".format(filename))
    resp = Response(data, mimetype="application/zip")
    return resp

if __name__ == '__main__':
   app.run(debug = True)
- test_threejs.html:
<!doctype html>
<html lang="en">

<head>
    <meta charset="utf-8">
    <style>
        html,
        body {
            overflow: hidden;
            width: 100%;
            height: 100%;
            margin: 0;
        }

        canvas {
            width: 100%;
            height: 100%;
            -ms-touch-action: none;
            touch-action: none;
        }
    </style>
    <title>Babylon example</title>
</head>

<body>
<canvas></canvas>
<script src="https://cdn.babylonjs.com/babylon.js"></script>
<script src="https://preview.babylonjs.com/loaders/babylonjs.loaders.min.js"></script>

<script>
    var canvas = document.querySelector("canvas");
    var engine = new BABYLON.Engine(canvas, true);

    var scene = new BABYLON.Scene(engine);
    scene.clearColor = new BABYLON.Color3(0.2, 0.2, 0.2);

    var camera = new BABYLON.FreeCamera("mainCamera", new BABYLON.Vector3(0, 5, -10), scene);
    camera.setTarget(BABYLON.Vector3.Zero());
    camera.attachControl(canvas, false);

    var light = new BABYLON.SpotLight("light", new BABYLON.Vector3(0, 14, -1), new BABYLON.Vector3(0, -1, 0), 1, 16,
        scene);
    light.intensity = 0.9;

    var sphereMaterial = new BABYLON.StandardMaterial("sphereMaterial", scene);
    sphereMaterial.diffuseColor = new BABYLON.Color3(0.6, 0.2, 0.2);
    sphereMaterial.specularPower = 128;

    var sphere = BABYLON.Mesh.CreateSphere("sphere", 16, 2, scene);
    sphere.position.y = 1;
    sphere.material = sphereMaterial;

    var groundMaterial = new BABYLON.StandardMaterial("groundMaterial", scene);
    groundMaterial.diffuseColor = new BABYLON.Color3(0.1, 0.3, 0.1);

    var ground = BABYLON.Mesh.CreateGround("ground", 10, 10, 2, scene);
    ground.material = groundMaterial;
    ground.receiveShadows = true;

    var shadowGenerator = new BABYLON.ShadowGenerator(1024, light);
    shadowGenerator.setDarkness(0.4);
    shadowGenerator.getShadowMap().renderList.push(sphere);
    shadowGenerator.useBlurVarianceShadowMap = true;
    shadowGenerator.blurScale = 2;
    shadowGenerator.bias = 0.01;

    BABYLON.SceneLoader.AppendAsync("glb/", "CesiumMan.glb", scene).then(function (scene) {
        scene.meshes[3].scaling.x = 3;
        scene.meshes[3].scaling.y = 3;
        scene.meshes[3].scaling.z = 3;

        scene.createDefaultCameraOrLight(true, true, true);
        scene.activeCamera.alpha += Math.PI;
    });

    BABYLON.SceneLoader.AppendAsync("glb/", "CesiumMan.glb", scene).then(function (scene) {
        scene.meshes[4].scaling.x = 3;
        scene.meshes[4].scaling.y = 3;
        scene.meshes[4].scaling.z = 3;
        scene.meshes[4].position.x = 3;
    });

    engine.runRenderLoop(function () {
        scene.render();
    });

    window.addEventListener("resize", function () {
        engine.resize();
    })
</script>
</body>
</html>
运行结果如下:

3.3 基于A-Frame的三维场景显示的网页
https://aframe.io/
https://codepen.io/AndraConnect/pen/YNogdG?editors=1000
A-Frame 可以从纯 HTML 文件开发,而无需安装任何东西。尝试 A-Frame 的一个好方法是在 Glitch
上重新混合启动示例,这是一个可以立即免费托管和部署的在线代码编辑器。
A-Frame 支持大多数 VR 耳机,例如 Vive、Rift、Windows Mixed Reality、Daydream、GearVR、Cardboard、Oculus Go,甚至可以用于增强现实。尽管 A-Frame 支持整个频谱,但 A-Frame 旨在定义超越基本 360° 内容的完全沉浸式交互式 VR 体验,充分利用位置跟踪和控制器。
组件:使用 A-Frame 的核心组件(例如几何、材质、灯光、动画、模型、光线投射器、阴影、位置音频、文本和大多数主要耳机的控件)开始运行。进一步了解数百个社区组件,包括环境、状态、粒子系统、物理、多用户、海洋、传送、超级手和 增强现实。
- test_A-Frame.py:
#***************************************************************
#   Purpose:   基于A-Frame.js的三维场景显示的网页(Flask的web服务器)
#   Author:    爱看书的小沐
#   Date:      2022-5-18
#   Languages: python
#   Platform:  python 3.9 win64
#   OS:        Win10 win64
# **************************************************************

from flask import Flask, Response
from flask import render_template, make_response, jsonify, send_from_directory
from io import FileIO
import os

app = Flask(__name__)

@app.route('/')
def index():
    return render_template('test_A-Frame.html')

@app.route("/js/<path:path>")
def get_js(path):
    data = FileIO("static/js/aframe/{}".format(path))
    resp = Response(data, mimetype="application/javascript")
    return resp

@app.route("/glb2/<filename>")
def get_binary(filename):
    data = FileIO("static/glb2/{}".format(filename))
    resp = Response(data, mimetype="application/zip")
    return resp

@app.route("/images/<filename>")
def get_image(filename):
    with open("static/images/{}".format(filename), 'rb') as f:
      image = f.read()
    resp = Response(image, mimetype="image/jpg")
    return resp

@app.route('/favicon.ico')
def favicon():
    return send_from_directory(os.path.join(app.root_path, 'static'), 'favicon.ico'
        , mimetype='image/vnd.microsoft.icon')

if __name__ == '__main__':
   app.run(debug = True)
- test_A-Frame.html:
<html>
<head>
  <script src="js/aframe-v1.3.0.min.js"></script>
</head>

<body>
  <a-scene background="color: #333" stats>
    <a-box position="-1 0.5 -3" rotation="0 45 0" color="#4CC3D9"></a-box>
    <a-sphere position="0 1.25 -5" radius="0.25" color="#EF2D5E"></a-sphere>
    <a-cylinder position="1 0.75 -3" radius="0.5" height="1.5" color="#FFC65D"></a-cylinder>
    <a-plane position="0 0 -4" rotation="-90 0 0" width="4" height="4" color="#7BC8A4"></a-plane>

    <a-assets>
      <a-asset-item id="XD40" src="glb2/XD40.glb"></a-asset-item>
      <a-mixin id="planet" geometry="primitive: sphere; radius: 0.5"></a-mixin>
      <a-mixin id="orbitAnimation"
        animation="property: object3D.rotation.y; to: 360; loop: true; easing: linear; dur: 3000"></a-mixin>
      <a-mixin id="spinAnimation"
        animation="property: object3D.rotation.y; to: 360; loop: true; easing: linear; dur: 96000"></a-mixin>
      <img id="sun" src="images/sun.jpg">
    </a-assets>

    <a-entity position="5 0 0" gltf-model="#XD40"></a-entity>
    <a-entity position="-5 0 0" gltf-model="#XD40"></a-entity>

    <a-entity position="0 6 -5">
      <a-entity light="type: point; intensity: 2"></a-entity>
      <a-entity light="type: ambient; color: #888"></a-entity>
      <a-entity mixin="planet spinAnimation" geometry="radius: 3" material="shader: flat; src: #sun"></a-entity>
      <a-entity mixin="orbitAnimation" animation="dur: 8000">
        <a-entity mixin="planet" material="color: red" position="8 0 0" geometry="radius: 1"></a-entity>
      </a-entity>
      <a-entity mixin="orbitAnimation" animation="dur: 4000">
        <a-entity mixin="planet" material="color: blue" position="6 0 0"></a-entity>
      </a-entity>
      <a-entity mixin="orbitAnimation" animation="dur: 2000">
        <a-entity animation__p="property: geometry.p; dir: alternate; easing: linear; loop: true; to: 4"
          animation__q="property: geometry.q; dir: alternate; easing: linear; loop: true; to: 7"
          geometry="primitive: torusKnot; radius: .5; radiusTubular: .05" material="color: green" position="4 0 0">
        </a-entity>
      </a-entity>
    </a-entity>

    <a-camera position='0 0 3' user-height='0' wasd-controls-enabled="true"></a-camera>
  </a-scene>

</body>
</html>
- 运行结果:

4、Flask测试网页(统计图表)
4.1 基于echarts的统计图的网页
https://echarts.apache.org
ECharts,一个使用 JavaScript 实现的开源可视化库,可以流畅的运行在 PC 和移动设备上,兼容当前绝大部分浏览器(IE9/10/11,Chrome,Firefox,Safari等),底层依赖矢量图形库 ZRender,提供直观,交互丰富,可高度个性化定制的数据可视化图表。
ECharts 提供了常规的折线图、柱状图、散点图、饼图、K线图,用于统计的盒形图,用于地理数据可视化的地图、热力图、线图,用于关系数据可视化的关系图、treemap、旭日图,多维数据可视化的平行坐标,还有用于 BI 的漏斗图,仪表盘,并且支持图与图之间的混搭。
- test_echarts.py:
#***************************************************************
#   Purpose:   基于echarts的统计图的网页(Flask的web服务器)
#   Author:    爱看书的小沐
#   Date:      2022-5-29
#   Languages: python
#   Platform:  python 3.9 win64
#   OS:        Win10 win64
# **************************************************************

from flask import Flask, Response, request
from flask import render_template, make_response, jsonify, send_from_directory
from io import FileIO
import os
import mimetypes
from flask_cors import CORS, cross_origin

app = Flask(__name__)
# cors = CORS(app)
CORS(app, supports_credentials=True)
# CORS(app, resources=r'/*')
# cors = CORS(app, resources={r"/api/*": {"origins": "*"}})

# 跨域支持
@app.after_request
def af_request(resp):
    """
    #请求钩子,在所有的请求发生后执行,加入headers。
    :param resp:
    :return:
    """
    resp = make_response(resp)
    resp.headers['Access-Control-Allow-Origin'] = '*'
    resp.headers['Access-Control-Allow-Methods'] = 'GET,POST'
    resp.headers['Access-Control-Allow-Headers'] = 'x-requested-with,content-type'
    return resp

# 只允许路径为'/login'跨域!
@app.route('/login')
@cross_origin()
def data():
    return jsonify({'name':'tomcat'})

@app.route('/test')
@cross_origin(supports_credentials=True)
def hello():
    name = request.args.get("name", "World")
    return f'Hello, {name}!'

@app.route('/')
def index():
    return render_template('test_echarts.html')

@app.route("/<path>")
def get_cesiumfile(path):
    directory = os.getcwd() + "/static/echarts-5.3.2/package/dist/"
    response = make_response(send_from_directory(directory, path.encode('utf-8').decode('utf-8'), as_attachment=False))
    mime_type = mimetypes.guess_type(path)[0]
    if path.endswith(".js") :
       mime_type = "application/javascript"
    response.headers['Content-Type'] = mime_type
    print(directory, path, mime_type)
    return response

@app.route('/favicon.ico')
def favicon():
    return send_from_directory(os.path.join(app.root_path, 'static'), 'favicon.ico'
        , mimetype='image/vnd.microsoft.icon')

if __name__ == '__main__':
   app.run(debug = True)
- 运行结果:


4.2 基于Highcharts.js的统计图的网页
https://www.highcharts.com.cn/
- test_echarts.py:
#***************************************************************
#   Purpose:   基于Highcharts.js的统计图的网页(Flask的web服务器)
#   Author:    爱看书的小沐
#   Date:      2022-5-29
#   Languages: python
#   Platform:  python 3.9 win64
#   OS:        Win10 win64
# **************************************************************
from flask import Flask, Response, request
from flask import render_template, make_response, jsonify, send_from_directory
from io import FileIO
import os
import mimetypes
from flask_cors import CORS, cross_origin

app = Flask(__name__)
cors = CORS(app)
# CORS(app, supports_credentials=True)
# CORS(app, resources=r'/*')
# cors = CORS(app, resources={r"/api/*": {"origins": "*"}})

@app.route('/')
def index():
    return render_template('test_Highcharts.html')

@app.route("/<path:path>")
def get_staticfile(path):
    directory = os.getcwd() + "/static/"
    print(directory)
    response = make_response(send_from_directory(directory, path.encode('utf-8').decode('utf-8'), as_attachment=False))
    mime_type = mimetypes.guess_type(path)[0]
    if path.endswith(".js") :
       mime_type = "application/javascript"
    response.headers['Content-Type'] = mime_type
    print(directory, path, mime_type)
    return response

@app.route('/favicon.ico')
def favicon():
    return send_from_directory(os.path.join(app.root_path, 'static'), 'favicon.ico'
        , mimetype='image/vnd.microsoft.icon')

if __name__ == '__main__':
   app.run(debug = True)
- 运行结果:

5、Flask测试网页(后台框架模板)
5.1 基于layui的后台框架模板的网页
- test_layui.py:
#***************************************************************
#   Purpose:   基于layui的后台框架模板的网页(Flask的web服务器)
#   Author:    爱看书的小沐
#   Date:      2022-5-24
#   Languages: python
#   Platform:  python 3.9 win64
#   OS:        Win10 win64
# **************************************************************
from flask import Flask, Response
from flask import render_template, make_response, jsonify, send_from_directory
from io import FileIO
import os

app = Flask(__name__)
#app = Flask(__name__, template_folder="templates")

app.jinja_env.block_start_string = '{%%'  # 修改块开始符号
app.jinja_env.block_end_string = '%%}'  # 修改块结束符号
app.jinja_env.variable_start_string = '{{{'  # 修改变量开始符号
app.jinja_env.variable_end_string = '}}}'  # 修改变量结束符号
app.jinja_env.comment_start_string = '##}'  # 修改注释开始符号
app.jinja_env.comment_end_string = '##}'  # 修改注释结束符号复制代码

# 因为vue和render_template的模板都是用{{  }},所以会冲突,将flask的修改为[[  ]]
##app.jinja_env.variable_start_string = '[['
##app.jinja_env.variable_end_string = ']]'

@app.route('/')
def index():
    return render_template('layui-v2.6.9/examples/table.html')

@app.route("/dist/css/<path:path>")
@app.route("/src/css/<path:path>")
def get_css2(path):
    data = FileIO("templates/layui-v2.6.9/src/css/{}".format(path))
    resp = Response(data, mimetype="text/css")
    return resp

@app.route("/dist/<path:path>")
@app.route("/src/<path:path>")
def get_json(path):
    data = FileIO("templates/layui-v2.6.9/src/{}".format(path))
    resp = Response(data, mimetype="application/javascript")
    return resp

@app.route("/json/<path:path>")
def get_binary(path):
    data = FileIO("templates/layui-v2.6.9/examples/json/{}".format(path))
    resp = Response(data, mimetype="application/json")
    return resp

@app.route('/favicon.ico')
def favicon():
    return send_from_directory(os.path.join(app.root_path, 'static'), 'favicon.ico'
        , mimetype='image/vnd.microsoft.icon')
    #<link rel="shortcut icon" href="{{ url_for('static', filename='favicon.ico') }}">

if __name__ == '__main__':
   app.run(debug = True)
- 运行结果:


5.2 基于layuimini的后台框架模板的网页
- test_layuimini.py:
#***************************************************************
#   Purpose:   基于layuimini的后台框架模板的网页(Flask的web服务器)
#   Author:    爱看书的小沐
#   Date:      2022-5-30
#   Languages: python
#   Platform:  python 3.9 win64
#   OS:        Win10 win64
# **************************************************************
from flask import Flask, Response
from flask import render_template, make_response, jsonify, send_from_directory
from io import FileIO
import os
import mimetypes

app = Flask(__name__)

app.jinja_env.block_start_string = '{%%'  # 修改块开始符号
app.jinja_env.block_end_string = '%%}'  # 修改块结束符号
app.jinja_env.variable_start_string = '{{{'  # 修改变量开始符号
app.jinja_env.variable_end_string = '}}}'  # 修改变量结束符号
app.jinja_env.comment_start_string = '##}'  # 修改注释开始符号
app.jinja_env.comment_end_string = '##}'  # 修改注释结束符号复制代码

@app.route('/')
def index():
    return render_template('layuimini-2/index.html')

@app.route("/<path:path>")
def get_staticfile(path):
    directory = os.getcwd() + "/templates/layuimini-2/"
    print(directory)
    response = make_response(send_from_directory(directory, path.encode('utf-8').decode('utf-8'), as_attachment=False))
    mime_type = mimetypes.guess_type(path)[0]
    if path.endswith(".js") :
       mime_type = "application/javascript"
    response.headers['Content-Type'] = mime_type
    print(directory, path, mime_type)
    return response

@app.route('/favicon.ico')
def favicon():
    return send_from_directory(os.path.join(app.root_path, 'static'), 'favicon.ico'
        , mimetype='image/vnd.microsoft.icon')
    #<link rel="shortcut icon" href="{{ url_for('static', filename='favicon.ico') }}">

if __name__ == '__main__':
   app.run(debug = True)
- 运行结果:

5.3 基于Pear Admin Layui的后台框架模板的网页
- test_layuimini.py:
#***************************************************************
#   Purpose:   基于Pear Admin Layui的后台框架模板的网页(Flask的web服务器)
#   Author:    爱看书的小沐
#   Date:      2022-5-30
#   Languages: python
#   Platform:  python 3.9 win64
#   OS:        Win10 win64
# **************************************************************
from flask import Flask, Response
from flask import render_template, make_response, jsonify, send_from_directory
from io import FileIO
import os
import mimetypes

app = Flask(__name__)

app.jinja_env.block_start_string = '{%%'  # 修改块开始符号
app.jinja_env.block_end_string = '%%}'  # 修改块结束符号
app.jinja_env.variable_start_string = '{{{'  # 修改变量开始符号
app.jinja_env.variable_end_string = '}}}'  # 修改变量结束符号
app.jinja_env.comment_start_string = '##}'  # 修改注释开始符号
app.jinja_env.comment_end_string = '##}'  # 修改注释结束符号复制代码

@app.route('/')
def index():
    return render_template('Pear-Admin-Layui-main/index.html')

@app.route("/<path:path>")
def get_staticfile(path):
    directory = os.getcwd() + "/templates/Pear-Admin-Layui-main/"
    print(directory)
    response = make_response(send_from_directory(directory, path.encode('utf-8').decode('utf-8'), as_attachment=False))
    mime_type = mimetypes.guess_type(path)[0]
    if path.endswith(".js") :
       mime_type = "application/javascript"
    response.headers['Content-Type'] = mime_type
    print(directory, path, mime_type)
    return response

@app.route('/favicon.ico')
def favicon():
    return send_from_directory(os.path.join(app.root_path, 'static'), 'favicon.ico'
        , mimetype='image/vnd.microsoft.icon')
    #<link rel="shortcut icon" href="{{ url_for('static', filename='favicon.ico') }}">

if __name__ == '__main__':
   app.run(debug = True)
- 运行结果:

6、Flask测试网页(其他)
6.1 基于vue的考试题目列表的网页
- test_vue.py:
#***************************************************************
#   Purpose:   基于vue的考试题目列表的网页(Flask的web服务器)
#   Author:    爱看书的小沐
#   Date:      2022-5-30
#   Languages: python
#   Platform:  python 3.9 win64
#   OS:        Win10 win64
# **************************************************************
import sqlite3,os
from flask import Flask
from flask import jsonify,render_template,send_from_directory
from flask_cors import CORS

app = Flask(__name__)

# CORS(app, supports_credentials=True)    #解决跨域问题
cors = CORS(app, resources={r"/api/*": {"origins": "*"}})   #两种模式都行

@app.route('/')
def home():
    return render_template('test_vue.html',title='flask + vue example')

@app.route('/api/questions')
def get_questions():
    db_path = os.getcwd() + "/static/exam.db"
    conn = sqlite3.connect( db_path )
    conn.row_factory = sqlite3.Row
    cur = conn.cursor()
    # sql = 'select * from questions'
    sql = 'SELECT * from questions ORDER BY RANDOM () LIMIT 100'
    rows = cur.execute(sql).fetchall()
    rows = [dict(row) for row in rows]
    return jsonify(rows)

@app.route('/favicon.ico')
def favicon():
    return send_from_directory(os.path.join(app.root_path, 'static'), 'favicon.ico'
        , mimetype='image/vnd.microsoft.icon')

if __name__ == "__main__":
    app.run(debug=True, port=5000)
- 运行结果:

亲,相关功能正在建设中,请稍等。。。

结语
如果您觉得该方法或代码有一点点用处,可以给作者点个赞,或打赏杯咖啡;╮( ̄▽ ̄)╭
如果您感觉方法或代码不咋地//(ㄒoㄒ)//,就在评论处留言,作者继续改进;o_O???
如果您需要相关功能的代码定制化开发,可以留言私信作者;(✿◡‿◡)
感谢各位童鞋们的支持!( ´ ▽´ )ノ ( ´ ▽´)っ!!!


 771
771

 被折叠的 条评论
为什么被折叠?
被折叠的 条评论
为什么被折叠?
 到【灌水乐园】发言


