


总体效果
类似混合现实,实现展示玩家玩的VR游戏的实况

基本思想
利用openCV 插件,通过摄像头获取到玩家在蓝幕中玩游戏的场景,再使用蓝幕技术,对图像做处理,获取玩家的图像;最后和游戏场景进行叠加。
具体实现( UE 4.12, Opencv 2.4.13)
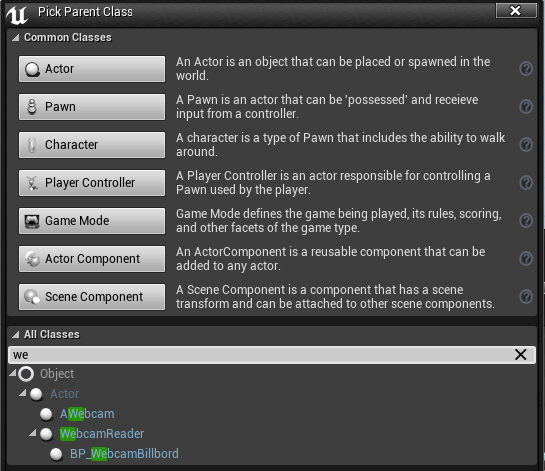
1, 在UE4 中打开 vs,添加一个class, 继承 Actor, WebCameraReader
2. UE4 中使用OpenCV 插件
方法一: 使用项目的dll 包含,即在项目中包含 OpenCV 文件中的 include, 然后在dll 中包含 \opencv\build\x64\vc12\lib (64位系统);
方法二: 把openCV的dll,做成一个插件调用;具体步骤 整理下插件的写法:① 在项目文件中,添加Plugins 文件夹,之后在Plugins 文件夹里面再创建一个插件的文件夹,比如 Plugins\CoolPlugin; 下面是CoolPlugin 的一些文件夹

uplugin 文件中,是需要编辑一些插件的信息,这些后面会显示在UE编辑器的插件信息中,如下所示,可以有一些关于插件的具体信息
{
	"FileVersion": 3,
	"Version": 1,
	"VersionName": "1.0",
	"FriendlyName": "Webcamera",
	"Description": "Adds web camera support",
	"Category": "WebcamReader",
	"CreatedBy": "Milen",
	"CreatedByURL": "http://blog.csdn.net/himilong/article/details/52829231",
	"DocsURL": "http://blog.csdn.net/himilong/article/details/52829231",
	"MarketplaceURL": "",
	"SupportURL": "http://blog.csdn.net/himilong/article/details/52829231",
	"Modules": [
		{
			"Name": "CoolPlugin",
			"Type": "Editor",
			"LoadingPhase": "Default"
		}
	],
	"EnabledByDefault": false,
	"CanContainContent": false,
	"IsBetaVersion": false,
	"Installed": false
}这些准备工作做好之后,就可以在代码中加载需要用到的lib 文件, dll 文件了。 在 CoolPlugin\Source\CoolPlugin 中,创建CoolPlugin.Buid.cs 文件
using UnrealBuildTool;
using System.IO;
public class CoolPlugin : ModuleRules
{
    public CoolPlugin(TargetInfo target)
    {
        PrivateDependencyModuleNames.AddRange(
            new string[] {
                "Engine",
                "UnrealEd",
                "InputCore",
                "Core",
                "Slate",
                "SlateCore",
                "EditorStyle",
                "CoreUObject",
                "CoolPlugin"   // add plugin file name
            });

        PrivateIncludePaths.AddRange(new[] { "CoolPlugin/Private" });

          LoadOpenCV(target);  //load dll or  lib files
    }
    //LoadOpenCV(Target);

    private string ModulePath
    {
        get
        {
            RulesAssembly r;
            FileReference CheckProjectFile;
            UProjectInfo.TryGetProjectForTarget("CoolProject", out CheckProjectFile);

            r = RulesCompiler.CreateProjectRulesAssembly(CheckProjectFile);
            FileReference f = r.GetModuleFileName(this.GetType().Name);

            return Path.GetDirectoryName(f.CanonicalName);

        }
        //get { return Path.GetDirectoryName(RulesCompiler.GetModuleFilename(this.GetType().Name)); }
    }
    private string ThirdPartyPath
    {
        get { return Path.GetFullPath(Path.Combine(ModulePath, "../../ThirdParty/")); }
    }

    public bool LoadOpenCV(TargetInfo Target)
    {
        bool isLibrarySupported = false;

        // Create OpenCV Path
        string OpenCVPath = Path.Combine(ThirdPartyPath, "OpenCV");

        // Get Library Path
        string LibPath = "";
        bool isdebug = Target.Configuration == UnrealTargetConfiguration.Debug && BuildConfiguration.bDebugBuildsActuallyUseDebugCRT;
        if (Target.Platform == UnrealTargetPlatform.Win64)
        {
            LibPath = Path.Combine(OpenCVPath, "Libraries", "Win64");
            isLibrarySupported = true;
        }
        else if (Target.Platform == UnrealTargetPlatform.Win32)
        {
            LibPath = Path.Combine(OpenCVPath, "Libraries", "Win32");
            isLibrarySupported = true;
        }
        else
        {
            string Err = string.Format("{0} dedicated server is made to depend on {1}. We want to avoid this, please correct module dependencies.", Target.Platform.ToString(), this.ToString()); System.Console.WriteLine(Err);
        }
       // PublicIncludePaths.AddRange(new string[] { "<Modulename>/Public", "<Modulename>/Classes" });

        //PublicIncludePaths.AddRange(new string[] { Path.Combine(OpenCVPath, "Includes") });
        if (isLibrarySupported)
        {
            //Add Include path
            PublicIncludePaths.AddRange(new string[] { Path.Combine(OpenCVPath, "Includes") });

            // Add Library Path
            PublicLibraryPaths.Add(LibPath);

            if (!isdebug)
            {
                PublicAdditionalLibraries.Add("opencv_imgproc2413.lib");

                //Add Dynamic Libraries (Debug Version)
                PublicDelayLoadDLLs.Add("opencv_imgproc2413.dll");


                PublicAdditionalLibraries.Add("opencv_core2413.lib");

                //Add Dynamic Libraries (Debug Version)
                PublicDelayLoadDLLs.Add("opencv_core2413.dll");

                PublicAdditionalLibraries.Add("opencv_highgui2413.lib");

                //Add Dynamic Libraries (Debug Version)
                PublicDelayLoadDLLs.Add("opencv_highgui2413.dll");
            }
            else
            {
                //Add Static Libraries (Debug Version)
                //PublicAdditionalLibraries.Add("opencv_ts300d.lib");
                PublicAdditionalLibraries.Add("opencv_imgproc2413d.lib");

                //Add Dynamic Libraries (Debug Version)
                PublicDelayLoadDLLs.Add("opencv_imgproc2413d.dll");

                PublicAdditionalLibraries.Add("opencv_core2413d.lib");

                //Add Dynamic Libraries (Debug Version)
                PublicDelayLoadDLLs.Add("opencv_core2413d.dll");

                PublicAdditionalLibraries.Add("opencv_highgui2413d.lib");

                //Add Dynamic Libraries (Debug Version)
                PublicDelayLoadDLLs.Add("opencv_highgui2413d.dll");
            }
        }

        Definitions.Add(string.Format("WITH_OPENCV_BINDING={0}", isLibrarySupported ? 1 : 0));

        return isLibrarySupported;
    }
}
3. 在webcamReader.h 中包含 使用到的OpenCV 中文件
#include "opencv2/core.hpp"
#include "opencv2/highgui.hpp"
#include "opencv2/imgproc.hpp"
#include "opencv2/video.hpp"
定义后面需要用到的几个主要用到的函数,onNextVideoFrame() 是在每获取到新的一帧图像之后的event, videoTextur 用来保存每次读取到的帧。 update 顾名思义就是不停的读图像,更新帧。
// Fill out your copyright notice in the Description page of Project Settings.

UCLASS()
class MYPROJECT_API AWebcamReader : public AActor
{
	GENERATED_BODY()

public:
	// Sets default values for this actor's properties
	AWebcamReader();

	// deallocates memory for the opencv fields
	~AWebcamReader();

	// Called when the game starts or when spawned
	virtual void BeginPlay() override;

	// Called every frame
	virtual void Tick( float DeltaSeconds ) override;

	// The device ID opened by the Video Stream
	UPROPERTY(BlueprintReadWrite, EditAnywhere, Category = Webcam)
		int32 CameraID ;

	//UPROPERTY(interp, Category = CameraSettings, meta = (ShowOnlyInnerProperties))
	//	struct FPostProcessSettings PostProcessSettings;

	UPROPERTY(interp, BlueprintReadWrite, Category = CameraSettings)//, meta = (ShowOnlyInnerProperties))
		struct FPostProcessSettings PostProcessSettings;


	// If the webcam images should be resized every frame
	UPROPERTY(BlueprintReadWrite, EditAnywhere, Category = Webcam)
		bool ShouldResize;

	// The targeted resize width and height (width, height)
	UPROPERTY(BlueprintReadWrite, EditAnywhere, Category = Webcam)
		FVector2D ResizeDeminsions;

	// The rate at which the color data array and video texture is updated (in frames per second)
	UPROPERTY(BlueprintReadWrite, EditAnywhere, Category = Webcam)
		float RefreshRate;

	// The refresh timer
	UPROPERTY(BlueprintReadWrite, Category = Webcam)
		float RefreshTimer;

	// Blueprint Event called every time the video frame is updated
	UFUNCTION(BlueprintNativeEvent, Category = Webcam)
		void OnNextVideoFrame();

	// OpenCV fields
	cv::Mat* frame;
	cv::VideoCapture* stream;
	cv::Size* size;

	// OpenCV prototypes
	void UpdateFrame();
	void UpdateTexture();

	// If the stream has succesfully opened yet
	UPROPERTY(BlueprintReadWrite, Category = Webcam)
		bool isStreamOpen;

	// The videos width and height (width, height)
	UPROPERTY(BlueprintReadWrite, Category = Webcam)
		FVector2D VideoSize;

	// The current video frame's corresponding texture
	UPROPERTY(BlueprintReadWrite, Category = Webcam)
		UTexture2D* VideoTexture;

	// The current data array
	UPROPERTY(BlueprintReadWrite, Category = Webcam)
		TArray<FColor> Data;

protected:

	// Use this function to update the texture rects you want to change:
	// NOTE: There is a method called UpdateTextureRegions in UTexture2D but it is compiled WITH_EDITOR and is not marked as ENGINE_API so it cannot be linked
	// from plugins.
	// FROM: https://wiki.unrealengine.com/Dynamic_Textures
	void UpdateTextureRegions(UTexture2D* Texture, int32 MipIndex, uint32 NumRegions, FUpdateTextureRegion2D* Regions, uint32 SrcPitch, uint32 SrcBpp, uint8* SrcData, bool bFreeData);

	// Pointer to update texture region 2D struct
	FUpdateTextureRegion2D* VideoUpdateTextureRegion;

};
4. cpp 文件, 首先初始化这个类,包含摄像机的ID,更新频率 以及程序用到的变量等
AWebcamReader::AWebcamReader()
{
 	// Set this actor to call Tick() every frame.  You can turn this off to improve performance if you don't need it.
	PrimaryActorTick.bCanEverTick = true;

	// Initialize OpenCV and webcam properties
	CameraID = 0;
	RefreshRate = 15;
	isStreamOpen = false;
	VideoSize = FVector2D(0, 0);
	ShouldResize = false;
	ResizeDeminsions = FVector2D(320, 240);
	stream = new cv::VideoCapture();
	frame = new cv::Mat();
	RefreshTimer = 1000000.0f;
}
在begin 中,打开摄像机,读取第一帧
void AWebcamReader::BeginPlay()
{
	Super::BeginPlay();

	stream->open(CameraID);
	if (stream->isOpened())
	{
		//Initialize stream
		isStreamOpen = true;
		UpdateFrame();
		VideoSize = FVector2D(frame->cols, frame->rows);
		size = new cv::Size(ResizeDeminsions.X, ResizeDeminsions.Y);
		VideoTexture = UTexture2D::CreateTransient(VideoSize.X, VideoSize.Y);
		VideoTexture->UpdateResource();
		VideoUpdateTextureRegion = new FUpdateTextureRegion2D(0, 0, 0, 0, VideoSize.X, VideoSize.Y);

		//Initialize data array
		Data.Init(FColor(0, 0, 0, 255), VideoSize.X * VideoSize.Y);
	}
}
tick() 函数中进行更新,并不断的调用 onNextVideoFrame(), 这个在后面的蓝图中,需要用到。 updateframe() 读数据,updatetexture()更新videotexture。
// Called every frame
void AWebcamReader::Tick( float DeltaTime )
{
	Super::Tick( DeltaTime );

	RefreshTimer += DeltaTime;
	if (isStreamOpen && RefreshTimer >= 1.0f / RefreshRate)
	{
		RefreshTimer -= 1.0f / RefreshRate;
		UpdateFrame();
		UpdateTexture();
		OnNextVideoFrame();
	}

}
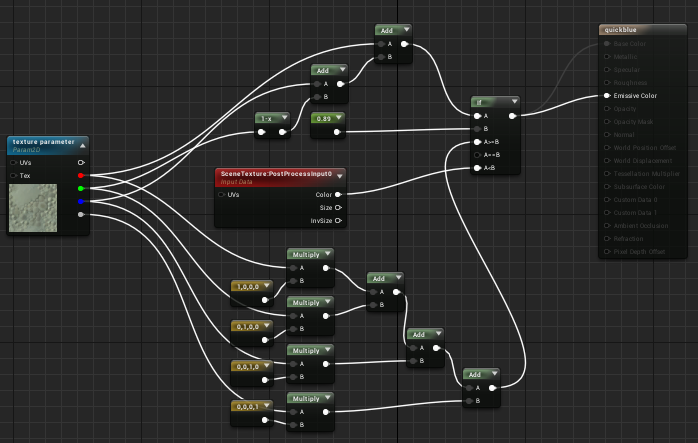
5, 新建一个material, 作为后期渲染的材质(material domain 设置为 post process), 按如下蓝图,实现对人物意外的背景色的剔除。其中需要注意 创建的texture parameter,这个在后面的作为 settextureparametervalue 的 paramer name. 如下蓝图的主要思想就是对pix 的RGB 进行分流,背景色 使用sceneTexture, 而人物保持不变. 此处背景是绿色,而绿色,人物的皮肤颜色,或者白色衣服等玩家可能出现颜色的G分量都比较大(),综合就采用相加的方法,作为if判断的A变量。背景色 R+ G 比较小,而人物的颜色比较大。从而区分
6. 编译上面的类之后,回到UE4 的编辑中,新建一个 webCamReader 的蓝图类
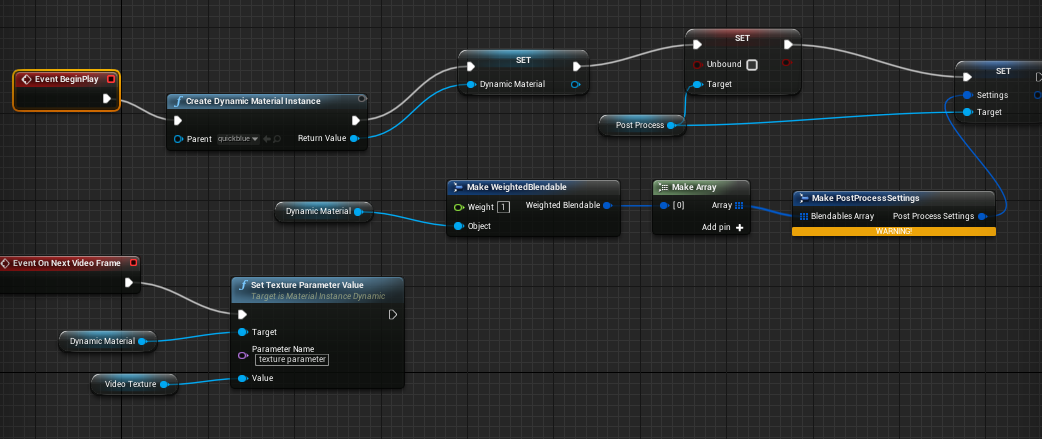
7, 使用上面的材质,创建 dynamic material instance,然后动态改变其 parameter value。post process 是添加的 component, 用于后期剔除人物背景。
set unbound 勾选,可以实现全屏的后期效果。这些可以在unreal 文档中查询到,不再叙述。
8, 点击 play 就可以实现本文刚开始的功能了!
Plugin Download:
http://download.csdn.net/detail/himilong/9681340
Reference :
uploadvr.com/epic-unreal-engine-4-mixed-reality-support/
opencv-srf.blogspot.com/2013/05/installing-configuring-opencv-with-vs.html
wiki.unrealengine.com/Integrating_OpenCV_Into_Unreal_Engine_4


 被折叠的 条评论
为什么被折叠?
被折叠的 条评论
为什么被折叠?
 到【灌水乐园】发言


