


技术在于交流、沟通,转载请注明出处并保持作品的完整性。
原文:https://blog.csdn.net/hiwubihe/article/details/81260882
[音频编解码系列文章]
- 音频编解码基础
- FFMPEG实现音频重采样
- FFMPEG实现PCM编码(采用封装格式实现)
- FFMPEG实现PCM编码(不采用封装格式实现)
- FAAC库实现PCM编码
- FAAD库实现RAW格式AAC解码
- FAAD库实现RAW格式AAC封装成ADTS格式
- FAAD库实现ADTS格式解码
- FFMPEG实现对AAC解码(采用封装格式实现)
- FFMPEG实现对AAC解码(不采用封装格式实现)
本篇基于FFMPEG实现把PCM编码成AAC或者MP3格式的视频文件,编码的比特率都是64kbps,代码中AAC格式编码不需要音频重采样,而MP3格式编码只支持样本平行存储的方式。在编码中,首先PCM文件的格式是一种编码方式,这种是波形编码,而各种压缩算法实现本身会支持一个格式,如对通道,样本格式的要求,所以当PCM文件格式与编码实现不一致时,就需要对PCM数据重采样,然后编码。MP3格式据说编码比特率在128Kbps的情况下,高频部分损失比较严重,后面可以分析一下。本篇编码是把AAC或者MP3当做一种封装格式如MP4这种封装格式进行的,下篇将介绍一种只打开编码器,不打开封装格式,获取原始数据直接送入编码器的方式。ffmpeg编码的AAC是ADTS格式。
PCM编码AAC或者MP3代码:
/*******************************************************************************
Copyright (c) wubihe Tech. Co., Ltd. All rights reserved.
--------------------------------------------------------------------------------

Date Created:	2014-10-25
Author:			wubihe QQ:1269122125 Email:1269122125@qq.com
Description:	代码实现PCM编码AAC,MP3格式
--------------------------------------------------------------------------------
Modification History
DATE          AUTHOR          DESCRIPTION
--------------------------------------------------------------------------------

********************************************************************************/
#include <stdio.h>

#define __STDC_CONSTANT_MACROS

#ifdef _WIN32
//Windows
extern "C"
{
#include "libavcodec/avcodec.h"
#include "libavformat/avformat.h"
#include "libswresample/swresample.h"
};
#else
//Linux...
#ifdef __cplusplus
extern "C"
{
#endif
#include <libavcodec/avcodec.h>
#include <libavformat/avformat.h>
#ifdef __cplusplus
};
#endif
#endif

#define INPUT_FILE_NAME			("huangdun_r48000_FMT_S16_c2.pcm")
//输出文件前缀
#define OUTPUT_FILE_NAME_PREFIX	("huangdun")
//输出文件后缀
//#define OUTPUT_FILE_NAME_SUFFIX	("aac")
//输出文件后缀
#define OUTPUT_FILE_NAME_SUFFIX	("mp3")
//输出文件比特率 该值越大 音频质量越好 音质损失越小
#define OUTPUT_FILE_BIT_RATE	(64000)

int flush_encoder(AVFormatContext *fmt_ctx,unsigned int stream_index)
{
	int ret;
	int got_frame;
	AVPacket enc_pkt;
	if (!(fmt_ctx->streams[stream_index]->codec->codec->capabilities &CODEC_CAP_DELAY))
		return 0;
	while (1)
	{
		enc_pkt.data = NULL;
		enc_pkt.size = 0;
		av_init_packet(&enc_pkt);
		//输入视频帧为NULL
		ret = avcodec_encode_audio2 (fmt_ctx->streams[stream_index]->codec, &enc_pkt,NULL, &got_frame);
		av_frame_free(NULL);
		if (ret < 0)
			break;
		if (!got_frame)
		{
			ret=0;
			break;
		}
		printf("Flush Encoder: Succeed to encode 1 frame!\tsize:%5d\n",enc_pkt.size);
		/* mux encoded frame */
		ret = av_write_frame(fmt_ctx, &enc_pkt);
		if (ret < 0)
			break;
	}
	return ret;
}

int main()
{

	static char*pFormatName[]=
	{
		"FMT_U8","FMT_S16","FMT_S32","FMT_FLT","FMT_DBL",
		"FMT_U8P","FMT_S16P","FMT_S32P","FMT_FLTP","FMT_DBLP"
	};

	//各种不同格式对应字节数
	static int mapSampleBytes[AV_SAMPLE_FMT_NB]
	={1,2,4,4,8,1,2,4,4,8};

	//PCM原始数据格式
	uint64_t iInputLayout				= AV_CH_LAYOUT_STEREO;
	int      iInputChans				= av_get_channel_layout_nb_channels(iInputLayout);
	AVSampleFormat eInputSampleFormat   = AV_SAMPLE_FMT_S16;
	int	     iInputSampleRate			= 48000;
	//不同样本格式长度
	int iInputSampleBytes				= mapSampleBytes[eInputSampleFormat];


	//PCM需要重采样的格式 部分编码器不支持原始PCM的数据格式如MP3
	uint64_t iOutputLayout				= AV_CH_LAYOUT_STEREO;
	int      iOutputChans				= av_get_channel_layout_nb_channels(iOutputLayout);
	AVSampleFormat eOutputSampleFormat ;
	int	     iOutputSampleRate			= 48000;


	if(strcmp(OUTPUT_FILE_NAME_SUFFIX,"aac") == 0)
	{
		eOutputSampleFormat	  = AV_SAMPLE_FMT_S16;
	}
	else if(strcmp(OUTPUT_FILE_NAME_SUFFIX,"mp3") == 0)
	{
		//MP3不支持AV_SAMPLE_FMT_S16这种格式
		eOutputSampleFormat	  = AV_SAMPLE_FMT_S16P;
	}
	else
	{

	}
	//编码样本长度
	int iOutputSampleBytes	= mapSampleBytes[eOutputSampleFormat];

	//是否需要重采样
	bool bNeedResample = false;
	if(eInputSampleFormat != eOutputSampleFormat)
	{
		bNeedResample = true;
	}

	//是否平面存储结构
	bool bPlanner      = false;
	if((eOutputSampleFormat>=AV_SAMPLE_FMT_U8P) &&(eOutputSampleFormat<=AV_SAMPLE_FMT_DBLP))
	{
		bPlanner      = true;
	}
	//打开输入文件
	FILE *pInputFile = fopen("huangdun_r48000_FMT_S16_c2.pcm", "rb");
	if(pInputFile == NULL)
	{

	}

	//打开输出文件
	char szOutFileName[256]={0};
	sprintf(szOutFileName,"%s_br%d_sr%d.%s",OUTPUT_FILE_NAME_PREFIX,OUTPUT_FILE_BIT_RATE,iOutputSampleRate,OUTPUT_FILE_NAME_SUFFIX);
	FILE *pOutputFile = fopen(szOutFileName, "wb");

	//打开中间测试文件
	char szTempFileName[256]={0};
	sprintf(szTempFileName,"%s_sr%d_c1.pcm",OUTPUT_FILE_NAME_PREFIX,iOutputSampleRate);
	FILE *pTempFile = fopen(szTempFileName, "wb");

	int iReturn;

	///编码器操作
	//注册所有编解码器
	av_register_all();

	//封装格式上下文 AVFormatContext中有AVInputFormat和AVOutputFormat
	//解复用时avformat_open_input()初始化AVInputFormat,复用时用户自己初始化AVOutputFormat
	AVFormatContext* pFormatCtx;
	AVOutputFormat * fmt;

	//Method 1.分配一个封装格式
	pFormatCtx = avformat_alloc_context();
	//根据后缀名 填充 输出格式上下文
	fmt = av_guess_format(NULL, szOutFileName, NULL);
	pFormatCtx->oformat = fmt;


	//Method 2.
	//avformat_alloc_output_context2(&pFormatCtx, NULL, NULL, out_file);
	//fmt = pFormatCtx->oformat;

	//添加一个流
	AVStream  *audio_st = avformat_new_stream(pFormatCtx, 0);
	if (audio_st==NULL)
	{
		return -1;
	}

	//添加一个输出路径
	if (avio_open(&pFormatCtx->pb,szOutFileName, AVIO_FLAG_READ_WRITE) < 0)
	{
		printf("Failed to open output file!\n");
		return -1;
	}

	//Show some information 日志信息
	av_dump_format(pFormatCtx, 0, szOutFileName, 1);

	//初始化编码器相关结构体 获取输出流中的编码上下文
	AVCodecContext* pCodecCtx = audio_st->codec;

	pCodecCtx->codec_id		  = fmt->audio_codec	;
	pCodecCtx->codec_type	  = AVMEDIA_TYPE_AUDIO	;
	//立体声
	pCodecCtx->channel_layout = iOutputLayout	;
	pCodecCtx->channels		  = iOutputChans    ;
	//编码比特率 AAC支持多种比特率 一般比特率越高 视频质量越好 需要传输带宽越大
	pCodecCtx->bit_rate		  = OUTPUT_FILE_BIT_RATE;
	pCodecCtx->sample_rate    = iOutputSampleRate;
	//PCM样本深度为AV_SAMPLE_FMT_S16 但不是所有格式的编码都支持这种格式
	pCodecCtx->sample_fmt	  = eOutputSampleFormat;


	//编码器
	AVCodec* pCodec = avcodec_find_encoder(pCodecCtx->codec_id);
	if (!pCodec)
	{
		printf("Can not find encoder!\n");
		return -1;
	}

	//打开解码器 有可能失败 -22 错误,原因不同的编码格式支持的样本格式不一样
	//如封装AAC格式样本格式是AV_SAMPLE_FMT_FLT,打开就出错
	if ((iReturn = avcodec_open2(pCodecCtx, pCodec,NULL)) < 0)
	{
		printf("Failed to open encoder :[%d]!\n",iReturn);
		return -1;
	}


	//重采用上下文
	SwrContext *pSwrCtx = NULL;


	//原始数据帧
	AVFrame* pRawframe  = NULL;
	//原始帧一Planer的大小 非平面分布的情况就是缓存总大小
	int iRawLineSize = 0;
	//原始帧缓存大小
	int iRawBuffSize = 0;
	//原始帧缓存
	uint8_t *pRawBuff= NULL;


	//重采样后数据帧
	AVFrame* pConvertframe = NULL;
	//重采样后一Planer的大小
	int iConvertLineSize  = 0;
	//重采样后缓存大小
	int iConvertBuffSize  = 0;
	//重采样后帧缓存
	uint8_t *pConvertBuff = NULL;

	//1帧数据样本数
	int iFrameSamples = pCodecCtx->frame_size;


	// 存储原始数据
	iRawLineSize = 0;
	iRawBuffSize  = av_samples_get_buffer_size(&iRawLineSize, iInputChans, iFrameSamples, eInputSampleFormat, 0);
	pRawBuff = (uint8_t *)av_malloc(iRawBuffSize);

	//原始数据保存在AVFrame结构体中
	pRawframe = av_frame_alloc();

	pRawframe->nb_samples	= iFrameSamples;
	pRawframe->format		= eInputSampleFormat;
	pRawframe->channels     = iInputChans;


	iReturn = avcodec_fill_audio_frame(pRawframe, iInputChans, eInputSampleFormat, (const uint8_t*)pRawBuff, iRawBuffSize, 0);
	if(iReturn<0)
	{
		return -1;
	}


	if(bNeedResample)
	{

		pSwrCtx = swr_alloc_set_opts(NULL,iOutputLayout, eOutputSampleFormat, iOutputSampleRate,
			iInputLayout,eInputSampleFormat , iInputSampleRate,0, NULL);
		swr_init(pSwrCtx);

		// 存储转换后数据
		iConvertLineSize  = 0;
		iConvertBuffSize  = av_samples_get_buffer_size(&iConvertLineSize, iOutputChans, iFrameSamples, eOutputSampleFormat, 0);
		pConvertBuff      = (uint8_t *)av_malloc(iConvertBuffSize);

		//转换后数据保存在AVFrame结构体中
		pConvertframe = av_frame_alloc();
		pConvertframe->nb_samples	= iFrameSamples;
		pConvertframe->format		= eOutputSampleFormat;
		pConvertframe->channels     = iOutputChans;

		iReturn = avcodec_fill_audio_frame(pConvertframe, iOutputChans, eOutputSampleFormat, (const uint8_t*)pConvertBuff, iConvertBuffSize, 0);
		if(iReturn<0)
		{
			return -1;
		}

	}


	//编码以后的数据是AVPacket
	AVPacket pkt;
	if(!bNeedResample)
	{
		av_new_packet(&pkt,iRawBuffSize);
	}
	else
	{
		av_new_packet(&pkt,iConvertBuffSize);
	}


	//Write Header
	avformat_write_header(pFormatCtx,NULL);


	//统计读取样本数
	long long lReadTotalSamples = 0;
	//每次读取样本数
	int iReadSamples;
	//统计所有的帧数
	int iFrameNum =0;
	//是否编码成功
	int got_frame =0;
	//临时
	AVFrame* pTempFrame=NULL;
	//读取数据 保存在pConvertframe->data
	int iRealRead = fread(pRawBuff, 1, iRawBuffSize, pInputFile);
	while(iRealRead>0)
	{
		iReadSamples = iRealRead/(iInputSampleBytes*iInputChans);
		if(bNeedResample)
		{
			swr_convert(pSwrCtx, (uint8_t**)pConvertframe->data, iFrameSamples ,(const uint8_t**)pRawframe->data, iFrameSamples );

			if(bPlanner)
			{
				//只保存一个通道 因为保存多个通道测试工具 audacity看不了
				fwrite(pConvertframe->data[0],pConvertframe->linesize[0],1,pTempFile);
			}
			printf("Convert Frame :%d\n",++iFrameNum);
			pTempFrame = pConvertframe;
		}
		else
		{
			pTempFrame = pRawframe;
		}


		pTempFrame->pts		    = lReadTotalSamples;
		got_frame				= 0;
		//Encode
		if(avcodec_encode_audio2(pCodecCtx, &pkt,pTempFrame, &got_frame)<0)
		{
			printf("Failed to encode!\n");
			return -1;
		}
		if (got_frame==1)
		{
			printf("Succeed to encode 1 frame! \tsize:%5d\n",pkt.size);
			pkt.stream_index = audio_st->index;
			av_write_frame(pFormatCtx, &pkt);
			av_free_packet(&pkt);
		}

		//统计样本数以转换前为准 转换前后样本数是一样的
		lReadTotalSamples += (iReadSamples);

		iRealRead = fread(pRawBuff, 1, iRawBuffSize, pInputFile);
	}

	//刷新编码器
	if(flush_encoder(pFormatCtx,0)<0)
	{
		printf("Flushing encoder failed\n");
		return -1;
	}

	fclose(pInputFile);
	fclose(pOutputFile);
	fclose(pTempFile);

	av_free(pRawBuff);

	if(bNeedResample)
	{
		av_free(pConvertBuff);
		swr_free(&pSwrCtx);
	}
	printf("Convert Success!!\n");
	getchar();
	return 0;

}
编码AAC生成文件 huangdun_br64000_sr48000.aac,可以直接用普通播放器播放如VLC
编码mp3生成文件 huangdun_br64000_sr48000.mp3,可以直接用普通播放器播放如VLC
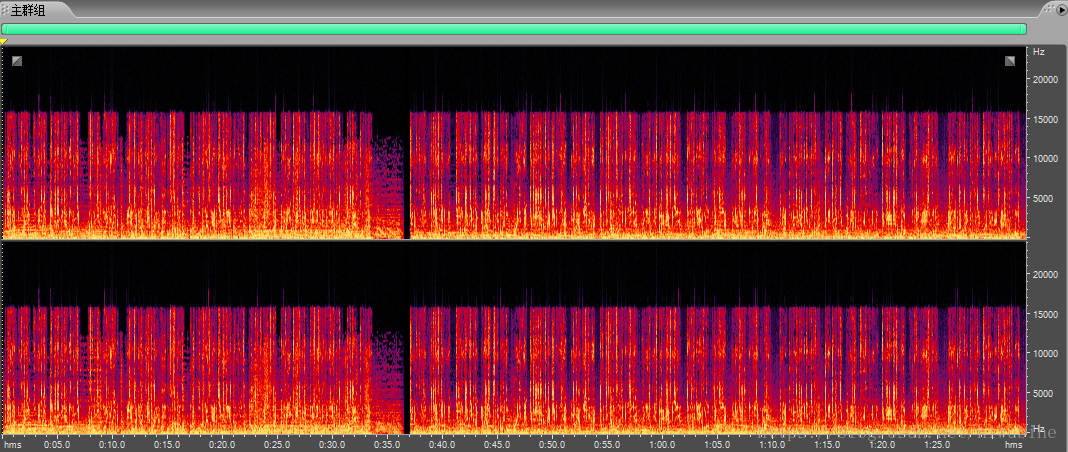
MP3格式频谱分析
原始PCM格式频谱图
编码MP3后的频谱图

从上面频谱图可以看出MP3格式编码对高频部分衰减确实很厉害,图中11000HZ---15000HZ部分全部衰减掉了。现在把程序中编码比特率提高到128Kbps,来看看效果。
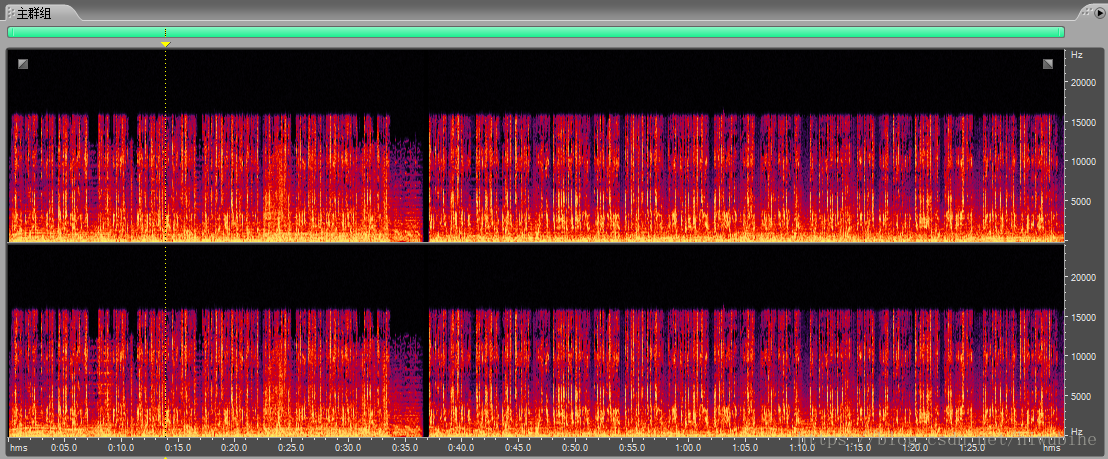
可以看到高频部分15000HZ衰减有明显减少,由此得出结论MP3编码格式优点压缩率高,能够在低码率的情况下提高较好的音质,适合网络传输,但是缺点是比特率低于128kbps的情况,高频部分有很高的衰减。
DEMO编译环境: Win7_64bit+VS2008
DEMO下载地址:https://download.csdn.net/download/hiwubihe/10569791


 1935
1935


 被折叠的 条评论
为什么被折叠?
被折叠的 条评论
为什么被折叠?
 到【灌水乐园】发言


