


from threading import Lock, Thread
from time import sleep
import ogl_viewer.viewer as gl
import cv_viewer.tracking_viewer as cv_viewer
lock = Lock()
run_signal = False
exit_signal = False
def xywh2abcd(xywh, im_shape):
output = np.zeros((4, 2))
# Center / Width / Height -> BBox corners coordinates
x_min = (xywh[0] - 0.5\*xywh[2]) #\* im\_shape[1]
x_max = (xywh[0] + 0.5\*xywh[2]) #\* im\_shape[1]
y_min = (xywh[1] - 0.5\*xywh[3]) #\* im\_shape[0]
y_max = (xywh[1] + 0.5\*xywh[3]) #\* im\_shape[0]

# A ------ B
# | Object |
# D ------ C

output[0][0] = x_min
output[0][1] = y_min

output[1][0] = x_max
output[1][1] = y_min

output[2][0] = x_max
output[2][1] = y_max

output[3][0] = x_min
output[3][1] = y_max
return output
def detections_to_custom_box(detections, im0):
output = []
for i, det in enumerate(detections):
xywh = det.xywh[0]
    # Creating ingestable objects for the ZED SDK
    obj = sl.CustomBoxObjectData()
    obj.bounding_box_2d = xywh2abcd(xywh, im0.shape)
    obj.label = det.cls
    obj.probability = det.conf
    obj.is_grounded = False
    output.append(obj)
return output
def torch_thread(weights, img_size, conf_thres=0.2, iou_thres=0.45):
global image_net, exit_signal, run_signal, detections
print("Intializing Network...")

model = YOLO(weights)

while not exit_signal:
    if run_signal:
        lock.acquire()

        img = cv2.cvtColor(image_net, cv2.COLOR_BGRA2RGB)
        # https://docs.ultralytics.com/modes/predict/#video-suffixes
        det = model.predict(img, save=False, imgsz=img_size, conf=conf_thres, iou=iou_thres)[0].cpu().numpy().boxes

        # ZED CustomBox format (with inverse letterboxing tf applied)
        detections = detections_to_custom_box(det, image_net)
        lock.release()
        run_signal = False
    sleep(0.01)
def main():
global image_net, exit_signal, run_signal, detections
capture_thread = Thread(target=torch_thread, kwargs={'weights': opt.weights, 'img\_size': opt.img_size, "conf\_thres": opt.conf_thres})
capture_thread.start()

print("Initializing Camera...")

zed = sl.Camera()

input_type = sl.InputType()
if opt.svo is not None:
    input_type.set_from_svo_file(opt.svo)

# Create a InitParameters object and set configuration parameters
init_params = sl.InitParameters(input_t=input_type, svo_real_time_mode=True)
init_params.coordinate_units = sl.UNIT.METER
init_params.depth_mode = sl.DEPTH_MODE.ULTRA  # QUALITY
init_params.coordinate_system = sl.COORDINATE_SYSTEM.RIGHT_HANDED_Y_UP
init_params.depth_maximum_distance = 50

runtime_params = sl.RuntimeParameters()
status = zed.open(init_params)

if status != sl.ERROR_CODE.SUCCESS:
    print(repr(status))
    exit()

image_left_tmp = sl.Mat()

print("Initialized Camera")

positional_tracking_parameters = sl.PositionalTrackingParameters()
# If the camera is static, uncomment the following line to have better performances and boxes sticked to the ground.
# positional\_tracking\_parameters.set\_as\_static = True
zed.enable_positional_tracking(positional_tracking_parameters)

obj_param = sl.ObjectDetectionParameters()
obj_param.detection_model = sl.OBJECT_DETECTION_MODEL.CUSTOM_BOX_OBJECTS
obj_param.enable_tracking = True
zed.enable_object_detection(obj_param)

objects = sl.Objects()
obj_runtime_param = sl.ObjectDetectionRuntimeParameters()

# Display
camera_infos = zed.get_camera_information()
camera_res = camera_infos.camera_resolution
# Create OpenGL viewer
viewer = gl.GLViewer()
point_cloud_res = sl.Resolution(min(camera_res.width, 720), min(camera_res.height, 404))
point_cloud_render = sl.Mat()
viewer.init(camera_infos.camera_model, point_cloud_res, obj_param.enable_tracking)
point_cloud = sl.Mat(point_cloud_res.width, point_cloud_res.height, sl.MAT_TYPE.F32_C4, sl.MEM.CPU)
image_left = sl.Mat()
# Utilities for 2D display
display_resolution = sl.Resolution(min(camera_res.width, 1280), min(camera_res.height, 720))
image_scale = [display_resolution.width / camera_res.width, display_resolution.height / camera_res.height]
image_left_ocv = np.full((display_resolution.height, display_resolution.width, 4), [245, 239, 239, 255], np.uint8)

# # Utilities for tracks view
# camera\_config = camera\_infos.camera\_configuration
# tracks\_resolution = sl.Resolution(400, display\_resolution.height)
# track\_view\_generator = cv\_viewer.TrackingViewer(tracks\_resolution, camera\_config.fps, init\_params.depth\_maximum\_distance)
# track\_view\_generator.set\_camera\_calibration(camera\_config.calibration\_parameters)
# image\_track\_ocv = np.zeros((tracks\_resolution.height, tracks\_resolution.width, 4), np.uint8)
# Camera pose
cam_w_pose = sl.Pose()

while viewer.is_available() and not exit_signal:
    if zed.grab(runtime_params) == sl.ERROR_CODE.SUCCESS:
        # -- Get the image
        lock.acquire()
        zed.retrieve_image(image_left_tmp, sl.VIEW.LEFT)
        image_net = image_left_tmp.get_data()
        lock.release()
        run_signal = True

        # -- Detection running on the other thread
        while run_signal:
            sleep(0.001)

        # Wait for detections
        lock.acquire()
        # -- Ingest detections
        zed.ingest_custom_box_objects(detections)
        lock.release()
        zed.retrieve_objects(objects, obj_runtime_param)

        # -- Display
        # Retrieve display data
        zed.retrieve_measure(point_cloud, sl.MEASURE.XYZRGBA, sl.MEM.CPU, point_cloud_res)
        point_cloud.copy_to(point_cloud_render)
        zed.retrieve_image(image_left, sl.VIEW.LEFT, sl.MEM.CPU, display_resolution)
        zed.get_position(cam_w_pose, sl.REFERENCE_FRAME.WORLD)

        # 3D rendering
        viewer.updateData(point_cloud_render, objects)
        # 2D rendering
        np.copyto(image_left_ocv, image_left.get_data())
        cv_viewer.render_2D(image_left_ocv, image_scale, objects, obj_param.enable_tracking)
        global_image = image_left_ocv
        # global\_image = cv2.hconcat([image\_left\_ocv, image\_track\_ocv])
        # # Tracking view
        # track\_view\_generator.generate\_view(objects, cam\_w\_pose, image\_track\_ocv, objects.is\_tracked)

        cv2.imshow("ZED | 2D View and Birds View", global_image)
        key = cv2.waitKey(10)
        if key == 27:
            exit_signal = True
    else:
        exit_signal = True

viewer.exit()
exit_signal = True
zed.close()
if name == ‘__main__’:
parser = argparse.ArgumentParser()
parser.add_argument(‘–weights’, type=str, default=‘yolov8n.pt’, help=‘model.pt path(s)’)
parser.add_argument(‘–svo’, type=str, default=None, help=‘optional svo file’)
parser.add_argument(‘–img_size’, type=int, default=416, help=‘inference size (pixels)’)
parser.add_argument(‘–conf_thres’, type=float, default=0.4, help=‘object confidence threshold’)
opt = parser.parse_args()
with torch.no_grad():
    main()
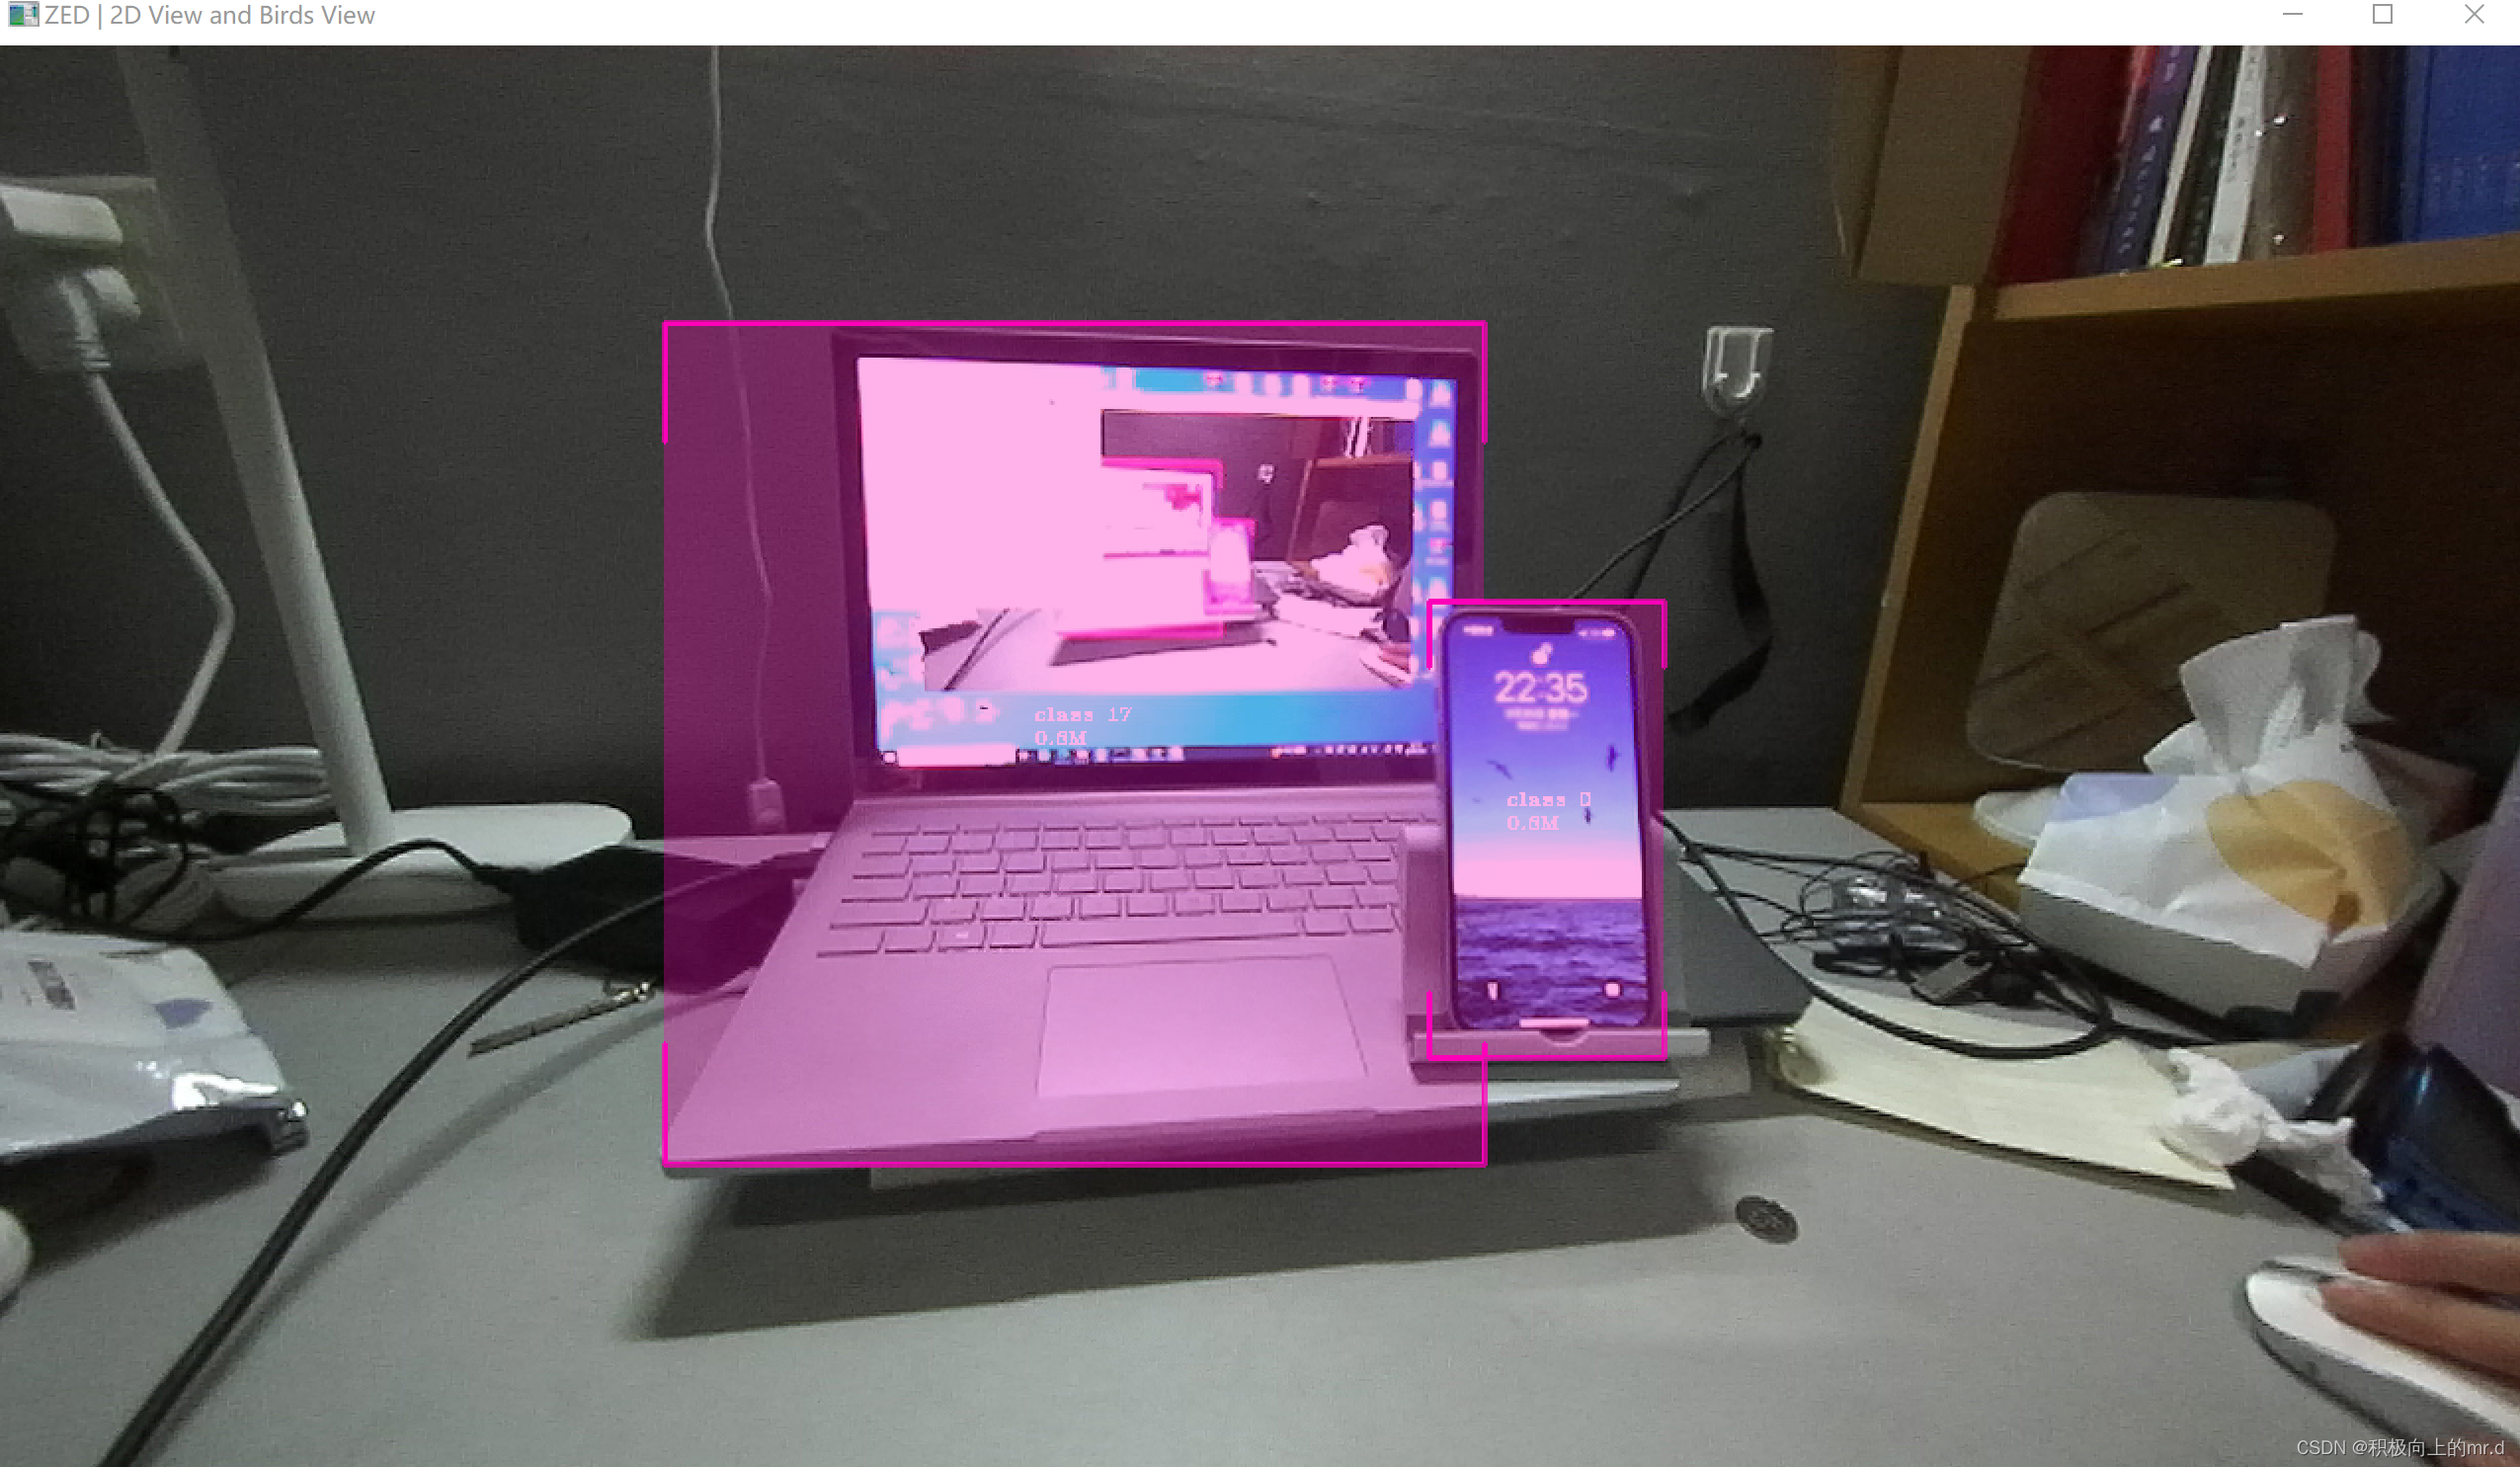
### 2.2 实验结果
测距图(感觉挺精准的)
视频展示:
Zed相机+YOLOv8目标检测跟踪
## 3. 版本二
### 3.1 相关代码
主代码 zed.py,具体放置在yolov8主目录下,可实现测距+跟踪+分割,完整代码六月开源
#!/usr/bin/env python3
import math
import sys
import numpy as np
from PIL import Image
import argparse
import torch
import cv2
import pyzed.sl as sl
from ultralytics.utils.plotting import Annotator, colors, save_one_box
from ultralytics import YOLO
from threading import Lock, Thread
from time import sleep
import ogl_viewer.viewer as gl
import cv_viewer.tracking_viewer as cv_viewer
zed = sl.Camera()
Create a InitParameters object and set configuration parameters
init_params = sl.InitParameters()
init_params.camera_resolution = sl.RESOLUTION.HD720
init_params.coordinate_units = sl.UNIT.METER
自我介绍一下,小编13年上海交大毕业,曾经在小公司待过,也去过华为、OPPO等大厂,18年进入阿里一直到现在。
深知大多数Python工程师,想要提升技能,往往是自己摸索成长或者是报班学习,但对于培训机构动则几千的学费,着实压力不小。自己不成体系的自学效果低效又漫长,而且极易碰到天花板技术停滞不前!
因此收集整理了一份《2024年Python开发全套学习资料》,初衷也很简单,就是希望能够帮助到想自学提升又不知道该从何学起的朋友,同时减轻大家的负担。


既有适合小白学习的零基础资料,也有适合3年以上经验的小伙伴深入学习提升的进阶课程,基本涵盖了95%以上前端开发知识点,真正体系化!
由于文件比较大,这里只是将部分目录大纲截图出来,每个节点里面都包含大厂面经、学习笔记、源码讲义、实战项目、讲解视频,并且后续会持续更新
如果你觉得这些内容对你有帮助,可以扫码获取!!!(备注:Python)
既有适合小白学习的零基础资料,也有适合3年以上经验的小伙伴深入学习提升的进阶课程,基本涵盖了95%以上前端开发知识点,真正体系化!
由于文件比较大,这里只是将部分目录大纲截图出来,每个节点里面都包含大厂面经、学习笔记、源码讲义、实战项目、讲解视频,并且后续会持续更新
如果你觉得这些内容对你有帮助,可以扫码获取!!!(备注:Python)


 5130
5130

 被折叠的 条评论
为什么被折叠?
被折叠的 条评论
为什么被折叠?
 到【灌水乐园】发言


