


一.摘要
水果的健康状态对消费者和供应链管理者来说至关重要。然而,传统的水果健康状态检测方法通常需要人工参与,费时且容易出错。为了解决这个问题,本研究提出了一种基于图像处理和机器学习的自动水果健康状态检测方法。
二.研究背景与意义
农业强国是社会主义现代化强国的根基。农业是基础,基础不牢大厦不稳。无论社会现代化程度有多高,14亿多人口的粮食和重要农产品稳定供给始终是头等大事。满足人民美好生活需要,离不开农业发展。全面建设社会主义现代化国家,出发点和落脚点是让人民生活越过越好。现代化越往前走、物质生活越丰富,人民群众越喜欢山清水秀的田园风光,农业除了保障粮食和重要农产品供给,其生态涵养、休闲观光、文化传承的功能就越能发挥积极作用。农业是近两亿人就业的产业,农村是近5亿农民常住的家园,只有把农业农村搞好了,广大农民安居乐业,他们才有充足的获得感、幸福感、安全感。实现高质量发展,也离不开农业发展。只有农业强了,农产品供给有保障,物价稳定、人心安定,经济大局才能稳住。拓展现代化发展空间,农业农村是大有可为的广阔天地。而病虫害一直是农业发展里令农民头疼的问题,病虫害对经济发展,浪费了大量人力物力,因此,准确的检测虫害信息,确定出害虫的位置,种类和分布情况等,是首先要解决的问题。
使用MATLAB建立模型自动检测病虫害有以下几点意义:
提高检测效率:自动检测系统能够快速、准确地识别果树病虫害,大大提高了检测的效率,节省了人力和时间成本。
减少误诊率:自动检测系统基于先进的图像识别技术,可以准确地辨别不同的病虫害类型,降低了误诊率,避免了因人为判断而造成的错误。
提前预警和防控:自动检测系统能够及时发现果树病虫害的存在,实现早期预警,帮助果农及时采取防控措施,避免病虫害的扩散和损失。
数据化管理:自动检测系统可以记录和分析大量的果树病虫害数据,帮助果农进行数据化管理,了解病虫害的分布和发展趋势,制定更科学的防治策略。
促进可持续发展:通过自动检测系统的应用,可以减少农药的使用量和频次,降低对环境的影响,促进果树种植的可持续发展。
综上所述,自动检测果树病虫害具有提高效率、减少误诊、提前预警和防控、数据化管理以及促进可持续发展等重要意义。
三.代码的实现过程
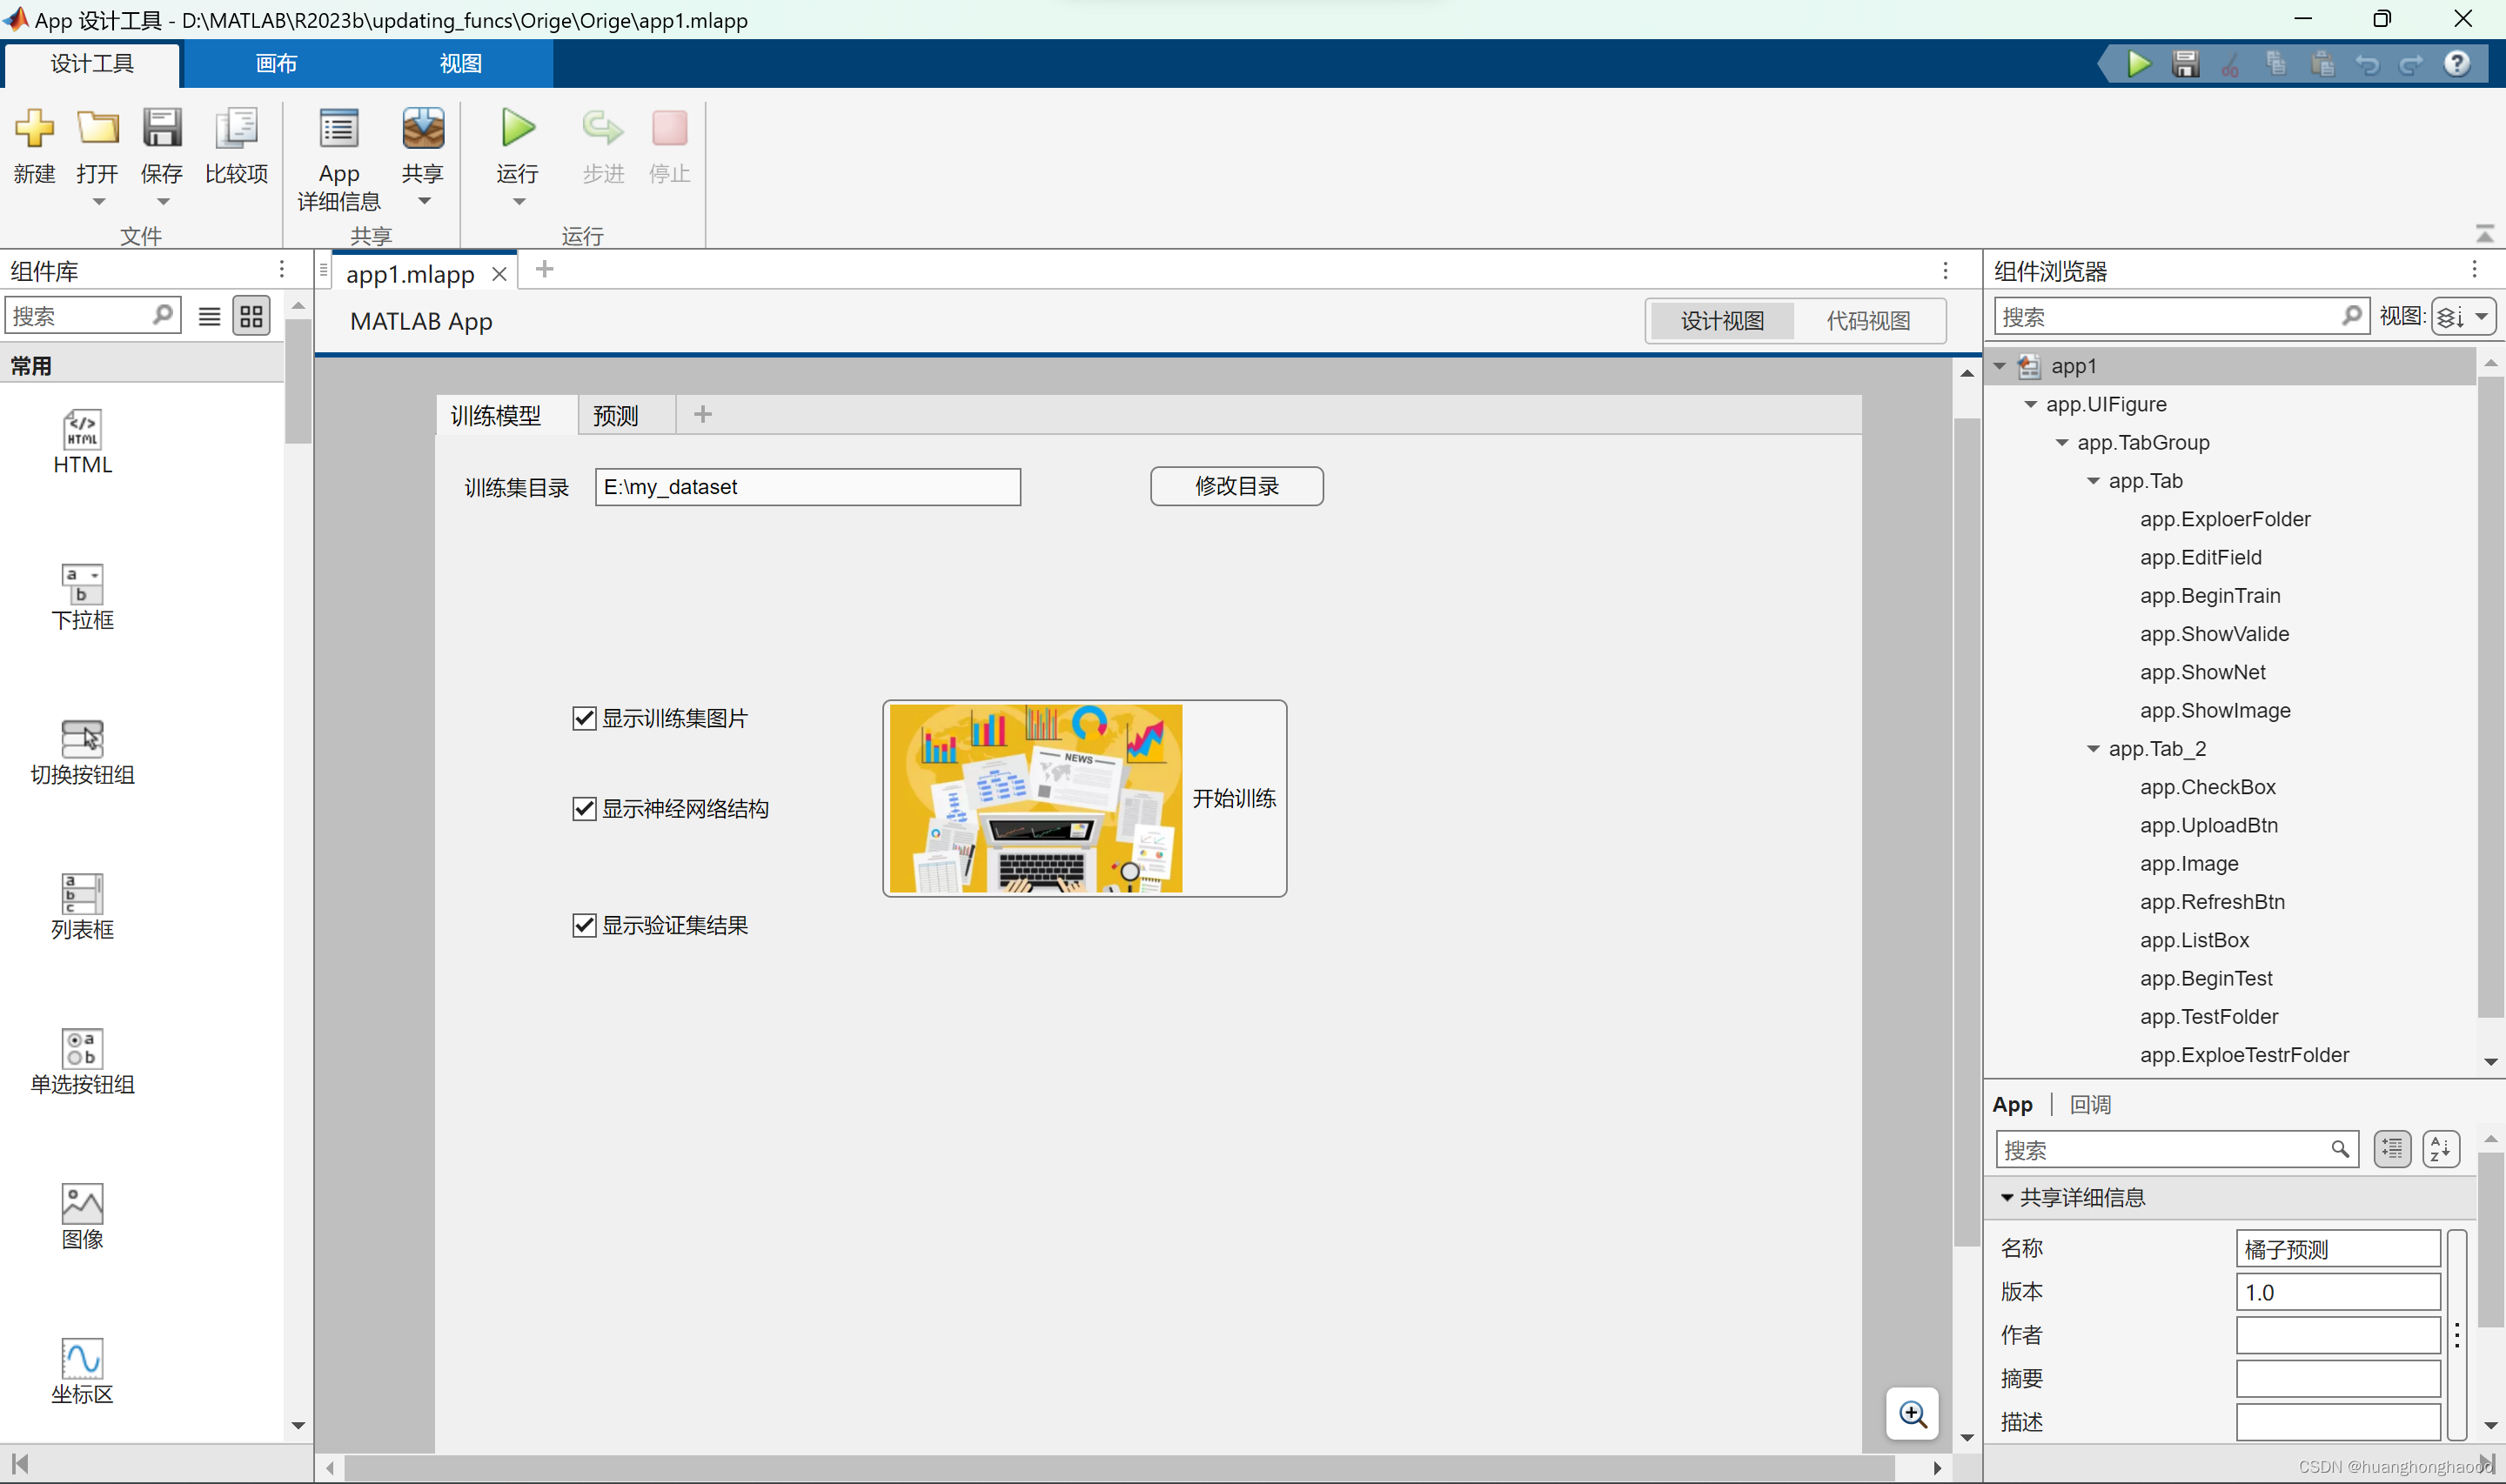
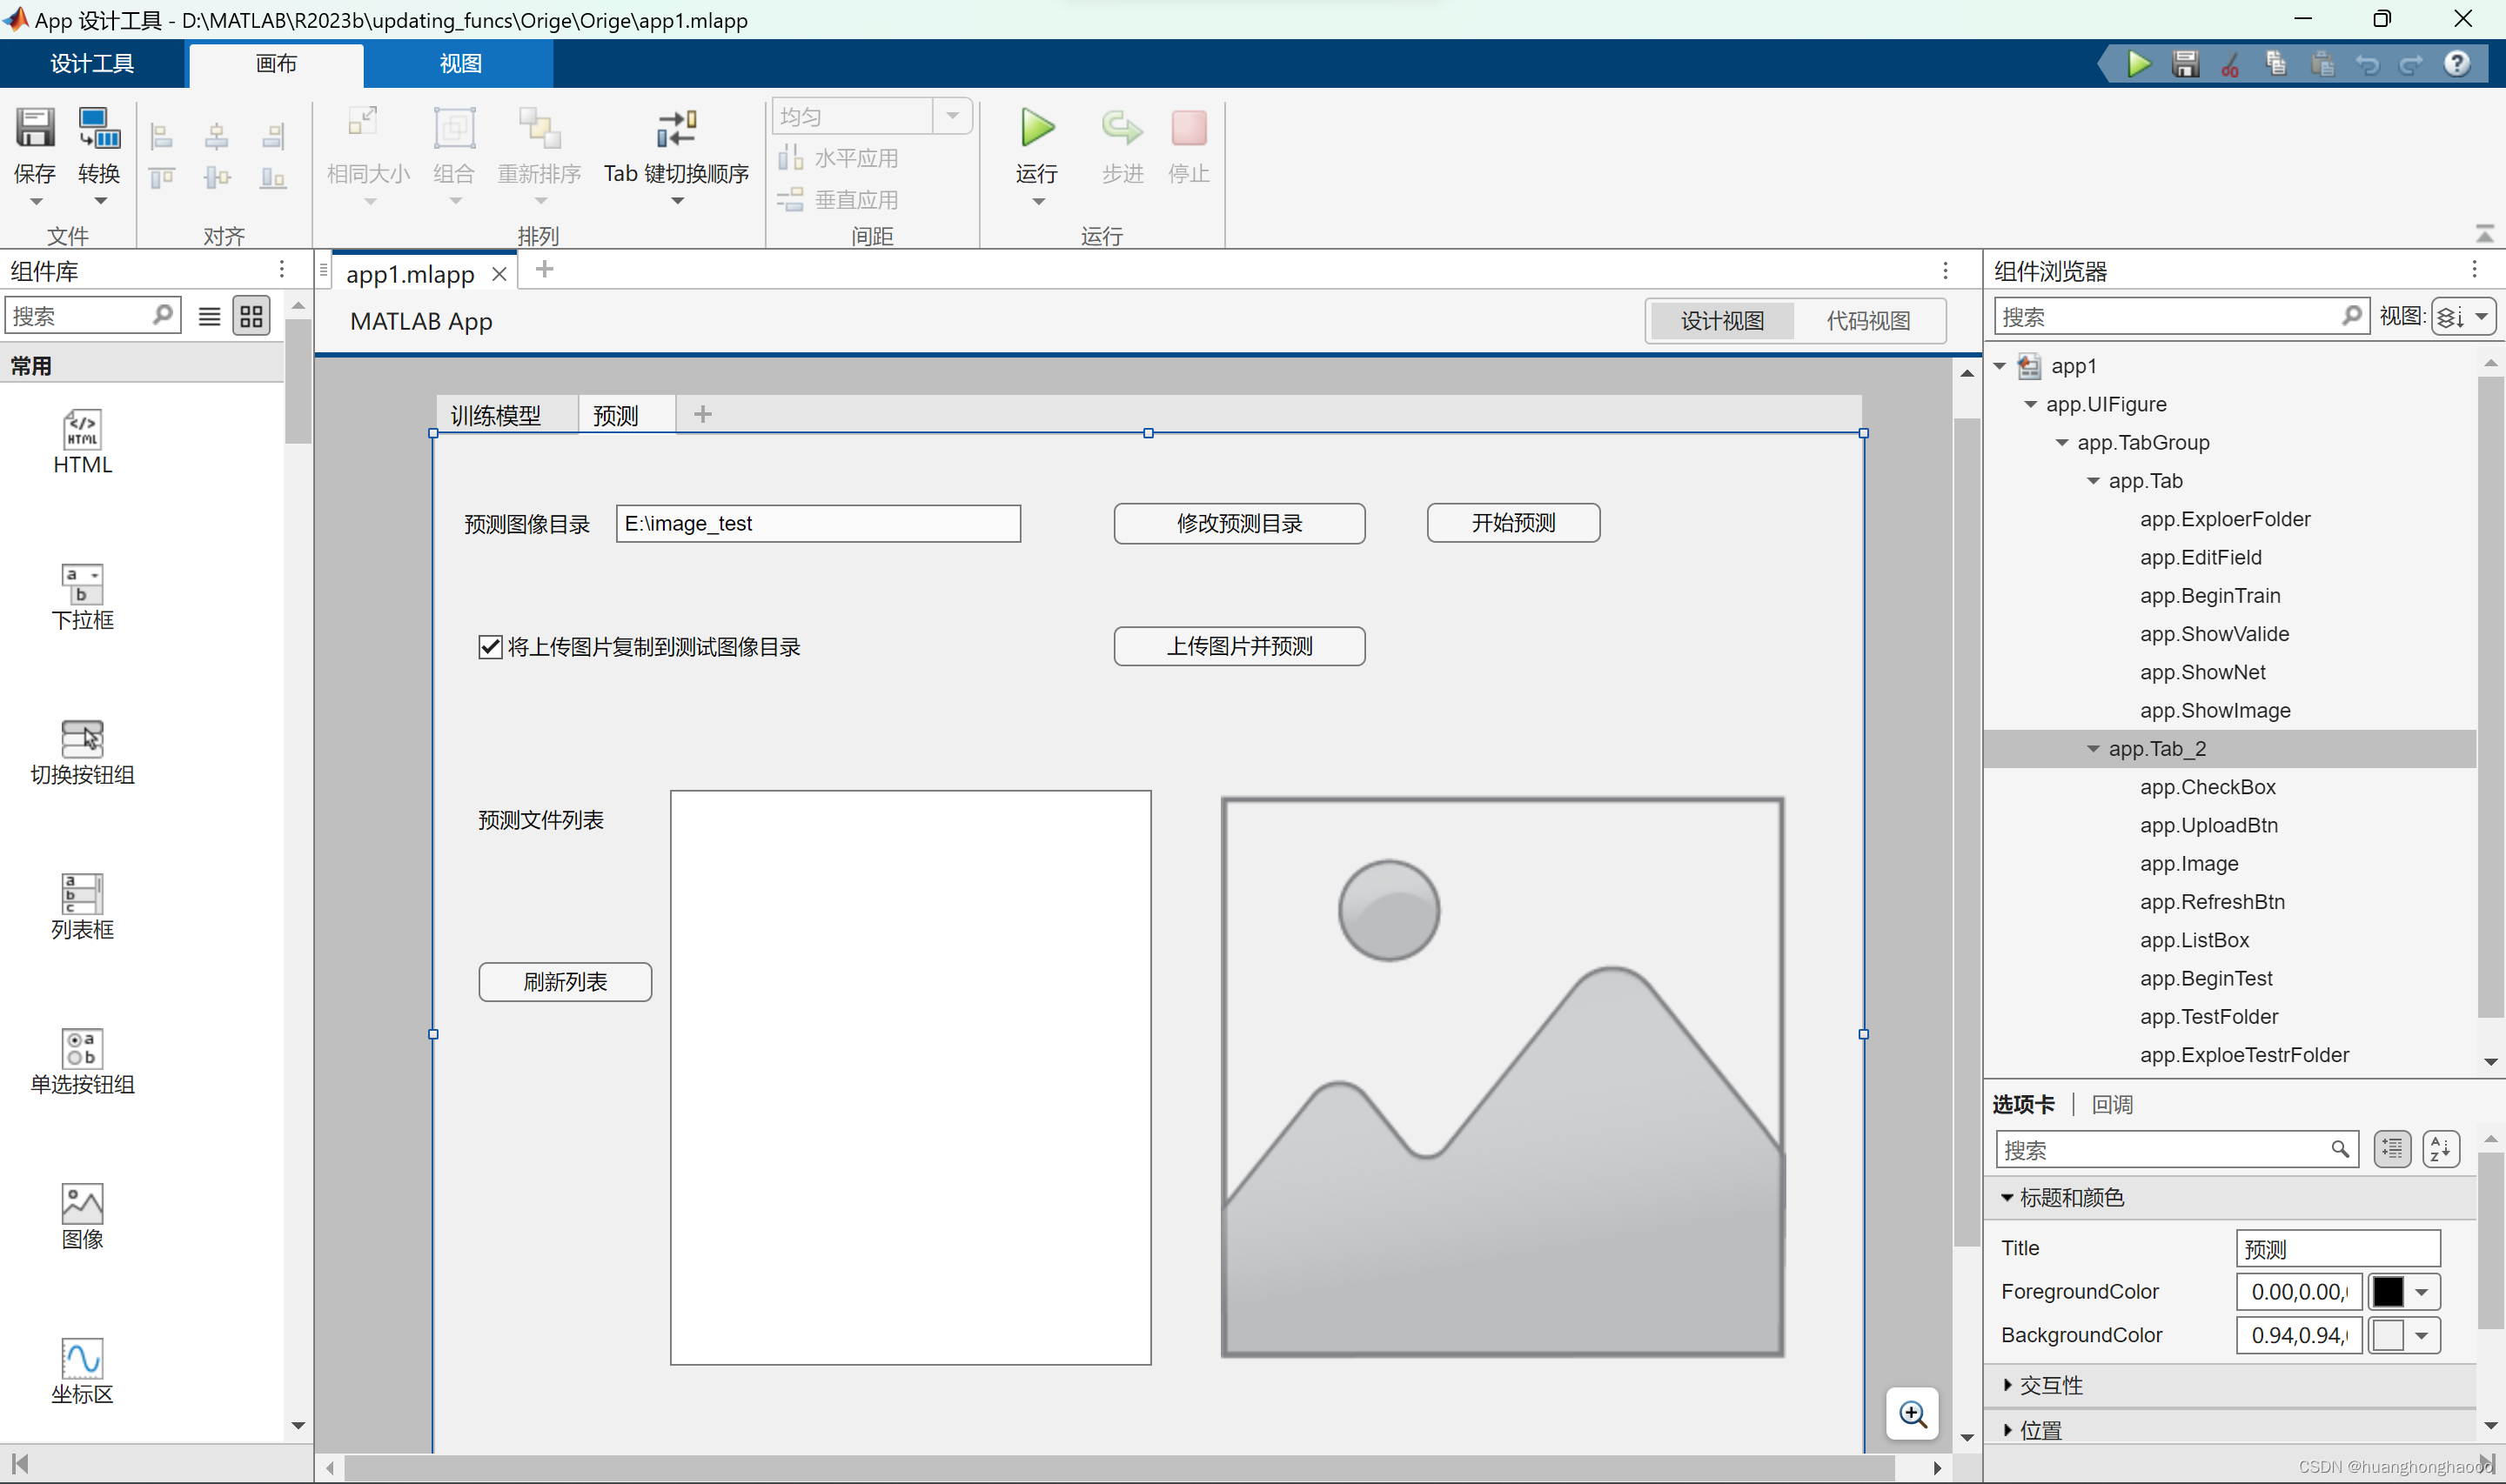
3.1 ui页面的设计
设计思路:为实现可视化以及便捷的目的,设计了训练以及预测两个板块,用户需在测试前先进行训练(这是必要的),并可选择是否显示训练集图片、神经网络结构等。在预测一栏,用户可以自由选择待测图像的路径;亦可单独或批量导入图片、并同时可选择是否将选中图片复制到测试集中。APP设计图片以及代码部分如下:
classdef app1 < matlab.apps.AppBase

    % Properties that correspond to app components
    properties (Access = public)
        UIFigure           matlab.ui.Figure
        TabGroup           matlab.ui.container.TabGroup
        Tab                matlab.ui.container.Tab
        ExploerFolder      matlab.ui.control.Button
        EditField          matlab.ui.control.EditField
        Label              matlab.ui.control.Label
        BeginTrain         matlab.ui.control.Button
        ShowValide         matlab.ui.control.CheckBox
        ShowNet            matlab.ui.control.CheckBox
        ShowImage          matlab.ui.control.CheckBox
        Tab_2              matlab.ui.container.Tab
        CheckBox           matlab.ui.control.CheckBox
        UploadBtn          matlab.ui.control.Button
        Image              matlab.ui.control.Image
        RefreshBtn         matlab.ui.control.Button
        ListBox            matlab.ui.control.ListBox
        Label_4            matlab.ui.control.Label
        BeginTest          matlab.ui.control.Button
        TestFolder         matlab.ui.control.EditField
        Label_3            matlab.ui.control.Label
        ExploeTestrFolder  matlab.ui.control.Button
        Label_2            matlab.ui.control.Label
    end


    properties (Access = public)
        netTransfer=[]; % 训练的神经网络
        istrained=false; % 是否已经训练了,默认没有训练
        tempSelectFileList % 当前选择的测试集文件
    end


    methods (Access = private)

        function fullfilePath = showimage(app,value)
            dataPath=app.TestFolder.Value;%folder
            fullfilePath=fullfile(dataPath,value);

            %im=imread(fullfilePath);
            %imshow(im)
            app.Image.ImageSource=fullfilePath;
        end

        function results = refreshList(app)
            dataPath=app.TestFolder.Value;

            imgFiles = dir(fullfile(dataPath, '*.jpg')); % 假设只处理jpg文件
            %更新listbox
            app.updateList(imgFiles);
        end
        function filesNames=updateList(app,imgFiles)
            numFiles = length(imgFiles);
            filesNames=strings(1,numFiles);

            if numFiles == 0
                errordlg('文件夹中没有找到图像文件。');
                return;
            else
                for i=1:numFiles
                    filesNames(i)=string(imgFiles(i).name);
                end
            end
            app.ListBox.Items=filesNames;
            app.ListBox.Value=filesNames(1);

            app.showimage(app.ListBox.Value);
        end
        %将文件名数组imgFiles存放到listbox列表中
        function filesNames=updateListByFileList(app,imgFiles)
            numFiles = length(imgFiles);
            filesNames=strings(1,numFiles);

            if numFiles == 0
                errordlg('文件夹中没有找到图像文件。');
                return;
            else
                for i=1:numFiles
                    filesNames(i)=imgFiles(i);
                end
            end
            app.ListBox.Items=filesNames;
            app.ListBox.Value=filesNames(1);

            app.showimage(app.ListBox.Value);
        end
        %将文件名列表fileList从uigetfile得到的字符串序列,复制到targetFolder
        %原始路径origFolder
        function results=copyFiles2Folder(app,fileList,origFolder,targetFolder)
            results=strings(1,length(fileList));
            for i = 1:length(fileList)
                oldName = fullfile(origFolder, fileList(i));

                % 生成新的随机文件名(仅包含字母和数字)
                newName = strcat('new_', num2str(randi([100000,999999])), '.jpg');
                % 构建完整的新文件路径
                newFullName = fullfile(targetFolder, newName);

                % 移动并重命名文件
                copyfile(oldName{1}, newFullName);
                results(i)=string(newName);
            end

        end
    end


    % Callbacks that handle component events
    methods (Access = private)

        % Button pushed function: ExploerFolder
        function ExploerFolderButtonPushed(app, event)
            baseFolder=app.EditField.Value;
            %弹出文件夹选择对话框
            filepath= uigetdir(baseFolder,'请选择文件夹');
            %什么没有选择,返回0
            if(filepath==0)
                return;%click cancel
            end
            app.EditField.Value=filepath;

        end

        % Button pushed function: BeginTrain
        function BeginTrainButtonPushed(app, event)
            dataPath=app.EditField.Value;
            if(dataPath=="")
                errordlg("必须选择训练集文件夹");
                return
            end
            app.Label_2.Text="开始训练";
            %形成训练集的数据源
            imds = imageDatastore(dataPath, 'IncludeSubfolders', true, 'LabelSource', 'foldernames');
            if (numel(imds.Files) == 0)
                disp('文件夹中没有找到图像文件,请选择其它文件夹');
                return;
            else
                %调用训练函数,把原来代码进行了拆分
                app.netTransfer=myTrainNet(imds,app.ShowImage.Value,app.ShowNet.Value,app.ShowValide.Value);
                app.Label_2.Text="训练结束";
                %标注已经训练,防止直接点击测试报错
                app.istrained=true;
                msgbox("训练结束");

            end
        end

        % Button pushed function: ExploeTestrFolder
        function ExploeTestrFolderButtonPushed(app, event)
            baseFolder=app.TestFolder.Value;
            %弹出文件夹选择对话框
            filepath= uigetdir(baseFolder,'请选择文件夹');
            %什么没有选择,返回0
            if(filepath==0)
                return;%click cancel
            end
            app.TestFolder.Value=filepath;
            app.refreshList();

        end

        % Button pushed function: BeginTest
        function BeginTestButtonPushed(app, event)
            dataPath=app.TestFolder.Value;
            if(dataPath=="")
                errordlg("必须选择测试集文件夹");
                return
            end

            if (~app.istrained)
                errordlg("必须训练后才能预测");
                return
            end
            %调用测试函数,将训练后网络传入
            testFolder(app.netTransfer,dataPath);
        end

        % Button pushed function: RefreshBtn
        function RefreshBtnButtonPushed(app, event)
            %刷新列表
            %更新按钮点击后,更新listbox
            app.refreshList();

        end

        % Value changed function: ListBox
        function ListBoxValueChanged(app, event)
            %点击Listbox后显示图片
            if isempty(app.ListBox.Items)
                return;
            end
            value=app.ListBox.Value;
            app.showimage(value);
        end

        % Button pushed function: UploadBtn
        function UploadBtnButtonPushed(app, event)
            %上传图片并预测
            dataPath=app.TestFolder.Value;
            [file,path] = uigetfile(fullfile(dataPath, '*.jpg'),...
                '选择一个或多个图片', ...
                'MultiSelect', 'on');
            if path==0
                return
            end
            % if isempty(length(file))
            %     errordlg("必须至少选择一个文件");
            %     return;
            % end

            %如果复制到目标目录,那么当前测试文件夹不变

            if app.CheckBox.Value
                results=app.copyFiles2Folder(file,path,dataPath);
                app.ListBox.Items=results;
                app.ListBox.Value=results(1);
                app.showimage(app.ListBox.Value);
                app.tempSelectFileList=results;

                testFiles(app.netTransfer,app.tempSelectFileList,app.TestFolder.Value);


            else
                %如果没有复制到当前目录,那么选择文件的路径就是测试目录
                app.TestFolder.Value=path;
                %更新listbox
                app.updateListByFileList(file);
                testFiles(app.netTransfer,file,app.TestFolder.Value);
            end
            %经过上面操作,在listbox的items中应该存入文件信息,路径信息在TestFolder文本框
            %以下代码对这些文件进行预测

        end
    end

    % Component initialization
    methods (Access = private)

        % Create UIFigure and components
        function createComponents(app)

            % Get the file path for locating images
            pathToMLAPP = fileparts(mfilename('fullpath'));

            % Create UIFigure and hide until all components are created
            app.UIFigure = uifigure('Visible', 'off');
            app.UIFigure.Position = [100 100 822 714];
            app.UIFigure.Name = '橘子预测';

            % Create Label_2
            app.Label_2 = uilabel(app.UIFigure);
            app.Label_2.HorizontalAlignment = 'center';
            app.Label_2.Position = [48 340 334 22];
            app.Label_2.Text = '';

            % Create TabGroup
            app.TabGroup = uitabgroup(app.UIFigure);
            app.TabGroup.Position = [1 1 822 714];

            % Create Tab
            app.Tab = uitab(app.TabGroup);
            app.Tab.Title = '训练模型';

            % Create ShowImage
            app.ShowImage = uicheckbox(app.Tab);
            app.ShowImage.Text = '显示训练集图片';
            app.ShowImage.Position = [80 516 106 22];
            app.ShowImage.Value = true;

            % Create ShowNet
            app.ShowNet = uicheckbox(app.Tab);
            app.ShowNet.Text = '显示神经网络结构';
            app.ShowNet.Position = [80 464 118 22];
            app.ShowNet.Value = true;

            % Create ShowValide
            app.ShowValide = uicheckbox(app.Tab);
            app.ShowValide.Text = '显示验证集结果';
            app.ShowValide.Position = [80 397 106 22];
            app.ShowValide.Value = true;

            % Create BeginTrain
            app.BeginTrain = uibutton(app.Tab, 'push');
            app.BeginTrain.ButtonPushedFcn = createCallbackFcn(app, @BeginTrainButtonPushed, true);
            app.BeginTrain.Icon = fullfile(pathToMLAPP, 'train.png');
            app.BeginTrain.Position = [258 424 233 114];
            app.BeginTrain.Text = '开始训练';

            % Create Label
            app.Label = uilabel(app.Tab);
            app.Label.HorizontalAlignment = 'right';
            app.Label.Position = [13 649 65 22];
            app.Label.Text = '训练集目录';

            % Create EditField
            app.EditField = uieditfield(app.Tab, 'text');
            app.EditField.Editable = 'off';
            app.EditField.Position = [93 649 245 22];
            app.EditField.Value = 'E:\my_dataset';

            % Create ExploerFolder
            app.ExploerFolder = uibutton(app.Tab, 'push');
            app.ExploerFolder.ButtonPushedFcn = createCallbackFcn(app, @ExploerFolderButtonPushed, true);
            app.ExploerFolder.Position = [412 649 100 23];
            app.ExploerFolder.Text = '修改目录';

            % Create Tab_2
            app.Tab_2 = uitab(app.TabGroup);
            app.Tab_2.Title = '预测';

            % Create ExploeTestrFolder
            app.ExploeTestrFolder = uibutton(app.Tab_2, 'push');
            app.ExploeTestrFolder.ButtonPushedFcn = createCallbackFcn(app, @ExploeTestrFolderButtonPushed, true);
            app.ExploeTestrFolder.Position = [391 627 145 24];
            app.ExploeTestrFolder.Text = '修改预测目录';

            % Create Label_3
            app.Label_3 = uilabel(app.Tab_2);
            app.Label_3.HorizontalAlignment = 'right';
            app.Label_3.Position = [13 628 77 22];
            app.Label_3.Text = '预测图像目录';

            % Create TestFolder
            app.TestFolder = uieditfield(app.Tab_2, 'text');
            app.TestFolder.Editable = 'off';
            app.TestFolder.Position = [105 628 233 22];
            app.TestFolder.Value = 'E:\image_test';

            % Create BeginTest
            app.BeginTest = uibutton(app.Tab_2, 'push');
            app.BeginTest.ButtonPushedFcn = createCallbackFcn(app, @BeginTestButtonPushed, true);
            app.BeginTest.Position = [571 628 100 23];
            app.BeginTest.Text = '开始预测';

            % Create Label_4
            app.Label_4 = uilabel(app.Tab_2);
            app.Label_4.Position = [26 454 111 30];
            app.Label_4.Text = '预测文件列表';

            % Create ListBox
            app.ListBox = uilistbox(app.Tab_2);
            app.ListBox.Items = {};
            app.ListBox.ValueChangedFcn = createCallbackFcn(app, @ListBoxValueChanged, true);
            app.ListBox.Position = [136 155 277 331];
            app.ListBox.Value = {};

            % Create RefreshBtn
            app.RefreshBtn = uibutton(app.Tab_2, 'push');
            app.RefreshBtn.ButtonPushedFcn = createCallbackFcn(app, @RefreshBtnButtonPushed, true);
            app.RefreshBtn.Position = [26 364 100 23];
            app.RefreshBtn.Text = '刷新列表';

            % Create Image
            app.Image = uiimage(app.Tab_2);
            app.Image.Position = [442 158 346 325];

            % Create UploadBtn
            app.UploadBtn = uibutton(app.Tab_2, 'push');
            app.UploadBtn.ButtonPushedFcn = createCallbackFcn(app, @UploadBtnButtonPushed, true);
            app.UploadBtn.Position = [391 557 145 23];
            app.UploadBtn.Text = '上传图片并预测';

            % Create CheckBox
            app.CheckBox = uicheckbox(app.Tab_2);
            app.CheckBox.Text = '将上传图片复制到测试图像目录';
            app.CheckBox.Position = [26 557 191 22];
            app.CheckBox.Value = true;

            % Show the figure after all components are created
            app.UIFigure.Visible = 'on';
        end
    end

    % App creation and deletion
    methods (Access = public)

        % Construct app
        function app = app1

            runningApp = getRunningApp(app);

            % Check for running singleton app
            if isempty(runningApp)

                % Create UIFigure and components
                createComponents(app)

                % Register the app with App Designer
                registerApp(app, app.UIFigure)
            else

                % Focus the running singleton app
                figure(runningApp.UIFigure)

                app = runningApp;
            end

            if nargout == 0
                clear app
            end
        end

        % Code that executes before app deletion
        function delete(app)

            % Delete UIFigure when app is deleted
            delete(app.UIFigure)
        end
    end
end
3.2 运行代码的实现
为编程过程简单易懂,在编写代码时将其分为几个部分分别进行优化和改正。下面呈现的几个函数具有训练、测试、导入文件等功用(注释部分较为详细,这里不过多赘述)。
下图为训练部分
function netTransfer=myTrainNet(imds,showOrigImage,showNet,showValide)
    %dataPath = 'E:\my_dataset';

    %读入数据形成图像数据集,包括子目录
    %现在从ui读入,所以不设置了
    %imds = imageDatastore(dataPath, 'IncludeSubfolders', true, 'LabelSource', 'foldernames');

    %将读入的图片数据集乱序,随机的目的是防止都显示同样的图片
     %这是为了显示用的
     numExample = min(numel(imds.Files),8);
     idx = randperm(numel(imds.Files), numExample);
    if(showOrigImage)%控制是否显示

        %定义一个存入图片以及标签的数组
        I_tile = cell(1, numExample);
        %把图片和标签读入
        for i = 1:numExample
            %读取图片
            I = readimage(imds, idx(i));
            %图片,标签存入数组
            I_tile{i} = insertText(I, [1, 1], string(imds.Labels(idx(i))), 'FontSize', 20);
        end
        %将多个图像帧合并为一个矩形分块图
        I_tile = imtile(I_tile);
        %开新窗口
        figure;
        %显示结果
        imshow(I_tile);

        %图片标题
        title('Examples of the Fruit Dataset');
    end
    %将图片分成测试集合训练集,测试集,后面按照目录读入测试集,这里可以不用测试集
    %[imdsTrain, imdsValidation, imdsTest] = splitEachLabel(imds, 0.6, 0.2, 0.2, 'randomized');
    %未用原始路径中的图片作为测试集
    [imdsTrain, imdsValidation] = splitEachLabel(imds, 0.6, 0.4, 'randomized');
    %训练集图片个数,没用到这个参数
    %numTrainImages = numel(imdsTrain.Labels);
    %载入深度学习网络模型,它是已经预训练完毕的,只要修改最后层就能实现任务
    net = squeezenet;
    %这是看网络结构,可以不写,写出后可以看到一个深度学习网络
    if(showNet)
       analyzeNetwork(net);
    end
    %网络输入层,是一个三维矩阵,227*227*3,就是图片大小必须是227*227的彩色图片
    %如果输入图片不满足这个要求,需要对图片进行处理,使得变成这样的大小
    inputSize = net.Layers(1).InputSize;
    %得到整个深度网络的结构,替换在lgraph中替换
    lgraph = layerGraph(net);
    %训练集样本标签共有多少类,有多少类,网络就输出多少个值
    numClasses = numel(categories(imdsTrain.Labels));
    %为了让网络能具有更好的结果(泛化能力强)需要对训练集的图片做些微小的变化
    %如一个橘子图片,所有像素都增加20应该也是橘子,这个变化后的样本也作为训练集输入到网络
    %这个变量就是将训练集像素值变化的范围
    pixelRange = [-30 30];
    %定义图像变换的方式
    imageAugmenter = imageDataAugmenter( ...
        'RandXReflection', true, ...
        'RandXTranslation', pixelRange, ...
        'RandYTranslation', pixelRange);
    %将训练集按照变换方式进行图像增强(样本变多了),训练集图片变成输入要求大小(227*227)
    augimdsTrain = augmentedImageDatastore(inputSize(1:2), imdsTrain, ...
        'DataAugmentation', imageAugmenter);
    %验证集只需要把图片变成输入图片大小即可,不需增强
    augimdsValidation = augmentedImageDatastore(inputSize(1:2), imdsValidation); % Add this line
    %网络训练的参数
    options = trainingOptions('adam', ...  %优化算法
        'MiniBatchSize', 100, ...          %每次传入网络的样本数
        'MaxEpochs', 5, ...                %训练多少轮(全部训练集都训练了算一轮)
        'InitialLearnRate', 2e-4, ...      %初始学习率
        'Shuffle', 'every-epoch', ...           %每轮都打乱样本
        'ValidationData', augimdsValidation, ...   %验证集
        'ExecutionEnvironment', "auto", ...
        'ValidationFrequency', 30, ...             %每多少次训练后,做一次验证
        'Verbose', false, ...	                   %是否训练时显示训练过程结果
    'Plots', 'training-progress');                 %绘制训练过程
    %替换样本,因为原来是1000个类别,我们需要3个,所以定义一个新的卷积层,输出是:numClasses,即3
    %[1, 1]是卷积核大小,numClasses是卷积核个数,个数多少就是控制输出多少
    %'WeightLearnRateFactor',10,后面都是两个是一对,这是权值比例
    %'BiasLearnRateFactor',10,偏差比例
    %"Name",'new_conv' 新建的层,命名
    newConvLayer =  convolution2dLayer([1, 1],numClasses,'WeightLearnRateFactor',10,'BiasLearnRateFactor',10,"Name",'new_conv');
    %将原来网络中名称为'conv10'的网络替换成自己定义的网络
    lgraph = replaceLayer(lgraph,'conv10',newConvLayer);
    %自定义一个最后的输出成
    newClassificatonLayer = classificationLayer('Name','new_classoutput');
    %把网络的最后一层换掉,换成自定义,现在查看变量:lgraph,会发现变化了
    lgraph = replaceLayer(lgraph,'ClassificationLayer_predictions',newClassificatonLayer);

    %这是训练过程,这是一个耗时过程
    netTransfer = trainNetwork(augimdsTrain,lgraph,options);
    %验证集验证与显示
    %验证集
    [YPred,scores] = classify(netTransfer,augimdsValidation);
    %定义显示的验证集样本个数,防止少于4个,这里取最小值
    valide_number=min(numel(imdsValidation.Files),4);
    %随机置换样本的顺序
    idx = randperm(numel(imdsValidation.Files),valide_number);
    if (showValide)
    %新开一个窗口
       figure
        %将图片显示出来
        for i = 1:valide_number
            %子图,整个图形是2行2列,这是绘制第i个图
            subplot(2,2,i)
            %读图像,在验证集imdsValidation中读
            I = readimage(imdsValidation,idx(i));
            %显示图像
            imshow(I)
            %图像预测标签
            label = YPred(idx(i));
            %图像打上标签
            title(string(label));
        end

    end
end
下图为测试部分:
function [YPred, scores] = testFiles(netTransfer,filesList,folder)
%根据训练后的网络netTransfer,对文件夹folder下文件列表filesList进行预测
%   此处显示详细说明
    tempFullFiles=strings(1,length(filesList));


    for i=1:length(filesList)
        filesList(i)
        tempFullFile=fullfile(folder,filesList(i))
        tempFullFiles(i)=tempFullFile;

    end
    fs = matlab.io.datastore.FileSet(tempFullFiles);
    [YPred, scores]=testFolder(netTransfer,fs);
end
下图中代码即实现了用户自由选择文件路径:
function [YPred, scores] = testFolder(netTransfer,testDataPath)
%TESTFOLDER 此处显示有关此函数的摘要
%   对一个文件夹所有内容进行测试
    %训练好的网络
    % 创建图像数据存储对象
    imdsTest = imageDatastore(testDataPath);
    inputSize = netTransfer.Layers(1).InputSize;
    % 预处理待测图像
    augimdsTest = augmentedImageDatastore(inputSize(1:2), imdsTest);

    % 进行测试集分类预测
    [YPred, scores] = classify(netTransfer, augimdsTest);

    %定义显示的测试集样本个数,防止少于4个,这里取最小值
    test_number=min(numel(augimdsTest.Files),4);
    %随机置换样本的顺序
    idx = randperm(numel(augimdsTest.Files),test_number);
    %新开一个窗口
    figure
    for i = 1:test_number
        %子图,整个图形是2行2列,这是绘制第i个图
        subplot(2,2,i)
        %读图像,在测试集imdsTest中读
        I = readimage(imdsTest,idx(i));
        %显示图像
        imshow(I)
        %图像预测标签
        label = YPred(idx(i));
        %图像打上标签
        title(string(label));
    end
end
这些代码中定义的函数都需要在上述的APP代码部分进行调用,才能发挥其作用。
四.发展预期目标
现在我的想法是再进行优化,使之能实现对含有多元素图片(例如含有多个橘子的图片)的自动分割和预测,代码仍在研究和不断报错中。。。。


 476
476


 被折叠的 条评论
为什么被折叠?
被折叠的 条评论
为什么被折叠?
 到【灌水乐园】发言


