


FrameLayout
<?xml version="1.0" encoding="utf-8"?>
<FrameLayout xmlns:android="http://schemas.android.com/apk/res/android"
    android:layout_width="match_parent"
    android:layout_height="match_parent">
    <Button
        android:layout_width="200dp"
        android:layout_height="200dp"
        android:text="Button1"
        android:visibility="invisible"/>
    <Button
        android:layout_width="100dp"
        android:layout_height="100dp"
        android:text="button2"
        android:visibility="visible"/>
    <Button
        android:layout_width="150dp"
        android:layout_height="50dp"
        android:text="button3"
        android:visibility="gone"/>
</FrameLayout>
TableLayout
<?xml version="1.0" encoding="utf-8"?>
<TableLayout xmlns:android="http://schemas.android.com/apk/res/android"
    android:layout_width="match_parent"
    android:layout_height="match_parent"
    android:stretchColumns="2"

    android:shrinkColumns="0,2">
    <TableRow>
        <Button android:text="button1"/>
        <Button android:text="button2"/>
        <Button android:text="button3"/>
        <Button android:text="button4"/>
    </TableRow>
    <TableRow>
        <Button android:text="button1"/>
        <Button android:text="button20121630000000000000"/>
        <Button android:text="button3"/>
    </TableRow>
    <TableRow>
        <Button android:text="button1"/>
        <Button android:text="button2"/>
        <Button android:text="button3"
            android:layout_span="2"
        />
    </TableRow>
    <TableRow>
        <Button android:text="button1"/>
        <Button android:text="button2"/>
        <Button android:text="button3"/>
    </TableRow>
</TableLayout>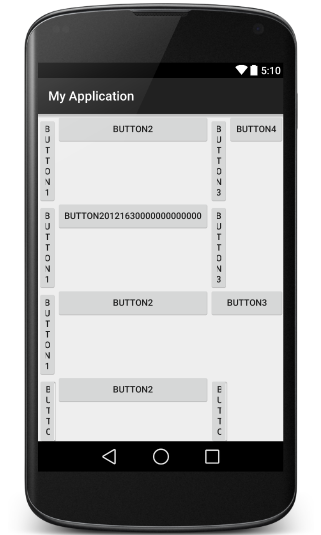
AbsoluteLayout
<?xml version="1.0" encoding="utf-8"?>
<AbsoluteLayout xmlns:android="http://schemas.android.com/apk/res/android"
    android:layout_width="match_parent" android:layout_height="match_parent">

    <Button
        android:layout_width="wrap_content"
        android:layout_height="wrap_content"
        android:text="New Button"
        android:id="@+id/button"
        android:layout_x="91dp"
        android:layout_y="148dp" />

    <Button
        android:layout_width="wrap_content"
        android:layout_height="wrap_content"
        android:text="New Button"
        android:id="@+id/button2"
        android:layout_x="4dp"
        android:layout_y="32dp" />

    <Button
        android:layout_width="wrap_content"
        android:layout_height="wrap_content"
        android:text="New Button"
        android:id="@+id/button3"
        android:layout_x="121dp"
        android:layout_y="33dp" />

    <Button
        android:layout_width="wrap_content"
        android:layout_height="wrap_content"
        android:text="New Button"
        android:id="@+id/button4"
        android:layout_x="108dp"
        android:layout_y="250dp" />

    <Button
        android:layout_width="wrap_content"
        android:layout_height="wrap_content"
        android:text="New Button"
        android:id="@+id/button5"
        android:layout_x="179dp"
        android:layout_y="200dp" />

    <Button
        android:layout_width="wrap_content"
        android:layout_height="wrap_content"
        android:text="New Button"
        android:id="@+id/button6"
        android:layout_x="149dp"
        android:layout_y="330dp" />

    <Button
        android:layout_width="wrap_content"
        android:layout_height="wrap_content"
        android:text="New Button"
        android:id="@+id/button7"
        android:layout_x="134dp"
        android:layout_y="92dp" />

    <Button
        android:layout_width="wrap_content"
        android:layout_height="wrap_content"
        android:text="New Button"
        android:id="@+id/button8"
        android:layout_x="253dp"
        android:layout_y="32dp" />

    <Button
        android:layout_width="wrap_content"
        android:layout_height="wrap_content"
        android:text="New Button"
        android:id="@+id/button9"
        android:layout_x="14dp"
        android:layout_y="430dp" />

    <Button
        android:layout_width="wrap_content"
        android:layout_height="wrap_content"
        android:text="New Button"
        android:id="@+id/button10"
        android:layout_x="253dp"
        android:layout_y="433dp" />

    <Button
        android:layout_width="wrap_content"
        android:layout_height="wrap_content"
        android:text="New Button"
        android:id="@+id/button11"
        android:layout_x="118dp"
        android:layout_y="393dp" />
</AbsoluteLayout>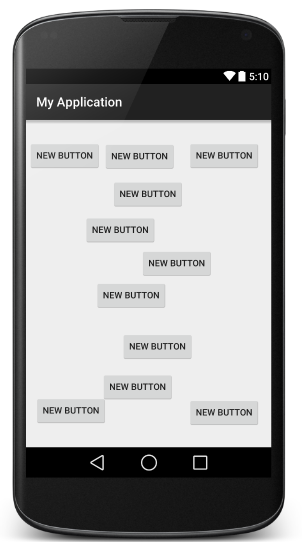
Activity的横竖屏问题和全屏问题
横竖屏问题
在manifests中的activity中进行编写
android:screenOrientation=”portrait”这是竖屏 landspace表示横屏
并且如果在这里定义横竖屏之后,在手机上将不能横竖屏自动转换
全屏问题
全屏这里分为两部分,一个是隐藏标题栏,另一种是全屏显示,没有信息栏
在manifests中编写的方式为:
android:theme=”@android:style/Theme.NoTitleBar.Fullscreen”
如果仅仅想隐藏标题栏,可以去掉Fullscreen。
在Activity中编写的方式为:
this.requestWindowFeature(Window.FEATURE_NO_TITLE);//去掉标题栏
this.getWindow().setFlags(WindowManager.LayoutParams.FLAG_FULLSCREEN, WindowManager.LayoutParams.FLAG_FULLSCREEN);//去掉信息栏
启动activity有两种方式
直接启动 使用intent启动activity
Intent intent=new Intent(MainActivity.this ,SecondActivity.class);
 startActivity(intent);
带返回值的启动方式
步骤:
1.第一个界面调用startactivityforresult(intent,requestcode);
2. 第二个界面县调用getintent()得到启动的intent;
3. 在关闭第二个界面钱先锋装数据 intent。putextra(“”,edittext.gettext.tostring)
4. 设置rusultcode setresult(result_ok,intent)
5. 关闭第二个界面
6. 第一个界面准备接收数据
7. 重写onactivityresult()
8. 判断resultcode
9. 然后从data中取出数据
第一个Activity代码
 Button button=(Button)findViewById(R.id.button_1);
        button.setOnClickListener(new View.OnClickListener() {
            @Override
            public void onClick(View v) {
                Intent intent=new Intent(MainActivity.this ,SecondActivity.class);

                startActivityForResult(intent,1234);
            }
        });
    }

    @Override
    protected void onActivityResult(int requestCode, int resultCode, Intent data) {
        switch ( requestCode){
            case (1234):
                if(resultCode==RESULT_OK){
                    String str=data.getStringExtra("backdata");
                    editText=(EditText)findViewById(R.id.text);
                    editText.setText("");
                    editText.append(str);
                }
                break;
        }

    }
第二个Activity的代码
 button= (Button) findViewById(R.id.button_back);
        editText= (EditText) findViewById(R.id.edittext);
        button.setOnClickListener(new View.OnClickListener() {
            @Override
            public void onClick(View v) {
                intent=new Intent();
                intent.putExtra("backdata",editText.getText().toString());
                setResult(RESULT_OK, intent);
                finish();
            }
        });


 4388
4388


 被折叠的 条评论
为什么被折叠?
被折叠的 条评论
为什么被折叠?
 到【灌水乐园】发言


