


1。介绍
Thymeleaf 是一个 Java 模板引擎,能够直接与 Spring 一起工作。有关 Thymeleaf 和 Spring 的介绍,请查看 this write-up。
除了这些基本功能之外,Thymeleaf 还为我们提供了一组实用程序对象,它们将帮助我们在应用程序中执行常见任务。
在本教程中,我们将讨论新旧 Java Date 类的处理和格式化以及 Thymeleaf 3.0 的一些特性。
2。 Maven 依赖项
首先,让我们创建配置以将 Thymeleaf 与 Spring 集成到我们的 pom.xml 中:
<dependency>
    <groupId>org.thymeleaf</groupId>
    <artifactId>thymeleaf</artifactId>
    <version>3.0.11.RELEASE</version>
</dependency>
<dependency>
    <groupId>org.thymeleaf</groupId>
    <artifactId>thymeleaf-spring5</artifactId>
    <version>3.0.11.RELEASE</version>
</dependency>
最新版本的 thymeleaf 和thymeleaf-spring5*可以可以在 Maven 中心找到。请注意,对于 Spring 4 项目,必须使用 *thymeleaf-spring4 库而不是 thymeleaf-spring5。
此外,为了使用新的 Java 8 Date 类,我们需要向 pom.xml 添加另一个依赖项:
<dependency>
    <groupId>org.thymeleaf.extras</groupId>
    <artifactId>thymeleaf-extras-java8time</artifactId>
    <version>3.0.4.RELEASE</version>
</dependency>
thymeleaf extras 是一个可选模块,由官方 Thymeleaf 团队支持,这是为了与 Java 8 Time API 兼容而创建的。它在表达式求值期间将 #temporals 对象添加到 Context 作为实用对象处理器。这意味着它可以用于评估对象图形导航语言 (OGNL) 和 Spring 表达式语言 (SpringEL) 中的表达式。
3。新旧:java.util 和 java.time
Time 包是 Java SE 平台的新日期、时间和日历 API。此新 API 与旧的旧 Date API 之间的主要区别在于,新 API 区分了时间轴的机器视图和人类视图。机器视图显示相对于 epoch 的一系列整数值,而人类视图显示一组字段(例如,年、月和日)。
要使用新的 Time 包,我们需要配置我们的模板引擎以使用新的 Java8TimeDialect:
private ISpringTemplateEngine templateEngine(ITemplateResolver templateResolver) {
    SpringTemplateEngine engine = new SpringTemplateEngine();
    engine.addDialect(new Java8TimeDialect());
    engine.setTemplateResolver(templateResolver);
    return engine;
}
这将添加类似于标准方言中的 #temporals 对象,允许从 Thymeleaf 模板格式化和创建 Temporal 对象。
为了测试新旧类的处理,我们将创建以下变量并将它们作为模型对象添加到我们的控制器类中:
model.addAttribute("standardDate", new Date());
model.addAttribute("localDateTime", LocalDateTime.now());
model.addAttribute("localDate", LocalDate.now());
model.addAttribute("timestamp", Instant.now());
现在,我们准备好使用 Thymeleaf 的 Expression 和 Temporals 实用程序对象了。
3.1。格式化日期
我们要介绍的第一个函数是格式化 Date 对象(添加到 Spring 模型参数中)。我们将使用 ISO8601 格式:
<h1>Format ISO</h1>
<p th:text="${#dates.formatISO(standardDate)}"></p>
<p th:text="${#temporals.formatISO(localDateTime)}"></p>
<p th:text="${#temporals.formatISO(localDate)}"></p>
<p th:text="${#temporals.formatISO(timestamp)}"></p>
无论我们的 Date 在后端如何设置,它都会根据所选标准显示在 Thymeleaf 中。 standardDate 将由#dates 实用程序处理。新的 LocalDateTime 、 LocalDate 和 Instant 类将由 #temporals 实用程序处理。
此外,如果我们想手动设置格式,我们可以使用:
<h1>Format manually</h1>
<p th:text="${#dates.format(standardDate, 'dd-MM-yyyy HH:mm')}"></p>
<p th:text="${#temporals.format(localDateTime, 'dd-MM-yyyy HH:mm')}"></p>
<p th:text="${#temporals.format(localDate, 'MM-yyyy')}"></p>
正如我们所观察到的,我们无法使用 #temporals.format(...) 处理 Instant 类 --- 这将导致 UnsupportedTemporalTypeException 。此外,仅当我们仅指定特定日期字段,跳过时间字段时,才可能格式化 LocalDate。
让我们看看最终结果: 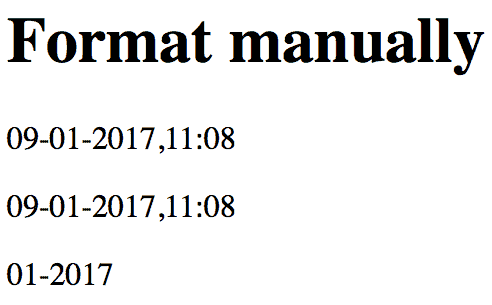
3.2。获取特定日期字段
为了获取 java.util.Date 类的特定字段,我们应该使用以下实用程序对象:
${#dates.day(date)}
${#dates.month(date)}
${#dates.monthName(date)}
${#dates.monthNameShort(date)}
${#dates.year(date)}
${#dates.dayOfWeek(date)}
${#dates.dayOfWeekName(date)}
${#dates.dayOfWeekNameShort(date)}
${#dates.hour(date)}
${#dates.minute(date)}
${#dates.second(date)}
${#dates.millisecond(date)}
对于新的 java.time 包,我们应该坚持使用 #temporals 实用程序:
${#temporals.day(date)}
${#temporals.month(date)}
${#temporals.monthName(date)}
${#temporals.monthNameShort(date)}
${#temporals.year(date)}
${#temporals.dayOfWeek(date)}
${#temporals.dayOfWeekName(date)}
${#temporals.dayOfWeekNameShort(date)}
${#temporals.hour(date)}
${#temporals.minute(date)}
${#temporals.second(date)}
${#temporals.millisecond(date)}
让我们看几个例子。首先,让我们显示一周中的今天:
<h1>Show only which day of a week</h1>
<p th:text="${#dates.day(standardDate)}"></p>
<p th:text="${#temporals.day(localDateTime)}"></p>
<p th:text="${#temporals.day(localDate)}"></p>
接下来,让我们显示工作日的名称:
<h1>Show the name of the week day</h1>
<p th:text="${#dates.dayOfWeekName(standardDate)}"></p>
<p th:text="${#temporals.dayOfWeekName(localDateTime)}"></p>
<p th:text="${#temporals.dayOfWeekName(localDate)}"></p>
最后,让我们显示当天的当前秒数:
<h1>Show the second of the day</h1>
<p th:text="${#dates.second(standardDate)}"></p>
<p th:text="${#temporals.second(localDateTime)}"></p>
请注意,为了使用时间部分,我们需要使用 LocalDateTime ,因为 LocalDate 会引发错误。
4。如何在表单中使用日期选择器
让我们看看如何使用日期选择器从 Thymeleaf 表单提交 Date 值。
首先,让我们创建一个带有 Date 属性的 Student 类:
public class Student implements Serializable {
    @DateTimeFormat(pattern = "yyyy-MM-dd")
    private Date birthDate;
}
@DateTimeFormat 注释声明 birthDate 字段应格式化为 a Date。
接下来,我们将创建一个 Thymeleaf 表单来提交 Date 输入:
<form th:action="@{/saveStudent}" method="post" th:object="${student}">
    <div>
        <label for="student-birth-date">Date of birth:</label>
        <input type="date" th:field="${student.birthDate}" id="student-birth-date"/>
    </div>
    <div>
        <button type="submit" class="button">Submit</button>
    </div>
</form>
当我们提交表单时,控制器将截获在表单中映射的带有 th:object 属性的 Student 对象。此外,th:field 属性将输入值与 birthDate 字段绑定。
现在,让我们创建一个控制器来拦截 POST 请求:
@RequestMapping(value = "/saveStudent", method = RequestMethod.POST)
public String saveStudent(Model model, @ModelAttribute("student") Student student) {
    model.addAttribute("student", student);
    return "datePicker/displayDate.html";
}
提交表单后,我们将在另一个页面上显示 birthDate 值,格式为 dd/MM/yyyy:
<h1>Student birth date</h1>
<p th:text="${#dates.format(student.birthDate, 'dd/MM/yyyy')}"></p>
结果显示了带有日期选择器的表单: 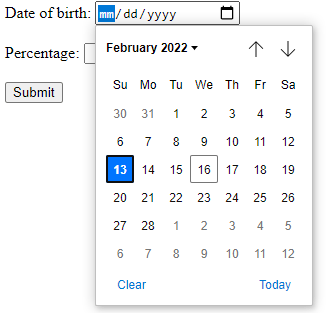
提交表单后,我们将看到选定的日期: 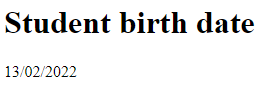
5。小结
在本教程中,我们讨论了 Thymeleaf 框架 3.0 版中实现的 Java Date 处理功能。
如何测试? 我们的建议是先在浏览器中使用代码,然后再检查我们现有的 JUnit 测试。
请注意,我们的示例并未涵盖 Thymeleaf 中的所有可用选项。如果您想了解所有类型的实用程序,请查看我们关于 Spring 和 Thymeleaf 表达式 的文章。
本教程的完整实现可以在 [over on GitHub](https://github.com/eugenp/tutorials/tree/master/spring-web-modules/spring-thymeleaf "The Full Registration/Authentication Example Project on Github ”)。 本文亦通过 NoOne 的个人博客 发表。


 2292
2292


 被折叠的 条评论
为什么被折叠?
被折叠的 条评论
为什么被折叠?
 到【灌水乐园】发言


