


iphone中由touchesBegan,touchesMoved,touchesEnded三个函数处理触摸事件。
分别代表开始触摸,移动,离开屏幕三个事件。
iphone中一般绘图在drawrect中进行。
下面是一段实现移动手指,当向不同方向移动时显示不同方向的箭头的代码。
#import "draw.h"
@implementation draw
- (id)initWithFrame:(CGRect)frame {
if (self = [super initWithFrame:frame]) {
// Initialization code
}
return self;
}
- (void)drawRect:(CGRect)rect {
// Drawing code
UIImage *image =[UIImage imageNamed:@"aa.gif"];
[image drawAtPoint:CGPointMake(p.x-30, p.y-30)];
if (move==LEFT) {
UIImage *imagemove =[UIImage imageNamed:@"left.png"];
[imagemove drawAtPoint:CGPointMake(50, 120) blendMode:kCGBlendModeNormal alpha:0.5f];
}
if (move==RIGHT) {
UIImage *imagemove =[UIImage imageNamed:@"right.png"];
[imagemove drawAtPoint:CGPointMake(50, 120) blendMode:kCGBlendModeNormal alpha:0.5f];
}
if (move==UP) {
UIImage *imagemove =[UIImage imageNamed:@"upp.png"];
[imagemove drawAtPoint:CGPointMake(50, 120) blendMode:kCGBlendModeNormal alpha:0.5f];
}
if (move==DOWN) {
UIImage *imagemove =[UIImage imageNamed:@"down.png"];
[imagemove drawAtPoint:CGPointMake(50, 120) blendMode:kCGBlendModeNormal alpha:0.5f];
}
}
-(void)touchesBegan:(NSSet *)touches withEvent:(UIEvent *)event{
UITouch *touch = [touches anyObject];
CGPoint location = [touch locationInView:self];
p.x=location.x;
p.y=location.y;
touchstart.x=p.x;
touchstart.y=p.y;
[self setNeedsDisplay];
}
-(void)touchesMoved:(NSSet *)touches withEvent:(UIEvent *)event{
UITouch *touch = [touches anyObject];
CGPoint location = [touch locationInView:self];
p.x=location.x;
p.y=location.y;
[self setNeedsDisplay];
}
-(void)touchesEnded:(NSSet *)touches withEvent:(UIEvent *)event{
CGPoint end;
UITouch *touch = [touches anyObject];
CGPoint location = [touch locationInView:self];
end.x=location.x;
end.y=location.y;
if (end.x-touchstart.x>10.0f&&end.y-touchstart.y<50.0f&&end.y-touchstart.y>-50.0f) {
move=RIGHT;
}
if (end.x-touchstart.x<-10.0f&&end.y-touchstart.y<50.0f&&end.y-touchstart.y>-50.0f) {
move=LEFT;
}
if (end.y-touchstart.y>10.0f&&end.x-touchstart.x<50.0f&&end.x-touchstart.x>-50.0f) {
move=DOWN;
}
if (end.y-touchstart.y<-10.0f&&end.x-touchstart.x<50.0f&&end.x-touchstart.x>-50.0f) {
move=UP;
}
[self setNeedsDisplay];
}
- (void)dealloc {
[super dealloc];
}
@end
首先要建立一个基于uiview的名叫draw的类。
其中draw.h
#import <UIKit/UIKit.h>
#define LEFT 1
#define RIGHT 2
#define UP 3
#define DOWN 4
@interface draw : UIView {
CGPoint p;
CGPoint touchstart;
int move;
}
@end
然后打开IB,将viewcontoller中的主视图命名为draw。
再加载自定义的图片(箭头)。
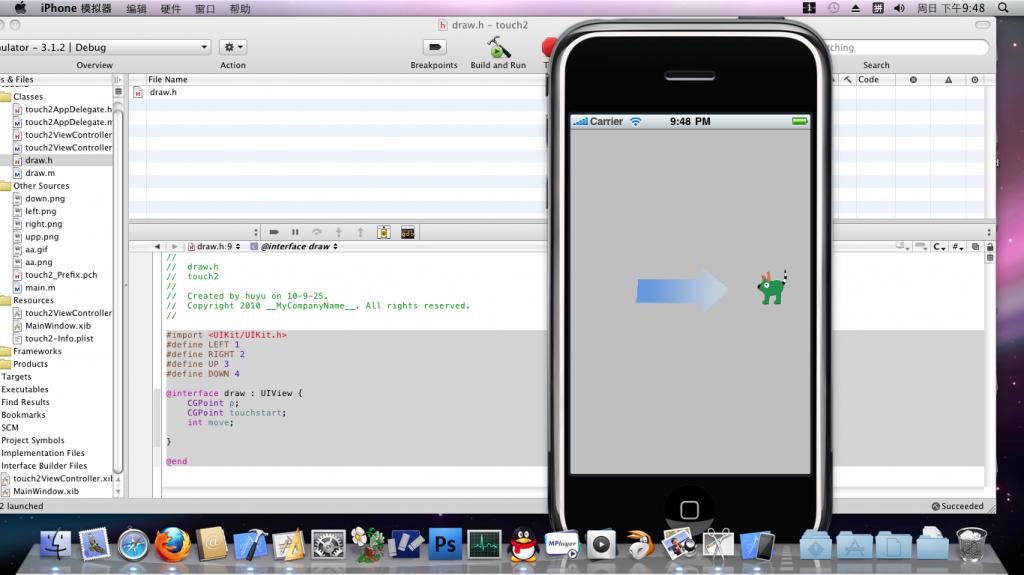
点击运行:
当我拖动小狗向右时出现了向右的箭头。


 1万+
1万+

 被折叠的 条评论
为什么被折叠?
被折叠的 条评论
为什么被折叠?
 到【灌水乐园】发言


