


文章目录
一、使用fixture实现部分前后置
语法:
@pytest.fixture(scope="作用域",params="数据驱动",autouser="自动执行",ids="自定义参数名称",name="别名")
- scope=“作用域”
- functioin:在每个方法(测试用例)的前后执行一次。
- class:在每个类的前后执行一次。
- module:在每个py文件前后执行一次。
- package/session:每个package前后执行一次。
1.function级别:在每个函数的前后执行
import pytest
@pytest.fixture(scope="function")
def execute_sql():
    print("执行数据库的验证,查询数据库。")
    yield "execute_sql"
    print("关闭数据库的连接")
调用:
class Test03:
    @pytest.mark.smoke
    def test_01(self, execute_sql):
        print("Test03--test01--" + execute_sql)
yield和return,都可以返回值,并且返回的值可以在测试用例中获取。
- yield生成器,返回一个对象,对象中可以有多个值,yield后面可以接代码。
- return 返回一个值,return后面不能接代码。
注意:如果加入autouse=True参数,那么表示不需要手动调用,会自动调用,那么和setup、teardown功能一致。
2.class级别:在每个类的前后执行一次
@pytest.fixture(scope="class")
def execute_sql_class():
    print("execute_sql_class-执行数据库的验证,查询数据库。")
    yield
    print("execute_sql_class-关闭数据库的连接")
调用:
@pytest.mark.usefixtures("execute_sql_class")
class Test03:
3.module级别:在每个模块的前后执行一次
和setup_module和teardown_module效果一样
@pytest.fixture(scope="module",autouse=True)
def execute_sql_module():
    print("execute_sql_module-执行数据库的验证,查询数据库。")
    yield
    print("execute_sql_module-关闭数据库的连接")
4.package、session级别,一般是和connftest.py文件一起使用
autouse=True 自动调用
params参数: 用于传输数据(list,tuple,字典列表,字典元组):
- 需要在夹具里面通过
request(固定写法)接收, - 再通过
request.param(固定写法)获取数据, - 最后通过
yield把数据返回到测试用例中,然后使用
import pytest
def read_yaml():
    return["无忧渡","折腰","淮水竹亭"]
@pytest.fixture(scope="function",params=read_yaml())
def execute_sql_func(request):
    print("execute_sql_func-执行数据库的验证,查询数据库。")
    yield request.param
    print("execute_sql_func-关闭数据库的连接")
ids参数: 它要和 params 一起使用,自定义参数名称。意义不大。了解即可
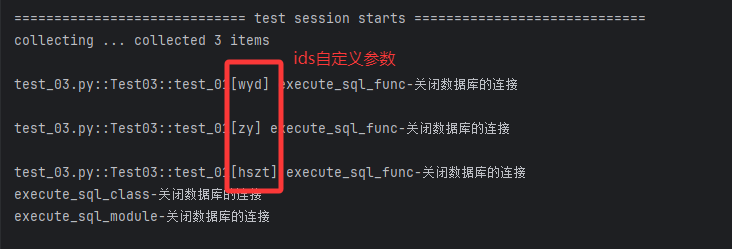
import pytest
def read_yaml():
    return["无忧渡","折腰","淮水竹亭"]
@pytest.fixture(scope="function",params=read_yaml(),ids=
['wyd','zy','hszt'])
def execute_sql_func(request):
    print("execute_sql_func-执行数据库的验证,查询数据库。")
    yield request.param
    print("execute_sql_func-关闭数据库的连接")
name参数: 对fixture固件取的别名。意义不大。了解即可,用了别名后,真名会失效,只能使用别名。
@pytest.fixture(scope="function",params=read_yaml(),ids=
['wyd','zy','hszt'],name="func")
def execute_sql_func(request):
    print("execute_sql_func-执行数据库的验证,查询数据库。")
    yield request.param
    print("execute_sql_func-关闭数据库的连接")

@pytest.mark.usefixtures("func")
class Test03:
    @pytest.mark.smoke
    def test_01(self, func):
        print("Test03--test01--" + func)
二、当fixture的级别为package,session时,那么一般和conftest.py文件一起使用。
1.名称是固定的conftest.py,主要用于单独的存放fixture固件的。
2.级别为package,session时,那么可以在多个包甚至多个py文件里面共享前后置。
举例:登录。
模块:模块的共性。
3.发现conftest.py文件里面的fixture不需要导包可以直接使用。
4.conftest.py文件,可以有多个。
作用: 出现重复日志,初始化一次日志对象。规避日志重复。连接数据库。关闭数据库。
注意: 多个前置同时存在的优先级。
- conftest.py为
function级别时优先级高于setup/teardown - conftest.py为
class级别时优先级高于setup_class/teardown_class - conftest.py为
session级别时优先级高于setup_module/teardown_module
/tesecases/conftest.py 夹具:
@pytest.fixture(scope="function")
def execute_sql_func_2():
    print("execute_sql_func_2")
/tesecases/user/conftest.py 夹具:
import pytest

@pytest.fixture(scope="function")
def user_func():
    print("user--共性")
调用多个conftest.py 中的夹具:
    def test_01(self, execute_sql_func_2, user_func):
        print("Test03--test01--" + execute_sql_func_2)
        print(user_func)
三、pytest断言
使用的是python原生的assert
比如:assert 'abc' in 'abcd'
四、pytest结合allure-pytest实现生成allure报告
第一步:下载allure文件
- 1.官网下载allure文件
- 2.下载之后解压到非中文的目录
- 3.把bin路径配置到系统变量path中:
E:\allure-2.13.7\bin(注意分号不要是中文的)
第二步:安装allure
- 安装allure报告:
pip install allure-pytest - 验证:
allure --version - 注意:可能需要重启 pycharm。
第三步:执行命令生成报告
- 1.在reports目录下生成temps目录,并且在temps目录下生产临时的json格式的临时报告
os.system("hrun testsuites/test_suites.yml ‐‐alluredir=reports/temps ‐‐clean‐alluredir")
加上–clean-alluredir表示:每执行一次把原来的清除。 - 2.根据临时json报告生成allure报告
os.system("allure generate report/temps ‐o report/allure-report --clean")
加上–clean表示:每执行一次把原来的清除。 pytest.ini文件代码:
[pytest]
addopts = ‐vs -m smoke ‐‐alluredir=reports/temps ‐‐clean‐alluredir
testpaths =  testcases/
python_files = test_*.py
python_classes = Test*
python_functions = test_*
markers =
    smoke: smoke testcases
    product: product testcases
all.py文件代码:
import os
import time
import pytest
if __name__ == "__main__":
    pytest.main()
    time.sleep(3)
    os.system("allure generate reports/temps ‐o reports/allures ‐‐clean")
    # 指定字符串运行测试用例:
    # pytest.main(['-vs','--reruns=2','-k','01'])
    # 指定模块运行测试用例:
    # pytest.main(['-vs','testcases/test_01.py'])
    # 指定文件夹运行测试用例:
    # pytest.main(['-vs','testcases/'])
    # 通过node id的方式运行测试用例:
    # pytest.main(['-vs','testcases/test_02.py::Test02::test_02'])
第四步:实现logo定制
1.修改\allure-2.x.x\config下的allure.yml配置文件,加入:最后一
句加上自定义logo插件。
plugins:
  - junit-xml-plugin
  - xunit-xml-plugin
  - trx-plugin
  - behaviors-plugin
  - packages-plugin
  - screen-diff-plugin
  - xctest-plugin
  - jira-plugin
  - xray-plugin
  - custom-logo-plugin
2.修改插件里面的图片和样式
.side‐nav__brand{
	background: url('logo.png') no‐repeat left center !important;
	margin‐left: 20px;
	height: 90px;
	background‐size: contain !important;
	}
.side‐nav__brand‐text{
	display: none;
	}


 840
840

 被折叠的 条评论
为什么被折叠?
被折叠的 条评论
为什么被折叠?
 到【灌水乐园】发言


