


This series of articles are the study notes of "Interfacing with the Arduino", by Prof. Harris, Department of Computer Science, University of California, Irvine. This article is the notes of week 2, lessen 3.
3. Lesson 3
3.1 Lecture 3.1 -DemoFade Example
In this experiment we are going to see pulse with modulation in action. We're going to use the the example sketch called fade. So if you're looking in your Arduino IDE., you look under examples, the subcategory basics and then there's one sketch called fade. So pull that up.
3.2 Lecture 3.2 -Making Sounds
So there's a common function that I do in the library called tone, which also generates a square wave. A similar to analogWrite but different.
3.2.2 tone()
- tone() can generate a square wave with an arbitrary frequency
- analogWrite() has a fixed frequency (490 Hz)
- duty cycle is fixed at 50%
- can be used to drive a speaker or buzzer
Tone, this function tone can generate a square wave with an arbitrary frequency. Now this is different than analogWrite because analogWrite has a fixed frequency. If you remember analogWrite generates a signal, a square wave that's 490 Hz, but tone can change the frequency and so it can be used for different purposes. Now tone cannot change a duty cycle, Right? With analogWrite you specify the duty cycle, tone has a fixed 50% duty cycle. But tone can change the frequency.
- two or three arguments
- Pin number
- Frequency, in Hz
- Duration in ms (optional)
Now, tone takes either two or three arguments. The first argument is a pin number, the pin that you wanna generate the tone on, that you wanna send this square wave to. The second argument is the frequency in hertz that you want for the signal. So whatever frequency you want,
you just send that as the second argument. And then the third argument, which is optional, is the duration in milliseconds. So how long do you want that tone to play? That could be your third argument. If you don't have a third argument, it'll just play, until you call another function called no tone, which will kill it.
3.2.2 Square Wave vs. Sine Wave
(1) Square waves sound bad: many high-frequency components
we're sending a square wave to make a sound. So, tone generates a square wave, right? It has to make a square wave because this is a digital component and it's only zeroes and ones. So, the wave has to be a square wave, but a square wave generally sounds bad. So, when you take a square wave, send it to a speaker, it's gonna sound bad. Reason why is because the square wave basically has sharp edges in it, okay? So you've got zero and then suddenly it's one. And instantaneously it's going from zero to one. That's extremely, that's infinite frequency if we were to do that.
Where a sine wave, if you would hear that, a pure sine wave is one frequency. It's a pure tone.

Square wave Sine wave
(2) Square wave is the best we can do with digital outputs
It might be the same frequency, but it sounds like a buzz. It has annoying high-frequency components. But that is the best we can do, because our Arduino is digital and it's just going to generate square waves. So with digital output square waves is the best that we can do. Although sine wave would sound much nicer. And if you really want to do this. If you really want to make music with an Arduino, and make it sound pleasing you would use a shield.
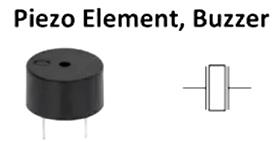
3.2.3Piezoelement as a buzzer
Now for the speaker we're gonna use a piezo element as a buzzer. These are very simple sound making devices, they look like that, you should have one like this in your kit. And here it's symbol.It's got two terminals, right? It's got two which are connected to signal and ground. So one side's connected to ground, the other side is connected to the signal, the say square wave, for instance, right? And it produces a click, essentially a click when the rising edge is applied. Or a sound, some kind of sound, which we'll call a click when the rising edge is applied. So if you have it clicking at a particular frequency, you can change the tone that's generated.


 687
687

 被折叠的 条评论
为什么被折叠?
被折叠的 条评论
为什么被折叠?
 到【灌水乐园】发言


