作者:mznewfacer(Wolf Geek) 时间:2011年11月30日 欢迎转载 ,请注明出处!
这两天又不能安生了,得写论文,好吧,先把arduino断下来,似乎我同时只能干一件事,严重怀疑自己的智商!顺便写一些基础总结吧,已备后用。可能会比较枯燥,但是必须强调的是这些都是图形图像方面的数学基础,不可忽视啊!
先看几个变换公式: 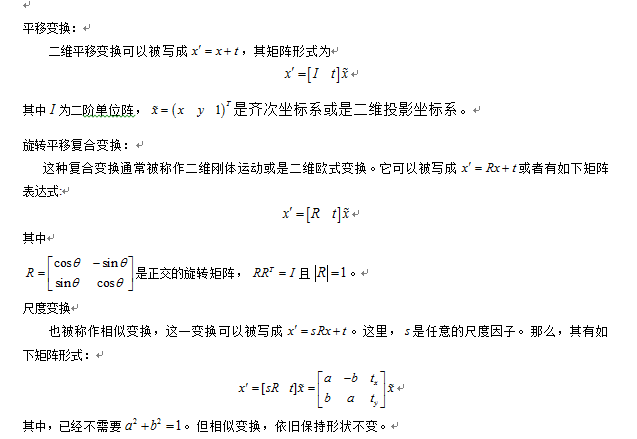

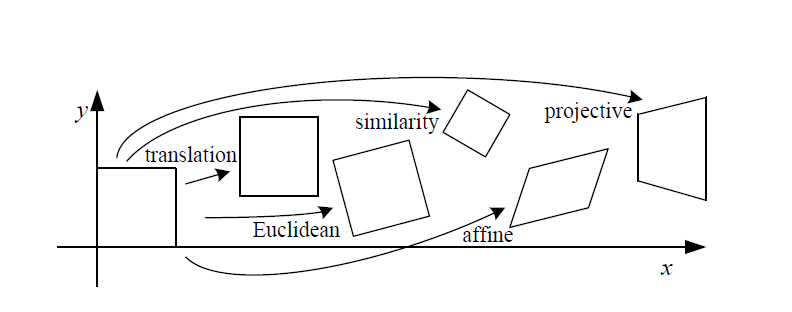
至此,二维平面上的所有变换集合就已叙述完毕,具体形式如下图所示。
对于三维图像而言,对应的变换矩阵就变为四阶矩阵。
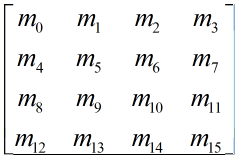

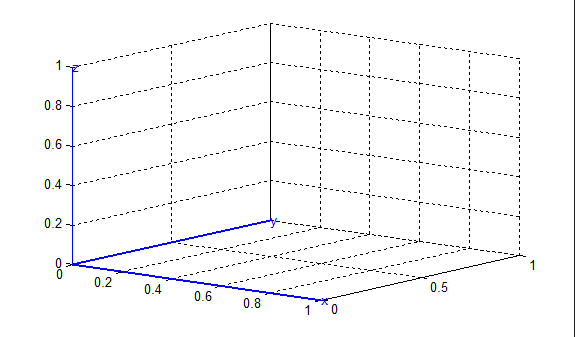
这就是初始化坐标系,对应的4阶齐次矩阵为四阶单位阵。

在此坐标系上画点[0.5 ; 0.5 ; 0.5],之后在Oxy平面上做投影,所得结果如下图所示:
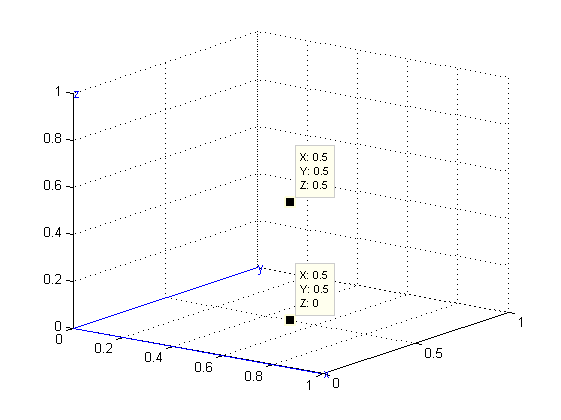
此时变换矩阵为

之后将坐标系绕z轴旋转45度并且在y轴方向上平移1.5个刻度,变换矩阵为
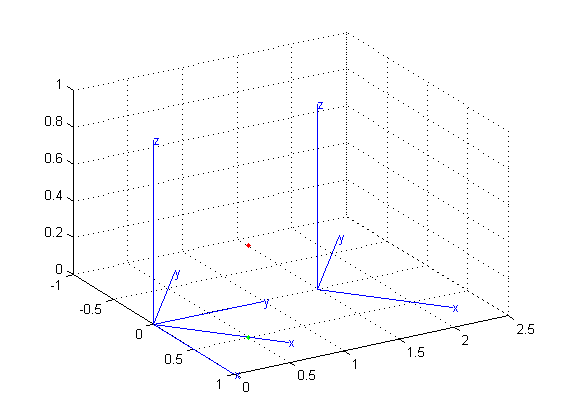
最后连续绕x轴,y轴,z轴分别旋转45度,得到结果如下图所示:
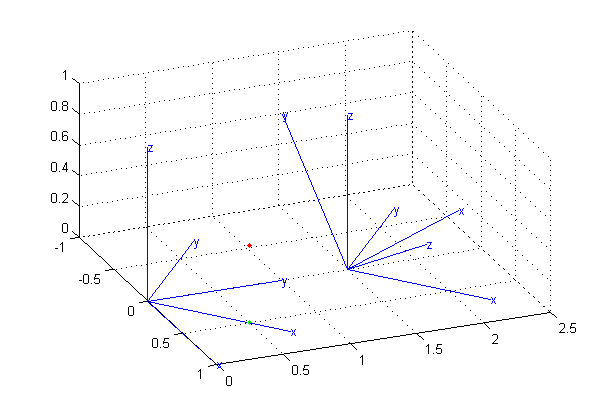
变换矩阵可以由此推得:

至于为什么引入齐次坐标系,这里就不做多余解释,详情可见这里。
最后用opengl画一下类似的坐标系变换,
#include <GL/glut.h> float w, h, tip = 0, turn = 0; float ORG[3] = {0,0,0}; float XP[3] = {1,0,0}, XN[3] = {-1,0,0}, YP[3] = {0,1,0}, YN[3] = {0,-1,0}, ZP[3] = {0,0,1}, ZN[3] = {0,0,-1},VP[3]={0, 0, -5}; void reshape (int nw, int nh) { w = nw; h = nh; } void Turn (int key, int x, int y) { switch (key) { case GLUT_KEY_RIGHT: turn += 5; break; case GLUT_KEY_LEFT : turn -= 5; break; case GLUT_KEY_UP : tip -= 5; break; case GLUT_KEY_DOWN : tip += 5; break; } } void Draw_Axes (void) { glPushMatrix (); glTranslatef (-1.5, -1.5, -5); glRotatef (tip , 1,0,0); glRotatef (turn, 0,1,0); glScalef (1, 1, 1); glLineWidth (2.0); glBegin (GL_LINES); glColor3f (1,0,0); // X axis is red. glVertex3fv (ORG); glVertex3fv (XP ); glColor3f (0,1,0); // Y axis is green. glVertex3fv (ORG); glVertex3fv (YP ); glColor3f (0,0,1); // z axis is blue. glVertex3fv (ORG); glVertex3fv (ZP ); glEnd(); glTranslatef (1, 1, 1); glBegin (GL_LINES); glColor3f (1,0,0); // X axis is red. glVertex3fv (ORG); glVertex3fv (XN ); glColor3f (0,1,0); // Y axis is green. glVertex3fv (ORG); glVertex3fv (YN ); glColor3f (0,0,1); // z axis is blue. glVertex3fv (ORG); glVertex3fv (ZN ); glEnd(); glTranslatef (-1, 0, 0); glRotatef (-90, 0,1,0); glBegin (GL_LINES); glColor3f (0,0,1); // X axis is blue. glVertex3fv (ORG); glVertex3fv (XN ); glColor3f (0,1,0); // Y axis is green. glVertex3fv (ORG); glVertex3fv (YN ); glColor3f (1,0,0); // z axis is red glVertex3fv (ORG); glVertex3fv (ZN); glEnd(); glPointSize(4.0f); glRotatef (-45, 0,1,0); glBegin(GL_POINTS); glColor3f (1,0,0); // X axis is red. glVertex3f(-1.0f, -1.0f, 0.0f); glEnd(); glRotatef (-90, 0,1,0); glBegin(GL_POINTS); glColor3f (1,0,0); glVertex3f(1.0f, -1.0f, 0.0f); glEnd(); glLoadIdentity(); glBegin(GL_POINTS); glColor3f (1,0,0); glVertex3fv(VP); glEnd(); glPopMatrix (); } void display (void) { glViewport (0, 0, w, h); glClear (GL_COLOR_BUFFER_BIT | GL_DEPTH_BUFFER_BIT); Draw_Axes (); glutSwapBuffers (); } void main (void) { glutInitWindowSize (600, 400); glutInitWindowPosition (400, 300); glutInitDisplayMode (GLUT_DEPTH | GLUT_DOUBLE | GLUT_RGB); glutCreateWindow ("坐标系变换"); glutDisplayFunc (display); glutIdleFunc (display); glutReshapeFunc (reshape); glutSpecialFunc (Turn); glClearColor (0.1, 0.2, 0.1, 1.0); glEnable (GL_DEPTH_TEST); glMatrixMode (GL_PROJECTION); gluPerspective (50.0, 1.5, 1.0, 10.0); glMatrixMode (GL_MODELVIEW); glutMainLoop (); }效果图
至于opengl的具体坐标系转换,像是世界坐标系到观察坐标系的转换,如何利用GL_PROJECTION投影矩阵将3维投影到2维上,投影时选择glFrustum()还是glOrtho(),以及各个变换的具体原理,Song Ho Ahn的博客中已经写得相当详细,里面有两个例子也很不错。理论部分,例子部分。


 2814
2814

 被折叠的 条评论
为什么被折叠?


