


一、实现背景
国外一开源,国内就自主,甚至最著名的大学,也这么NO FACE,真的让人无语至极。图片文字提取功能,如此简单功能,10多年前就有人实现了,而且开源让大家免费使用,有些人屏蔽国外下载地址,然后自己换皮,挂在网上就开始收费。基于这个背景,怎么能忍,果断开源所有源代码。
二、实现平台
1、win10-64
2、Qt 5.14.1 (MSVC 2017, 64 bit)
3、引用开源库tessdata
三、运行程序(绿色安装包下载地址)演示
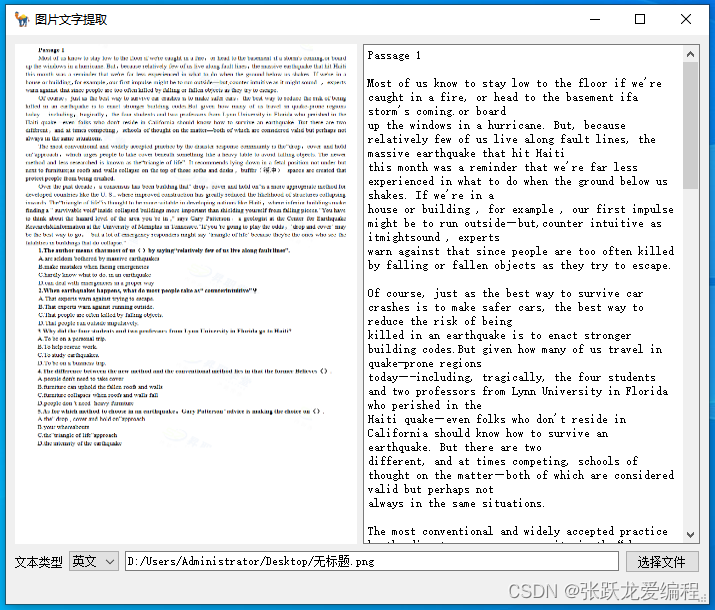
在文本类型种选择“中文/英文”,然后选择图片文件,即可完成图片问题提取
四、核心源码(源码包下载地址)
1、mainwindow.h
#ifndef MAINWINDOW_H
#define MAINWINDOW_H

#include <QMainWindow>

#include "tesseract/baseapi.h"
#include "tesseract/strngs.h"
#include "leptonica/allheaders.h"

QT_BEGIN_NAMESPACE
namespace Ui { class MainWindow; }
QT_END_NAMESPACE

class MainWindow : public QMainWindow
{
    Q_OBJECT

public:
    MainWindow(QWidget *parent = nullptr);
    ~MainWindow();

protected:
    void paintEvent(QPaintEvent *event) override;

private:
    Ui::MainWindow *ui;
    tesseract::TessBaseAPI *api = nullptr;

    QPixmap pixmap;

private slots:
    void on_comboBox_currentIndexChanged(int index);
    void on_pushButton_clicked();

};
#endif // MAINWINDOW_H
2、mainwindow.cpp
#include "mainwindow.h"
#include "ui_mainwindow.h"

#include <QFileDialog>
#include <QMessageBox>
#include <QTextCodec>
#include <QPixmap>

MainWindow::MainWindow(QWidget *parent)
    : QMainWindow(parent)
    , ui(new Ui::MainWindow)
{
    ui->setupUi(this);
    api = new tesseract::TessBaseAPI();
    if (api->Init("D:/mycode/testDemo/ocrtest/ocrlib/tessdata", "eng"))
    {
        QMessageBox::warning(0,"Error","Could not initialize tesseract");
        exit(1);
    }
}

MainWindow::~MainWindow()
{
    api->End();

    delete ui;
}

void MainWindow::on_comboBox_currentIndexChanged(int index)
{
    QString language;
    if(index == 1) language = "chi_sim";
    else language = "eng";

    if (api->Init("D:/mycode/testDemo/ocrtest/ocrlib/tessdata", language.toStdString().data()))
    {
        QMessageBox::warning(0,"Error","Could not initialize tesseract");
        exit(1);
    }
}

void MainWindow::on_pushButton_clicked()
{
    QString filename = QFileDialog::getOpenFileName(nullptr, "Image", "", "");
    if(filename.isEmpty()){
        QMessageBox::warning(0,"Error","no find image");
        return ;
    }
    ui->lineEdit_path->setText(filename);
    // 加载图片,创建一个QPixmap对象
    pixmap.load(filename);
    //QPixmap pixmap(filename); // 替换为你的图片路径
    // 在QLabel上显示图片
    ui->label_picture->setPixmap(pixmap.scaled(ui->label_picture->size(), Qt::IgnoreAspectRatio));
    //ui->label_picture->setPixmap(pixmap);
    // 显示标签
    ui->label_picture->show();

    QTextCodec *code = QTextCodec::codecForName("GB2312");
    std::string str = code->fromUnicode(filename).data();

    const char* ch = str.c_str();

    Pix *image = pixRead(ch);
    api->SetImage(image);

    char *outText = api->GetUTF8Text();

    ui->textEdit_text->setText(QString(outText));

    delete [] outText;
    pixDestroy(&image);
}

void MainWindow::paintEvent(QPaintEvent *event)
{
    if(!pixmap.isNull()){
        QSize centralSize = ui->centralwidget->size();
        int height = centralSize.height()-ui->statusbar->height()-ui->comboBox->height()-18;
        int width = centralSize.width()/2-9;
        // 在QLabel上显示图片
        ui->label_picture->setPixmap(pixmap.scaled(QSize(width,height), Qt::IgnoreAspectRatio));
        // 显示标签
        ui->label_picture->show();
    }
}
3、mainwindow.ui
<?xml version="1.0" encoding="UTF-8"?>
<ui version="4.0">
 <class>MainWindow</class>
 <widget class="QMainWindow" name="MainWindow">
  <property name="geometry">
   <rect>
    <x>0</x>
    <y>0</y>
    <width>522</width>
    <height>453</height>
   </rect>
  </property>
  <property name="windowTitle">
   <string>图片文字提取</string>
  </property>
  <property name="windowIcon">
   <iconset resource="png.qrc">
    <normaloff>:/camel.png</normaloff>:/camel.png</iconset>
  </property>
  <widget class="QWidget" name="centralwidget">
   <property name="sizePolicy">
    <sizepolicy hsizetype="Preferred" vsizetype="Preferred">
     <horstretch>100</horstretch>
     <verstretch>0</verstretch>
    </sizepolicy>
   </property>
   <layout class="QGridLayout" name="gridLayout_2">
    <item row="0" column="0">
     <layout class="QHBoxLayout" name="horizontalLayout" stretch="100,100">
      <item>
       <widget class="QWidget" name="widget" native="true">
        <property name="styleSheet">
         <string notr="true"/>
        </property>
        <layout class="QGridLayout" name="gridLayout">
         <property name="leftMargin">
          <number>0</number>
         </property>
         <property name="topMargin">
          <number>0</number>
         </property>
         <property name="rightMargin">
          <number>0</number>
         </property>
         <property name="bottomMargin">
          <number>0</number>
         </property>
         <property name="verticalSpacing">
          <number>6</number>
         </property>
         <item row="0" column="0">
          <widget class="QLabel" name="label_picture">
           <property name="sizePolicy">
            <sizepolicy hsizetype="Expanding" vsizetype="Expanding">
             <horstretch>0</horstretch>
             <verstretch>0</verstretch>
            </sizepolicy>
           </property>
           <property name="styleSheet">
            <string notr="true">background-color: rgb(197, 197, 197);</string>
           </property>
           <property name="text">
            <string/>
           </property>
           <property name="scaledContents">
            <bool>true</bool>
           </property>
           <property name="alignment">
            <set>Qt::AlignCenter</set>
           </property>
          </widget>
         </item>
        </layout>
       </widget>
      </item>
      <item>
       <widget class="QTextEdit" name="textEdit_text"/>
      </item>
     </layout>
    </item>
    <item row="1" column="0">
     <layout class="QHBoxLayout" name="horizontalLayout_2">
      <item>
       <widget class="QLabel" name="label_2">
        <property name="text">
         <string>文本类型</string>
        </property>
       </widget>
      </item>
      <item>
       <widget class="QComboBox" name="comboBox">
        <item>
         <property name="text">
          <string>英文</string>
         </property>
        </item>
        <item>
         <property name="text">
          <string>中文</string>
         </property>
        </item>
       </widget>
      </item>
      <item>
       <widget class="QLineEdit" name="lineEdit_path"/>
      </item>
      <item>
       <widget class="QPushButton" name="pushButton">
        <property name="text">
         <string>选择文件</string>
        </property>
       </widget>
      </item>
     </layout>
    </item>
   </layout>
  </widget>
  <widget class="QStatusBar" name="statusbar"/>
 </widget>
 <resources>
  <include location="png.qrc"/>
 </resources>
 <connections/>
</ui>


 1万+
1万+


 被折叠的 条评论
为什么被折叠?
被折叠的 条评论
为什么被折叠?
 到【灌水乐园】发言


