


目录
安装:
pip install vtk
pip install mayavi
pip install PyQt5
pip install pyqt5 mayavi traits traitsui
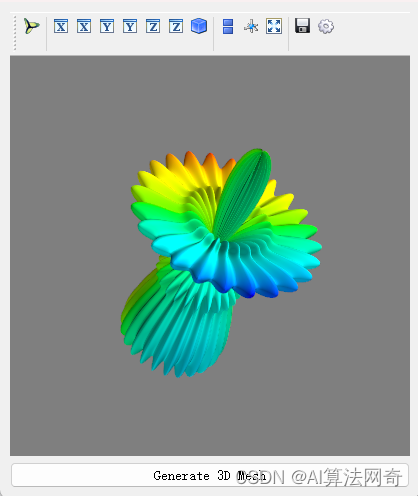
示例代码:
import sys
from PyQt5.QtWidgets import QApplication, QMainWindow, QVBoxLayout, QWidget, QPushButton
from traits.api import HasTraits, Instance
from traitsui.api import View, Item
from tvtk.pyface.scene_editor import SceneEditor
from mayavi.tools.mlab_scene_model import MlabSceneModel
from mayavi.core.ui.mayavi_scene import MayaviScene

class Visualization(HasTraits):
    scene = Instance(MlabSceneModel, ())

    def __init__(self):
        HasTraits.__init__(self)

    # the layout of the dialog created
    view = View(Item('scene', editor=SceneEditor(scene_class=MayaviScene),
                     height=250, width=300, show_label=False), )


class MainWindow(QMainWindow):
    def __init__(self, parent=None):
        super(MainWindow, self).__init__(parent)

        self.setWindowTitle('Mayavi embedded in PyQt5')

        # Create the main widget and layout
        main_widget = QWidget()
        self.setCentralWidget(main_widget)
        layout = QVBoxLayout(main_widget)

        # Create the Mayavi visualization
        self.visualization = Visualization()
        self.mayavi_scene = self.visualization.edit_traits(parent=main_widget, kind='subpanel').control
        layout.addWidget(self.mayavi_scene)

        # Create a button and connect its event
        self.button = QPushButton('Generate 3D Mesh')
        layout.addWidget(self.button)
        self.button.clicked.connect(self.button_event)

    def button_event(self):
        # Create the data.
        from numpy import pi, sin, cos, mgrid
        dphi, dtheta = pi / 250.0, pi / 250.0
        [phi, theta] = mgrid[0:pi + dphi * 1.5:dphi, 0:2 * pi + dtheta * 1.5:dtheta]
        m0 = 4; m1 = 3; m2 = 2; m3 = 3; m4 = 6; m5 = 2; m6 = 6; m7 = 4;
        r = sin(m0 * phi) ** m1 + cos(m2 * phi) ** m3 + sin(m4 * theta) ** m5 + cos(m6 * theta) ** m7
        x = r * sin(phi) * cos(theta)
        y = r * cos(phi)
        z = r * sin(phi) * sin(theta)

        # View it.
        self.visualization.scene.mlab.mesh(x, y, z)

if __name__ == '__main__':
    app = QApplication(sys.argv)
    mw = MainWindow()
    mw.show()
    sys.exit(app.exec_())
生成3d检测框:
import sys
import numpy as np
from PyQt5.QtWidgets import QApplication, QMainWindow, QVBoxLayout, QWidget, QPushButton
from traits.api import HasTraits, Instance
from traitsui.api import View, Item
from tvtk.pyface.scene_editor import SceneEditor
from mayavi.tools.mlab_scene_model import MlabSceneModel
from mayavi.core.ui.mayavi_scene import MayaviScene
from mayavi import mlab

class Visualization(HasTraits):
    scene = Instance(MlabSceneModel, ())

    def __init__(self):
        HasTraits.__init__(self)

    # the layout of the dialog created
    view = View(Item('scene', editor=SceneEditor(scene_class=MayaviScene),
                     height=600, width=800, show_label=False), )

    def draw_3d_box(self, center, size, orientation):
        c, s = np.cos(orientation), np.sin(orientation)
        R = np.array([
            [c, -s, 0],
            [s, c, 0],
            [0, 0, 1]
        ])

        l, w, h = size / 2.0
        corners = np.array([
            [ l,  w,  h],
            [ l, -w,  h],
            [-l, -w,  h],
            [-l,  w,  h],
            [ l,  w, -h],
            [ l, -w, -h],
            [-l, -w, -h],
            [-l,  w, -h]
        ])

        corners = np.dot(corners, R.T) + center

        edges = [
            [0, 1], [1, 2], [2, 3], [3, 0],
            [4, 5], [5, 6], [6, 7], [7, 4],
            [0, 4], [1, 5], [2, 6], [3, 7]
        ]

        for edge in edges:
            self.scene.mlab.plot3d(
                [corners[edge[0], 0], corners[edge[1], 0]],
                [corners[edge[0], 1], corners[edge[1], 1]],
                [corners[edge[0], 2], corners[edge[1], 2]],
                color=(1, 0, 0), tube_radius=None, line_width=1, figure=self.scene.mayavi_scene
            )

class MainWindow(QMainWindow):
    def __init__(self, parent=None):
        super(MainWindow, self).__init__(parent)

        self.setWindowTitle('Mayavi embedded in PyQt5')

        # Create the main widget and layout
        main_widget = QWidget()
        self.setCentralWidget(main_widget)
        layout = QVBoxLayout(main_widget)

        # Create the Mayavi visualization
        self.visualization = Visualization()
        self.mayavi_scene = self.visualization.edit_traits(parent=main_widget, kind='subpanel').control
        layout.addWidget(self.mayavi_scene)

        # Create a button and connect its event
        self.button = QPushButton('Generate 3D Detection Box')
        layout.addWidget(self.button)
        self.button.clicked.connect(self.button_event)

    def button_event(self):
        # Example data for a 3D box
        center = np.array([0, 0, 0])
        size = np.array([2, 1, 1])
        orientation = np.pi / 4  # 45 degrees

        # Draw the 3D box
        self.visualization.draw_3d_box(center, size, orientation)

if __name__ == '__main__':
    app = QApplication(sys.argv)
    mw = MainWindow()
    mw.show()
    sys.exit(app.exec_())
显示立方体 两个窗口
import sys
import numpy as np
from PyQt5.QtWidgets import QApplication, QMainWindow, QVBoxLayout, QWidget, QPushButton
from PyQt5.QtCore import QTimer
from traits.api import HasTraits, Instance
from traitsui.api import View, Item
from mayavi.tools.mlab_scene_model import MlabSceneModel
from mayavi.core.ui.api import MlabSceneModel, SceneEditor
from mayavi import mlab

class Visualization(HasTraits):
    scene = Instance(MlabSceneModel, ())

    def __init__(self):
        HasTraits.__init__(self)
        self.figure = mlab.figure(bgcolor=(1, 1, 1), size=(800, 600))

    # Layout of the dialog created
    view = View(Item('scene', editor=SceneEditor(scene_class=MlabSceneModel),
                     height=600, width=800, show_label=False), resizable=True)

    def draw_3d_box(self, center, size, orientation):
        # Define the rotation matrix
        c, s = np.cos(orientation), np.sin(orientation)
        R = np.array([
            [c, -s, 0],
            [s, c, 0],
            [0, 0, 1]
        ])

        # Half dimensions
        l, w, h = size / 2.0
        corners = np.array([
            [ l,  w,  h],
            [ l, -w,  h],
            [-l, -w,  h],
            [-l,  w,  h],
            [ l,  w, -h],
            [ l, -w, -h],
            [-l, -w, -h],
            [-l,  w, -h]
        ])

        # Rotate and translate corners
        corners = np.dot(corners, R.T) + center

        # Define edges of the box
        edges = [
            (0, 1), (1, 2), (2, 3), (3, 0),
            (4, 5), (5, 6), (6, 7), (7, 4),
            (0, 4), (1, 5), (2, 6), (3, 7)
        ]

        # Plot edges
        for edge in edges:
            mlab.plot3d([corners[edge[0]][0], corners[edge[1]][0]],
                        [corners[edge[0]][1], corners[edge[1]][1]],
                        [corners[edge[0]][2], corners[edge[1]][2]],
                        color=(1, 0, 0), tube_radius=0.01, figure=self.figure)

class MainWindow(QMainWindow):
    def __init__(self, parent=None):
        super(MainWindow, self).__init__(parent)
        self.setWindowTitle('Moving 3D Box with Mayavi and PyQt5')

        # Main widget and layout
        main_widget = QWidget()
        self.setCentralWidget(main_widget)
        layout = QVBoxLayout(main_widget)

        # Create the Mayavi visualization
        self.visualization = Visualization()
        self.ui = self.visualization.edit_traits(parent=main_widget, kind='subpanel').control
        layout.addWidget(self.ui)

        # Timer for moving the box
        self.timer = QTimer(self)
        self.timer.timeout.connect(self.update_position)
        self.timer.start(100)  # Update every 100 ms

        # Box parameters
        self.box_center = np.array([0, 0, 0])
        self.box_size = np.array([1, 1, 1])
        self.orientation = 0  # No rotation initially

    def update_position(self):
        self.visualization.figure.scene.disable_render = True  # For performance
        self.box_center[0] += 0.1  # Move along X
        mlab.clf()  # Clear the figure
        self.visualization.draw_3d_box(self.box_center, self.box_size, self.orientation)
        self.visualization.figure.scene.disable_render = False  # Re-enable rendering

if __name__ == '__main__':
    app = QApplication(sys.argv)
    window = MainWindow()
    window.show()
    sys.exit(app.exec_())


 584
584

 被折叠的 条评论
为什么被折叠?
被折叠的 条评论
为什么被折叠?
 到【灌水乐园】发言


