


 本文详细解释了SpringBoot中BeanDefinition的注册、创建Bean的流程,以及处理循环依赖的机制,通过实例演示和源码分析,帮助读者理解Spring的初始化过程。
SpringBoot扩展篇:循环依赖源码链路
1. 相关文章
SpringBoot 源码解析全集
SpringBoot 源码解析5:ConfigurationClassPostProcessor整体流程和@ComponentScan源码分析
SpringBoot 源码解析6:Bean的创建① AbstractBeanFactory#doGetBean
SpringBoot 源码解析7:Bean的创建② AbstractAutowireCapableBeanFactory#createBean
SpringBoot扩展篇:Spring注入 @Autowired & @Resource
在Spring中,注册BeanDefinition和实例化bean的流程是分开的。
在bean实例化之前,Spring已经将所有要实例化的Bean的信息封装成BeanDefinition,
并且注册到DefaultListableBeanFactory#beanDefinitionMap。
本文只是循环依赖原理总结和相关代码链路,想要真正读懂循环依赖源码,需要一定的内功心法,详细的源码解析在上面链接中。
2. 一个简单的Demo
@Component
public class ObjectA {

    @Autowired
    private ObjectB objectB;

}
@Component
public class ObjectB {

    @Autowired
    private ObjectA objectA;

}
这是一个简单的循环依赖Demo,后续的讲解以Demo为例。ObjectA、ObjectB 简称A,B。
3. 流程图
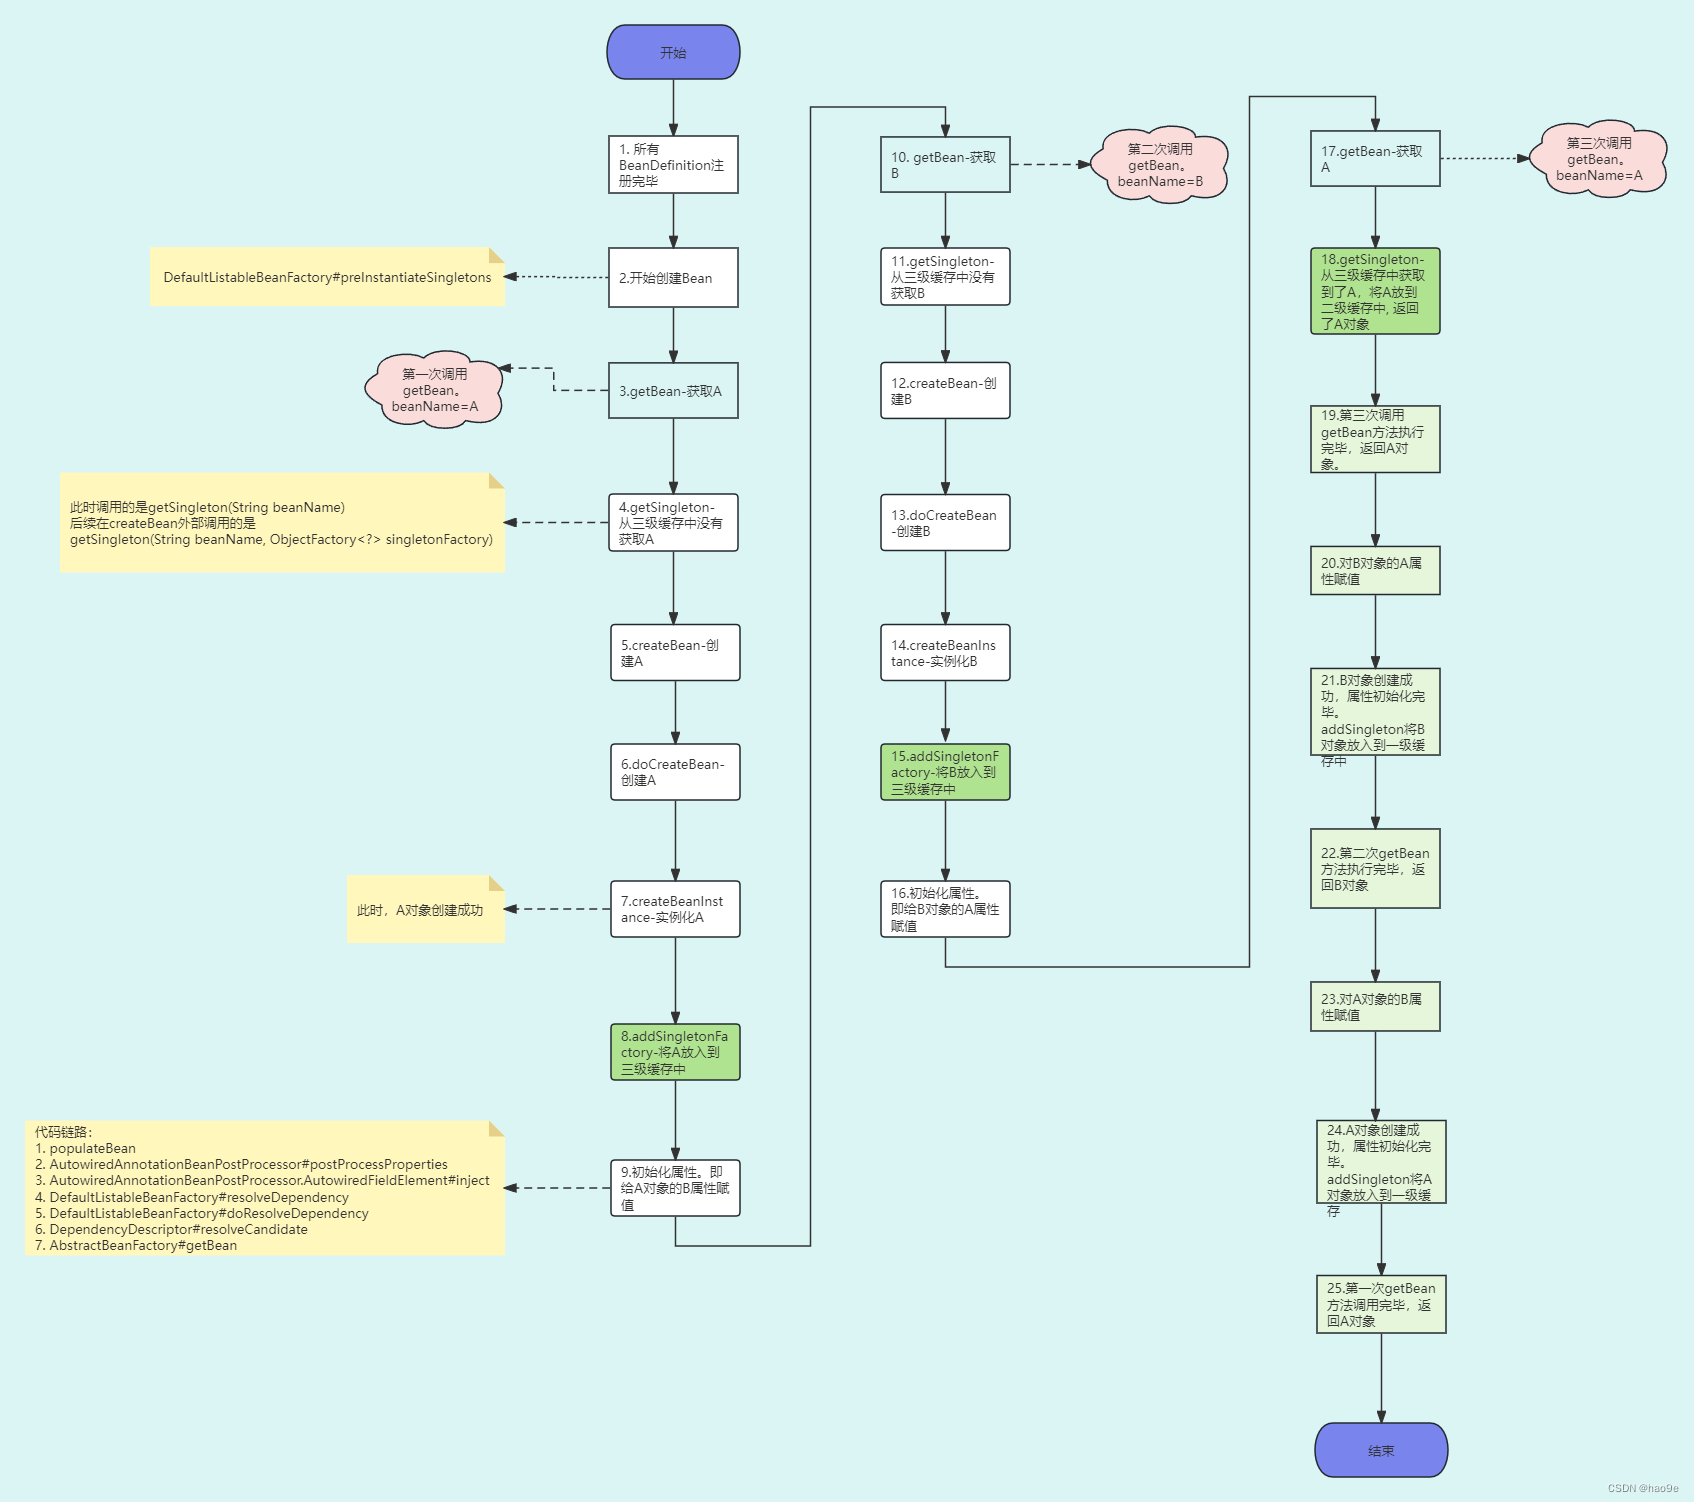
这是作者照着源码一步一步Debug画出的流程图,下面的Step序号与流程图中序号一致,挑重点讲。
3.1 BeanDefinition的注册
Step1:在实例化之前,Spring将要创建的Bean所对应的BeanDefinition都注册到BeanFactory。
参考:SpringBoot 源码解析5:ConfigurationClassPostProcessor整体流程和@ComponentScan源码分析
3.2 开始创建Bean
Step2:在此之前,所有的BeanDifinition全部注册到bean工厂。
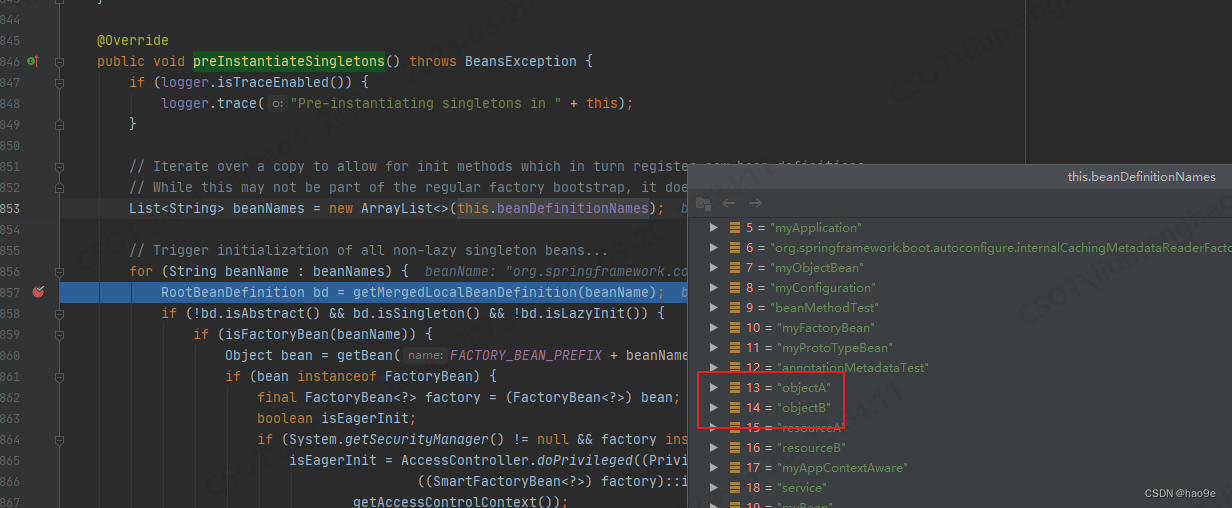
@Override
public void preInstantiateSingletons() throws BeansException {
	if (logger.isTraceEnabled()) {
		logger.trace("Pre-instantiating singletons in " + this);
	}

	// Iterate over a copy to allow for init methods which in turn register new bean definitions.
	// While this may not be part of the regular factory bootstrap, it does otherwise work fine.
	List<String> beanNames = new ArrayList<>(this.beanDefinitionNames);

	// Trigger initialization of all non-lazy singleton beans...
	for (String beanName : beanNames) {
		RootBeanDefinition bd = getMergedLocalBeanDefinition(beanName);
		if (!bd.isAbstract() && bd.isSingleton() && !bd.isLazyInit()) {
			if (isFactoryBean(beanName)) {
				Object bean = getBean(FACTORY_BEAN_PREFIX + beanName);
				if (bean instanceof FactoryBean) {
					final FactoryBean<?> factory = (FactoryBean<?>) bean;
					boolean isEagerInit;
					if (System.getSecurityManager() != null && factory instanceof SmartFactoryBean) {
						isEagerInit = AccessController.doPrivileged((PrivilegedAction<Boolean>)
										((SmartFactoryBean<?>) factory)::isEagerInit,
								getAccessControlContext());
					}
					else {
						isEagerInit = (factory instanceof SmartFactoryBean &&
								((SmartFactoryBean<?>) factory).isEagerInit());
					}
					if (isEagerInit) {
						getBean(beanName);
					}
				}
			}
			else {
				getBean(beanName);
			}
		}
	}

	// Trigger post-initialization callback for all applicable beans...
	for (String beanName : beanNames) {
		Object singletonInstance = getSingleton(beanName);
		if (singletonInstance instanceof SmartInitializingSingleton) {
			final SmartInitializingSingleton smartSingleton = (SmartInitializingSingleton) singletonInstance;
			if (System.getSecurityManager() != null) {
				AccessController.doPrivileged((PrivilegedAction<Object>) () -> {
					smartSingleton.afterSingletonsInstantiated();
					return null;
				}, getAccessControlContext());
			}
			else {
				smartSingleton.afterSingletonsInstantiated();
			}
		}
	}
}
在refresh方法中,会调用DefaultListableBeanFactory#preInstantiateSingletons,遍历所有的beanName,调用getBean方法获取Bean。
3.3 从三级缓存获取Bean
protected Object getSingleton(String beanName, boolean allowEarlyReference) {
	Object singletonObject = this.singletonObjects.get(beanName);
	if (singletonObject == null && isSingletonCurrentlyInCreation(beanName)) {
		synchronized (this.singletonObjects) {
			singletonObject = this.earlySingletonObjects.get(beanName);
			if (singletonObject == null && allowEarlyReference) {
				ObjectFactory<?> singletonFactory = this.singletonFactories.get(beanName);
				if (singletonFactory != null) {
					singletonObject = singletonFactory.getObject();
					this.earlySingletonObjects.put(beanName, singletonObject);
					this.singletonFactories.remove(beanName);
				}
			}
		}
	}
	return singletonObject;
}
singletonObjects:一级缓存
earlySingletonObjects: 二级缓存
singletonFactory:三级缓存,从三级缓存中获取Bean时,会调用singletonFactory.getObject()。
从缓存中逐级获取,如果缓存中找到了对应的Bean,那么就会返回bean,getBean方法调用结束。否则,就会创建Bean,放入缓存,然后返回bean。
3.4 创建Bean
doCreateBean方法
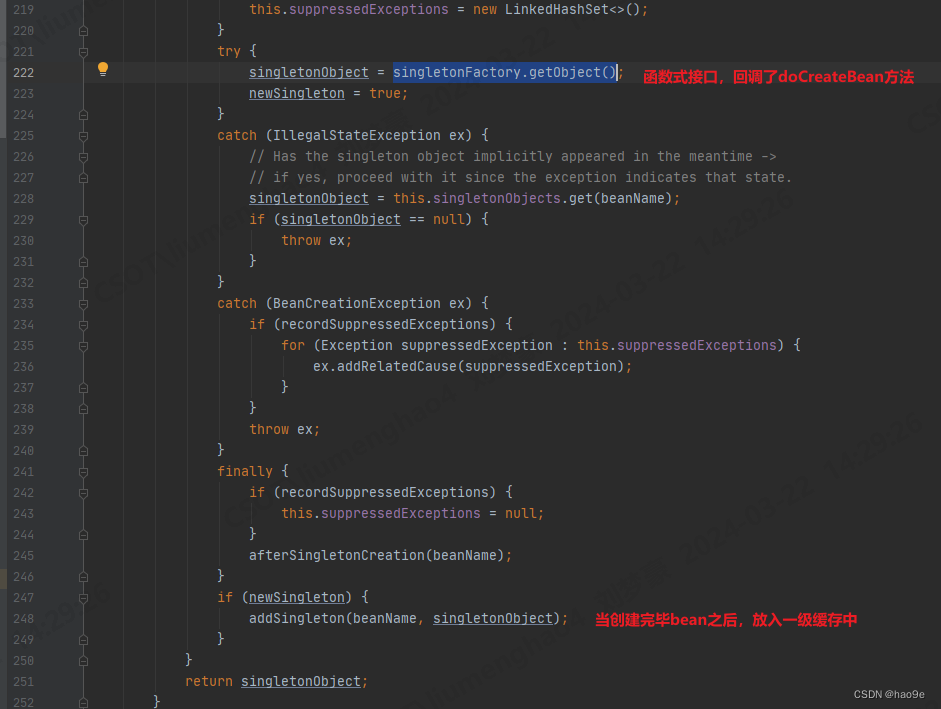
- singletonFactory是一个函数式接口,会回调CreateBean方法创建Bean。
//AbstractBeanFactory#doGetBean
if (mbd.isSingleton()) {
	sharedInstance = getSingleton(beanName, () -> {
		try {
			return createBean(beanName, mbd, args);
		}
		catch (BeansException ex) {
			// Explicitly remove instance from singleton cache: It might have been put there
			// eagerly by the creation process, to allow for circular reference resolution.
			// Also remove any beans that received a temporary reference to the bean.
			destroySingleton(beanName);
			throw ex;
		}
	});
	bean = getObjectForBeanInstance(sharedInstance, name, beanName, mbd);
}
- 当创建完成单例Bean,最终会放入到一级缓存中。对应Step21和Step24,先放入的B,在放入的A。
protected void addSingleton(String beanName, Object singletonObject) {
	synchronized (this.singletonObjects) {
		this.singletonObjects.put(beanName, singletonObject);
		this.singletonFactories.remove(beanName);
		this.earlySingletonObjects.remove(beanName);
		this.registeredSingletons.add(beanName);
	}
}
3.5 实例化Bean
Step7:createBeanInstance
Spring中兼容了自定义Supplier创建、@Configuration注解的工厂创建、构造器创建等多种创建方式。
3.6 添加三级缓存
Step8:放入到三级缓存singletonObjects中,此时的A只是对象创建成功,属性还未开始赋值。
boolean earlySingletonExposure = (mbd.isSingleton() && this.allowCircularReferences &&
		isSingletonCurrentlyInCreation(beanName));
if (earlySingletonExposure) {
	if (logger.isTraceEnabled()) {
		logger.trace("Eagerly caching bean '" + beanName +
				"' to allow for resolving potential circular references");
	}
	addSingletonFactory(beanName, () -> getEarlyBeanReference(beanName, mbd, bean));
}
protected void addSingletonFactory(String beanName, ObjectFactory<?> singletonFactory) {
	Assert.notNull(singletonFactory, "Singleton factory must not be null");
	synchronized (this.singletonObjects) {
		if (!this.singletonObjects.containsKey(beanName)) {
			this.singletonFactories.put(beanName, singletonFactory);
			this.earlySingletonObjects.remove(beanName);
			this.registeredSingletons.add(beanName);
		}
	}
}
一个bean只会缓存在一个缓存中,在加入到一个缓存的时候,会移除其他两个缓存。
@FunctionalInterface
public interface ObjectFactory<T> {

	/**
	 * Return an instance (possibly shared or independent)
	 * of the object managed by this factory.
	 * @return the resulting instance
	 * @throws BeansException in case of creation errors
	 */
	T getObject() throws BeansException;

}
可以看到,三级缓存中存放的是ObjectFactory,函数式接口。
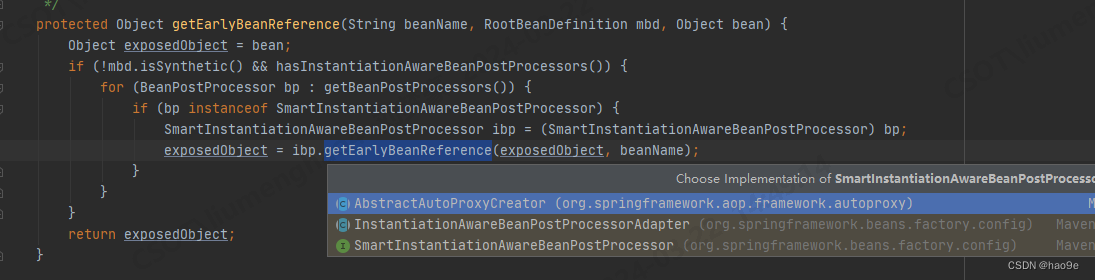
我们可以看到,如果当前bean被代理了,那么就会在AbstractAutoProxyCreator中缓存了当前bean对应的代理bean,那么三级缓存会返回代理bean,否则就会返回当前bean。
3.7 属性初始化
初始化逻辑可参考:SpringBoot扩展篇:Spring注入 @Autowired & @Resource
最终会回调getBean方法,参数为A对象依赖bean的名称。此时,第二次调用getBean方法
3.8 B的创建过程
B的创建会重复3.3-3.7流程,发现B也依赖A。就会第三次调用getBean方法。
3.9 最终流程
- 第三次调用getBean方法获取A,但是此时的A已经缓存在singletonFactory中,在调用getSingleton的时候,会将A从singletonFactory中取出来,放入到二级缓存earlySingletonObjects中。
- 第三次getBean方法就会返回A,对B对象的A属性赋值。
- 当B对象的所有属性赋值完毕之后,会调用addSingleton将B放入到一级缓存中。此时的B是最终成品。
- 第二次getBean方法返回B对象,对A对象的B属性赋值。
- 当A对象的所有属性赋值完毕之后,会调用addSingleton将A放入到一级缓存中。此时的A是最终成品。
- 第一次调用getBean方法返回A对象。流程结束!


 657
657

 被折叠的 条评论
为什么被折叠?
被折叠的 条评论
为什么被折叠?
 到【灌水乐园】发言


