


一.框架概述
1.1 什么是框架
1.1.1 什么是框架
软件开发的一套解决方案,不同框架解决不同的问题;
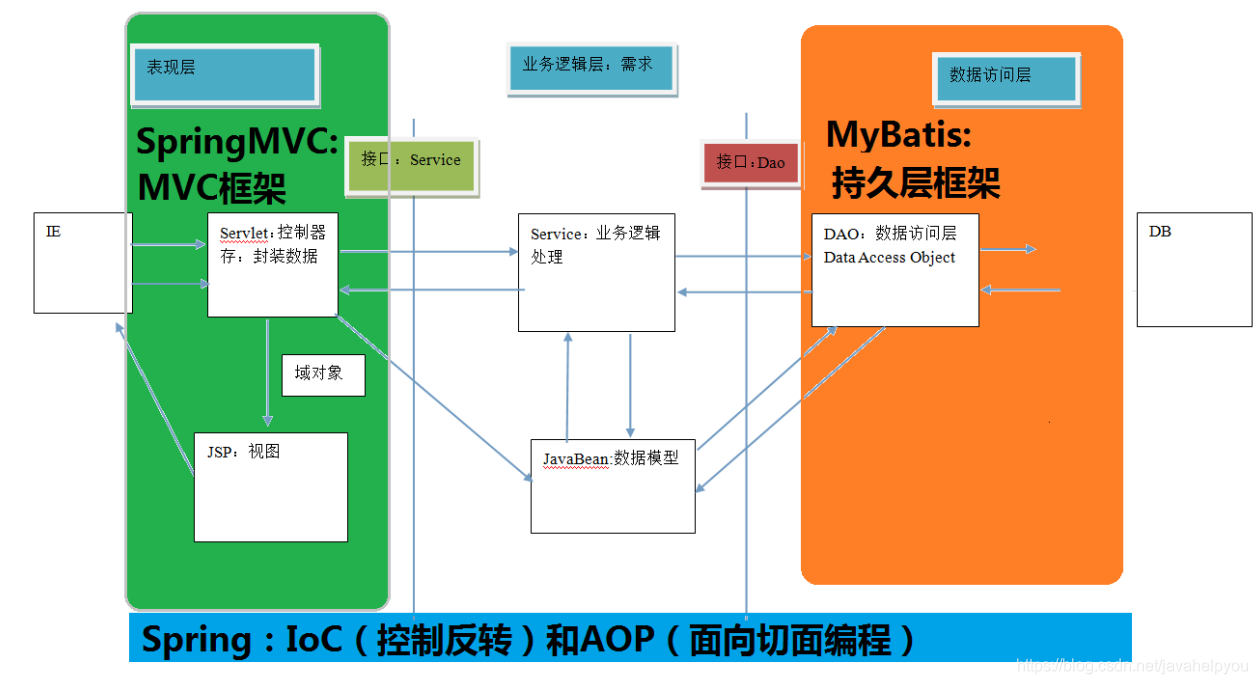
1.1.2 三层架构
表现层:展示数据
业务层:处理业务需求
持久层:和数据库交互
1.1.3 持久层技术解决方案
规范
JDBC技术: Connection PreparedStatement ResultSet
工具类
spring的JdbcTemplate
apache的DBUtils
1.1.4 JDBC问题分析
maven依赖
<dependencies>
    <dependency>
        <groupId>mysql</groupId>
        <artifactId>mysql-connector-java</artifactId>
        <version>5.1.25</version>
    </dependency>
</dependencies>
  public static void main(String[] args) {
        Connection connection = null;
        PreparedStatement preparedStatement = null;
        ResultSet resultSet = null;
        try {
//加载数据库驱动
            Class.forName("com.mysql.jdbc.Driver");
//通过驱动管理类获取数据库链接
            connection = DriverManager.getConnection("jdbc:mysql://ip地址/数据库?characterEncoding=utf-8", "root", "密码");
//定义 sql 语句 ?表示占位符
            String sql = "select * from emp where id = ?";
            //获取预处理 statement
            preparedStatement = connection.prepareStatement(sql);
//设置参数,第一个参数为 sql 语句中参数的序号(从 1 开始),第二个参数为设置的参数值
            preparedStatement.setInt(1, 1);
//向数据库发出 sql 执行查询,查询出结果集
            resultSet = preparedStatement.executeQuery();
//遍历查询结果集
            while (resultSet.next()) {
                System.out.println(resultSet.getString("id") + " " + resultSet.getString("ename"));
            }
        } catch (Exception e) {
            e.printStackTrace();
        } finally {
//释放资源
            if (resultSet != null) {
                try {
                    resultSet.close();
                } catch (SQLException e) {
                    e.printStackTrace();
                }
            }
            if (preparedStatement != null) {
                try {
                    preparedStatement.close();
                } catch (SQLException e) {
                    e.printStackTrace();
                }
            }
            if (connection != null) {
                try {
                    connection.close();
                } catch (SQLException e) {
// TODO Auto-generated catch block
                    e.printStackTrace();
                }
            }
        }
    }
问题:
1、数据库链接创建、释放频繁造成系统资源浪费从而影响系统性能,如果使用数据库链接池可解决此问题。
2、Sql 语句在代码中硬编码,造成代码不易维护,实际应用 sql 变化的可能较大,sql 变动需要改变 java代码。
3、使用 preparedStatement 向占位符传参数存在硬编码,因为 sql 语句的 where 条件不一定,可能多也可能少,修改 sql 还要修改代码,系统不易维护。
4、对结果集解析存在硬编码(查询列名),sql 变化导致解析代码变化,系统不易维护,如果能将数据库记录封装成 pojo 对象解析比较方便。
1.1.5 mybatis框架
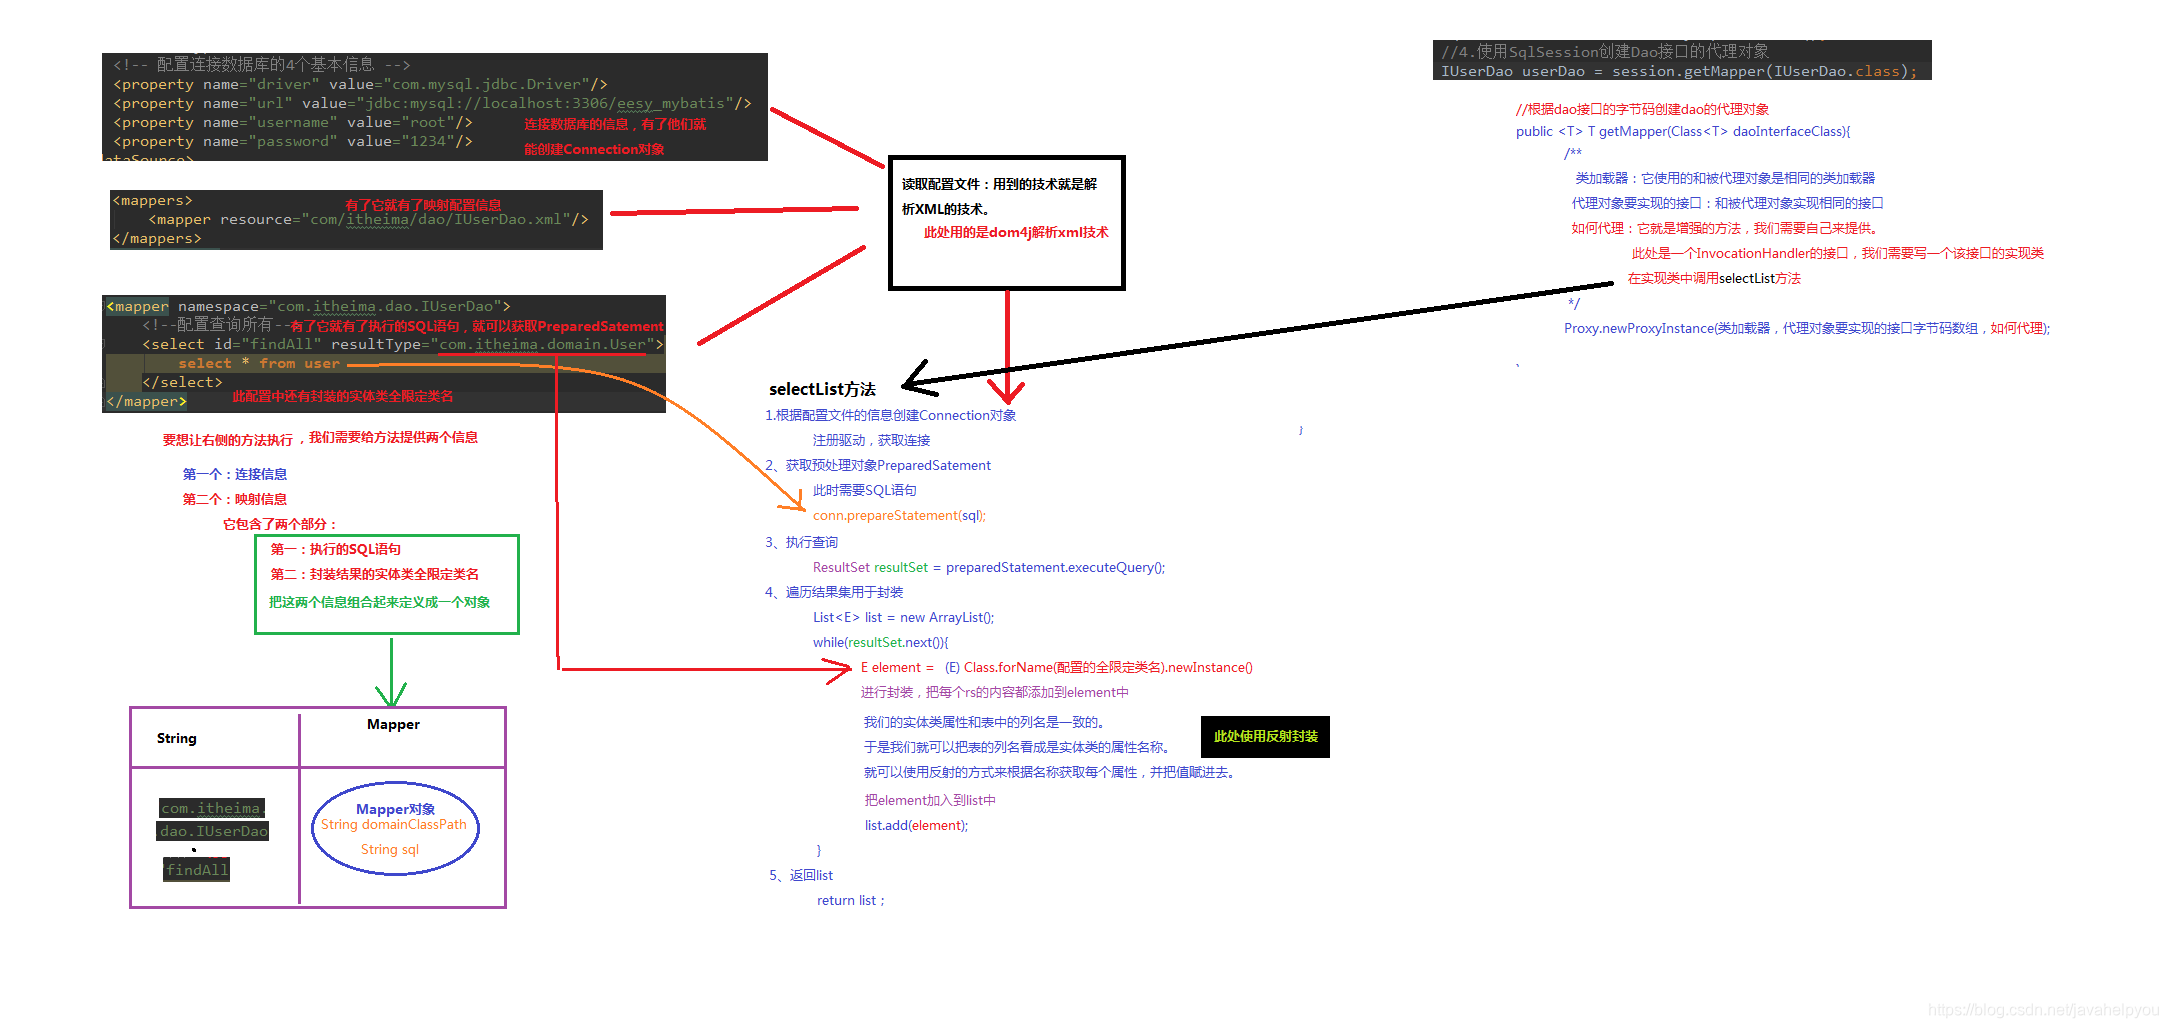
mybatis 是一个持久层框架,内部封装了 jdbc,使开发者只需要关注 sql 语句本身,而不需要花费精力去处理加载驱动、创建连接、创建 statement 等繁杂的过程。
mybatis 通过 xml 或注解的方式将要执行的各种 statement 配置起来,并通过 java 对象和 statement 中sql 的动态参数进行映射生成最终执行的 sql 语句,最后由 mybatis 框架执行 sql 并将结果映射为 java 对象并返回。
采用 ORM 思想解决了实体和数据库映射的问题,对 jdbc 进行了封装,屏蔽了 jdbc api 底层访问细节。
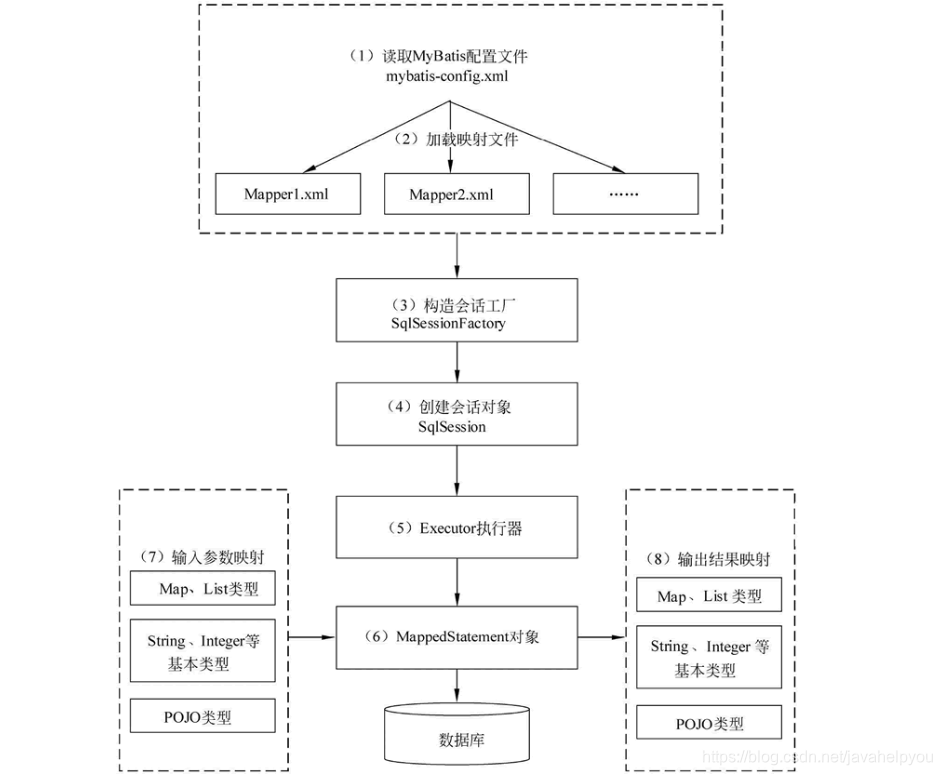
Executor执行器:
Mybatis有三种基本的Executor执行器,SimpleExecutor、ReuseExecutor、BatchExecutor。
SimpleExecutor:每执行一次update或select,就开启一个Statement对象,用完立刻关闭Statement对象。
ReuseExecutor:执行update或select,以sql作为key查找Statement对象,存在就使用,不存在就创建,用完后,不关闭Statement对象,而是放置于Map<String, Statement>内,供下一次使用。
BatchExecutor:执行update(没有select,JDBC批处理不支持select),将所有sql都添加到批处理中(addBatch()),等待统一执行(executeBatch()),它缓存了多个Statement对象,每个Statement对象都是addBatch()完毕后,等待逐一执行executeBatch()批处理。
**#{}和KaTeX parse error: Expected 'EOF', got '#' at position 12: {}的区别:** #̲{}是占位符,预编译处理;{}是拼接符,字符串替换,没有预编译处理。
Mybatis在处理#{}时,#{}传入参数是以字符串传入,会将SQL中的#{}替换为?号,调用PreparedStatement的set方法来赋值。Mybatis在处理KaTeX parse error: Expected 'EOF', got '#' at position 77: …ment编译 变量替换后,#̲{} 对应的变量自动加上单引号…{} 对应的变量不会加上单引号 ‘’
#{} 可以有效的防止SQL注入;${} 不能防止SQL 注入
1.1.6 mybatis入门
a.创建maven工程,并导入坐标
b.创建实体类和dao接口
c.创建主配置文件
d.创建映射配置文件
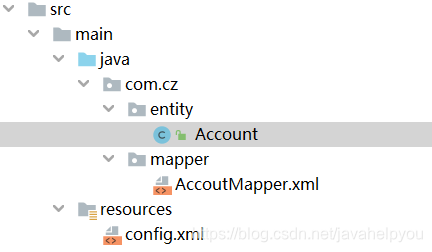
注意:
在idea中创建目录和包不同,创建包时,com.cz.dao为三级结构;创建目录时,com.cz.dao为一级目录;
mybatis的映射配置文件位置必须和dao接口的包结构相同;
映射配置文件的mapper标签的namespace属性取值必须为dao接口的全限定类名;
映射配置文件的操作配置,id必须为dao接口的方法名;
e.
编程步骤:
创建SqlSessionFactory
通过SqlSessionFactory创建SqlSession
通过sqlsession执行数据库操作
调用session.commit()提交事务
调用session.close()关闭会话
   //1.读取配置文件
     InputStream in = Resources.getResourceAsStream("SqlMapConfig.xml");
    //2.创建SqlSessionFactory
     SqlSessionFactoryBuilder sqlSessionFactoryBuilder = new SqlSessionFactoryBuilder();
     SqlSessionFactory sessionFactory = sqlSessionFactoryBuilder.build(in);
    //3.使用工厂生产SqlSession
    final SqlSession sqlSession = sessionFactory.openSession();
    //4.使用SqlSession创建Dao接口的代理对象
    final IUserDao mapper = sqlSession.getMapper(IUserDao.class);
    // 5.使用代理对象执行方法
    final List<User> all = mapper.findAll();
    for(User u:all){
        System.out.println(u);
    }
    //6.释放资源
    sqlSession.close();
    in.close();
注意:
在映射配置中,告知mybatis封装到哪个实体类中,即指定实体类的全限定类名;
创建工厂,mybatis使用构建者模式;生产SqlSession,使用工厂模式;创建Dao接口实现类,使用代理模式
二.mybatis使用
pom文件
<dependencies>
 <dependency>
 <groupId>org.mybatis</groupId>
 <artifactId>mybatis</artifactId>
 <version>3.4.5</version>
 </dependency>
 <dependency>
 <groupId>mysql</groupId>
 <artifactId>mysql-connector-java</artifactId>
 <version>8.0.11</version>
 </dependency>
 <dependency>
 <groupId>org.projectlombok</groupId>
 <artifactId>lombok</artifactId>
 <version>1.18.6</version>
 <scope>provided</scope>
 </dependency>
</dependencies> <build>
 <resources>
 <resource>
 <directory>src/main/java</directory>
 <includes>
 <include>**/*.xml</include>
 </includes>
 </resource>
 </resources>
</build>
use mybatis;
create table if not exists t_account(
                          id int primary key auto_increment,
                          username varchar(11),
                          password varchar(11),
                          age int
);
set global time_zone="+8:00";
创建实体类
import lombok.AllArgsConstructor;
import lombok.Data;
import lombok.NoArgsConstructor;

@Data
@AllArgsConstructor
@NoArgsConstructor
public class Account {
    private long id;
    private String username;
    private String password;
    private int age;
}
1.使用原生接口
主配置文件
<?xml version="1.0" encoding="UTF-8"?>
<!DOCTYPE configuration PUBLIC "-//mybatis.org//DTD Config 3.0//EN"
"http://mybatis.org/dtd/mybatis-3-config.dtd">
<configuration>
<!-- 配置MyBatis运⾏环境 -->
<environments default="development">
<environment id="development">
<!-- 配置JDBC事务管理 -->
<transactionManager type="JDBC"></transactionManager>
<!-- POOLED配置JDBC数据源连接池 -->
<dataSource type="POOLED">
<property name="driver" value="com.mysql.cj.jdbc.Driver"></property>
<property name="url" value="jdbc:mysql://localhost:3306/mybatis?useUnicode=true&characterEncoding=UTF-8"></property>
<property name="username" value="root"></property>
<property name="password" value="123456"></property>
</dataSource>
</environment>
</environments>
<mappers>
<mapper resource="com/cz/mapper/AccoutMapper.xml"></mapper>
</mappers>
</configuration>
映射文件
<?xml version="1.0" encoding="UTF-8" ?>
<!DOCTYPE mapper PUBLIC "-//mybatis.org//DTD Mapper 3.0//EN"
        "http://mybatis.org/dtd/mybatis-3-mapper.dtd">
<mapper namespace="com.cz.mapper.AccoutMapper">
    <insert id="save" parameterType="com.cz.entity.Account">
        insert into t_account(username,password,age) values(#{username},#{password},#{age})
    </insert>
</mapper>
测试:
public class AccountMapper {
    public static void main(String[] args) throws IOException {
        /*使用、原生接口*/
        //加载MyBatis配置⽂件
        InputStream inputStream = AccountMapper.class.getClassLoader().getResourceAsStream("config.xml");
        SqlSessionFactoryBuilder sqlSessionFactoryBuilder = new
                SqlSessionFactoryBuilder();
        SqlSessionFactory sqlSessionFactory =
                sqlSessionFactoryBuilder.build(inputStream);
        SqlSession sqlSession = sqlSessionFactory.openSession();
        String statement = "com.cz.mapper.AccoutMapper.save";
        Account account = new Account(1L,"abc","123123",22);
        sqlSession.insert(statement,account);
        sqlSession.commit();
    }
}
模糊查询like语句:
(1)’%${question}%’ 可能引起SQL注入,不推荐
(2)"%"#{question}"%" 注意:因为#{…}解析成sql语句时候,会在变量外侧自动加单引号’ ',所以这里 % 需要使用双引号" ",不能使用单引号 ’ ',不然会查不到任何结果。
(3)CONCAT(’%’,#{question},’%’) 使用CONCAT()函数,推荐
(4)使用bind标签
select id,sex,age,username,password from person where username LIKE #{pattern}
获取生成的主键
MySQL:
<insert id="insertUser" useGeneratedKeys="true" keyProperty="userId" >
    insert into user(
    user_name, user_password, create_time)
    values(#{userName}, #{userPassword} , #{createTime, jdbcType= TIMESTAMP})
</insert>
当实体类中的属性名和表中的字段名不一样
第1种: 通过在查询的SQL语句中定义字段名的别名,让字段名的别名和实体类的属性名一致。
<select id="getOrder" parameterType="int" resultType="com.cz.pojo.Order">
       select order_id id, order_no orderno ,order_price price form orders where order_id=#{id};
</select>
第2种: 通过来映射字段名和实体类属性名的一一对应的关系。
<select id="getOrder" parameterType="int" resultMap="orderResultMap">
	select * from orders where order_id=#{id}
</select>

<resultMap type="com.cz.pojo.Order" id="orderResultMap">
    <!–用id属性来映射主键字段–>
    <id property="id" column="order_id">

    <!–用result属性来映射非主键字段,property为实体类属性名,column为数据库表中的属性–>
    <result property ="orderno" column ="order_no"/>
    <result property="price" column="order_price" />
</reslutMap>
2.通过Mapper代理实现自定义接口
自定义接口
public interface AccountRepository {
    int save(Account account);
    int update(Account account);
    int deleteById(long id);
    List<Account> findAll();
    Account findById(Long id);
}
创建接口对应的Mapper.xml
规则:
Mapper.xml中namespace为接口全类名,id为接口对应的方法名
<?xml version="1.0" encoding="UTF-8" ?>
<!DOCTYPE mapper PUBLIC "-//mybatis.org//DTD Mapper 3.0//EN"
        "http://mybatis.org/dtd/mybatis-3-mapper.dtd">
<mapper namespace="com.cz.repository.AccountRepository">
    <insert id="save" parameterType="com.cz.entity.Account">
 insert into t_account(username,password,age) values(#{username},#{password},#{age})
 </insert>
    <update id="update" parameterType="com.cz.entity.Account">
 update t_account set username = #{username},password = #{password},age= #{age} where id = #{id}
 </update>
    <delete id="deleteById" parameterType="long">
 delete from t_account where id = #{id}
 </delete>
    <select id="findAll" resultType="com.cz.entity.Account">
 select * from t_account
 </select>
    <select id="findById" parameterType="long" resultType="com.cz.entity.Account">
 select * from t_account where id = #{id}
 </select>
</mapper>
statement 标签:select、update、delete、insert 分别对应查询、修改、删除、添加操作。parameterType和接口对应方法的参数类型一致,resultType和接口对应方法返回值类型一致
3.一对多的关系
4.多对多的关系

@Data
public class Goods {
    private Integer id;
    private String name;
    private List<Customer> customers;
}
@Data
public class Customer {
    private Integer id;
    private String name;
    private List<Goods> goods;
}
public interface CustomerRepository {
    public Customer findById(Integer id);
}
<?xml version="1.0" encoding="UTF-8" ?>
<!DOCTYPE mapper PUBLIC "-//mybatis.org//DTD Mapper 3.0//EN"
                "http://mybatis.org/dtd/mybatis-3-mapper.dtd">
<mapper namespace="com.cz.repository.CustomerRepository">
    <resultMap id="customerMap" type="com.cz.entity.Customer">
        <id property="id" column="id"></id>
        <result property="name" column="name"></result>
        <collection property="goods" ofType="com.cz.entity.Goods">
            <id property="id" column="gid"></id>
            <result property="name" column="gname"></result>
        </collection>
    </resultMap>

    <select id="findById" parameterType="Integer" resultMap="customerMap">
       select c.*,g.id gid,g.name gname from customer c,customer_goods cg,goods  g where c.id=cg.cid and g.id=cg.gid and c.id=#{id};
    </select>
</mapper>
5.逆向工程
mybatis 框架需要:实体类 自定义Mapper接口 Mapper.xml
逆向工程帮助开发者自动创建三个组件
如何使用:
mybatis Generator 代码生成器,支持基本crud;
(1).pom文件
    <dependencies>
 <dependency>
 <groupId>org.mybatis</groupId>
 <artifactId>mybatis</artifactId>
 <version>3.4.5</version>
 </dependency>
 <dependency>
 <groupId>mysql</groupId>
 <artifactId>mysql-connector-java</artifactId>
 <version>8.0.11</version>
 </dependency>
 <dependency>
 <groupId>org.mybatis.generator</groupId>
 <artifactId>mybatis-generator-core</artifactId>
 <version>1.3.2</version>
 </dependency>
</dependencies>
(2).xml文件
jdbcConnection配置数据库连接信息
javaModelGenerator 配置javaBean生成策略
sqlMapGenerator配置sql映射文件生成策略
javaClientGenerator配置Mapper接口生成策略
table配置目标数据表
<?xml version="1.0" encoding="UTF-8"?>
<!DOCTYPE generatorConfiguration
PUBLIC "-//mybatis.org//DTD MyBatis Generator Configuration 1.0//EN"
"http://mybatis.org/dtd/mybatis-generator-config_1_0.dtd">
<generatorConfiguration>
<context id="testTables" targetRuntime="MyBatis3">
<jdbcConnection driverClass="com.mysql.cj.jdbc.Driver"
connectionURL="jdbc:mysql://localhost:3306/mybatis?useUnicode=true&characterEncoding=UTF-8"
userId="root"
password="123456"></jdbcConnection>
<javaModelGenerator targetPackage="com.cz.entity" targetProject="./src/main/java"></javaModelGenerator>
<sqlMapGenerator targetPackage="com.cz.repository" targetProject="./src/main/java"></sqlMapGenerator>
<javaClientGenerator type="XMLMAPPER" targetPackage="com.cz.repository" targetProject="./src/main/java"></javaClientGenerator>
<table tableName="customer" domainObjectName="Customer"></table>
</context>
</generatorConfiguration>
(3)创建 Generator 执行类
public class Main {
    public static void main(String[] args) {
        List<String> warings = new ArrayList<String>();
        boolean overwrite = true;
        String genCig = "/generatorConfig.xml";
        File configFile = new File(Main.class.getResource(genCig).getFile());
        ConfigurationParser configurationParser = new ConfigurationParser(warings);
        Configuration configuration = null;
        try {
            configuration = configurationParser.parseConfiguration(configFile);
        } catch (IOException e) {
            e.printStackTrace();
        } catch (XMLParserException e) {
            e.printStackTrace();
        }
        DefaultShellCallback callback = new DefaultShellCallback(overwrite);
        MyBatisGenerator myBatisGenerator = null;
        try {
            myBatisGenerator = new
                    MyBatisGenerator(configuration, callback, warings);
        } catch (InvalidConfigurationException e) {
            e.printStackTrace();
        }
        try {
            myBatisGenerator.generate(null);
        } catch (SQLException e) {
            e.printStackTrace();
        } catch (IOException e) {
            e.printStackTrace();
        } catch (InterruptedException e) {
            e.printStackTrace();
        }
    }
}
6.mybatis延迟加载
针对数据持久层,在某些特定情况下访问数据库,在其他情况不访问;
使用CGLIB创建目标对象的代理对象,当调用目标方法时,进入拦截器方法,比如调用a.getB().getName(),拦截器invoke()方法发现a.getB()是null值,那么就会单独发送事先保存好的查询关联B对象的sql,把B查询上来,然后调用a.setB(b),于是a的对象b属性就有值了,接着完成a.getB().getName()方法的调用。
开启延迟加载
 <settings>
        <!-- 打印SQL-->
        <setting name="logImpl" value="STDOUT_LOGGING" />
        <!-- 开启延迟加载 -->
        <setting name="lazyLoadingEnabled" value="true"/>
    </settings>
将多表关联查询拆分
7.mybatis缓存
减少 Java 应用与数据库的交互次数,提升程序的运行效率。
一级缓存:SqlSession级别,默认开启,不能关闭
操作数据库时,创建SqlSession对象,在对象中有一个HashMap用于存储缓存数据,不同SqlSession之间缓存数据区域互相不影响。
第一次与数据库交互,将结果缓存,第二次直接从缓存中获取
SqlSession在执行DML操作时,必须清空缓存
二级缓存:Mapper级别,默认关闭,可开启
多个SqlSession使用同一个Mapper的SQL语句操作数据库,得到的数据存在二级缓存区,使用HashMap进行数据的存储。二级缓存跨SqlSession
(1)使用mybatis自带的二级缓存:
配置文件中:
<settings>
 <!-- 打印SQL-->
 <setting name="logImpl" value="STDOUT_LOGGING" />
 <!-- 开启延迟加载 -->
 <setting name="lazyLoadingEnabled" value="true"/>
 <!-- 开启二级缓存 -->
 <setting name="cacheEnabled" value="true"/>
</settings>
映射文件中:
<cache></cache>
实体类中实现序列化接口
(2)ehcache 二级缓存
pom文件
  <dependency>
            <groupId>org.mybatis</groupId>
            <artifactId>mybatis-ehcache</artifactId>
            <version>1.0.0</version>
        </dependency>
        <dependency>
            <groupId>net.sf.ehcache</groupId>
            <artifactId>ehcache-core</artifactId>
            <version>2.4.3</version>
        </dependency>
添加ehcache.xml
<ehcache xmlns:xsi="http://www.w3.org/2001/XMLSchema-instance"
         xsi:noNamespaceSchemaLocation="../config/ehcache.xsd">
    <diskStore/>
    <defaultCache
            maxElementsInMemory="1000"
            maxElementsOnDisk="10000000"
            eternal="false"
            overflowToDisk="false"
            timeToIdleSeconds="120"
            timeToLiveSeconds="120"
            diskExpiryThreadIntervalSeconds="120"
            memoryStoreEvictionPolicy="LRU">
    </defaultCache>
</ehcache>
配置文件开启二级缓存
<settings>
 <!-- 打印SQL-->
 <setting name="logImpl" value="STDOUT_LOGGING" />
 <!-- 开启延迟加载 -->
 <setting name="lazyLoadingEnabled" value="true"/>
 <!-- 开启二级缓存 -->
 <setting name="cacheEnabled" value="true"/>
</settings>
映射文件设置缓存
<cache type="org.mybatis.caches.ehcache.EhcacheCache">
 <!-- 缓存创建之后,最后一次访问缓存的时间至缓存失效的时间间隔 -->
 <property name="timeToIdleSeconds" value="3600"/>
 <!-- 缓存自创建时间起至失效的时间间隔 -->
 <property name="timeToLiveSeconds" value="3600"/>
 <!-- 缓存回收策略,LRU表示移除近期使用最少的对象 -->
 <property name="memoryStoreEvictionPolicy" value="LRU"/>
</cache>
实体类不需要实现序列化接口
8.动态sql


 949
949

 被折叠的 条评论
为什么被折叠?
被折叠的 条评论
为什么被折叠?
 到【灌水乐园】发言


