


往期回顾:
下面接着介绍threejs中的材质:
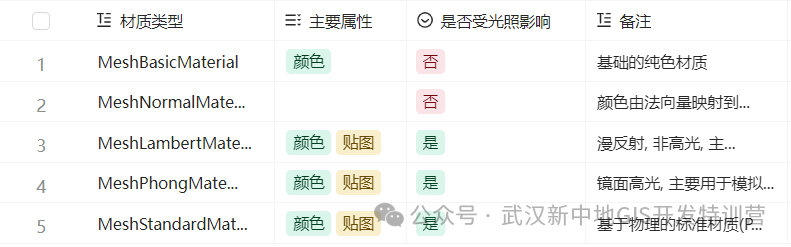
不同的材质的应用场景不同, 从整体上分为两大类
-
普通材质: 不受光线的影响 -
物理材质: 模拟物体对光线的反射, 在不同的光照下显示效果不同
推荐
-
快速写Deom, 简单使用的话, 采用
MeshNormalMaterial, 最简单, 便于观察, 有明显的立体效果 -
在生产时使用
MeshStandardMaterial, 便于模拟真实的物理效果(为了保证更逼真的效果, 最好是设置环境贴图, 模拟物体对环境光的反射/折射)
1) 基础材质
对于基础材质MeshBasicMaterial我们主要使用的属性
-
color: 定义表面的颜色
-
wireframe: 是否显示线框
完整示例:
import * as THREE from 'three'
import { OrbitControls } from 'three/addons/controls/OrbitControls.js'
import * as dat from 'dat.gui'
// 一. 创建场景
const scene = new THREE.Scene()
// 二. 创建相机
const camera = new THREE.PerspectiveCamera(
45,
window.innerWidth / window.innerHeight
)
camera.position.set(0, 0, 5)
// 三. 创建物体
const cubeGeometry = new THREE.BoxGeometry(2, 2, 2)
const cubeMaterial = new THREE.MeshBasicMaterial({ color: 0xff0000 })
const cube = new THREE.Mesh(cubeGeometry, cubeMaterial)
scene.add(cube)
// 集成Gui
const gui = new dat.GUI()
const data = {
  color: 0xff0000,
  wireframe: false,
}
gui.addColor(data, 'color').onChange((value) => {
console.log(cube.material)
  cube.material.color.set(value)
})
gui.add(data, 'wireframe').onChange((value) => {
  cube.material.wireframe = value
})
// 四. 创建渲染器
const renderer = new THREE.WebGLRenderer({ antialias: true })
renderer.setPixelRatio(window.devicePixelRatio)
renderer.setSize(window.innerWidth, window.innerHeight)
renderer.setAnimationLoop(animation)
// 将渲染的canvas添加到body元素中
document.body.appendChild(renderer.domElement)
// 五. 辅助工具
const control = new OrbitControls(camera, renderer.domElement)
const axesHelper = new THREE.AxesHelper(10)
scene.add(axesHelper)
const gridHelper = new THREE.GridHelper(20, 20, 0xffffff, 0xffffff)
gridHelper.material.transparent = true
gridHelper.material.opacity = 0.5
scene.add(gridHelper)
function animation() {
  renderer.render(scene, camera)
}
window.addEventListener('resize', () => {
  camera.aspect = window.innerWidth / window.innerHeight
  camera.updateProjectionMatrix()
  renderer.setSize(window.innerWidth, window.innerHeight)
})
color对象的注意事项
color对象的rgb范围为[0,1]的浮点数, 而不是[0, 255]的整数
在源码中做了归一化处理, 就是数学里的比例换算再映射到sRGB色彩空间
setHex( hex, colorSpace = SRGBColorSpace ) {
  hex = Math.floor( hex );
// 归一化处理
this.r = ( hex >> 16 & 255 ) / 255;
this.g = ( hex >> 8 & 255 ) / 255;
this.b = ( hex & 255 ) / 255;
// 默认映射到SRGB色彩空间
  ColorManagement.toWorkingColorSpace( this, colorSpace );
return this;
}改造MeshGui支持材质属性调整
import * as THREE from 'three'
import { BaseGui } from './BaseGui'
function defaultHandler(item, key, value) {
  item[key] = value
}
const Vector3Config = {
  x: {
    handler: defaultHandler,
  },
  y: {
    handler: defaultHandler,
  },
  z: {
    handler: defaultHandler,
  },
}
function eulerHandler(item, key, value) {
  item[key] = THREE.MathUtils.degToRad(value)
}
const EulerConfig = {
  x: {
    extend: [-180, 180],
    handler: eulerHandler,
  },
  y: {
    extend: [-180, 180],
    handler: eulerHandler,
  },
  z: {
    extend: [-180, 180],
    handler: eulerHandler,
  },
}
function geometryHandler(item, key, value, parent) {
const params = { ...parent.geometry.parameters }
  params[key] = value
  parent.geometry.dispose()
  parent.geometry = new THREE[parent.geometry.type](...Object.values(params))
}
const GeometryMapping = {
  BoxGeometry: {
    width: {
      name: 'x轴宽度',
      extend: [2, 20],
      handler: geometryHandler,
    },
    height: {
      name: 'y轴高度',
      extend: [2, 20],
      handler: geometryHandler,
    },
    depth: {
      name: 'z轴深度',
      extend: [2, 20],
      handler: geometryHandler,
    },
  },
  SphereGeometry: {
    radius: {
      name: '半径',
      min: 1,
      handler: geometryHandler,
    },
    widthSegments: {
      name: '水平分段数',
      min: 3,
      handler: geometryHandler,
    },
    heightSegments: {
      name: '垂直分段数',
      min: 2,
      handler: geometryHandler,
    },
  },
  PlaneGeometry: {
    width: {
      name: 'x轴宽度',
      min: 1,
      handler: geometryHandler,
    },
    height: {
      name: 'y轴高度',
      min: 1,
      handler: geometryHandler,
    },
  },
}
function colorHandler(item, key, value) {
  item[key].set(value)
}
const MaterialMapping = {
  MeshBasicMaterial: {
    color: {
      method: 'addColor',
      handler: colorHandler,
    },
    wireframe: {
      handler: defaultHandler,
    },
  },
}
export class MeshGui extends BaseGui {
constructor(options = {}) {
if (!options.target.isMesh) {
      console.error('target must be an instance of Mesh')
return
    }
super()
this.init(options)
  }
init(options) {
this.mesh = options.target
this.geometry = this.mesh.geometry
this.material = this.mesh.material
this.position = this.mesh.position
this.rotation = this.mesh.rotation
this.scale = this.mesh.scale
    options.position !== false ? this.initPosition() : ''
    options.rotation !== false ? this.initRotation() : ''
    options.scale !== false ? this.initScale() : ''
    options.geometry !== false ? this.initGeometry() : ''
    options.material !== false ? this.initMaterial() : ''
  }
  initPosition() {
    console.log(this.position)
this.initGuiFolder(this.position, '位置', this.mesh, Vector3Config)
  }
  initRotation() {
this.initGuiFolder(this.rotation, '旋转(度)', this.mesh, EulerConfig)
  }
  initScale() {
this.initGuiFolder(this.scale, '缩放', this.mesh, Vector3Config)
  }
  initGeometry() {
const geometry = this.geometry
const type = geometry.type
const config = GeometryMapping[type]
if (config) {
this.initGuiFolder(geometry.parameters, geometry.type, this.mesh, config)
    }
  }
  initMaterial() {
const material = this.material
const type = this.material.type
const config = MaterialMapping[type]
if (config) {
this.initGuiFolder(material, type, this.mesh, config)
    }
  }
}
2) 法向材质
MeshNormalMaterial(法向材质)的颜色由当前点的法向量(三维坐标)做为rgb值
法向量
法向量(Normal vector)是指垂直于某一对象表面上的一条向量
在三维几何中,一个平面可以由一个点和一个法向量唯一确定
法向量在计算物体表面的光照、碰撞检测以及物体位置的计算等方面很有用
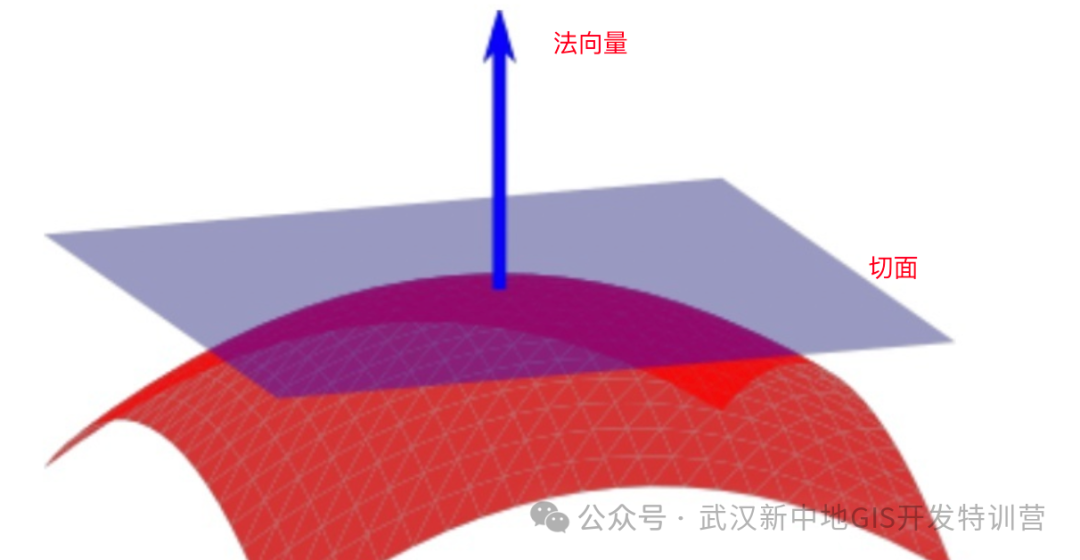
在three.js中, 法向量是一个Vector3(三维矢量对象), 有xyz三个属性. 取值范围[0, 1].
正好可以做为颜色的rgb值
import * as THREE from 'three'
import { OrbitControls } from 'three/addons/controls/OrbitControls.js'
import { MeshGui } from '../gui'
// 一. 创建场景
const scene = new THREE.Scene()
// 二. 创建相机
const camera = new THREE.PerspectiveCamera(
45,
window.innerWidth / window.innerHeight
)
camera.position.set(0, 0, 5)
// 三. 创建物体
const cubeGeometry = new THREE.BoxGeometry(2, 2, 2)
const cubeMaterial = new THREE.MeshNormalMaterial()
const cube = new THREE.Mesh(cubeGeometry, cubeMaterial)
scene.add(cube)
new MeshGui({
  target: cube,
})
// 四. 创建渲染器
const renderer = new THREE.WebGLRenderer({ antialias: true })
renderer.setPixelRatio(window.devicePixelRatio)
renderer.setSize(window.innerWidth, window.innerHeight)
renderer.setAnimationLoop(animation)
// 将渲染的canvas添加到body元素中
document.body.appendChild(renderer.domElement)
// 五. 辅助工具
const control = new OrbitControls(camera, renderer.domElement)
const axesHelper = new THREE.AxesHelper(10)
scene.add(axesHelper)
const gridHelper = new THREE.GridHelper(20, 20, 0xffffff, 0xffffff)
gridHelper.material.transparent = true
gridHelper.material.opacity = 0.5
scene.add(gridHelper)
function animation() {
  renderer.render(scene, camera)
}
window.addEventListener('resize', () => {
  camera.aspect = window.innerWidth / window.innerHeight
  camera.updateProjectionMatrix()
  renderer.setSize(window.innerWidth, window.innerHeight)
})
3) PBR材质
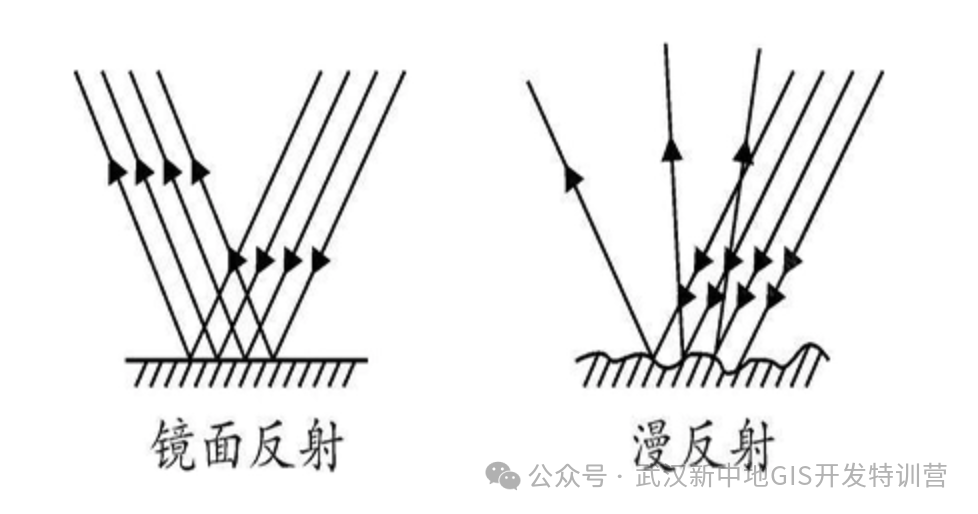
PBR材质, 也叫物理材质, 用于模拟光照到不同的物体上发生反射, 产生更逼真的显示效果
比较著名的物理模型有
-
Lambert模型: 主要模拟光线
漫反射, 通常用于模拟木材/石材等表面粗糙的材质 -
Phong模型: 主要模拟光线
镜面反射, 通常用于模拟金属/镜子等表面光滑的材质
效果:
树的顶部用圆锥体模拟
示例:
// 1. 创建一个Lambert材质的圆锥体
const coneGeometry = new THREE.ConeGeometry(2, 10, 32)
const coneMaterial = new THREE.MeshLambertMaterial({ color: 0x00ffff })
const cone = new THREE.Mesh(coneGeometry, coneMaterial)
cone.position.y = 5
此时, 我们发现渲染的是一个黑色的圆锥体, 是因为没有添加光源的原因.
这里我们分别使用两种不同的光源测试对比
-
环境光, 整个场景都会照亮, 不会形成阴影
-
点光源, 光从一个点向四周辐射,
向光面被照亮,背光面会形成阴影
环境光
// 添加环境灯光源
const ambientLight = new THREE.AmbientLight(0xffffff, 0.5)
scene.add(ambientLight)
点光源
// 添加点光源
const pointLight = new THREE.PointLight(0xffffff, 1)
pointLight.position.set(10, 10, 10)
scene.add(pointLight)
测试效果
树干可以用一个圆柱体模拟
示例:
// 1. 创建一个Lambert材质的圆锥体
const coneGeometry = new THREE.ConeGeometry(3, 5, 32)
const coneMaterial = new THREE.MeshLambertMaterial({ color: 0x00ffff })
const cone = new THREE.Mesh(coneGeometry, coneMaterial)
cone.position.y = 5

// 2. 创建一个Phone材质的圆柱体
const cylinderGeometry = new THREE.CylinderGeometry(1, 1, 5, 32, 2)
const cylinderMaterial = new THREE.MeshPhongMaterial({ color: 0x00ffff })
const cylinder = new THREE.Mesh(cylinderGeometry, cylinderMaterial)

// 创建一个组
const group = new THREE.Group()
// 添加到组中
group.add(cone)
group.add(cylinder)
建模后, 可以添加到一个组里, 方便统一管理
完整示例:
import * as THREE from 'three'
import { OrbitControls } from 'three/addons/controls/OrbitControls.js'

import { MeshGui } from '../gui'

// 一. 创建场景
const scene = new THREE.Scene()

// 二. 创建相机
const camera = new THREE.PerspectiveCamera(
  45,
  window.innerWidth / window.innerHeight
)
camera.position.set(0, 0, 5)

// 三. 创建物体
// 1. 创建一个Lambert材质的圆锥体
const coneGeometry = new THREE.ConeGeometry(3, 5, 32)
const coneMaterial = new THREE.MeshLambertMaterial({ color: 0x00ffff })
const cone = new THREE.Mesh(coneGeometry, coneMaterial)
cone.position.y = 5

// 2. 创建一个Phone材质的圆柱体
const cylinderGeometry = new THREE.CylinderGeometry(1, 1, 5, 32, 2)
const cylinderMaterial = new THREE.MeshPhongMaterial({ color: 0x00ffff })
const cylinder = new THREE.Mesh(cylinderGeometry, cylinderMaterial)

// 创建一个组
const group = new THREE.Group()
// 添加到组中
group.add(cone)
group.add(cylinder)

scene.add(group)

// 添加点光源
const pointLight = new THREE.PointLight(0xffffff, 1)
pointLight.position.set(10, 10, 10)
scene.add(pointLight)

// 四. 创建渲染器
const renderer = new THREE.WebGLRenderer({ antialias: true })
renderer.setPixelRatio(window.devicePixelRatio)
renderer.setSize(window.innerWidth, window.innerHeight)
renderer.setAnimationLoop(animation)
// 将渲染的canvas添加到body元素中
document.body.appendChild(renderer.domElement)

// 五. 辅助工具
const control = new OrbitControls(camera, renderer.domElement)

const axesHelper = new THREE.AxesHelper(10)
scene.add(axesHelper)

const gridHelper = new THREE.GridHelper(20, 20, 0xffffff, 0xffffff)
gridHelper.material.transparent = true
gridHelper.material.opacity = 0.5
scene.add(gridHelper)

function animation() {
  renderer.render(scene, camera)
}

window.addEventListener('resize', () => {
  camera.aspect = window.innerWidth / window.innerHeight
  camera.updateProjectionMatrix()

  renderer.setSize(window.innerWidth, window.innerHeight)
})需要本教程视频版可加小助手(whxzdjy)备注【threejs】免费领取
下一期我们接着介绍threejs中的纹理


 9853
9853


 被折叠的 条评论
为什么被折叠?
被折叠的 条评论
为什么被折叠?
 到【灌水乐园】发言


