


Android坐标系统
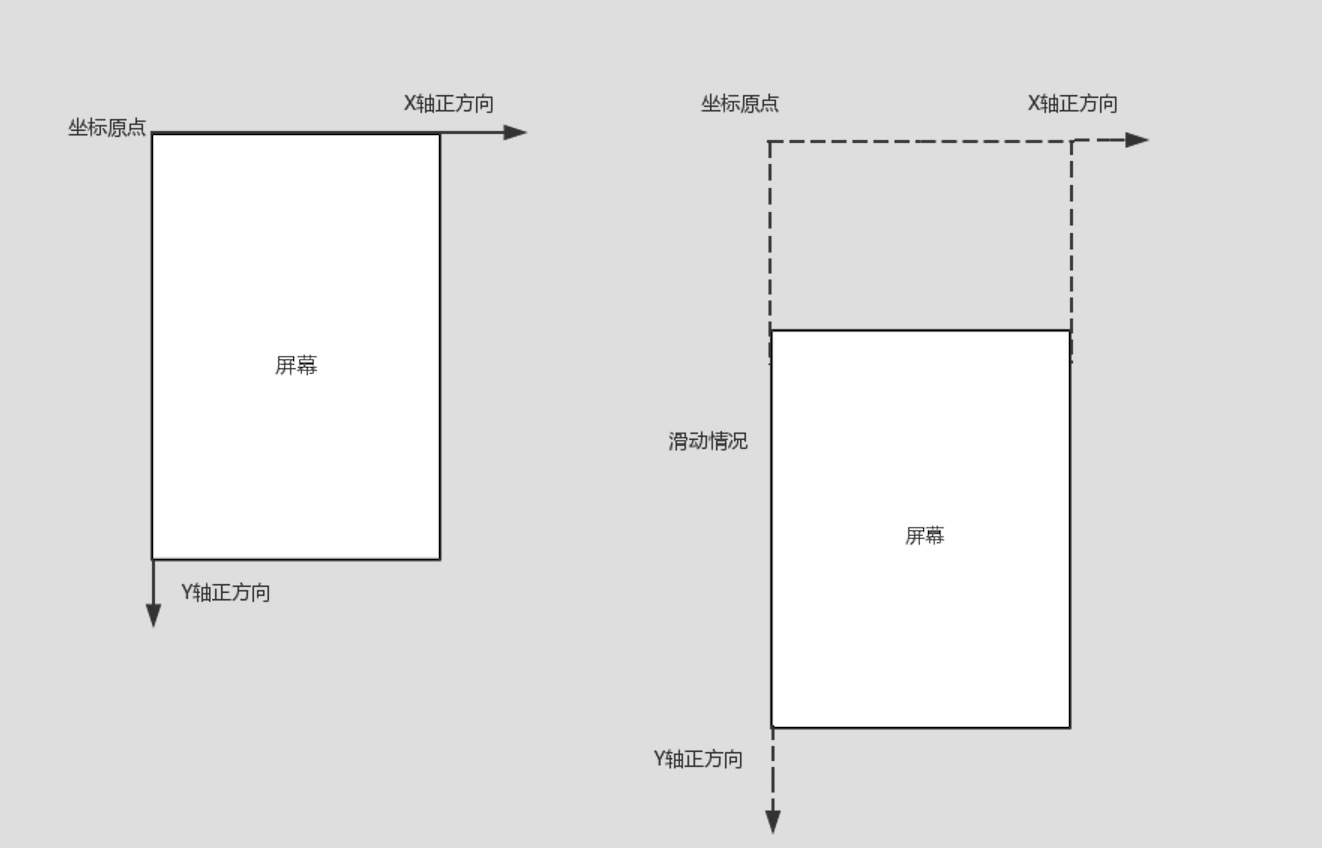
Android系统中屏幕左上角为系统原点,其中原点向右方向为X轴正方向,原点向下方向为Y轴正方向。
View类
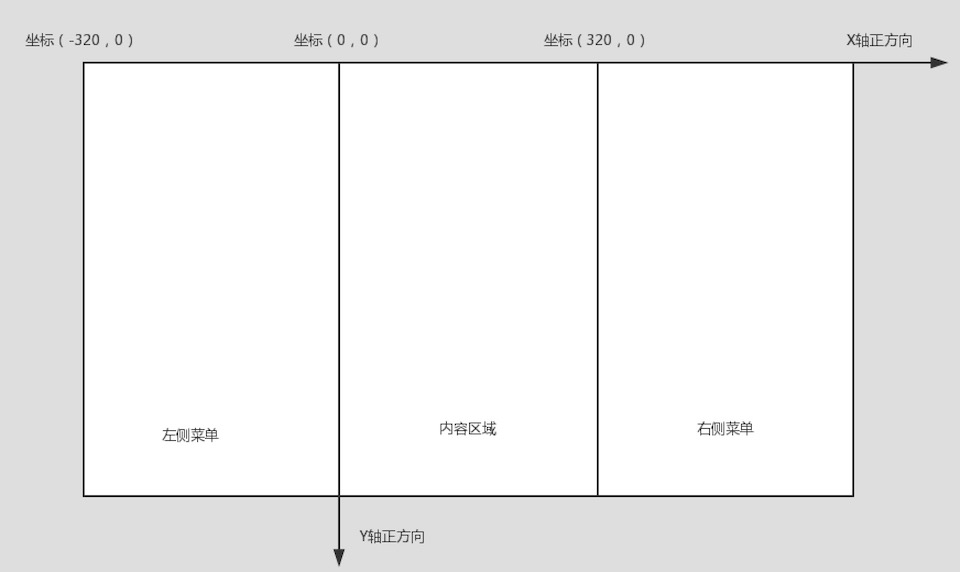
我们知道View的绘制中先测量后布局,而这一步布局就是确定View的位置,而针对代码表现就是设置上述四个成员变量的值,这几个值构成的矩形区域就是View要显示的位置,这里要说明的一点就是这里的位置都是相对于父视图来说的,举个简单的例子,我们常见的侧滑菜单,它分为左侧部分、内容部分、右侧部分,其中针对内容部分来说,它的父视图就是由这三部分构成的一个大的矩形框。
视图宽度:也是mRight和mLeft的差值
/**
 * Return the width of the your view.
 *
 * @return The width of your view, in pixels.
 */
public final int getWidth() {
    return mRight - mLeft;
}
视图高度:也是mBottom和mTop的差值
/**
 * Return the height of your view.
 *
 * @return The height of your view, in pixels.
 */
public final int getHeight() {
    return mBottom - mTop;
}
视图测量宽度:getMeasuredWidth()
视图测量高度:getMeasuredHeight()
这里提一下这两个和前面提到的两个的区别,在类刚开始初始化,我们调用这两个值其实得到的结果都是0,但是我们可以从onDraw方法里面可以获取到控件的大小(结果是以像素为单位),原因在于在View的绘制过程中,第一步就是要测量view的尺寸,而measure的过程就是获得mMeasuredWidth和mMeasuredHeight的值,即视图内容所占的宽度和高度,当然前提是你必须在父视图的onLayout或者onDraw方法里面调用measure(0,0)方法,否则你得到的结果和getWidth()得到的结果是一样的。而getWidth()和getHeight()返回的是mRight - mLeft和mBottom - mTop的值,必须在经过父视图layout布局好确定位置之后,才有对应的mLeft等4个值,如果没有父视图,默认就是整个屏幕,一般情况下,layout过程会参考这里测量得到的mMeasuredWidth和mMeasuredHeight来安排子视图在父视图中显示的位置,但是这不是必须的,measure得到的值也有可能完全没有被使用,尤其是在自定义Viewgroup中,有些子视图位置就是确定的,这时候我们可以直接在布局的时候通过几个参数来安排子视图的位置。
getX():相对于父视图来说,距离左边缘的距离 注意和mLeft的区别,在mLeft基础上加上getTranslationX()才可以,即View水平方向移动的偏移量
getY():相对于父视图来说,距离上边缘的距离 注意和mTop的区别,在mTop基础上加上getTranslationY()才可以,即View竖直方向移动的偏移量
getLocationOnScreen(location):该方法获取到当前view的位置,location(0)代表X值,表示该view的左边缘与屏幕的左边缘之间的距离。可以想象,当滑屏产生,view开始移动该值肯定会改变的。location(1)代表Y值,表示该view的上边缘与屏幕的上边缘之间的距离,该距离肯定是包含标题栏的高度的。
int[] location = new int[2];
v.getLocationOnScreen(location);
int x = location[0];
int y = location[1];
getLocationInWindow(location):在window占据全部screen时,返回值和上一个相同,不同的典型情况是在Dialog中时,当Dialog出现在屏幕中间时,View.getLocationOnScreen()取得的值要比View.getLocationInWindow()取得的值要大,一个坐标系统是屏幕,一个坐标系统是window。
mScrollX:屏幕左边缘减去父视图的左边缘为0的距离,换句话说当前视图相对于屏幕原点在X轴上的偏移量.
/**
 * Return the scrolled left position of this view. This is the left edge of
 * the displayed part of your view. You do not need to draw any pixels
 * farther left, since those are outside of the frame of your view on
 * screen.
 *
 * @return The left edge of the displayed part of your view, in pixels.
 */
public final int getScrollX() {
    return mScrollX;
}
mScrollY:屏幕上边缘减去父视图的上边缘为0的距离,换句话说当前视图相对于屏幕原点在Y轴上的偏移量.
/**
* Return the scrolled top position of this view. This is the top edge of
* the displayed part of your view. You do not need to draw any pixels above
* it, since those are outside of the frame of your view on screen.
*
* @return The top edge of the displayed part of your view, in pixels.
*/
public final int getScrollY() {
return mScrollY;
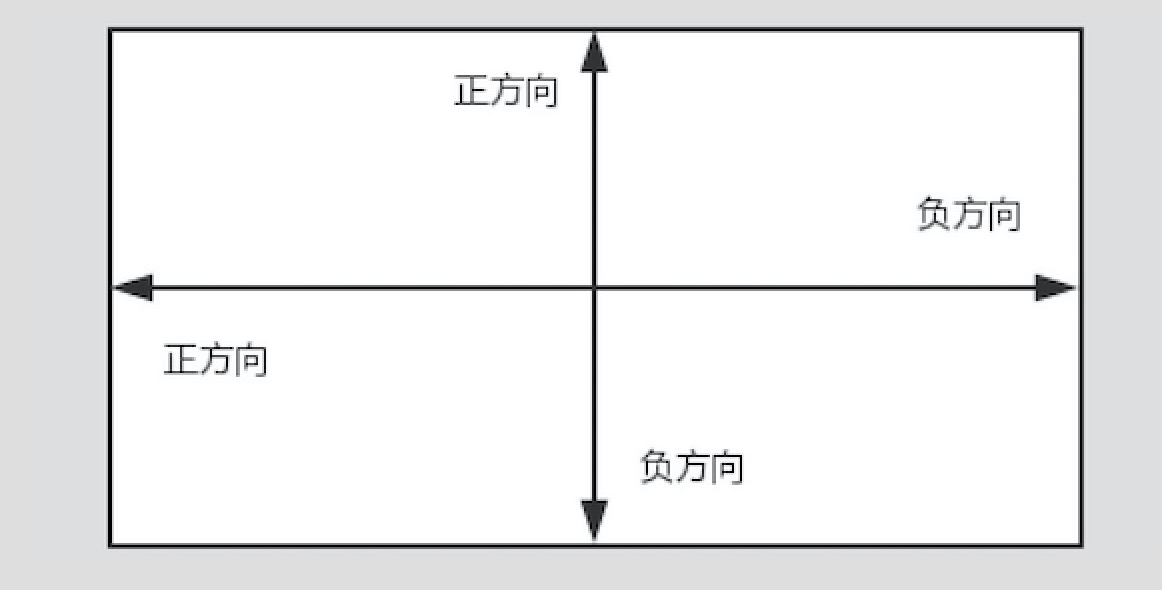
}scrollTo(x,y):将整个父视图的左上角定为(0,0),再移动这个屏幕的左上角到父视图的点(x,y)处,注意此处的x和y是根据父视图的坐标系来定的。所以对于x轴负值向右移动、正值向左移动;对于y轴负值向下移动、正值向上移动。
/**
 * Set the scrolled position of your view. This will cause a call to
 * {@link #onScrollChanged(int, int, int, int)} and the view will be
 * invalidated.
 * @param x the x position to scroll to
 * @param y the y position to scroll to
 */
public void scrollTo(int x, int y) {
    if (mScrollX != x || mScrollY != y) {
        int oldX = mScrollX;
        int oldY = mScrollY;
        mScrollX = x;
        mScrollY = y;
        invalidateParentCaches();
        onScrollChanged(mScrollX, mScrollY, oldX, oldY);
        if (!awakenScrollBars()) {
            postInvalidateOnAnimation();
        }
    }
}
scrollBy(x,y):x代表横向移动的距离,y代表纵向移动的距离
/**
 * Move the scrolled position of your view. This will cause a call to
 * {@link #onScrollChanged(int, int, int, int)} and the view will be
 * invalidated.
 * @param x the amount of pixels to scroll by horizontally
 * @param y the amount of pixels to scroll by vertically
 */
public void scrollBy(int x, int y) {
    scrollTo(mScrollX + x, mScrollY + y);
}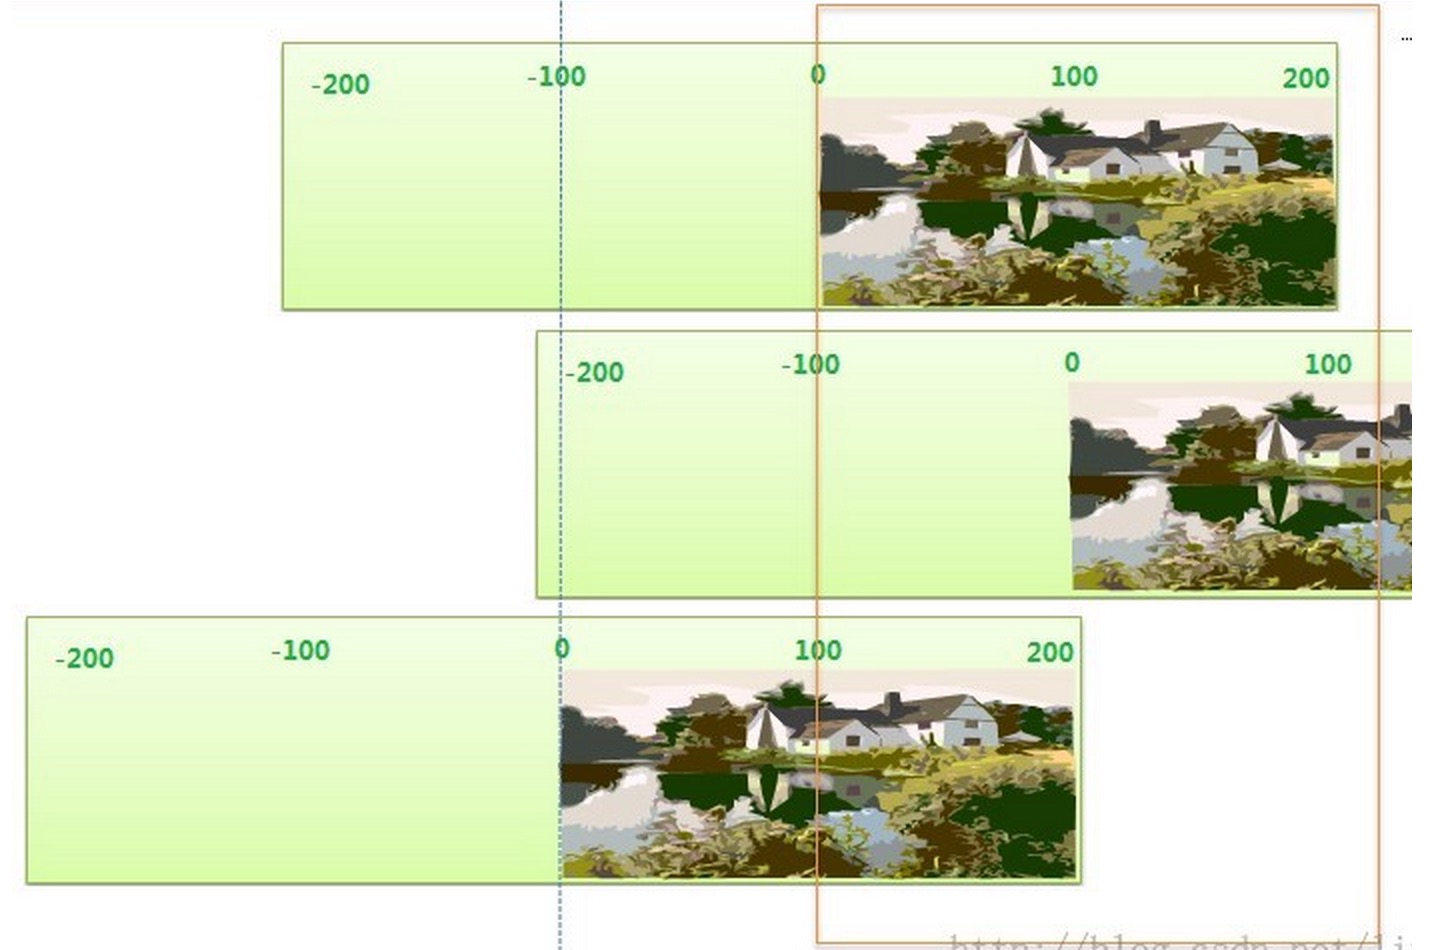
举个例子:图上面,褐色的框,其实就是我们眼睛看到的手机界面,就是一个窗口。而绿色的长方体就是一块可以左右拉动的幕布,其实也就是我们要显示在窗口上面的内容,它其实是可以很大,大到无限大,只是没在窗口中间的,所以我们就看不到。而getScrollX 其实获取的值,就是这块 幕布在窗口左边界时候的值了,而幕布上面哪个点是原点(0,0)呢?就是初始化时内容显示的位置。所以当我们将幕布往右推动的时候,幕布在窗口左边界的值就会在0的左边(-100),而向左推动,则其值会是在0的右边(100)。
Scroller类
getCurrX():获取Scroller当前水平滚动的位置
/**
 * Returns the current X offset in the scroll.
 *
 * @return The new X offset as an absolute distance from the origin.
 */
public final int getCurrX() {
    return mCurrX;
}
getCurrY():获取Scroller当前竖直滚动的位置
/**
 * Returns the current Y offset in the scroll.
 *
 * @return The new Y offset as an absolute distance from the origin.
 */
public final int getCurrY() {
    return mCurrY;
}
getFinalX():获取Scroller最终停止的水平位置
/**
 * Returns where the scroll will end. Valid only for "fling" scrolls.
 *
 * @return The final X offset as an absolute distance from the origin.
 */
public final int getFinalX() {
    return mFinalX;
}
getFinalY():获取Scroller最终停止的竖直位置
/**
 * Returns where the scroll will end. Valid only for "fling" scrolls.
 *
 * @return The final Y offset as an absolute distance from the origin.
 */
public final int getFinalY() {
    return mFinalY;
}
setFinalX(int newX):设置Scroller最终停留的水平位置,没有动画效果,直接跳到目标位置
setFinalY(int newY):设置mScroller最终停留的竖直位置,没有动画效果,直接跳到目标位置
startScroll(int startX, int startY, int dx, int dy):startX, startY为开始滚动的位置,dx,dy为滚动的偏移量, 使用默认完成时间250ms。
startScroll(int startX, int startY, int dx, int dy, int duration) :startX, startY为开始滚动的位置,dx,dy为滚动的偏移量, duration为完成滚动的时间。
computeScrollOffset():返回值为boolean,true说明滚动尚未完成,false说明滚动已经完成。这是一个很重要的方法,通常放在View.computeScroll()中,用来判断是否滚动是否结束。
官方demo大致如下:
public class CustomView extends LinearLayout {

    private static final String TAG = "Scroller";

    private Scroller mScroller;

    public CustomView(Context context, AttributeSet attrs) {
        super(context, attrs);
        mScroller = new Scroller(context);
    }

    //调用此方法滚动到目标位置
    public void smoothScrollTo(int fx, int fy) {
        int dx = fx - mScroller.getFinalX();
        int dy = fy - mScroller.getFinalY();
        smoothScrollBy(dx, dy);
    }

    //调用此方法设置滚动的相对偏移
    public void smoothScrollBy(int dx, int dy) {

        //设置mScroller的滚动偏移量
        mScroller.startScroll(mScroller.getFinalX(), mScroller.getFinalY(), dx, dy);
        invalidate();//这里必须调用invalidate()才能保证computeScroll()会被调用,否则不一定会刷新界面,看不到滚动效果
    }

    @Override
    public void computeScroll() {

        //先判断mScroller滚动是否完成
        if (mScroller.computeScrollOffset()) {

            //这里调用View的scrollTo()完成实际的滚动
            scrollTo(mScroller.getCurrX(), mScroller.getCurrY());

            //必须调用该方法,否则不一定能看到滚动效果
            postInvalidate();
        }
        super.computeScroll();
    }
}
VelocityTracker类
getXVelocity():指滑动速度包括速率和方向两个方面,往左滑动小于0,值为负;往右滑动大于0,值为正。
getYVelocity():指滑动速度包括速率和方向两个方面,往上滑动小于0,值为负;往下滑动大于0,值为正。
addMovement(MotionEvent):收集滑动数据用来计算速度。
computeCurrentVelocity(units):用来计算当前速度。
官方Demo大致如下:
public class MainActivity extends Activity {
    private static final String DEBUG_TAG = "Velocity";
        ...
    private VelocityTracker mVelocityTracker = null;
    @Override
    public boolean onTouchEvent(MotionEvent event) {
        int index = event.getActionIndex();
        int action = event.getActionMasked();
        int pointerId = event.getPointerId(index);

        switch(action) {
            case MotionEvent.ACTION_DOWN:
                if(mVelocityTracker == null) {
                    // Retrieve a new VelocityTracker object to watch the velocity of a motion.
                    mVelocityTracker = VelocityTracker.obtain();
                }
                else {
                    // Reset the velocity tracker back to its initial state.
                    mVelocityTracker.clear();
                }
                // Add a user's movement to the tracker.
                mVelocityTracker.addMovement(event);
                break;
            case MotionEvent.ACTION_MOVE:
                mVelocityTracker.addMovement(event);
                // When you want to determine the velocity, call
                // computeCurrentVelocity(). Then call getXVelocity()
                // and getYVelocity() to retrieve the velocity for each pointer ID.
                mVelocityTracker.computeCurrentVelocity(1000);
                // Log velocity of pixels per second
                // Best practice to use VelocityTrackerCompat where possible.
                Log.d("", "X velocity: " +
                        VelocityTrackerCompat.getXVelocity(mVelocityTracker,
                        pointerId));
                Log.d("", "Y velocity: " +
                        VelocityTrackerCompat.getYVelocity(mVelocityTracker,
                        pointerId));
                break;
            case MotionEvent.ACTION_UP:
            case MotionEvent.ACTION_CANCEL:
                // Return a VelocityTracker object back to be re-used by others.
                mVelocityTracker.recycle();
                break;
        }
        return true;
    }
}
MotionEvent类
getRawX():触摸点相对于屏幕原点的x坐标
getRawY():触摸点相对于屏幕原点的Y坐标
getX():触摸点相对于其所在视图原点的x坐标
getY():触摸点相对于其所在视图原点的Y坐标
MarginLayoutParams类
leftMargin:获取View的左边距,有可能是附近的其他子view,也有可能是相对父视图。
topMargin:获取View的上边距,有可能是附近的其他子view,也有可能是相对父视图。
rightMargin:获取View的右边距,有可能是附近的其他子view,也有可能是相对父视图。
bottomMargin:获取View的下边距,有可能是附近的其他子view,也有可能是相对父视图。


 1532
1532

 被折叠的 条评论
为什么被折叠?
被折叠的 条评论
为什么被折叠?
 到【灌水乐园】发言


