


文章目录
CUDA和CUDNN编程环境简介
CUDA™是一种由NVIDIA推出的通用 并行计算 ; 架构,该架构使 GPU,能够解决复杂的计算。
CUDNN是一个GPU 加速的深度神经网络基元库,能够以高度优化的方式实现标准例程(如前向和反向卷积、池化层、归一化和激活层)。 全球的深度学习研究人员和框架开发者都依赖cuDNN 来实现高性能GPU 加速。
环境准备
安装依赖
安装前提:zlib, openssl,glibc这些常用库先安装好,并选择合适的版本
One must install kernel-devel and gcc kernel on a CentOS 7:
$ sudo yum group install "Development Tools"
$ sudo yum install kernel-devel

$ sudo yum -y install epel-release
$ sudo yum -y install dkms
升级gcc
yum install centos-release-scl
yum install devtoolset-8 ## devtoolset-8对应gcc8.x.x版本

## 在当前shell激活gcc:
scl enable devtoolset-8 bash
或
source /opt/rh/devtoolset-8/enable
安装三部曲
先查看显卡型号:
lspci | grep -i --color ‘vga|3d|2d’
或者:sudo lshw -class display
如果是英伟达显卡,则 lspci | grep -i nvidia,再lspci -v -s <设备号>, 如下图:
查得显卡存储大小为32G。
- 驱动安装,输入nvidia-smi,如果没有该命令,就去下载NV的驱动。
- CUDA Toolkit, 我下载的是cuda-repo-rhel7-12-3-local-12.3.1_545.23.08-1.x86_64.rpm,安装完执行deviceQuery、bandwidthTest检查是否安装成功。切换到CUDA Sample目录,deviceQuery默认在/home/xxx/NVIDIA_CUDA-xxx/下,make一下就编译出来了。
- cudnn安装。我下载的是cudnn-local-repo-rhel7-8.9.6.50-1.0-1.x86_64.rpm,下载到/usr/local目录下,执行:tar -zxvf cudnn-8.0-linux-x64-v6.0.tgz,解开,配置环境变量即可。
加几个环境变量:
export CUDA_HOME=$CUDA_HOME:/usr/local/cuda
export PATH=$PATH:/usr/local/cuda/bin
export LD_LIBRARY_PATH=$LD_LIBRARY_PATH:/usr/local/cuda/lib64
Nvidia驱动安装
下载驱动,驱动有两种形式:一种是run包,一种是rpm包:
 一个1.3G,一个143M。
方式一:run包的安装
到官网驱动页面,选择自己显卡的驱动:
 The procedure to install proprietary Nvidia GPU Drivers on CentOS 7 Linux is as follows:
- Update your system running yum command or dnf command
- Blacklist nouveau driver
- Download the Nvidia driver for CentOS 7
- Install required software to install the proprietary Nvidia driver on CentOS
- Disable Nouveau driver in CentOS 7
- Switch to CentOS 7 to text mode
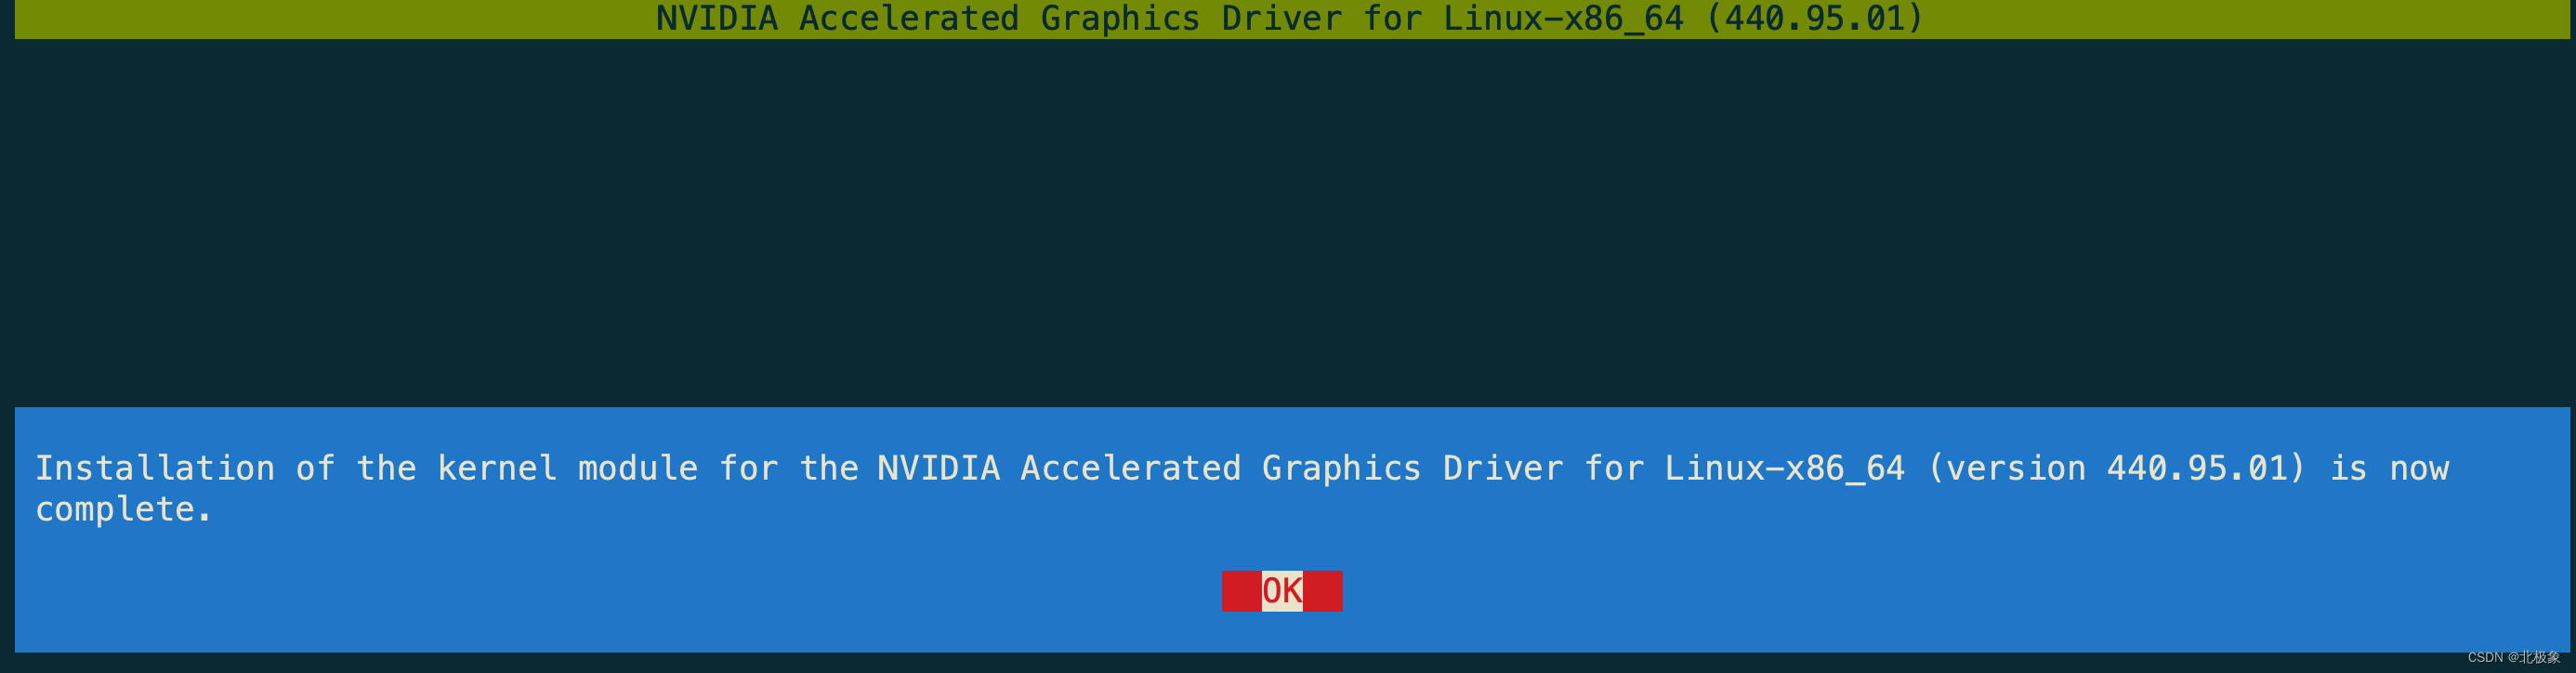
- Run the NVIDIA driver installer
- Reboot the CentOS 7 to use the NVIDIA driver
1 – Download the driver from NVIDIA. Driver’s filename looks like to NVIDIA-Linux-x86_64-290.10.run.

2 – To install the driver, the X-server must be stopped. All operations must be executed from the command line (virtual console). Fortunately, only few operations are required. To open the first virtual console, type [Ctrl]+[Alt]+[F1]. There are six virtual consoles and any console from F1 to F6 is ok. Once the console it opened, enter your login. Now you can stop the X-server with:

    sudo /etc/init.d/gdm stop

This command is better:

    sudo stop gdm

The following command can also help:

    sudo killall Xorg

3 – Now you can install the driver:

    sudo sh NVIDIA-Linux-x86_64-290.10.run
在CentOS上,还需要:
禁掉Nouveau驱动,Nouveau是由第三方为NVIDIA显卡开发的一个开源3D驱动。
$ cat /etc/modprobe.d/blacklist-nvidia-nouveau.conf
blacklist nouveau
options nouveau modeset=0
更新内核参数:dracut --force,然后reboot。
 GPU驱动安装完成后,Persistence-M默认为关闭(off)状态,GPU驱动在开启Persistence-M属性状态下性能更稳定。为了业务更稳定地进行,建议您通过NVIDIA Persistence Daemon方式开启Persistence-M属性。
执行以下命令,运行NVIDIA Persistence Daemon:
nvidia-persistenced --user username
方式二:驱动rpm包的安装
先装三个主要的依赖:gcc、kernel-devel、dkms,其中需要注意的是,kernel-devel的版本需要与当前内核的版本一致,不然后面会出现找不到文件的情况。
首先安装一下1.3G的rpm包,再刷新yum源,再安装driver:
nvidia-driver-local-repo-rhel7-535.129.03-1.0-1.x86_64.rpm

yum clean all
yum makecache
yum -y update

yum install nvidia-driver
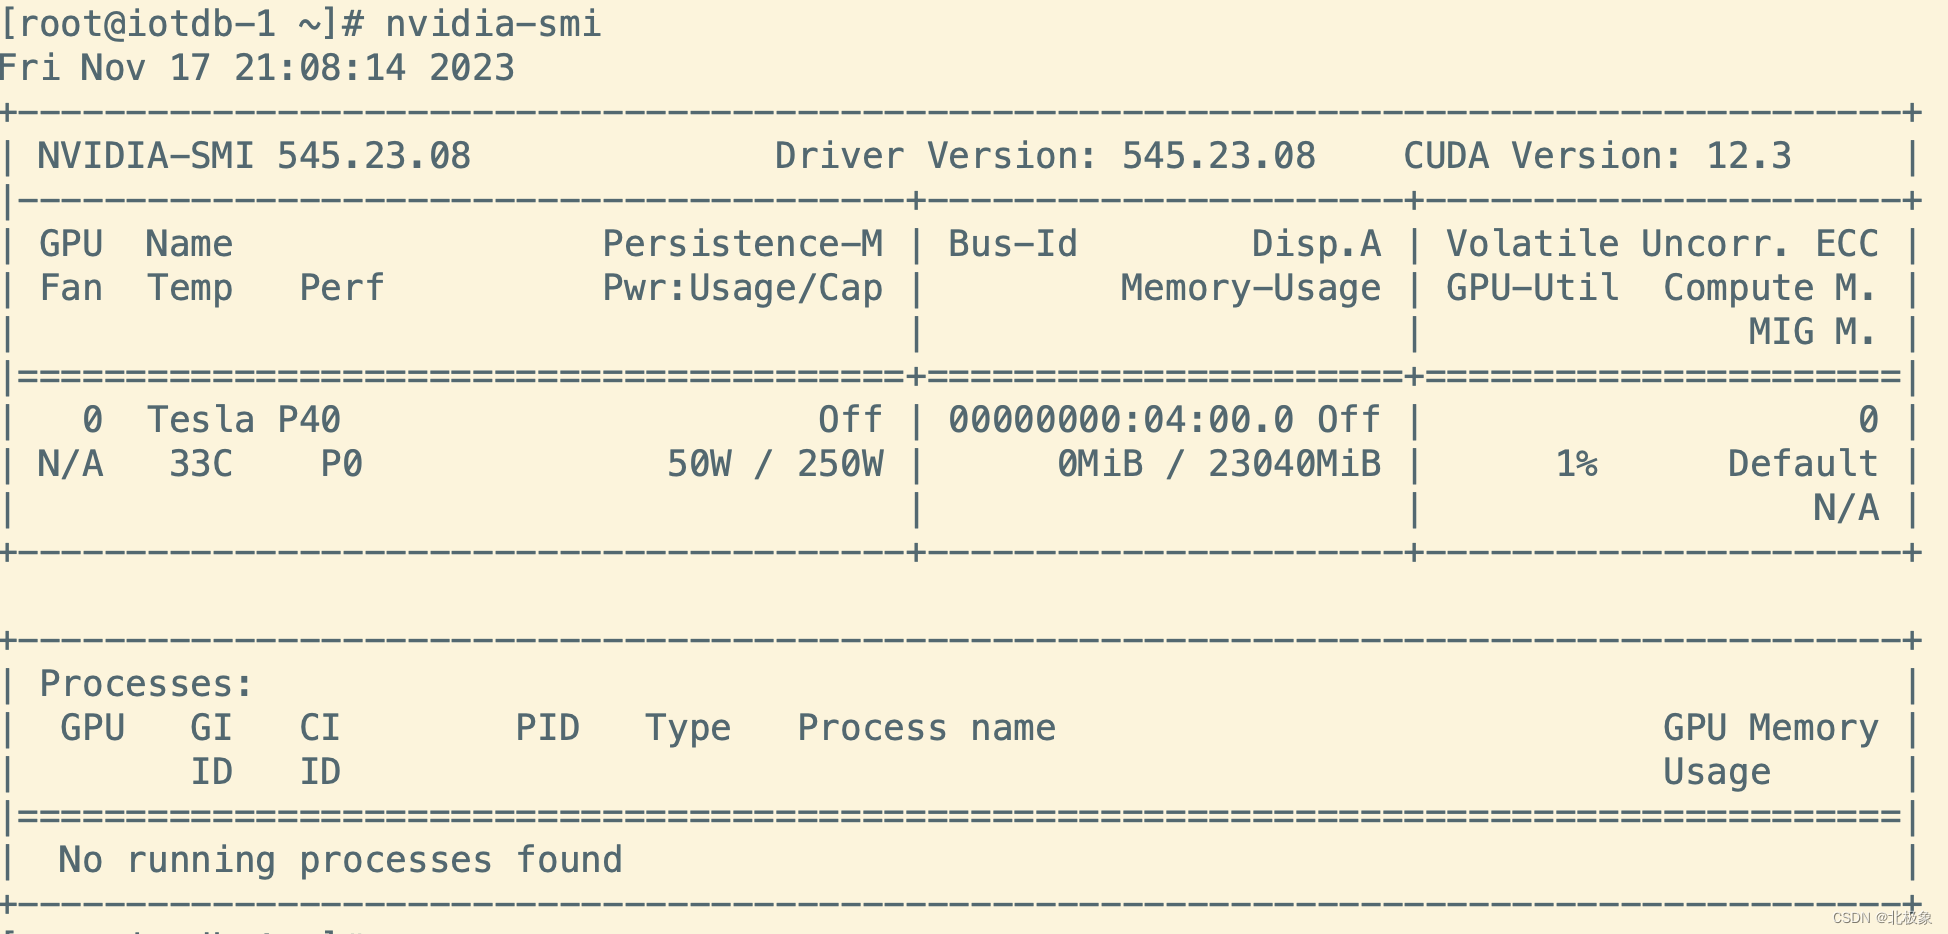
重启机器后,运行:
 有时需要升级内核:
## 检查内核版本:
uname -r
## 查看可安装的版本
yum list | grep kernel-devel
## 安装内核
yum install kernel-devel.x86_64
## 安装依赖
yum -y install gcc dkms
卸载NV驱动
./NVIDIA-Linux-x86_64-440.33.01.run --uninstall
或:sudo /usr/bin/nvidia-uninstall
各种环境安装简述
Mac Pro
我的Mac Pro是2015年中的,配备的是 Intel Iris Pro Graphics 集成GPU显卡,所以用不了CUDA。
很不幸,Pytorch团队不发布 Mac OS CUDA版。macOS 10.14 (Mojave) 及更高版本目前暂不支持CUDA。 因此,如需获得CUDA 支持,请勿升级至高于macOS 10.13.6 的版本。 从Premiere Pro 14.0 开始,不再支持CUDA。但是有热心人帮我们编译了pytorch-osx-build版本。
ThinkPad W530
我的ThinkPad W530配的是NVIDIA Quadro K1000M显卡,这是一款采用了台积电 28nm工艺的GPU,采用Nvidia Kepler架构,上市时间为2012年6月1日。具有 12.7亿个晶体管、192 个 CUDA 核心和 2GB DDR3 显存,具备 256KB 二级缓存,理论算力326.4GFLOPS,总功耗为45W。K1000M is a Kepler GPU. It supports CUDA.
下载安装CUDA:
wget https://developer.download.nvidia.com/compute/cuda/repos/ubuntu2004/x86_64/cuda-ubuntu2004.pin
sudo mv cuda-ubuntu2004.pin /etc/apt/preferences.d/cuda-repository-pin-600
wget https://developer.download.nvidia.com/compute/cuda/12.3.1/local_installers/cuda-repo-ubuntu2004-12-3-local_12.3.1-545.23.08-1_amd64.deb
sudo dpkg -i cuda-repo-ubuntu2004-12-3-local_12.3.1-545.23.08-1_amd64.deb
sudo cp /var/cuda-repo-ubuntu2004-12-3-local/cuda-*-keyring.gpg /usr/share/keyrings/
sudo apt-get update
sudo apt-get -y install cuda-toolkit-12-3
ThinkPad P15
NVIDIA Quadro RTX5000显卡:
Turing GPU
3,072 NVIDIA® CUDA® 核心
384 NVIDIA® Tensor核心
48 NVIDIA® RT 核心
16GB GDDR6 内存
高达 448GB/s 显存带宽
62T RTX-OPS
8 Giga Rays/s 光线投射
11.2 TFLOPS FP32 效能
22.3 TFLOPS FP16 效能
178.4TOPS INT8 效能
89.2 TFLOPS Tensor运算
最大功耗:265W
4x DisplayPort 1.4
1x VirtualLink
CentOS 7
于是借了台朋友的Linux服务器,安装有NV的显卡Tesla P40,显存32G,价格估计3万出头。理论算力11.76 TFLOPS(FP32)、367.4 GFLOPS。
[root@iotdb-1 ~]# lspci | grep NVIDIA
04:00.0 3D controller: NVIDIA Corporation GP102GL [Tesla P40] (rev a1)
[root@iotdb-1 ~]# lspci -v -s 04:00.0
04:00.0 3D controller: NVIDIA Corporation GP102GL [Tesla P40] (rev a1)
        Subsystem: NVIDIA Corporation Device 11d9
        Flags: bus master, fast devsel, latency 0, IRQ 96, NUMA node 0
        Memory at 91000000 (32-bit, non-prefetchable) [size=16M]
        Memory at 3b000000000 (64-bit, prefetchable) [size=32G]
        Memory at 3b800000000 (64-bit, prefetchable) [size=32M]
        Capabilities: [60] Power Management version 3
        Capabilities: [68] MSI: Enable+ Count=1/1 Maskable- 64bit+
        Capabilities: [78] Express Endpoint, MSI 00
        Capabilities: [100] Virtual Channel
        Capabilities: [250] Latency Tolerance Reporting
        Capabilities: [128] Power Budgeting <?>
        Capabilities: [420] Advanced Error Reporting
        Capabilities: [600] Vendor Specific Information: ID=0001 Rev=1 Len=024 <?>
        Capabilities: [900] #19
        Kernel driver in use: nouveau
        Kernel modules: nouveau
下载安装CUDA:
wget https://developer.download.nvidia.com/compute/cuda/12.3.1/local_installers/cuda-repo-rhel7-12-3-local-12.3.1_545.23.08-1.x86_64.rpm
sudo rpm -i cuda-repo-rhel7-12-3-local-12.3.1_545.23.08-1.x86_64.rpm
sudo yum clean all
sudo yum -y install cuda-toolkit-12-3
使用阿里镜像源:
先下载cuda-rhel7.repo文件,然后修改:
sed -e ‘s,developer.download.nvidia.cn/compute/cuda/repos/,mirrors.aliyun.com/nvidia-cuda,g’ \
-e ‘s,developer.download.nvidia.com/compute/cuda/repos,mirrors.aliyun.com/nvidia-cuda,g’ \
-i /etc/yum.repos.d/cuda-rhel7.repo
然后安装:
yum makecache
yum install cuda-12-3
PyTorch安装
安装
直接在CentOS 7上安装,报找不到:
 发现我用的是python 3.12,果断降到3.10。
pip install torch1.12.1+cu102 torchvision0.13.1+cu102 torchaudio==0.12.1 --extra-index-url https://download.pytorch.org/whl/cu102
再Macbook Pro上安装:
pip3 install torch torchvision torchaudio
在Apple M1 芯片上安装:
pip3 install --pre torch torchvision torchaudio --extra-index-url https://download.pytorch.org/whl/nightly/cpu
验证
>>> import torch
>>> print(torch.__version__)
2.1.1+cu121
>>> print(torch.cuda.is_available())
True
>>> x = torch.rand(5, 3)
>>> print(x)
tensor([[0.5475, 0.8505, 0.5119],
        [0.7170, 0.0864, 0.8615],
        [0.2313, 0.8355, 0.9407],
        [0.8058, 0.2958, 0.4819],
        [0.6380, 0.3769, 0.6650]])
>>>
附录
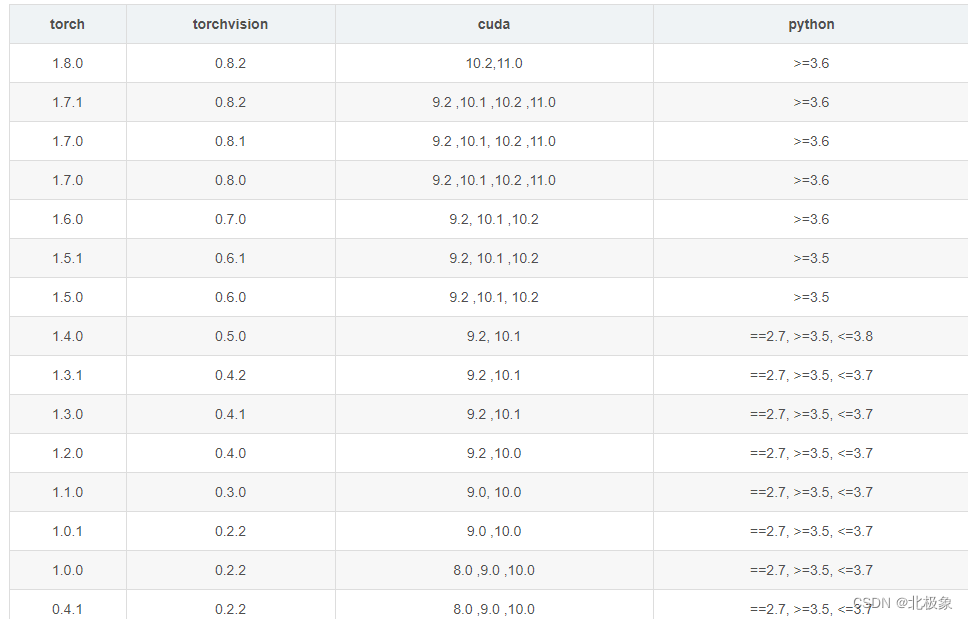
Pytorch 各个GPU版本CUDA和cuDNN对应版本
torch、torchvision、cuda 、python对应版本匹配,参照官网https://pytorch.org/get-started/previous-versions/
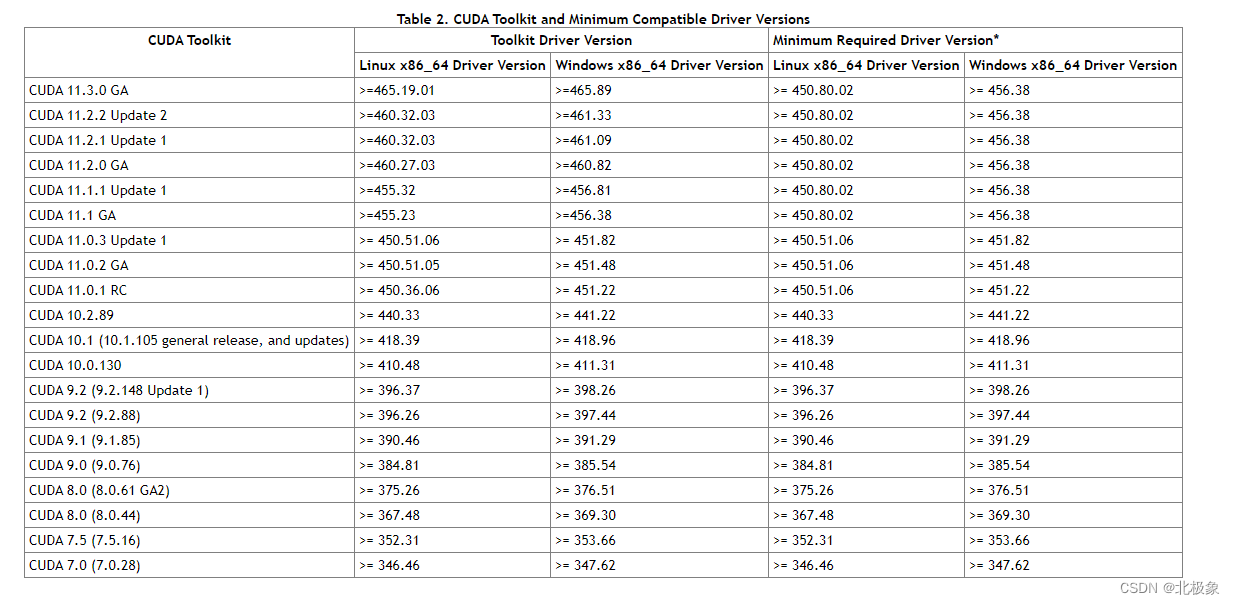
 CUDA与显卡驱动:https://docs.nvidia.com/cuda/cuda-toolkit-release-notes/index.html
参考链接
GPU相关
- nvidia显卡驱动
- cuda-toolkit下载
- cudnn下载
- CUDA 版本与 NVIDIA 驱动兼容性
- 阿里云GPU计算型ECS实例安装NVIDIA驱动和CUDA
- 在GPU计算型实例中安装GPU驱动
- 显卡算力查看
- cudnn for mac
- pytorch on MacOS
- tsinghua镜像
- 关于基于 Intel 的 Mac 电脑上的集成显卡
- NVIDIA驱动安装 - 从问题到解决(Linux/Ubuntu)
- nvidia docker


 1244
1244

 被折叠的 条评论
为什么被折叠?
被折叠的 条评论
为什么被折叠?
 到【灌水乐园】发言


