


开发核心系列——Handler由浅入深解析
作用
在 Android 开发中,Handler 是一个用于处理和调度线程之间通信的类。它的主要作用是允许你在一个线程中安排和执行任务(或代码块),以及在另一个线程中执行这些任务。Handler 主要用于实现线程之间的通信和定时任务调度。具体作用包括以下几部分:
主线程与后台线程的通信
在 Android 应用中,主线程(也称为 UI 线程)用于更新用户界面。然而,有些操作可能会阻塞主线程,导致应用的响应性降低。通过在后台线程执行耗时操作,然后使用 Handler 将结果传递回主线程,可以保持界面的流畅性。
异步任务处理
有时候你需要在后台线程执行一些耗时的操作,比如从网络下载数据。Handler 可以让你在后台线程中执行这些操作,然后将结果传递给主线程更新界面。
定时任务调度
Handler 可以与 Runnable 对象一起使用,用来安排延迟执行或周期性执行的任务。这可以用来实现一些周期性的操作,比如定时更新数据或执行后台操作。
线程安全性
Handler 可以帮助你在多线程环境中实现线程安全。通过将任务提交给特定的 Handler,你可以确保这些任务在合适的线程上执行,避免了多线程同时访问数据导致的竞态条件问题。
初次使用
以下是一个基本的示例,演示了如何使用 Handler 在后台线程中模拟下载任务,并在主线程中更新进度:
import android.os.Bundle;
import android.os.Handler;
import android.os.Looper;
import android.os.Message;
import android.support.v7.app.AppCompatActivity;
import android.widget.ProgressBar;
import android.widget.TextView;

public class MainActivity extends AppCompatActivity {

    private ProgressBar progressBar;
    private TextView statusTextView;
    private Handler mainHandler;

    @Override
    protected void onCreate(Bundle savedInstanceState) {
        super.onCreate(savedInstanceState);
        setContentView(R.layout.activity_main);

        progressBar = findViewById(R.id.progressBar);
        statusTextView = findViewById(R.id.statusTextView);

        mainHandler = new Handler(Looper.getMainLooper()) {
            @Override
            public void handleMessage(Message msg) {
                super.handleMessage(msg);
                // Update UI based on message received from background thread
                int progress = msg.arg1;
                progressBar.setProgress(progress);
                statusTextView.setText("Download Progress: " + progress + "%");
            }
        };

        startBackgroundThread();
    }

    private void startBackgroundThread() {
        Thread backgroundThread = new Thread(new Runnable() {
            @Override
            public void run() {
                // Simulate a download task
                for (int i = 0; i <= 100; i++) {
                    // Create a message to update UI with progress
                    Message message = mainHandler.obtainMessage();
                    message.arg1 = i;

                    // Send the message to update UI
                    mainHandler.sendMessage(message);

                    try {
                        Thread.sleep(100); // Simulate a delay
                    } catch (InterruptedException e) {
                        e.printStackTrace();
                    }
                }
            }
        });

        backgroundThread.start();
    }
}
在这个示例中,我们创建了一个界面,包含一个进度条和一个文本视图,用于显示下载进度。在 onCreate() 方法中,我们创建了一个主线程的 Handler,用于在后台线程中发送消息,更新主线程的 UI。startBackgroundThread() 方法创建一个后台线程,模拟下载任务并通过 mainHandler 发送消息来更新下载进度。handleMessage() 方法在主线程中被调用,根据收到的消息更新界面。
优势和劣势
优势
- 线程间通信:
Handler允许你在不同的线程之间发送消息和数据。这是在多线程应用中实现线程间通信的一种有效方式,特别是在主线程与后台线程之间。 - 界面更新: 在 Android 中,UI 操作必须在主线程(UI 线程)中执行。使用
Handler可以将后台线程中的计算或网络请求结果传递给主线程,以便更新用户界面。 - 定时任务:
Handler可以与Runnable一起使用,实现定时任务的调度。这对于需要周期性执行某些操作的情况非常有用,如轮询更新数据。 - 可控性和灵活性: 通过控制消息的发送时间、优先级等,你可以更好地管理任务的执行。
Handler提供了很大的灵活性,可以根据需要进行定制。 - 避免竞态条件: 使用
Handler可以帮助你避免多线程环境下的竞态条件问题,因为它们会确保任务在正确的线程上执行。
劣势
- 复杂性:
Handler在处理异步任务和线程间通信时需要一些额外的代码和管理。这可能会增加一些复杂性,特别是对于初学者来说。 - 内存泄漏: 不正确地使用
Handler可能会导致内存泄漏,特别是在你的Handler持有外部对象的引用时,可能会导致这些对象无法被垃圾回收。 - 错误处理困难: 由于
Handler在不同的线程中操作,因此可能难以处理出现的错误。错误堆栈可能会难以追踪。 - 并发问题: 在某些情况下,
Handler可能无法满足需要处理的高并发情况。在这种情况下,你可能需要考虑使用其他并发工具。
总体来说,Handler 是一个强大的工具,用于处理线程间通信和任务调度。它在 Android 应用中非常有用,但在使用时需要注意正确的用法,以避免潜在的问题。随着 Android 框架的发展,也出现了其他的并发和异步处理解决方案,开发者可以根据具体情况选择最适合的工具。
深度剖析
想要深入了解Handler的机制,首先我们需要了解设计Handler的思想以及关于Handler的设计所需的类以及其作用:
handler线程间通信设计思想
Handler 实现线程间通信的设计思想基于消息传递机制,它通过创建消息队列和消息循环,允许不同线程之间通过消息交换数据和信息。主要分为以下几个部分:
- 消息队列的创建: 每个
Handler实例都有一个关联的消息队列(MessageQueue),用于存储待处理的消息。这些消息是通过sendMessage()等方法发送到消息队列中。 - 消息循环的启动: 每个线程都有一个消息循环(
Looper),它会不断从消息队列中取出消息,并将其分发给相应的Handler进行处理。通过调用Looper.prepare()和Looper.loop()方法,可以创建和启动消息循环。 - 消息的创建和发送: 你可以通过创建
Message对象,将要传递的数据和信息封装到消息中。然后,通过sendMessage()、sendMessageDelayed()等方法将消息发送到消息队列中。 - 消息的处理: 在消息循环中,当一个消息被取出时,系统会将其传递给相应的
Handler实例的handleMessage()方法进行处理。这是你自定义的代码块,用于根据消息内容执行特定操作,如更新 UI、处理数据等。 - 线程同步:
Handler内部会自动同步线程,确保消息在正确的线程上执行。例如,如果你在后台线程中创建一个Handler,它会自动将消息发送到主线程的消息循环中执行,从而避免了线程安全问题。 - 消息的分发: 消息循环会不断从消息队列中取出消息,并将消息分发给相应的
Handler进行处理。这意味着你可以在不同线程中创建多个Handler,实现不同线程间的通信。
总之,Handler 通过封装消息队列、消息循环以及消息的发送和处理,实现了线程间通信的机制。
了解Handler设计所涉及的API
- MessageQueue:对消息的管理,构建一个消息队列用来保存发送的消息,且每个Looper构建了唯一的MessageQueue,Looper就可以从该消息队列获取到消息然后分发到handler。
- Looper:作者认为更多是用来管理MessageQueue的类,并且保证了handler所在绑定唯一的Looper,这样同一个线程中的handler只会从同一个Looper获取到消息分发,对于消息的获取能够更加安全。
- Message:消息块,用于传递实际消息的包装对象。例如日常生活中快递的包装盒。
- Handler:作者认为handler就是一个接口,一个可以作为线程间通信的接口,底层的工作是靠Looper和Message来完成的。
源码分析
Handler创建过程
-
handler的属性和创建:
  @UnsupportedAppUsage
  final Looper mLooper;
  final MessageQueue mQueue;
  @UnsupportedAppUsage
  final Callback mCallback;
  final boolean mAsynchronous;
  @UnsupportedAppUsage
  IMessenger mMessenger;

  public Handler(@Nullable Callback callback, boolean async) {
          if (FIND_POTENTIAL_LEAKS) {
              final Class<? extends Handler> klass = getClass();
              if ((klass.isAnonymousClass() || klass.isMemberClass() || klass.isLocalClass()) &&
                      (klass.getModifiers() & Modifier.STATIC) == 0) {
                  Log.w(TAG, "The following Handler class should be static or leaks might occur: " +
                      klass.getCanonicalName());
              }
          }

          mLooper = Looper.myLooper();   //方法获取查看一下对Looper分析,作用是获取到当前线程绑定的唯一Looper
          if (mLooper == null) {
              throw new RuntimeException(
                  "Can't create handler inside thread " + Thread.currentThread()
                          + " that has not called Looper.prepare()");
          }
          mQueue = mLooper.mQueue;
          mCallback = callback;
          mAsynchronous = async;
  }
主要内容可以得知每个handler的创建会绑定当前线程的Looper且绑定当前Looper的MessagerQueue。如果没有Looper可绑定则会报错。所以每次创建Handler之前都必须要先创建Looper。
-
此时可能有人会提问了为什么主线程没有创建Looper就可以创建Handler,那我们通过程序的入口ActivityThread的main方法就可以知道答案了,在该方法中我们会看到掉用了Looper的prepareMainLooper()方法,创建且存储在了Looper中主线程的唯一Looper,以下贴入源码:
public final class ActivityThread extends ClientTransactionHandler
        implements ActivityThreadInternal {
  public static void main(String[] args) {
    ...
    Looper.prepareMainLooper();
    ...
    Looper.loop();
    ...
  }
}

public final class Looper {
    @UnsupportedAppUsage
    private static Looper sMainLooper;  // guarded by Looper.class
      /**
     * Initialize the current thread as a looper, marking it as an
     * application's main looper. See also: {@link #prepare()}
     *
     * @deprecated The main looper for your application is created by the Android environment,
     *   so you should never need to call this function yourself.
     */
    @Deprecated
    public static void prepareMainLooper() {
        prepare(false);
        synchronized (Looper.class) {
            if (sMainLooper != null) {
                throw new IllegalStateException("The main Looper has already been prepared.");
            }
            sMainLooper = myLooper();
        }
    }
}
-
-
此时我们再看看Looper的属性和创建
/**
  * Class used to run a message loop for a thread.  Threads by default do
  * not have a message loop associated with them; to create one, call
  * {@link #prepare} in the thread that is to run the loop, and then
  * {@link #loop} to have it process messages until the loop is stopped.
  *
  * <p>Most interaction with a message loop is through the
  * {@link Handler} class.
  *
  * <p>This is a typical example of the implementation of a Looper thread,
  * using the separation of {@link #prepare} and {@link #loop} to create an
  * initial Handler to communicate with the Looper.
  *
  * <pre>
  *  class LooperThread extends Thread {
  *      public Handler mHandler;
  *
  *      public void run() {
  *          Looper.prepare();
  *
  *          mHandler = new Handler(Looper.myLooper()) {
  *              public void handleMessage(Message msg) {
  *                  // process incoming messages here
  *              }
  *          };
  *
  *          Looper.loop();
  *      }
  *  }</pre>
  */
public final class Looper {
		@UnsupportedAppUsage
    static final ThreadLocal<Looper> sThreadLocal = new ThreadLocal<Looper>();
    @UnsupportedAppUsage
    private static Looper sMainLooper;  // guarded by Looper.class
    @UnsupportedAppUsage
    final MessageQueue mQueue;
    final Thread mThread;

      /** Initialize the current thread as a looper.
      * This gives you a chance to create handlers that then reference
      * this looper, before actually starting the loop. Be sure to call
      * {@link #loop()} after calling this method, and end it by calling
      * {@link #quit()}.
      */
    public static void prepare() {
        prepare(true);
    }

    private static void prepare(boolean quitAllowed) {
        if (sThreadLocal.get() != null) {
            throw new RuntimeException("Only one Looper may be created per thread");
        }
        sThreadLocal.set(new Looper(quitAllowed));
    }

  	private Looper(boolean quitAllowed) {
        mQueue = new MessageQueue(quitAllowed);
        mThread = Thread.currentThread();
    }
  	    /**
     * Return the Looper object associated with the current thread.  Returns
     * null if the calling thread is not associated with a Looper.
     */
    public static @Nullable Looper myLooper() {
        return sThreadLocal.get();
    }
}
以上部分Looper代码可了解,每个线程拥有独一的Looper,若当前线程已有Looper再次创建Looper则会报错,用了ThreadLocal来存储。且每个Looper拥有独一的MessageQueue,这就构成了基本的数据链。而Looper负责管理这条MessageQueue数据链。
-
此时再来看看MessageQueue的源码
MessageQueue属性:
    // True if the message queue can be quit.
    //用于标示消息队列是否可以被关闭,主线程的消息队列不可关闭
    private final boolean mQuitAllowed;

    @SuppressWarnings("unused")
    // 该变量用于保存native代码中的MessageQueue的指针
    private long mPtr; // used by native code

    //在MessageQueue中,所有的Message是以链表的形式组织在一起的,该变量保存了链表的第一个元素,也可以说它就是链表的本身
    Message mMessages;

    //当Handler线程处于空闲状态的时候(MessageQueue没有其他Message时),可以利用它来处理一些事物,该变量就是用于保存这些空闲时候要处理的事务
    private final ArrayList<IdleHandler> mIdleHandlers = new ArrayList<IdleHandler>();

    // 注册FileDescriptor以及感兴趣的Events,例如文件输入、输出和错误,设置回调函数,最后
    // 调用nativeSetFileDescriptorEvent注册到C++层中,
    // 当产生相应事件时,由C++层调用Java的DispathEvents,激活相应的回调函数
    private SparseArray<FileDescriptorRecord> mFileDescriptorRecords;

     // 用于保存将要被执行的IdleHandler
    private IdleHandler[] mPendingIdleHandlers;

    //标示MessageQueue是否正在关闭。
    private boolean mQuitting;

    // Indicates whether next() is blocked waiting in pollOnce() with a non-zero timeout.
    // 标示 MessageQueue是否阻塞
    private boolean mBlocked;

    // The next barrier token.
    // Barriers are indicated by messages with a null target whose arg1 field carries the token.
    // 在MessageQueue里面有一个概念叫做同步屏障,它用于拦截同步的Message,阻止这些消息被执行,
    // 只有异步Message才会放行。同步屏障本身也是一个Message,只是它的target为null并且arg1用于区分不同的同步屏障,
     // 所以该变量就是用于不断累加生成不同的同步屏障。
    private int mNextBarrierToken;
MessageQueuee构造函数:
    MessageQueue(boolean quitAllowed) {
        mQuitAllowed = quitAllowed;
        mPtr = nativeInit();
    }
构造函数分别是设置了MessageQueue是否可以退出和native层代码的相关初始化
Message发送过程
-
message的属性:
		/**
     * User-defined message code so that the recipient can identify
     * what this message is about. Each {@link Handler} has its own name-space
     * for message codes, so you do not need to worry about yours conflicting
     * with other handlers.
     * 用户定义的Message的标识符用以分辨消息的内容。Hander拥有自己的消息代码的命名空间,因此你不用担心与其他的Handler冲突。
     */
    public int what;

    /**
     * arg1 and arg2 are lower-cost alternatives to using
     * {@link #setData(Bundle) setData()} if you only need to store a
     * few integer values.
     * 大概意思是如果你仅仅是保存几个整形的数值,相对于使用setData()方法,使用arg1和arg2是较低成本的替代方案。
     */
    public int arg1;
    public int arg2;

    /**
     * An arbitrary object to send to the recipient.  When using
     * {@link Messenger} to send the message across processes this can only
     * be non-null if it contains a Parcelable of a framework class (not one
     * implemented by the application).   For other data transfer use
     * {@link #setData}.
     *
     * <p>Note that Parcelable objects here are not supported prior to
     * the {@link android.os.Build.VERSION_CODES#FROYO} release.
     * 将一个独立的对象发送给接收者。当使用Messenger去送法消息,并且这个对象包含Parcelable类的时候,它必须是非空的。对于其他			*	数据的传输,建议使用setData()方法
     *
		 * 请注意,在Android系统版本FROYO(2.2)之前不支持Parcelable对象。
     */
    public Object obj;

    /**
     * Optional Messenger where replies to this message can be sent.  The
     * semantics of exactly how this is used are up to the sender and
     * receiver.
     * 回复跨进程的Messenger
     */
    public Messenger replyTo;

    /**
     * Indicates that the uid is not set;
     *
     * @hide Only for use within the system server.
     */
    public static final int UID_NONE = -1;

    /**
     * Optional field indicating the uid that sent the message.  This is
     * only valid for messages posted by a {@link Messenger}; otherwise,
     * it will be -1.
     * Messager发送这的Uid
     */
    public int sendingUid = UID_NONE;

    /**
     * Optional field indicating the uid that caused this message to be enqueued.
     *
     * @hide Only for use within the system server.
     */
    public int workSourceUid = UID_NONE;

    /** If set message is in use.
     * This flag is set when the message is enqueued and remains set while it
     * is delivered and afterwards when it is recycled.  The flag is only cleared
     * when a new message is created or obtained since that is the only time that
     * applications are allowed to modify the contents of the message.
     *
     * It is an error to attempt to enqueue or recycle a message that is already in use.
     * 正在使用的标志值 表示当前Message 正处于使用状态,当Message处于消息队列中、处于消息池中或者Handler正在处理Message的			 * 时候,它就处于使用状态。
     */
    /*package*/ static final int FLAG_IN_USE = 1 << 0;

    /** If set message is asynchronous(异步标志值 表示当前Message是异步的。) */
    /*package*/ static final int FLAG_ASYNCHRONOUS = 1 << 1;

    /** Flags to clear in the copyFrom method(消息标志值 在调用copyFrom()方法时,该常量将会被设置,其值其实和FLAG_IN_USE一样) */
    /*package*/ static final int FLAGS_TO_CLEAR_ON_COPY_FROM = FLAG_IN_USE;

		//消息标志,上面三个常量 FLAG 用在这里
    @UnsupportedAppUsage
    /*package*/ int flags;

    /**
     * The targeted delivery time of this message. The time-base is
     * {@link SystemClock#uptimeMillis}.
     * @hide Only for use within the tests.
     * 用于存储发送消息的时间点,以毫秒为单位
     */
    @UnsupportedAppUsage
    @VisibleForTesting(visibility = VisibleForTesting.Visibility.PACKAGE)
    public long when;

		//用于存储比较复杂的数据
    /*package*/ Bundle data;

		//用于存储发送当前Message的Handler对象,Handler其实和Message相互持有引用的
    @UnsupportedAppUsage
    /*package*/ Handler target;

		/*用于存储将会执行的Runnable对象,前面提到过除了handlerMessage(Message msg)方法,你也可以使用Runnable执行操作,要注意的是这种方法并不会创建新的线程。*/
    @UnsupportedAppUsage
    /*package*/ Runnable callback;

    // sometimes we store linked lists of these things(指向下一个Message,也就是线程池其实是一个链表结构)
    @UnsupportedAppUsage
    /*package*/ Message next;


    /** @hide */
		//该静态变量仅仅是为了给同步块提供一个锁而已
    public static final Object sPoolSync = new Object();
		//该静态的Message是整个线程池链表的头部,通过它才能够逐个取出对象池的Message
    private static Message sPool;
		//该静态变量用于记录对象池中的Message的数量,也就是链表的长度
    private static int sPoolSize = 0;
		//设置了对象池中的Message的最大数量,也就是链表的最大长度
    private static final int MAX_POOL_SIZE = 50;
		//该版本系统是否支持回收标志位
    private static boolean gCheckRecycle = true;
message的创建:
message的创建有两种方式,一种是直接new一个新的message,一种是调用message的obtain方法或者Handler.obtainMessage()从一个可回收的对象池中获取Message对象。
    /** Constructor (but the preferred way to get a Message is to call {@link #obtain() Message.obtain()}).
    */
    public Message() {
    }

		/**
     * Return a new Message instance from the global pool. Allows us to
     * avoid allocating new objects in many cases.
     */
    public static Message obtain() {
        synchronized (sPoolSync) {
            if (sPool != null) {
                Message m = sPool;
                sPool = m.next;
                m.next = null;
                m.flags = 0; // clear in-use flag
                sPoolSize--;
                return m;
            }
        }
        return new Message();
    }

    /**
     * Same as {@link #obtain()}, but copies the values of an existing
     * message (including its target) into the new one.
     * @param orig Original message to copy.
     * @return A Message object from the global pool.
     */
    public static Message obtain(Message orig) {
        Message m = obtain();
        m.what = orig.what;
        m.arg1 = orig.arg1;
        m.arg2 = orig.arg2;
        m.obj = orig.obj;
        m.replyTo = orig.replyTo;
        m.sendingUid = orig.sendingUid;
        m.workSourceUid = orig.workSourceUid;
        if (orig.data != null) {
            m.data = new Bundle(orig.data);
        }
        m.target = orig.target;
        m.callback = orig.callback;

        return m;
    }

    /**
     * Same as {@link #obtain()}, but sets the value for the <em>target</em> member on the Message returned.
     * @param h  Handler to assign to the returned Message object's <em>target</em> member.
     * @return A Message object from the global pool.
     */
    public static Message obtain(Handler h) {
        Message m = obtain();
        m.target = h;

        return m;
    }

    /**
     * Same as {@link #obtain(Handler)}, but assigns a callback Runnable on
     * the Message that is returned.
     * @param h  Handler to assign to the returned Message object's <em>target</em> member.
     * @param callback Runnable that will execute when the message is handled.
     * @return A Message object from the global pool.
     */
    public static Message obtain(Handler h, Runnable callback) {
        Message m = obtain();
        m.target = h;
        m.callback = callback;

        return m;
    }

    /**
     * Same as {@link #obtain()}, but sets the values for both <em>target</em> and
     * <em>what</em> members on the Message.
     * @param h  Value to assign to the <em>target</em> member.
     * @param what  Value to assign to the <em>what</em> member.
     * @return A Message object from the global pool.
     */
    public static Message obtain(Handler h, int what) {
        Message m = obtain();
        m.target = h;
        m.what = what;

        return m;
    }

    /**
     * Same as {@link #obtain()}, but sets the values of the <em>target</em>, <em>what</em>, and <em>obj</em>
     * members.
     * @param h  The <em>target</em> value to set.
     * @param what  The <em>what</em> value to set.
     * @param obj  The <em>object</em> method to set.
     * @return  A Message object from the global pool.
     */
    public static Message obtain(Handler h, int what, Object obj) {
        Message m = obtain();
        m.target = h;
        m.what = what;
        m.obj = obj;

        return m;
    }

    /**
     * Same as {@link #obtain()}, but sets the values of the <em>target</em>, <em>what</em>,
     * <em>arg1</em>, and <em>arg2</em> members.
     *
     * @param h  The <em>target</em> value to set.
     * @param what  The <em>what</em> value to set.
     * @param arg1  The <em>arg1</em> value to set.
     * @param arg2  The <em>arg2</em> value to set.
     * @return  A Message object from the global pool.
     */
    public static Message obtain(Handler h, int what, int arg1, int arg2) {
        Message m = obtain();
        m.target = h;
        m.what = what;
        m.arg1 = arg1;
        m.arg2 = arg2;

        return m;
    }

    /**
     * Same as {@link #obtain()}, but sets the values of the <em>target</em>, <em>what</em>,
     * <em>arg1</em>, <em>arg2</em>, and <em>obj</em> members.
     *
     * @param h  The <em>target</em> value to set.
     * @param what  The <em>what</em> value to set.
     * @param arg1  The <em>arg1</em> value to set.
     * @param arg2  The <em>arg2</em> value to set.
     * @param obj  The <em>obj</em> value to set.
     * @return  A Message object from the global pool.
     */
    public static Message obtain(Handler h, int what,
            int arg1, int arg2, Object obj) {
        Message m = obtain();
        m.target = h;
        m.what = what;
        m.arg1 = arg1;
        m.arg2 = arg2;
        m.obj = obj;

        return m;
    }
Android官方团队是推荐使用Message.obtain()方法来获取Message对象的,那我们就来看下Message.obtain()是如何获取Message对象的。我们看obtain()无参调用所设计的结构,其余的类似:
   private static Message sPool;
	 private static final int MAX_POOL_SIZE = 50;

   // sometimes we store linked lists of these things(指向下一个Message,也就是线程池其实是一个链表结构)
   @UnsupportedAppUsage
   /*package*/ Message next;

		/**
     * Return a new Message instance from the global pool. Allows us to
     * avoid allocating new objects in many cases.
     */
    public static Message obtain() {
       // 保证线程安全
        synchronized (sPoolSync) {
            if (sPool != null) {
                Message m = sPool;
                sPool = m.next;
                m.next = null;
                 // flags为移除使用标志
                m.flags = 0; // clear in-use flag
                sPoolSize--;
                return m;
            }
        }
        return new Message();
    }

		/**
     * Recycles a Message that may be in-use.
     * Used internally by the MessageQueue and Looper when disposing of queued Messages.
     */
    void recycleUnchecked() {
        // Mark the message as in use while it remains in the recycled object pool.
        // Clear out all other details.
        // 添加正在使用标志位,其他情况就除掉
        flags = FLAG_IN_USE;
        what = 0;
        arg1 = 0;
        arg2 = 0;
        obj = null;
        replyTo = null;
        sendingUid = -1;
        when = 0;
        target = null;
        callback = null;
        data = null;
        //拿到同步锁,以避免线程不安全
        synchronized (sPoolSync) {
            if (sPoolSize < MAX_POOL_SIZE) {
                next = sPool;
                sPool = this;
                sPoolSize++;
            }
        }
    }
通过obtain()源码,可以得到message是通过一个全局的sPool获取的。通过英文单词pool可以猜测这是一个对象池的指针。那么这个对象池是如何得到的呢,此时再看recycleUnchecked()方法最后同步锁块下的代码就可以得知了。
- 假设当前sPool为null,此时next=sPool也为null;
- 接着令sPool = this,此时sPool等于当前的Message,对象池中便有了第一个Message;
- 最后再记录对象池中的Message个数。
可以通过以下的图来了解
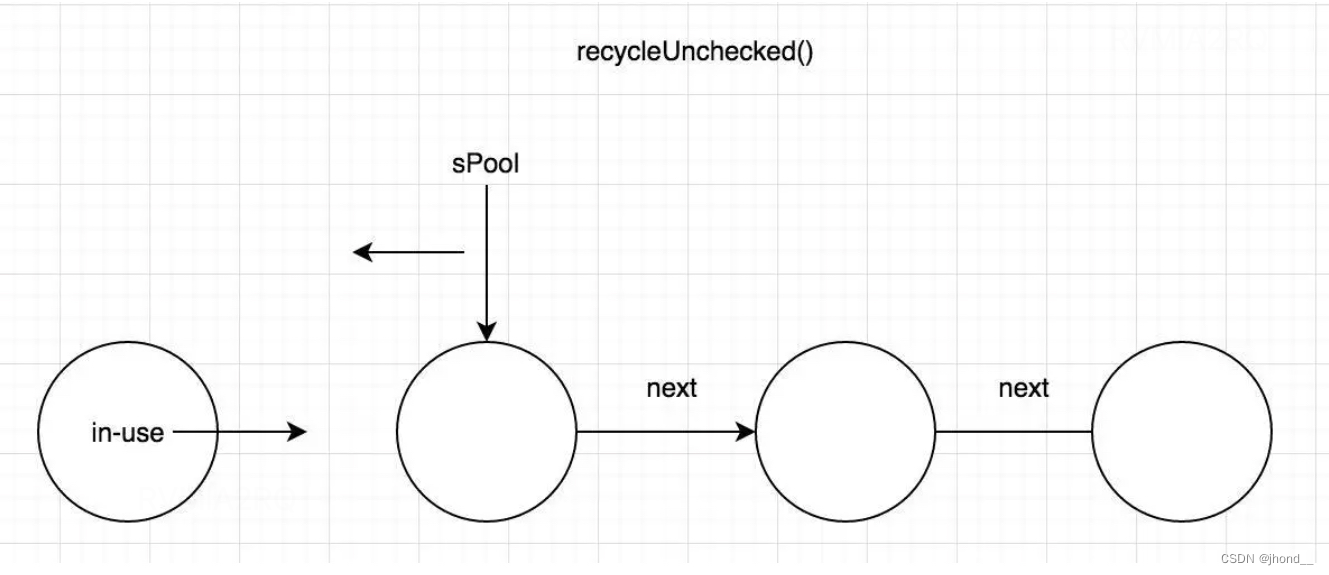
同样如果已经使用过的Message,需要回收到对象池中一样的过程,这钟大欧式保证线程同步的,所以始终会形成一条链式结构。sPool始终指向对象池链表的链表头处。
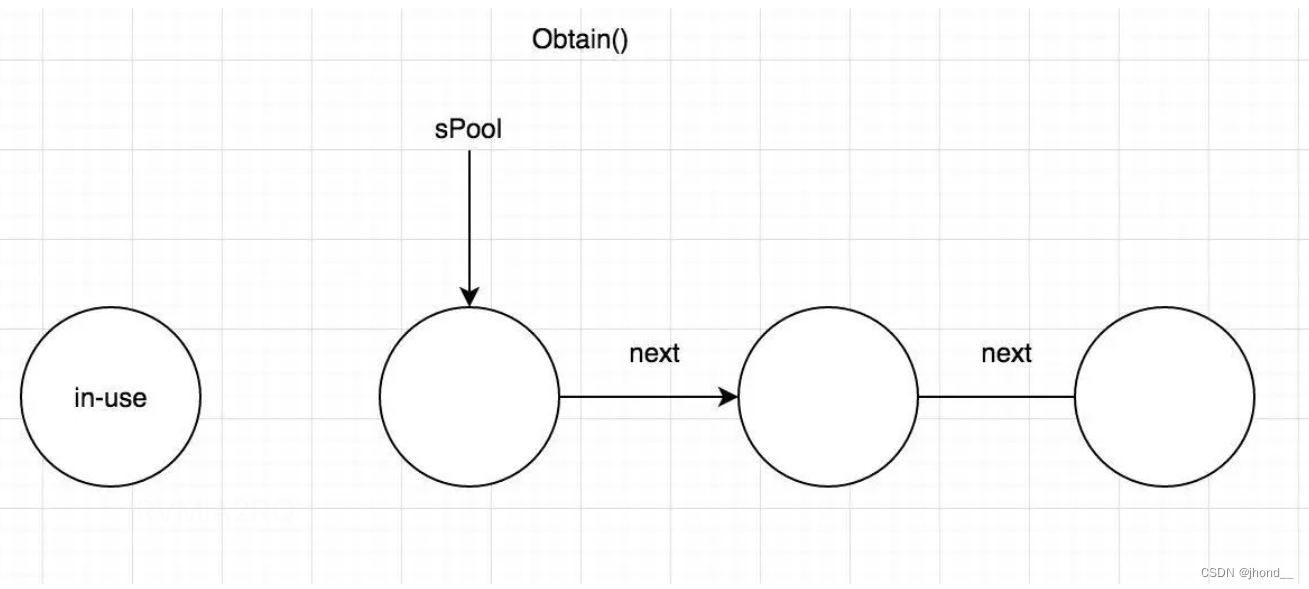
然后我们再来看一下obtain()是如何取的:
- 先从当前的sPool指向处取的链表头Message;
- 接着令sPool指向对象池的下一个节点;
- 最后令取到的message的next置空,这样就取得了一个单独的message对象。
同样我们也能通过图来了解整个过程:
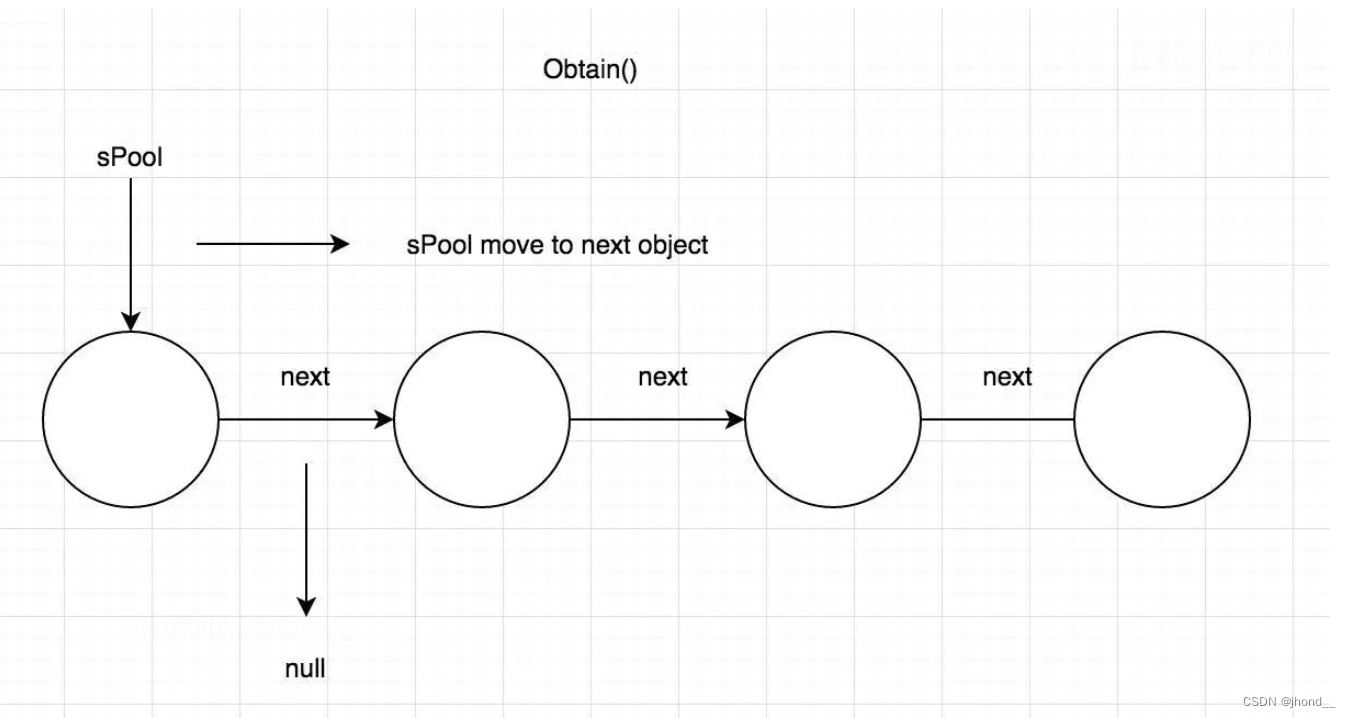
===============》
总结:通过Message.obtain()可以从全局的对象池中获取到message,同时在使用完后可以很方便的回收,得到了很好的复用,同时又通过了同步锁保证了message在获取和回收时保证了线程的安全。
-
此时获得了Message块后,我们就可以开始下一步利用Hanlder将Message块进行发送,我们需要传递的数据存入到message块中,那么具体Handler是如何发送的呢,我们进一步分析:
大家平时发送消息主要是调用的两大类方法:
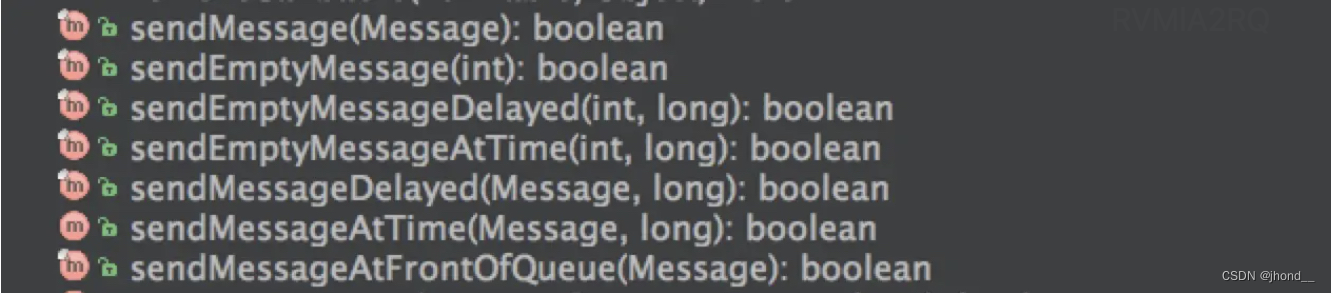

光看上面这些API你可能会觉得handler能法两种消息,一种是Runnable对象,一种是message对象,这是直观的理解,但其实post发出的Runnable对象最后都封装成message对象了。具体看过源码会知道其实最终的发送消息都会传递到Handler绑定的MessageQueue的enqueueMessage方法。所以这里就分析我们最简单常用的sendMessage(Message)的一整个流程。
先通过源码看一下这个流程的经过:
		/**
     * Pushes a message onto the end of the message queue after all pending messages
     * before the current time. It will be received in {@link #handleMessage},
     * in the thread attached to this handler.
     *
     * @return Returns true if the message was successfully placed in to the
     *         message queue.  Returns false on failure, usually because the
     *         looper processing the message queue is exiting.
     * 在当前时间,在所有待处理消息之后,将消息推送到消息队列的末尾。在和当前线程关联的的Handler里面的handleMessage将收到这			 * 条消息,
     */
		public final boolean sendMessage(@NonNull Message msg) {
        return sendMessageDelayed(msg, 0);
    }

		public final boolean sendMessageDelayed(@NonNull Message msg, long delayMillis) {
        if (delayMillis < 0) {
            delayMillis = 0;
        }
        return sendMessageAtTime(msg, SystemClock.uptimeMillis() + delayMillis);
    }

		public boolean sendMessageAtTime(@NonNull Message msg, long uptimeMillis) {
        MessageQueue queue = mQueue;
        if (queue == null) {
            RuntimeException e = new RuntimeException(
                    this + " sendMessageAtTime() called with no mQueue");
            Log.w("Looper", e.getMessage(), e);
            return false;
        }
        return enqueueMessage(queue, msg, uptimeMillis);
    }

		private boolean enqueueMessage(@NonNull MessageQueue queue, @NonNull Message msg,
            long uptimeMillis) {
        msg.target = this;
        msg.workSourceUid = ThreadLocalWorkSource.getUid();

        if (mAsynchronous) {   //如果是异步消息handler,则设置message为异步消息
            msg.setAsynchronous(true);
        }
        return queue.enqueueMessage(msg, uptimeMillis);
    }
以上便是handler中发送消息的流程,总共就做了4件事
- 为message设置延迟处理的时间,关于SystemClock可查看https://www.jianshu.com/p/e6877401a0e2
- 设置message处理事件的目标handler和workSourceUid值
- 判定message是否是异步消息,是的话设置异步消息标识为true。关于异步消息、同步消息、同步屏障后面会细说。
- 最后将message和延迟处理时间一起传到handler绑定的messageQueue的enqueueMessage方法中进行处理。
之后我们看看MessageQueue的enqueueMessage方法做了什么:
boolean enqueueMessage(Message msg, long when) {
  //第1步
    if (msg.target == null) {
        throw new IllegalArgumentException("Message must have a target.");
    }

    synchronized (this) {
      //第2步
        if (msg.isInUse()) {
            throw new IllegalStateException(msg + " This message is already in use.");
        }
      //第3步
        if (mQuitting) {
            IllegalStateException e = new IllegalStateException(
                    msg.target + " sending message to a Handler on a dead thread");
            Log.w(TAG, e.getMessage(), e);
            msg.recycle();  //message回收
            return false;
        }
			//第4步
        msg.markInUse();
        msg.when = when;
        Message p = mMessages;
        boolean needWake;
      //第5步
        if (p == null || when == 0 || when < p.when) {
            // New head, wake up the event queue if blocked.
            msg.next = p;
            mMessages = msg;
            needWake = mBlocked;
        } else {
            // Inserted within the middle of the queue.  Usually we don't have to wake
            // up the event queue unless there is a barrier at the head of the queue
            // and the message is the earliest asynchronous message in the queue.
            //除非消息队列的头部是同步屏障(barrier),或者消息队列的第一个消息是异步消息,
            //否则如果是插入到中间位置,我们通常不唤醒消息队列,
            needWake = mBlocked && p.target == null && msg.isAsynchronous();
            Message prev;
            for (;;) {
                prev = p;
                p = p.next;
                if (p == null || when < p.when) {
                    break;
                }
                if (needWake && p.isAsynchronous()) {
                    needWake = false;
                }
            }
            msg.next = p; // invariant: p == prev.next
            prev.next = msg;
        }
				//第6步
        // We can assume mPtr != 0 because mQuitting is false.
        if (needWake) {
            nativeWake(mPtr);
        }
    }
    return true;
}
我们通过上面代码看看messageQueue具体是如何处理message的:
-
第一步判断message得目标处理事件的handler是否为空,如果为空则抛出错误。因为这个方法是往消息队列存入一个正常的同步消息或异步消息,目标handler不能为空。如果目标handler为空那是同步屏障,具体的异步消息、同步消息和同步屏障后面会细说。我们先了解这个概念就是一个消息队列中存放着同步消息和异步消息,如果存在了同步屏障,则同步屏障后面的消息只允许异步消息通过让handler接收到并进行处理,同步消息需要等待异步消息处理完后去掉同步屏障,同步消息才可以继续按顺序让handler接收到消息进行处理。
-
第二步判断该消息是否已经被使用过了,如果被使用过了则无法继续使用。
-
第三步判断当前消息队列是否正在关闭,如果正在关闭消息无法加入,抛出错误并回收消息到消息对象池。
-
第四步对该message进行进行基础属性的赋值,设置消息的处理时间、正在使用标志。
-
第五步判断当前的消息队列是否为空或传入的消息延迟处理时间是否为0或小于当前消息队列头消息的延迟时间,如果符合其中一条则加入当前消息队列的头部变成头消息进行第一时间处理;否则则应该加入到消息队列中,而非头部。需要注意的是其中有一个是否需要唤醒消息队列的判断位needWake,正常情况下是我们消息到了处理时间自动唤醒,时间没到的话我们会阻塞消息队列去处理一些不重要的消息,但是如果此时有需要立刻执行的消息入了队列则我们需要唤醒;那么那些是我们需要立刻处理的消息呢:
1、执行延时时间小于当前的消息;
2、加入到有同步屏障的消息队列中,在该消息的前面无异步消息,此时也需要及时处理该加入的异步消息。
-
第六步,如果需要唤醒消息队列,则调用了底层c++本地代码唤醒队列,这里我们不做细讲。
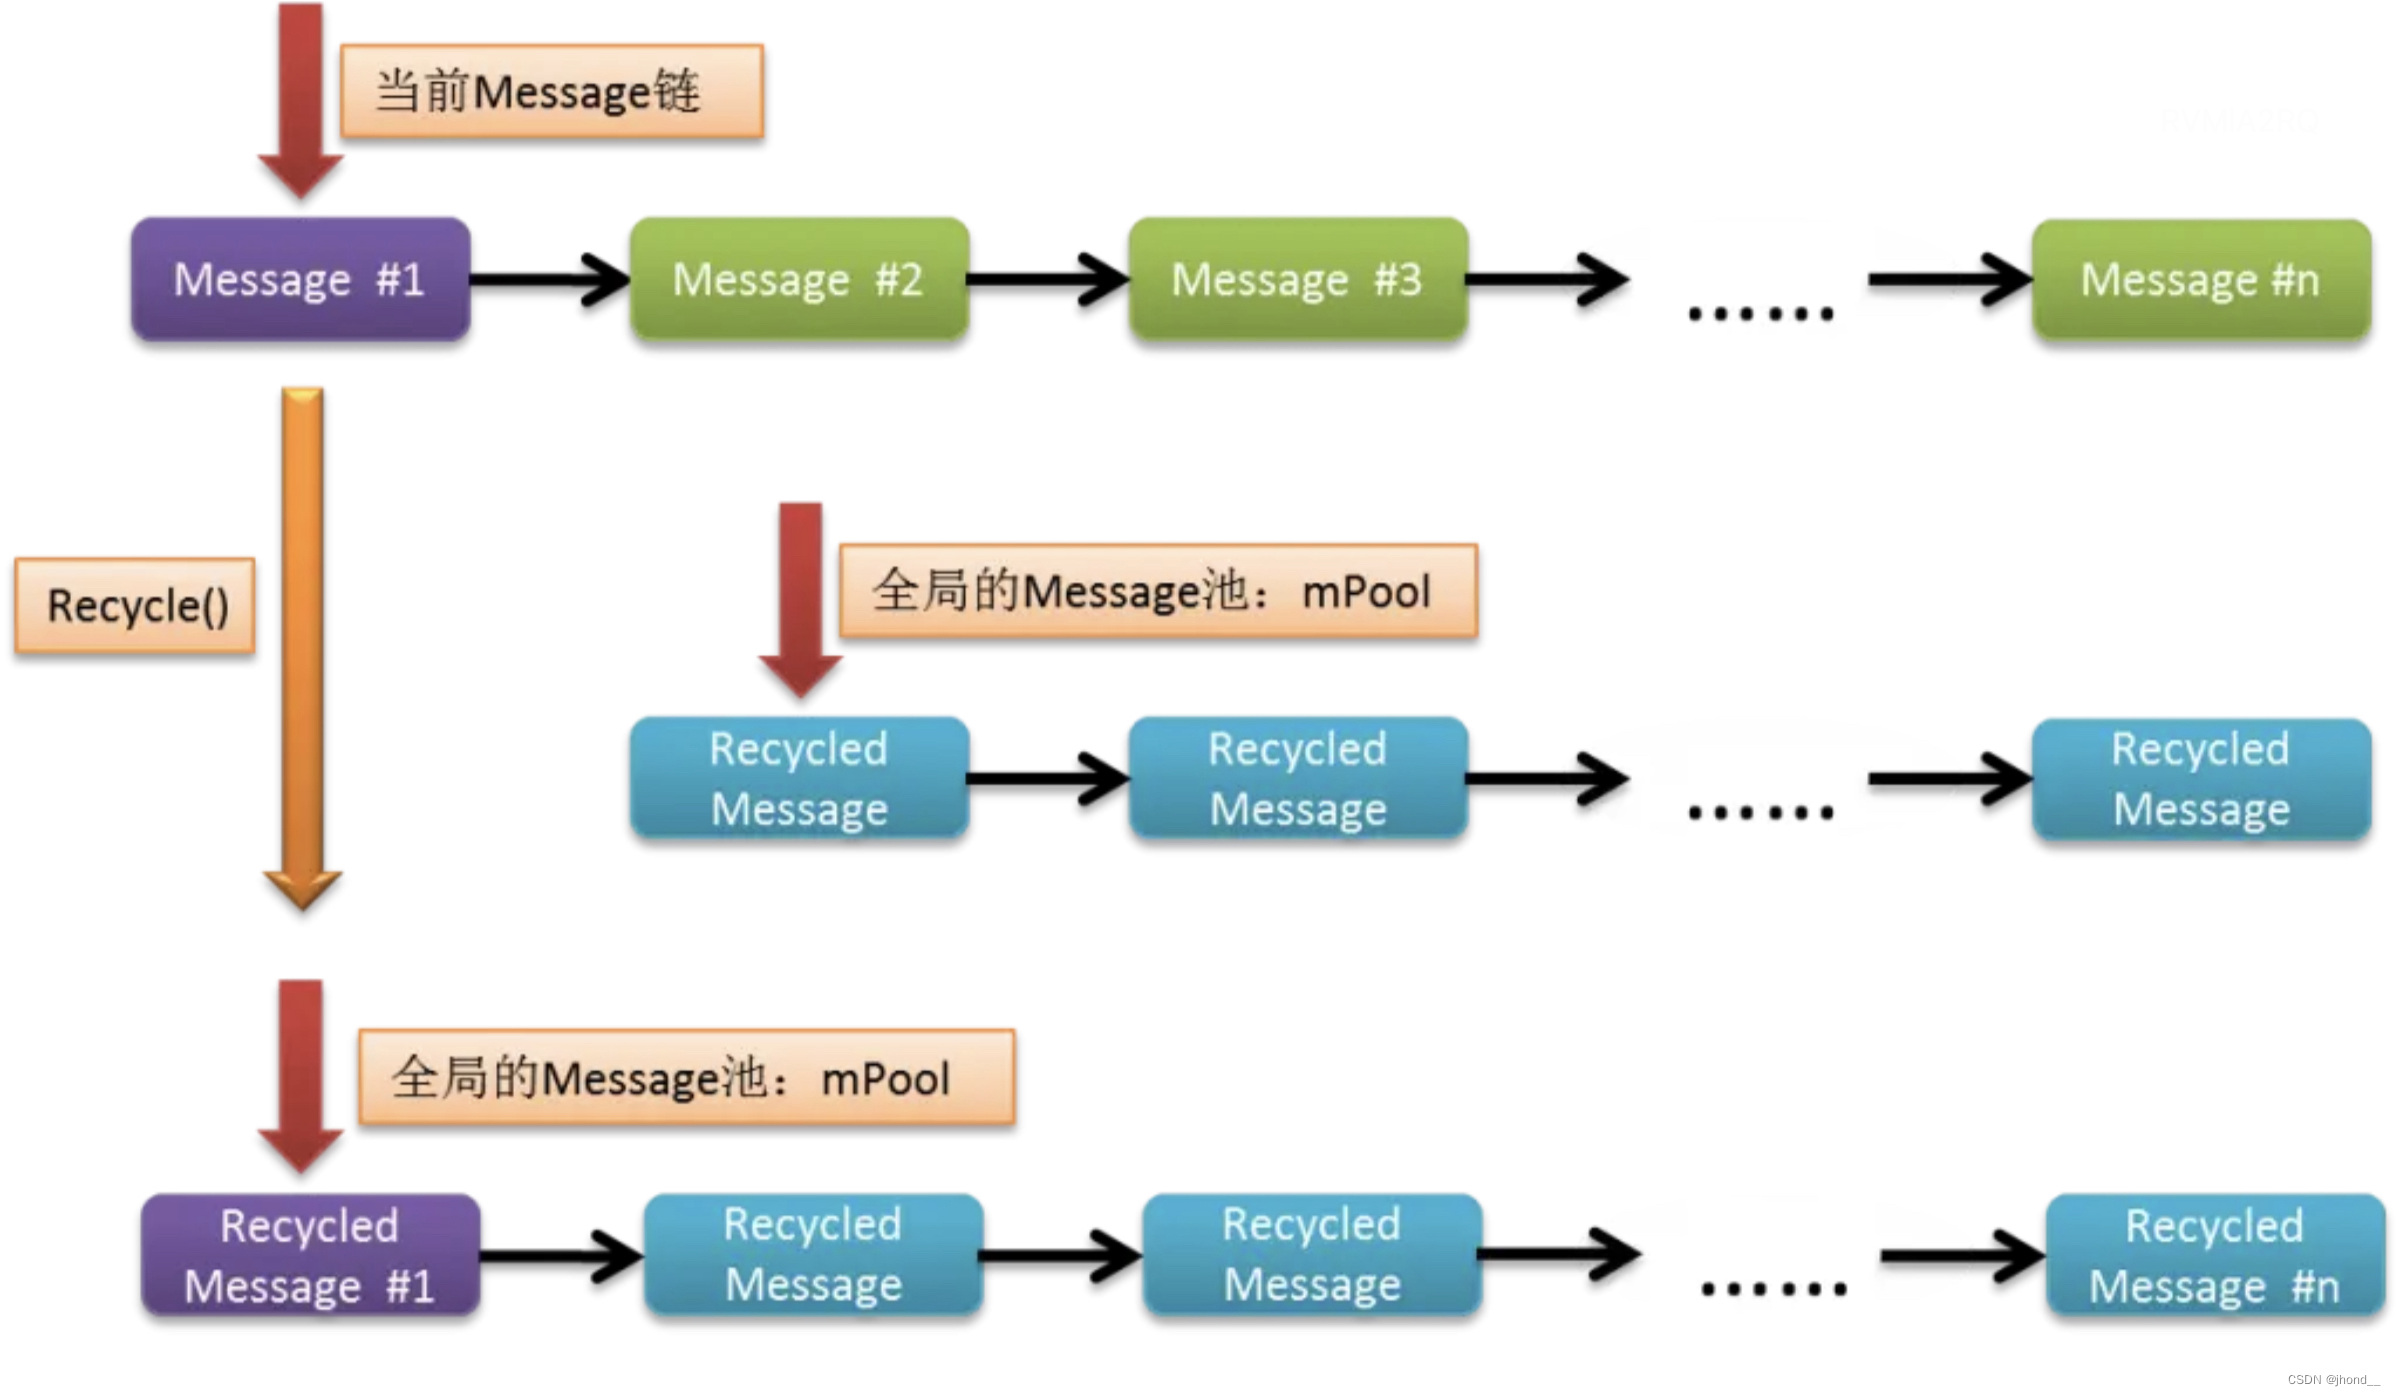
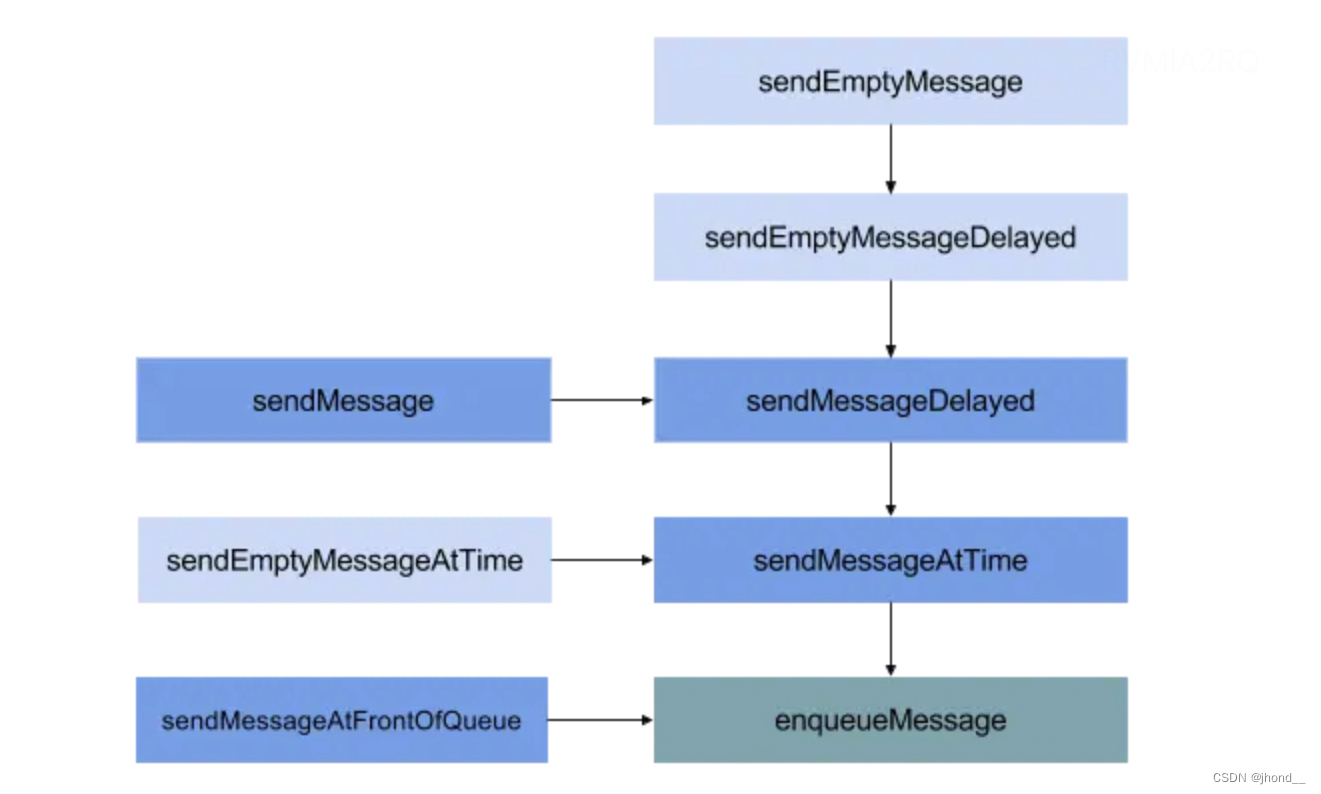
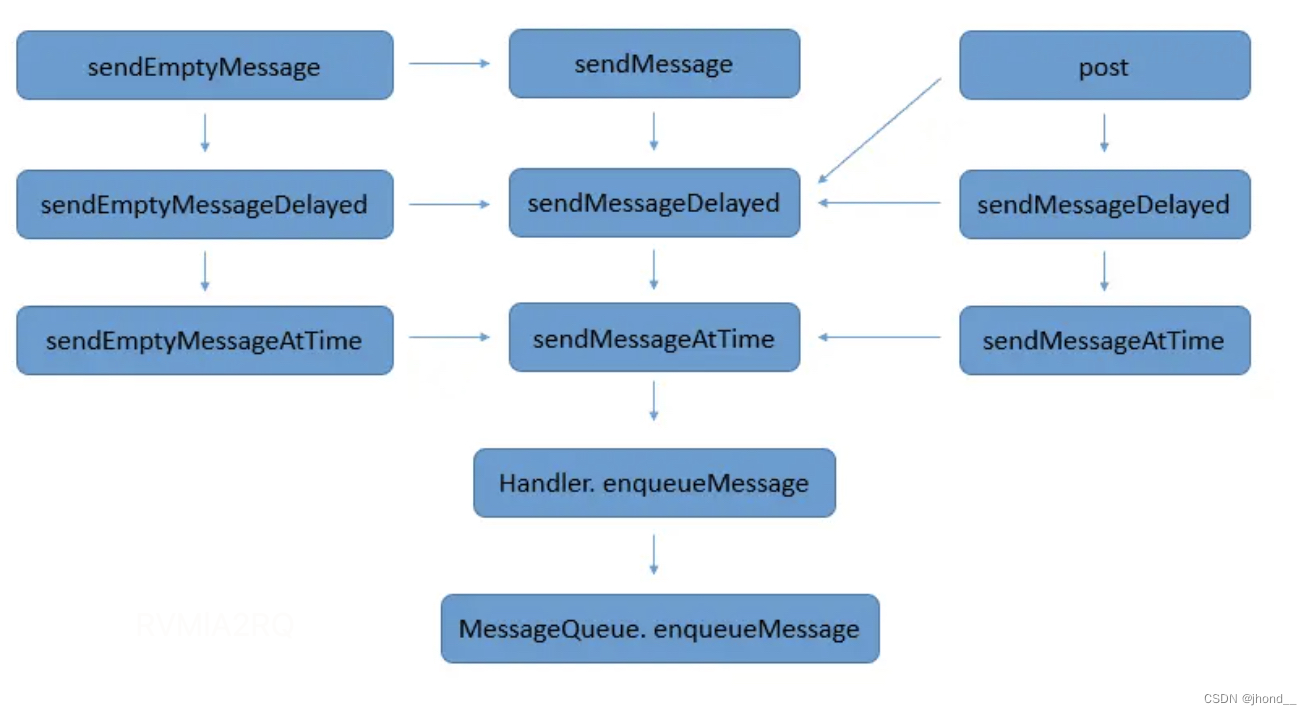
其他的发送消息的流程最终其实都跑到这,具体可以自行看源码,这里就不分析了,摘抄了网上的两张发送消息的方法流程图可以了解一下:
通过以上分析此时我们成功把message发送到了消息队列中了,之后handler只需要从对列中获取到消息并进行相应处理即可,那么具体如何获取到消息呢?我们再进一步进行分析:
Looper.loop(),Handler获取消息过程
通过上面的handler构建和message消息的发送,可以知道message并不是直接发送到指定handler的,而是发送到消息队列中。那么handler如何获取消息的呢,可以理解为消息队列负责把消息分发到指定的handler,之后handler再处理发送过来的消息。那么是如何分发的呢,此时就需要了解Looper.loop()方法了,该方法通过死循环监听消息队列中的消息。如果有消息需要处理发送到handler,looper.loop()则会调用目标handler的dispatchMessage(Message)方法发送到handler。具体源码:
/**
 * Run the message queue in this thread. Be sure to call
 *
 * {@link #quit()} to end the loop.
 */
@SuppressWarnings("AndroidFrameworkBinderIdentity")
public static void loop() {
   	// 获取TLS存储的Looper对象
    final Looper me = myLooper();
  	//没有Looper 对象,直接抛异常
    if (me == null) {
        throw new RuntimeException("No Looper; Looper.prepare() wasn't called on this thread.");
    }

    // Make sure the identity of this thread is that of the local process,
    // and keep track of what that identity token actually is.
    Binder.clearCallingIdentity();
  	// 确保权限检查基于本地进程,而不是基于最初调用进程
    final long ident = Binder.clearCallingIdentity();

    // Allow overriding a threshold with a system prop. e.g.
    // adb shell 'setprop log.looper.1000.main.slow 1 && stop && start'
    final int thresholdOverride =
            SystemProperties.getInt("log.looper."
                    + Process.myUid() + "."
                    + Thread.currentThread().getName()
                    + ".slow", 0);

    me.mSlowDeliveryDetected = false;

    for (;;) {
      	//调用本Looper类中真正获取message的方法
        if (!loopOnce(me, ident, thresholdOverride)) {
            return;
        }
    }
}

/**
 * Poll and deliver single message, return true if the outer loop should continue.
 * 取出和发送一个消息,如果当前looper仍在使用返回true
 */
@SuppressWarnings("AndroidFrameworkBinderIdentity")
private static boolean loopOnce(final Looper me,
                                final long ident, final int thresholdOverride) {
  //获取一个消息块,可能会堵塞
  Message msg = me.mQueue.next(); // might block
  //消息队列关闭才会返回null,此时looper也不能继续使用了
  if (msg == null) {
    // No message indicates that the message queue is quitting.
    return false;
  }

  // This must be in a local variable, in case a UI event sets the logger
  // 默认为null,可通过setMessageLogging()方法来指定输出,用于debug功能
  final Printer logging = me.mLogging;
  if (logging != null) {
    logging.println(">>>>> Dispatching to " + msg.target + " "
                    + msg.callback + ": " + msg.what);
  }

  // Make sure the observer won't change while processing a transaction.
  // 确保在处理事物的时候不会改变观察者
  final Observer observer = sObserver;

  final long traceTag = me.mTraceTag;
  long slowDispatchThresholdMs = me.mSlowDispatchThresholdMs;
  long slowDeliveryThresholdMs = me.mSlowDeliveryThresholdMs;
  if (thresholdOverride > 0) {
    slowDispatchThresholdMs = thresholdOverride;
    slowDeliveryThresholdMs = thresholdOverride;
  }
  final boolean logSlowDelivery = (slowDeliveryThresholdMs > 0) && (msg.when > 0);
  final boolean logSlowDispatch = (slowDispatchThresholdMs > 0);

  final boolean needStartTime = logSlowDelivery || logSlowDispatch;
  final boolean needEndTime = logSlowDispatch;

  if (traceTag != 0 && Trace.isTagEnabled(traceTag)) {
    Trace.traceBegin(traceTag, msg.target.getTraceName(msg));
  }

  final long dispatchStart = needStartTime ? SystemClock.uptimeMillis() : 0;
  final long dispatchEnd;
  Object token = null;
  if (observer != null) {
    token = observer.messageDispatchStarting();
  }

  long origWorkSource = ThreadLocalWorkSource.setUid(msg.workSourceUid);
  try {
     // 用于分发消息,调用Message的target变量(也就是Handler了)的dispatchMessage方法来处理消息
    msg.target.dispatchMessage(msg);
    if (observer != null) {
      observer.messageDispatched(token, msg);
    }
    dispatchEnd = needEndTime ? SystemClock.uptimeMillis() : 0;
  } catch (Exception exception) {
    if (observer != null) {
      observer.dispatchingThrewException(token, msg, exception);
    }
    throw exception;
  } finally {
    ThreadLocalWorkSource.restore(origWorkSource);
    if (traceTag != 0) {
      Trace.traceEnd(traceTag);
    }
  }

  if (logSlowDelivery) {
    if (me.mSlowDeliveryDetected) {
      if ((dispatchStart - msg.when) <= 10) {
        Slog.w(TAG, "Drained");
        me.mSlowDeliveryDetected = false;
      }
    } else {
      if (showSlowLog(slowDeliveryThresholdMs, msg.when, dispatchStart, "delivery",
                      msg)) {
        // Once we write a slow delivery log, suppress until the queue drains.
        me.mSlowDeliveryDetected = true;
      }
    }
  }
  if (logSlowDispatch) {
    showSlowLog(slowDispatchThresholdMs, dispatchStart, dispatchEnd, "dispatch", msg);
  }

  if (logging != null) {
    logging.println("<<<<< Finished to " + msg.target + " " + msg.callback);
  }

  // Make sure that during the course of dispatching the
  // identity of the thread wasn't corrupted.
  // 确保分发过程中identity不会损坏
  final long newIdent = Binder.clearCallingIdentity();
  if (ident != newIdent) {
    // 打印identiy改变的log,在分发消息过程中是不希望身份被改变
    Log.wtf(TAG, "Thread identity changed from 0x"
            + Long.toHexString(ident) + " to 0x"
            + Long.toHexString(newIdent) + " while dispatching to "
            + msg.target.getClass().getName() + " "
            + msg.callback + " what=" + msg.what);
  }
	// 将Message放入消息池
  msg.recycleUnchecked();

  return true;
}
以上便是Looper.loop()方法在获取消息块时做的事情,因为有一些是原生的方法就不细说,主要说的有一下几点:
- 获取当前线程的looper对象,如果获取不到则直接报错;
- 对消息的真正分发时间做一个监听,具体处理其实是在loop()的死循环中调用了loopOnce()方法中具体处理的;
- 进入死循环,调用loopOnce()真正获取到了消息,通过与当前线程绑定的消息队列中调用next()方法获取最新的要处理的消息块,之后会细讲;
- 获取到消息块后判断消息是否为空,如果为空则直接返回false跳出死循环。否则调用消息块绑定的handler的dispatchMessage(Message)方法将消息发送到目标handler。后面同样会细讲handler的该消息处理方法;
- 最后消息处理完后调用消息块的recycleUnchecked()方法,将消息放回到消息池中。
以上几点就是主要需要了解的。在这个过程中还做了一些事情就是利用了观察者模式,来观察looper管理消息发送的正常与否,记录了发送的真正时间、打印日志。
通过上面分析我们可以知道looper是担任了管理消息的一个角色,真正获取到消息的是绑定到该looper的消息队列中的next()方法;而获取到消息后需要分发给指定的handler,调用的则是消息块绑定的handler的dispatchMessage(Message)方法;那么我们接下来就来看看这两个方法又分别做了什么:
MessagQueue.next()
@UnsupportedAppUsage
Message next() {
    // Return here if the message loop has already quit and been disposed.
    // This can happen if the application tries to restart a looper after quit
    // which is not supported.
  	// 如果消息循环已经退出了。则直接在这里return。因为调用disposed()方法后mPtr=0
    final long ptr = mPtr;
    if (ptr == 0) {
        return null;
    }
		//记录空闲时处理的IdlerHandler的数量
    int pendingIdleHandlerCount = -1; // -1 only during first iteration
  	// native层用到的变量 ,如果消息尚未到达处理时间,则表示为距离该消息处理事件的总时长,
  	// 表明Native Looper只需要block到消息需要处理的时间就行了。 所以nextPollTimeoutMillis>0表示还有消息待处理
    int nextPollTimeoutMillis = 0;
  	// 进入死循环获取消息块,可能会block
    for (;;) {
        if (nextPollTimeoutMillis != 0) {
          	// 刷新下Binder命令,一般在阻塞前调用
            Binder.flushPendingCommands();
        }
				// 调用native层进行消息标示,nextPollTimeoutMillis 为0立即返回,为-1则阻塞等待。
        nativePollOnce(ptr, nextPollTimeoutMillis);

				// 同步代码块保证线程安全
        synchronized (this) {
            // Try to retrieve the next message.  Return if found.
          	// 获取开机到现在的时间
            final long now = SystemClock.uptimeMillis();
            Message prevMsg = null;
          	// 获取MessageQueue的链表表头的第一个元素
            Message msg = mMessages;
						// 判断Message是否是同步屏障,如果是则执行循环,拦截所有同步消息,直到取到第一个异步消息为止
            if (msg != null && msg.target == null) {
                // 如果能进入这个if,则表面MessageQueue的第一个元素就是同步屏障(barrier)
                // Stalled by a barrier.  Find the next asynchronous message in the queue.
                // 循环遍历出第一个异步消息,这段代码可以看出同步屏障会拦截所有同步消息
                do {
                    prevMsg = msg;
                    msg = msg.next;
                  //如果msg==null或者msg是异步消息则退出循环,msg==null则意味着已经循环结束
                } while (msg != null && !msg.isAsynchronous());
            }
          	// 判断是否有可执行的Message
            if (msg != null) {
              	// 判断该Mesage是否到了被执行的时间。
                if (now < msg.when) {
                    // Next message is not ready.  Set a timeout to wake up when it is ready.
                  	// 当Message还没有到被执行时间的时候,记录下一次要执行的Message的时间点
                    nextPollTimeoutMillis = (int) Math.min(msg.when - now, Integer.MAX_VALUE);
                } else {
                    // Message的被执行时间已到
                    // Got a message.
                    // 从队列中取出该Message,并重新构建原来队列的链接
                    // 当前有消息,所以不能阻塞
                    mBlocked = false;
                  	// 如果还有上一个元素,可以理解为不是取出第一个元素,主要是在上面有同步屏障下取的第一个异步消息
                    if (prevMsg != null) {
                      	//上一个元素的next(越过自己)直接指向下一个元素
                        prevMsg.next = msg.next;
                    } else {
                      	//取第一个消息,让头部消息直接指向第二个消息
                        mMessages = msg.next;
                    }
                  	// 因为要取出msg,所以msg的next不能指向链表的任何元素,所以next要置为null
                    msg.next = null;
                    if (DEBUG) Log.v(TAG, "Returning message: " + msg);
                  	// 标记该Message为正处于使用状态,然后返回Message
                    msg.markInUse();
                    return msg;
                }
            } else {
                // No more messages.
              	// 没有任何可执行的Message,重置时间
                nextPollTimeoutMillis = -1;
            }

            // Process the quit message now that all pending messages have been handled.
          	// 关闭消息队列,返回null,通知Looper停止循环
            if (mQuitting) {
                dispose();
                return null;
            }

            // If first time idle, then get the number of idlers to run.
            // Idle handles only run if the queue is empty or if the first message
            // in the queue (possibly a barrier) is due to be handled in the future.
            // 当第一次循环的时候才会在空闲的时候去执行IdleHandler,从代码可以看出所谓的空闲状态
            // 指的就是当队列中没有任何可执行的Message,这里的可执行有两要求,
            // 即该消息链表中没有消息或当前的消息还没到执行时间
            if (pendingIdleHandlerCount < 0
                    && (mMessages == null || now < mMessages.when)) {
                pendingIdleHandlerCount = mIdleHandlers.size();
            }

          	// 这里是消息队列阻塞( 死循环) 的重点,消息队列在阻塞的标示是消息队列中没有任何消息,
            // 并且所有的 IdleHandler 都已经执行过一次了
            if (pendingIdleHandlerCount <= 0) {
                // No idle handlers to run.  Loop and wait some more.
                mBlocked = true;
                continue;
            }
						// 初始化要被执行的IdleHandler,最少4个
            if (mPendingIdleHandlers == null) {
                mPendingIdleHandlers = new IdleHandler[Math.max(pendingIdleHandlerCount, 4)];
            }
            mPendingIdleHandlers = mIdleHandlers.toArray(mPendingIdleHandlers);
        }

        // Run the idle handlers.
        // We only ever reach this code block during the first iteration.
      	// 开始循环执行所有的IdleHandler,并且根据返回值判断是否保留IdleHandler
        for (int i = 0; i < pendingIdleHandlerCount; i++) {
            final IdleHandler idler = mPendingIdleHandlers[i];
            mPendingIdleHandlers[i] = null; // release the reference to the handler

            boolean keep = false;
            try {
                keep = idler.queueIdle();
            } catch (Throwable t) {
                Log.wtf(TAG, "IdleHandler threw exception", t);
            }

            if (!keep) {
                synchronized (this) {
                    mIdleHandlers.remove(idler);
                }
            }
        }

        // Reset the idle handler count to 0 so we do not run them again.
      	// 重点代码,IdleHandler只会在消息队列阻塞之前执行一次,执行之后改标示设置为0,
        // 之后就不会再执行,一直到下一次调用MessageQueue.next() 方法。
        pendingIdleHandlerCount = 0;

        // While calling an idle handler, a new message could have been delivered
        // so go back and look again for a pending message without waiting.
      	// 当执行了IdleHandler 的 处理之后,会消耗一段时间,这时候消息队列里的可能有消息已经到达
      	// 可执行时间,所以重置该变量回去重新检查消息队列。
        nextPollTimeoutMillis = 0;
    }
}
通过上面源码分析:
可以获得消息的情况:
- 正常情况下不会阻塞且有消息发送的情况下,会对消息链表的头消息块mMessages开始获取要分发的消息,分为两种情况:
- 消息头是同步屏障——>即消息块的目标handler为null。这样情况下则会往消息队列后找,找到第一个异步消息
- 若头消息不是同步屏障则直接取第一个消息作为发送的消息
- 获取到消息块之后判断消息块的执行时间when是否小于当前的时间,如果小于当前时间的话就更新消息队列中取出该消息并且标志消息块已使用和消息对列不阻塞标志位。否则就更新下一次唤醒时间nextPollTimeoutMillis。
没有获取到消息或者消息还没到执行时间的情况下:
- 在首次进入死循环的时候若没有获取到消息或者获取到的消息还没到执行的时间,我们会先去将mIdleHandlers列表中的IdleHandler赋值给数组mPendingIdleHandler,然后依次执行完全部idleHandler中的唯一方法queueIdle(),方法返回一个布尔值,若返回位true则继续保留在mIdleHandlers列表中,否则就删除。保存下来的idleHandler在下一次Looper调用消息队列的next()方法时首次进入还会执行其方法queueIdle()。
- 此时第一次循环结束后,每次循环最后都会更新
nextPollTimeoutMillis = 0;所以第二次循环的时候一样立即唤醒,然后同上面找到消息的流程去找消息。若找到的处理消息还没到执行时间则更新nextPollTimeoutMillis = (int) Math.min(msg.when - now, Integer.MAX_VALUE);,若没找到消息则更新nextPollTimeoutMillis = -1。当nextPollTimeoutMillis为-1时就进入了阻塞,否则就等待指导的时间。
总结:
若我们能找到处理的消息且消息块的执行时间when小于当前时间则直接返回我们的消息块;否则如果找不到消息或者找到的消息还没到执行时间我们会先去将mIdleHandlers列表中存储的IdleHandler全部执行一遍唯一的方法queueIdle(),之后再重新找一遍消息,若同样找不消息或者找到的消息还没到执行时间,就会进入阻塞,具体阻塞多久看是否找到消息,若没找到消息nextPollTimeoutMillis = -1就会一直阻塞下去,若找到消息则阻塞的时间为下一个要执行的消息块的时间与当前时间的时间差。
Handler.dispatchMessage(Message)
/**
 * Handle system messages here.
 */
public void dispatchMessage(@NonNull Message msg) {
    if (msg.callback != null) {
        handleCallback(msg);
    } else {
        if (mCallback != null) {
            if (mCallback.handleMessage(msg)) {
                return;
            }
        }
        handleMessage(msg);
    }
}

@UnsupportedAppUsage
final Callback mCallback;

public interface Callback {
  /**
  	* @param msg A {@link android.os.Message Message} object
    * @return True if no further handling is desired
    */
  boolean handleMessage(@NonNull Message msg);
}

private static void handleCallback(Message message) {
        message.callback.run();
}

/**
	* Subclasses must implement this to receive messages.
  */
public void handleMessage(@NonNull Message msg) {
}
以上就handler获取到消息块干的事情,整体来说比较简单:
- 首先判断该消息块时是否是Runnable消息块,如果是则执行。
- 否则如果只是普通消息传递的消息块,判断当前handler是否有包括Callback接口,如果有则将消息传递到消息回调接口的handleMessage(Message)方法中进行处理。
- 最后如果判断以上情况都不满足就把消息发给当前handler的handleMessage(Message)方法处理,所以我们刚学handler时构建一个handler常会在资料上看见重写handler的handleMessage(Message)方法作为处理消息的出口。
最后通过上面的总结可以发现消息处理的优先级:
message.callback > handler.mCallback.handleMessage(Message) > handler.handleMessage(Message)
总结
以上就是我们handler机制的一整套流程,从最开始的创建到消息的传递,再从消息传递到如何接收消息,最后消息如何进行处理。以上都做了一一的介绍。其中包含了一些原生方法就不做过多的了解,更多是了解这一套流程消息的传递机制、消息队列的结构、消息的结构、Looper是如何管理消息的。具体分析对于handler机制的优势和可能会出现的问题具体看:https://www.jianshu.com/p/f03a3dc55941
MessageQueue中Message的分类
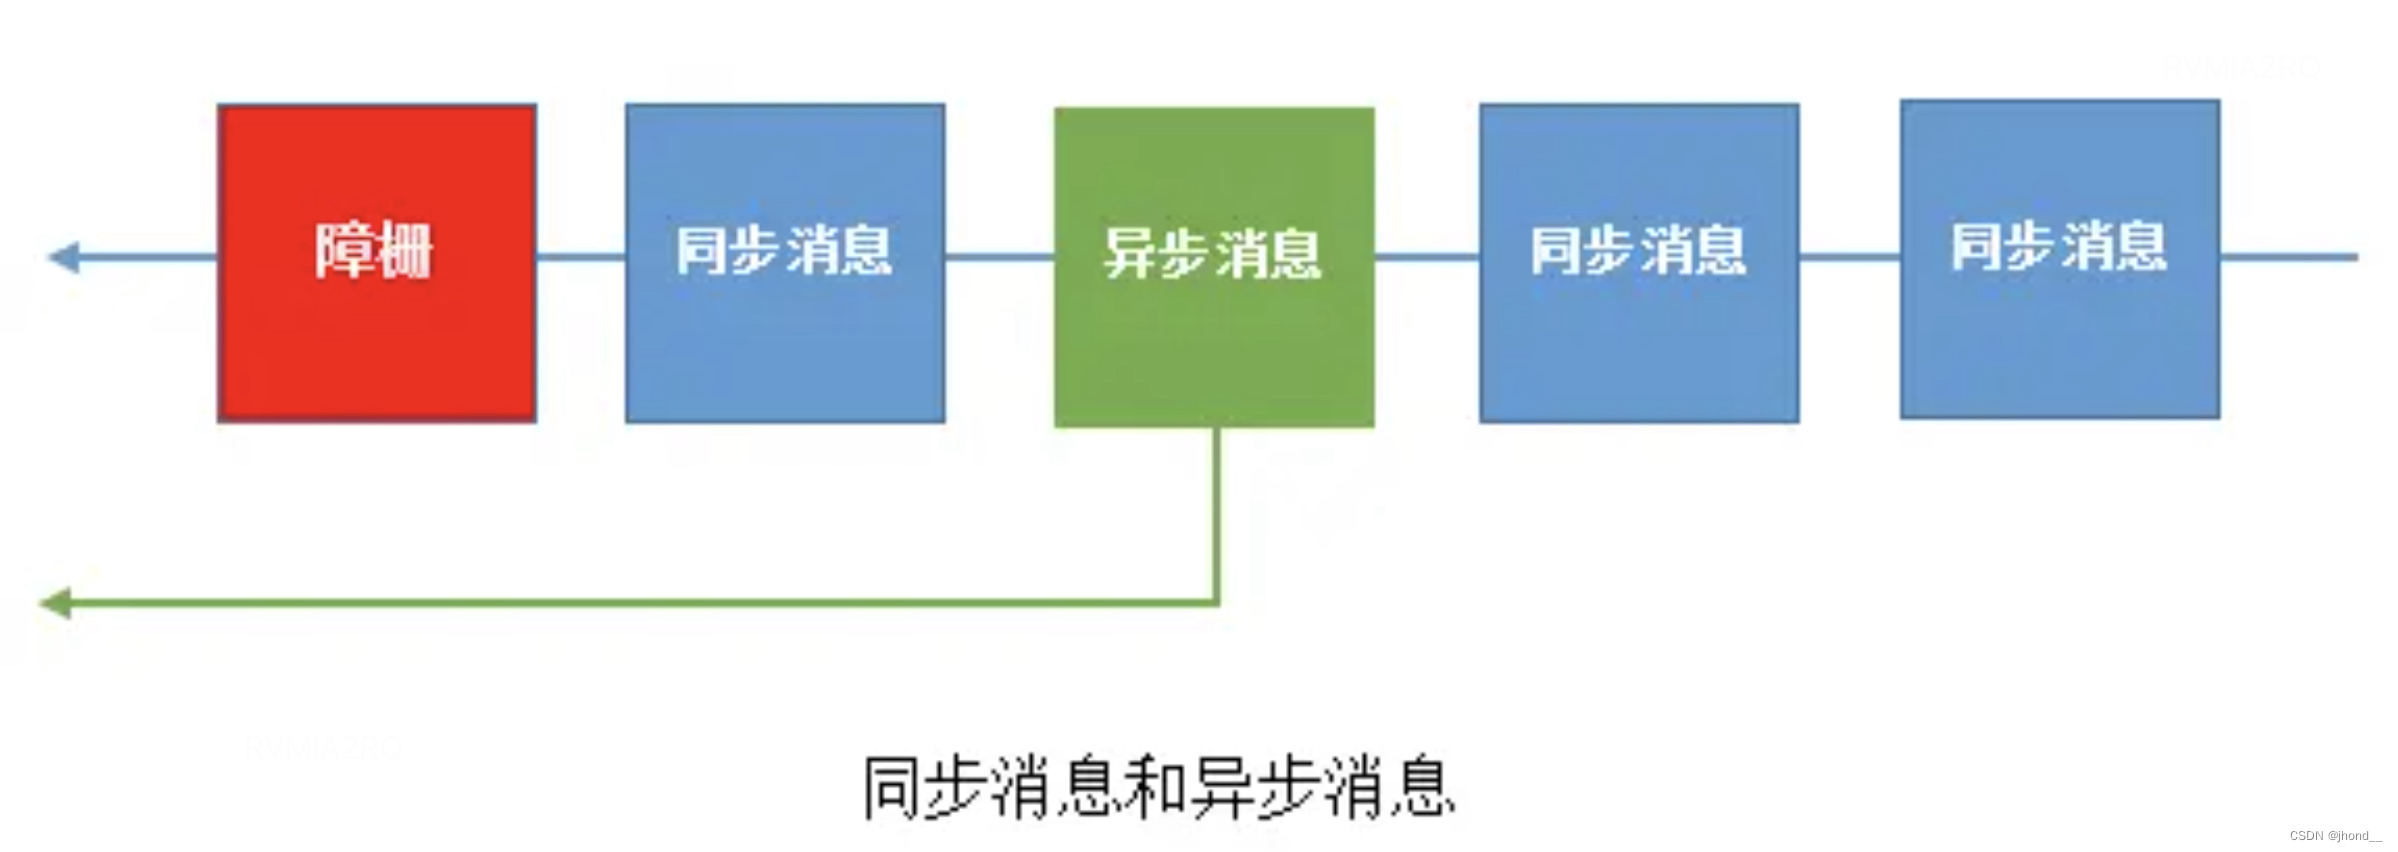
在上面我们一直讲到在消息队列中有两类消息分别是同步消息和异步消息,还有同步屏障负责阻塞同步消息的发送。那么这两类消息和同步屏障到底是什么呢,我们不妨展开讲讲:
在MessageQueue中,Message被分成3类,分别是
- 同步消息
- 异步消息
- 同步屏障
那我们就一次来看下:
(一) 同步消息:
正常情况下我们通过Handler发送的Message都属于同步消息,除非我们在发送的时候执行该消息是一个异步消息。同步消息会按顺序排列在队列中,除非指定Message的执行时间,否咋Message会按顺序执行。
(二) 异步消息:
想要往消息队列中发送异步消息,我们必须在初始化Handler的时候通过构造函数public Handler(boolean async)中指定Handler是异步的,这样Handler在讲Message加入消息队列的时候就会将Message设置为异步的。
(三) 同步屏障(Barrier):
同步屏障也可以称为障栅(Barrier) 是一种特殊的Message,它的target为null只有同步屏障(障栅)的target可以为null,如果我们自己视图设置Message的target为null的话会报异常,并且arg1属性被用作同步屏障(障栅)的标识符来区别不同的作同步屏障(障栅)。同步屏障(障栅)的作用是用于拦截队列中同步消息,放行异步消息。就好像交警一样,在道路拥挤的时候会决定哪些车辆可以先通过,这些可以通过的车辆就是异步消息。
-
添加同步屏障(障栅)
// The next barrier token.
// Barriers are indicated by messages with a null target whose arg1 field carries the token.
// 下一个同步屏障的标志,同步屏障是一个target为null,arg1记录当前同步屏障标志的message
@UnsupportedAppUsage
private int mNextBarrierToken;

/**
 * Posts a synchronization barrier to the Looper's message queue.
 *
 * Message processing occurs as usual until the message queue encounters the
 * synchronization barrier that has been posted.  When the barrier is encountered,
 * later synchronous messages in the queue are stalled (prevented from being executed)
 * until the barrier is released by calling {@link #removeSyncBarrier} and specifying
 * the token that identifies the synchronization barrier.
 *
 * This method is used to immediately postpone execution of all subsequently posted
 * synchronous messages until a condition is met that releases the barrier.
 * Asynchronous messages (see {@link Message#isAsynchronous} are exempt from the barrier
 * and continue to be processed as usual.
 *
 * This call must be always matched by a call to {@link #removeSyncBarrier} with
 * the same token to ensure that the message queue resumes normal operation.
 * Otherwise the application will probably hang!
 *
 * @return A token that uniquely identifies the barrier.  This token must be
 * passed to {@link #removeSyncBarrier} to release the barrier.
 *
 * @hide
 */
@UnsupportedAppUsage
@TestApi
public int postSyncBarrier() {
    return postSyncBarrier(SystemClock.uptimeMillis());
}

private int postSyncBarrier(long when) {
    // Enqueue a new sync barrier token.
    // We don't need to wake the queue because the purpose of a barrier is to stall it.
  	// 添加一个同步屏障,并且不需要唤醒队列因为这就是同步屏障的目的就是阻塞同步消息的
    synchronized (this) {
      //第一步
        final int token = mNextBarrierToken++;
      //第二步
        final Message msg = Message.obtain();
        msg.markInUse();
        msg.when = when;
        msg.arg1 = token;

      //第三步
        Message prev = null;
        Message p = mMessages;
      //第四步
        if (when != 0) {
            while (p != null && p.when <= when) {
                prev = p;
                p = p.next;
            }
        }
      //第五步
        if (prev != null) { // invariant: p == prev.next
            msg.next = p;
            prev.next = msg;
        } else {
            msg.next = p;
            mMessages = msg;
        }
      //第六步
        return token;
    }
}
查看postSyncBarrier()备注:
1、向Looper的消息队列中发送一个同步的同步屏障(barrier)
2、如果没有发送同步的同步屏障(barrier),消息处理像往常一样该怎么处理就怎么处理。当发现遇到同步屏障(barrier)后,队列中后续的同步消息会被阻塞,直到通过调用removeSyncBarrier()释放指定的同步屏障(barrier)。
3、这个方法会导致立即推迟所有后续发布的同步消息,直到满足释放指定的同步屏障(barrier)。而异步消息则不受同步屏障(barrier)的影响,并按照之前的流程继续处理。
4、必须使用相同的token去调用removeSyncBarrier(),来保证插入的同步屏障(barrier)和移除的是一个同一个,这样可以确保消息队列可以正常运行,否则应用程序可能会挂起。
5、返回值是同步屏障(barrier)的唯一标识符,持有个token去调用removeSyncBarrier()方法才能达到真正的释放同步屏障(barrier)
postSyncBarrier(long)代码步骤分析:
第一步 获取同步屏障的唯一标示,然后自增该变量作为下一个同步屏障的标示,通过mNextBarrierToken ++,我们得知,这些唯一标示是从0开始,自加1的。
第二步 从Message消息对象池中获取一个Message,并重置它的when和arg1。并且arg1为token的值,通过msg.markInUse()标示msg正在被使用。这里并没有给tareget赋值。
第三步 创建变量pre和p为第四步做准备,其中p被赋值为mMessages,而mMessages未消息队列的第一个元素,所以p此时就是消息队列的第一个元素。
第四步 通过对 队列中的第一个Message的when和同步屏障的when作比较,决定同步屏障在整个消息队列中的位置,比如是放在队列的头部,还是队列中第二个位置,如果同步屏障在头部,则拦截后面所有的同步消息,如果在第二的位置,则会放过第一个,然后拦截剩下的消息,以此类推。
第五步 把msg插入到消息队列中
第六步 返回token
从源码中我们可以看出,在把同步屏障(障栅)插入队列的时候先通过when的比较,根据不同的情况把同步屏障(障栅)插入到不同的位置,具体情况如下图所示:
当Message.when<Barrier.when,也就是第一个Message的执行时间点在同步屏障(障栅)之前。
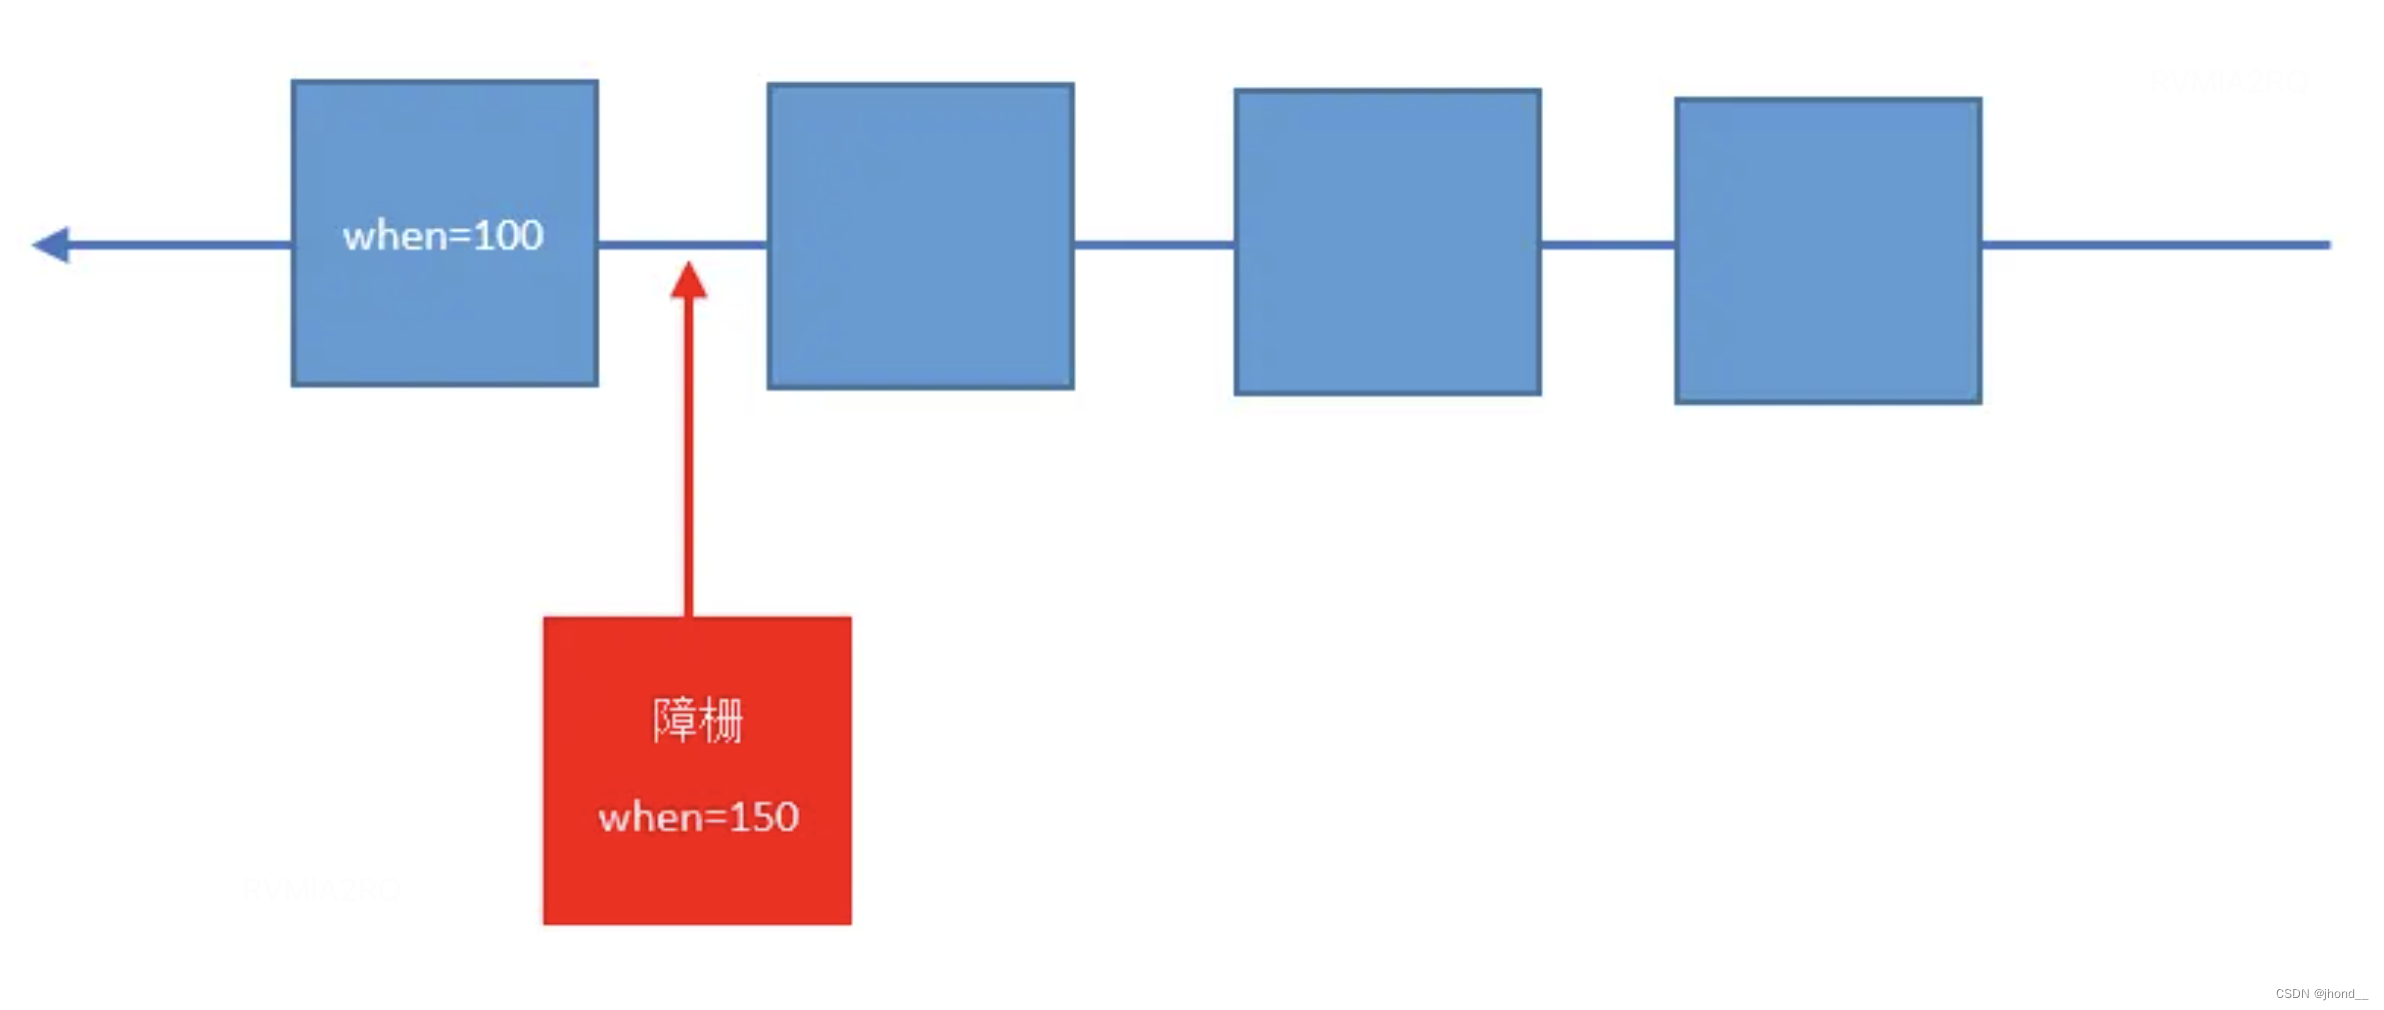
当Message.when>=Barrier.when,也就是第一个Message的执行时间点在同步屏障(障栅)之后。

以上就是我们添加一个同步屏障的全部步骤,可以发现同步屏障有一下特点:
- 同步屏障也是一个message,但是发送的目标handler为null;
- 每个同步屏障都有一个标志位token,赋值给message中的属性arg1;
- 每次调用添加一个同步屏障的when时间点无法自行设置,只能添加当前一个时间点的同步屏障。
-
删除同步屏障
/**
 * Removes a synchronization barrier.
 *
 * @param token The synchronization barrier token that was returned by
 * {@link #postSyncBarrier}.
 *
 * @throws IllegalStateException if the barrier was not found.
 *
 * @hide
 */
@UnsupportedAppUsage
@TestApi
public void removeSyncBarrier(int token) {
    // Remove a sync barrier token from the queue.
    // If the queue is no longer stalled by a barrier then wake it.
    synchronized (this) {
        Message prev = null;
      // 获取消息队列的第一个元素
        Message p = mMessages;
      //遍历消息队列的所有元素,直到p.targe==null并且 p.arg1==token才是我们想要的同步屏障
        while (p != null && (p.target != null || p.arg1 != token)) {
            prev = p;
            p = p.next;
        }
        if (p == null) {
            throw new IllegalStateException("The specified message queue synchronization "
                    + " barrier token has not been posted or has already been removed.");
        }
      //是否需要唤醒
        final boolean needWake;
        if (prev != null) {
          //跳过同步屏障,将同步屏障的上一个元素的next指向同步屏障的next
            prev.next = p.next;
          //因为有元素,所以不需要唤醒
            needWake = false;
        } else {
          //如果是第一个元素,则直接下消息队列中的第一个元素指向同步屏障的下一个即可
            mMessages = p.next;
          //如果消息队列中的第一个元素是null则说明消息队列中没有消息或第一个消息不是同步屏障,所以需要唤醒
            needWake = mMessages == null || mMessages.target != null;
        }
        p.recycleUnchecked();

        // If the loop is quitting then it is already awake.
        // We can assume mPtr != 0 when mQuitting is false.
        if (needWake && !mQuitting) {
            nativeWake(mPtr);
        }
    }
}
删除同步屏障(barrier)的方法也很简单,就是不断地遍历消息队列(链表结构),直到倒找与指定的token相匹配的同步屏障,然后把它从队列中移除。
常见面试题
-
android中实现多线程通信的方法?
view.post,activity.runOnUiThread,AsyncTask这些方式内部都是用了Handler。
-
系统为什么不允许在子线程中访问UI?
- View不是线程安全的,加上锁机制会让UI访问的逻辑变得复杂。
- 锁机制会降低UI访问的效率,因为锁机制会阻塞某些线程的执行。
-
一个线程可以有几个Handler?几个Looper?
一个线程可以有多个Handler,但是只有一个Looper。创建Handler之前,需要创建Looper,否则会报错。
-
Handler的阻塞唤醒机制是怎么回事?
Handler的阻塞唤醒机制是基于Linux的阻塞唤醒机制。这个机制也是类似于handler机制的模式。在本地创建一个文件描述符,然后需要等待的一方则监听这个文件描述符,唤醒的一方只需要修改这个文件,那么等待的一方就会收到文件从而打破唤醒。和Looper监听MessageQueue,Handler添加message是比较类似的。
文章引用
https://www.jianshu.com/p/e271ee639b68 Message介绍
https://www.jianshu.com/p/14ba1cb98b08 MessageQueue介绍


 3335
3335


 被折叠的 条评论
为什么被折叠?
被折叠的 条评论
为什么被折叠?
 到【灌水乐园】发言


