


需求:
项目中pc端和移动端两套代码需根据用户的设备进行自动切换。
说明:
该方法中的所有系统都是在同一根目录下,只是实现了多入口在入口处添加用户设备的条件判断,通过不同的入口显示不同的页面。
实现:
代码分为两个部分,pc端(pc)和移动端(move)
在使用脚手架创建项目的时候就有一个系统了,这里将脚手架创建出来的这个做pc端,我们只需要再添加一个移动端的就可以了。
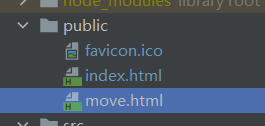
1、在public文件下创建一个move.html (复制index.html做修改就可以了)
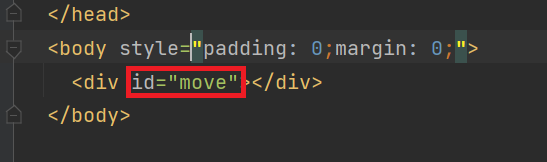
2、修改move.html
改成 id=“move”
3、在views文件下创建move文件和pc文件,分别装的就是移动端和pc端的文件
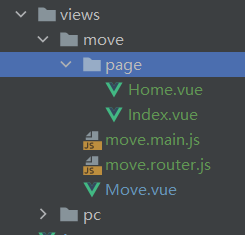
move文件下:
- page:移动端组件文件
- move.main.js:移动端的入口文件(仿照main.js)
- move.router.js:移动端的路由配置文件(仿照router --> index.js)
- Move.vue:移动端的根组件(仿照App.vue)
4、修改Move.vue(仿照App.vue)
<template>
  <div id="move">
    <router-view/>
  </div>
</template>

<script>
export default{
  data() {return {}},
  methods: {},
}
</script>

<style>

</style>
5、修改router文件下的index.js
import Vue from 'vue'
import VueRouter from 'vue-router'

import index from '../../components/index.vue'
Vue.use(VueRouter)

const routes = [
  {
    path: '/',
    name: 'pcIndex',
    component: () => import('../views/pc/Index.vue')
  },

]
const router = new VueRouter({
  routes
})

router.beforeEach((to, from, next) => {
  if (/Android|webOS|iPhone|iPod|BlackBerry/i.test(navigator.userAgent)) {
    window.location.href = '/move.html/'
    return
  }
  next()
})

export default router
6、修改move.router.js(仿照router --> index.js)
import Vue from 'vue'
import VueRouter from 'vue-router'

Vue.use(VueRouter)

const routes = [
    {
        path: '/',
        name: 'moveIndex',
        component: () => import('./page/Index.vue')
    },
]

const router = new VueRouter({
    routes
})

export default router
7、修改move.main.js(仿照main.js)
import Vue from 'vue'
import Move from './Move.vue'
import router from './move.router.js'

Vue.config.productionTip = false

new Vue({
  router,
  render: h => h(Move)
}).$mount('#move')
8、然后在vue.config.js中添加如下配置
module.exports ={
...
	pages: {

        //(1)输出一个页面
        //  main: {
        //    entry: 'src/main.js',
        //    template: 'public/index.html',
        //    filename: 'maker.html',
        //    chunks: ['chunk-vendors', 'chunk-common', 'index']
        //  },

        //(2)输出多个页面
        move: {
            template: "public/move.html",
            entry: "src/views/move/move.main.js",
            filename: "move.html",
            title: "move",
            keywords: "333",
            description: "444",
        },
        index: {
            template: "public/index.html",
            entry: "src/main.js",
            filename: "index.html",
            title: "index",
            keywords: "333",
            description: "444",
        }
    },
}
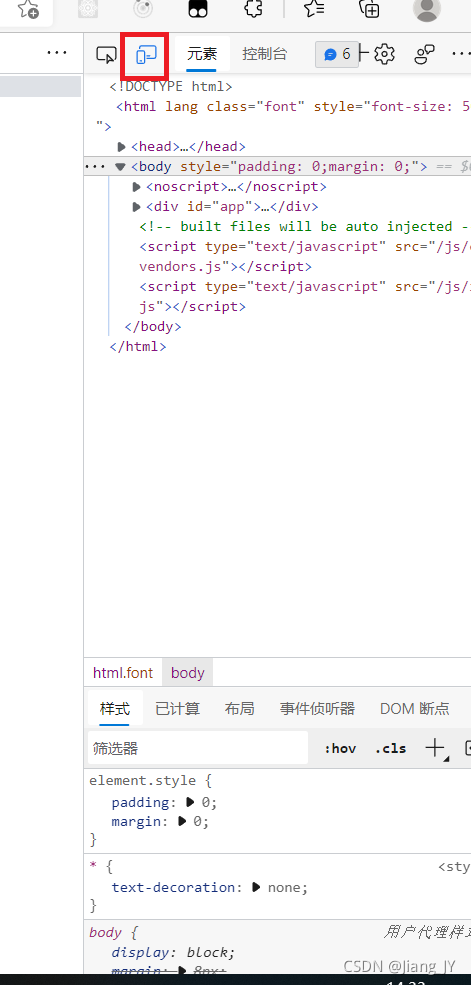
这样就可以了,运行项目后,浏览器内按 f12 打开调试窗口点击下图处切换成移动端屏幕,再按 f5 刷新即可
参考链接


 6508
6508


 被折叠的 条评论
为什么被折叠?
被折叠的 条评论
为什么被折叠?
 到【灌水乐园】发言


