


代码下载
技术栈:
- React 核心库:react、react-dom、react-router-dom
- 脚手架:create-react-app
- 数据请求:axios
- UI组件库: antd-mobile
- 其他组件库: react-virtualized、formik+yup、react-spring 等
- 百度地图API
项目搭建
部署本地接口
后台项目这里不做详细记录,只为辅助前端开发,这是后台项目下载地址。
- 将后台项目下载到本地,使用MySQLWorkbench新建名为
hkzf的数据库,字符集选择utf8,其他默认。 - 在MySQLWorkbench中,点击 File -> Open SQL Script…,然后选中db文件夹中的
hkzf_db.sql文件打开,双击选中mydb数据库并点击open,点击文档编辑区域上方闪电图标执行。 - 使用VSCode打开项目,执行
npm i安装依赖库,进入config/mysql.js文件修改module.exports中的 password 为自己的数据库密码。 - 执行
npm start运行后台项目,此时可以使用 Postman 测试相应接口,也可以在浏览器中直接打开接口文档地址http://localhost:8080。
初始化项目
1、初始化项目:npx create-react-app react_hkzf_mobile
2、启动项目,在项目根目录执行命令 npm start,主要结构说明:
| 结构 | 说明 |
|---|---|
| public | 公共资源 |
| public/index.html | 首页(必须有) |
| public/manifest.json | PWA应用的元数据 |
| src | 项目源码,写项目功能代码 |
| src/index.js | 项目入口文件(必须有) |
| src/App.js | 项目的根组件 |
| src/setupTests.js | App组件的测试文件 |
| src/reportWebVitals.js | 用来实现PWA(可选) |
3、项目中 src 目录增加结构如下:
| 结构 | 说明 |
|---|---|
assets/ | 资源(图片、字体图标等) |
components/ | 公共组件 |
pages/ | 页面 |
utils/ | 工具 |
antd-mobile 组件库 介绍
antd-mobile 中文文档
安装:
npm i antd-mobile
导入要使用的组件,渲染组件:
    import { Button } from 'antd-mobile';

    function App() {
      return (
        <div className="App">
          <Button>按钮</Button>
        </div>
      );
    }
配置基础路由
1、安装,在项目根目录执行 npm i react-router-dom 或 yarn add react-router-dom
2、在 src/index.html 中导入路由组件:
import { BrowserRouter as Router, Routes, Route, Link, Navigate } from "react-router-dom";
3、在 pages 文件夹中创建 Home.js、House.js、News.js、Profile.js 和 CityList.js 五个组件
项目整体布局有两种:
- 有TabBar的页面: 首页、找房、资讯、我的
- 无TabBar的页面:城市选择等
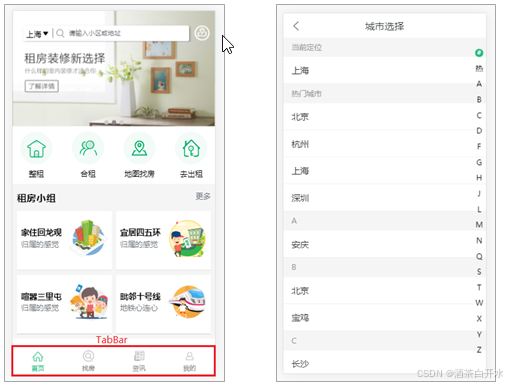
TabBar 的菜单也可以实现路由切换,也就是路由内部切换路由(嵌套路由)。用 App 组件表示父路由的内容,用 Home、House、News 和 Profile 组件表示子路由的内容。
4、在 App 组件中,添加一个Route作为子路由的出口:
    function App() {
      return (<>
        App
        <Outlet></Outlet>
      </>)
    }
5、在入口文件 index.js 中设置路由,子路由以父路由path开头(父组件展示了,子组件才会展示),修改 pathname 为 /home,Home 组件的内容就会展示在 APP 组件中了:
        <Router>
          <Routes>
            {/* 父路由 */}
            <Route path='/' element={<App></App>}>
              {/* 子路由 */}
              <Route path='/home' element={<Home></Home>}></Route>
              <Route path='/house' element={<House></House>}></Route>
              <Route path='/news' element={<News></News>}></Route>
              <Route path='/profile' element={<Profile></Profile>}></Route>
            </Route>

            <Route path='/cityList' element={<CityList></CityList>}></Route>
          </Routes>
        </Router>
外观和样式调整
1、修改页面标题,在index.html里面修改:
<title>React 好客租房案例</title>
2、基础样式调整,在 index.css 中调整 css 样式布局:
    html, body {
      height: 100%;
      font-family: 'Microsoft YaHei';
      color: #333;
      background-color: #fff;
      margin: 0;
      padding: 0;
    }

    * {
      box-sizing: border-box;
    }
实现TabBar
打开 antd-mobile 组件库中TabBar的组件文档,选中配合路由使用拷贝核心代码到 App 组件中(App是父路由组件)并调整代码:
    function App() {
      const tabs = [
        {
          key: '/home',
          title: '首页',
          icon: 'icon-ind',
        },
        {
          key: '/house',
          title: '找房',
          icon: 'icon-findHouse',
        },
        {
          key: '/news',
          title: '资讯',
          icon: 'icon-infom',
        },
        {
          key: '/profile',
          title: '我的',
          icon: 'icon-my',
        },
      ]

      const location = useLocation()
      const navigate = useNavigate()
      console.log('-----', location.pathname);

      return (<>
        <Outlet></Outlet>
        <TabBar activeKey={location.pathname} defaultActiveKey='home' safeArea onChange={(key) => navigate(key)}>
          {tabs.map(item => (
            <TabBar.Item
              key={item.key}
              icon={(active) => active ? <i className={`active iconfont ${item.icon}`} /> : <i className={`iconfont ${item.icon}`} />}
              title={(active) => active ? <span className={`active`}>{item.title}</span> : <span>{item.title}</span>}
            />
          ))}
        </TabBar>
      </>)
    }
修改 TabBar 组件 css 样式布局:
    .active {
      color: #21b97a;
    }
    .iconfont {
      font-size: 20px;
    }
    .adm-tab-bar {
      position: fixed;
      bottom: 0;
      width: 100%;
    }
设置路由重定向:
        <Router>
          <Routes>
            {/* 路由重定向 */}
            <Route path='/' element={<Navigate to='/home' replace></Navigate>}></Route>

            {/* 父路由 */}
            <Route path='/' element={<App></App>}>
              {/* 子路由 */}
              <Route path='/home' element={<Home></Home>}></Route>
              <Route path='/house' element={<House></House>}></Route>
              <Route path='/news' element={<News></News>}></Route>
              <Route path='/profile' element={<Profile></Profile>}></Route>
            </Route>

            <Route path='/cityList' element={<CityList></CityList>}></Route>
          </Routes>
        </Router>
首页模块
轮播图
打开 antd-mobile 组件库的 Swiper 走马灯 组件文档,选择循环拷贝核心代码到 Home 组件中。并优化相应的结构,删除不必要的代码:
    mport {Swiper, Toast } from 'antd-mobile'
    import './Home.css'

    const colors = ['#ace0ff', '#bcffbd', '#e4fabd', '#ffcfac']

    const items = colors.map((color, index) => (
      <Swiper.Item key={index}>
        <div
          className='content'
          onClick={() => {
            Toast.show(`你点击了卡片 ${index + 1}`)
          }}
        >
          {index + 1}
        </div>
      </Swiper.Item>
    ))

    export default function Home() {
        return (<>
            <Swiper
              loop
              autoplay
              onIndexChange={i => {
                console.log(i, 'onIndexChange1')
              }}
            >
              {items}
            </Swiper>
        </>)
    }
修改轮播图相关 css 样式布局:
    /* 轮播图 */
    .content {
        height: 212px;
        color: #ffffff;
        display: flex;
        justify-content: center;
        align-items: center;
        font-size: 48px;
        user-select: none;
        img {
            height: 212px;
        }
    }
    .adm-page-indicator {
        --active-dot-size: 3px;
    }
获取轮播图的数据
1、安装 axios: npm i axios
2、新建 utils > useData.js 文件,在这里配置 axios,并自定义获取网络数据的 Hook:
    import { useState, useEffect } from "react";
    import axios from "axios";

    // 全局配置
    axios.defaults.timeout = 10000 // 超时时间
    axios.defaults.baseURL = 'http://127.0.0.1:8080' // 域名
    // 响应拦截器
    axios.interceptors.response.use((res) => {
        console.log('data: ', res);
        return res.data
    }, (error) => {
        console.log('error: ', error);
    })

    function useNetwork(url, stringParams, type) {
        const [data, setData] = useState(null)
        const [error, setError] = useState(null)
        const [loading, setLoading] = useState(true)
        useEffect(() => {
            console.log('stringParams:', stringParams);
            let ignore = false
            const request = async () => {
                try {
                    let result = null
                    switch (type) {
                        case 'GET':
                            result = await axios.get(url, stringParams && JSON.parse(stringParams))
                            break;
                        case 'POST':
                            result = await axios.post(url, stringParams && JSON.parse(stringParams))
                            break
                        default:
                            break;
                    }
                    if (!ignore && result) {
                        setData(result)
                    }
                    setLoading(false)
                } catch (error) {
                    if (!ignore) {
                        setError(error)
                        setLoading(false)
                    }
                }
            }
            request()
            return () => {
                ignore = true
                setLoading(false)
            }
        }, [url, stringParams, type])

        return { data, error, loading }
    }
    function useGet(url, params) {
        return useNetwork(url, JSON.stringify(params), 'GET')
    }
    function usePost(url, params) {
        return useNetwork(url, JSON.stringify(params), 'POST')
    }

    const useData = { get: useGet, post: usePost }
    export default useData
说明:React Effect 使用
Object.is比较依赖项的值,如果依赖项为 对象,则比较的是是否在内存中为同一对象。自定义 Hook useNetwork 中的请求参数需要比较的是参数内容(值)是否相同,所以将参数转化为字符串作为Effect依赖性。
3、在 Home 组件中,导入 useData 获取数据并优化调整代码结构:
    import useData from '../utils/useData'

    // 渲染轮播图
    function renderSwiper(data, indexChange, indexClick) {
        return data && <Swiper
        loop
        autoplay
        onIndexChange={ indexChange }
        >
            {data.body.map((item, index) => (
                <Swiper.Item key={index}>
                    <div
                    className='content'
                    style={{ background: 'red' }}
                    onClick={ (e) => indexClick(index, e) }
                    >
                        <img src={'http://127.0.0.1:8080' + item.imgSrc} style={{width: '100%'}} alt=''></img>
                    </div>
                </Swiper.Item>
            ))}
        </Swiper>
    }

    export default function Home() {
        const { data: swiperData } = useData.get('/home/swiper')
        console.log('swiperData: ', swiperData);

        return (<>
            {/* 轮播图 */}
            { renderSwiper(swiperData, i => console.log('indexChange: ', i), i => Toast.show(`你点击了卡片 ${i + 1}`)) }
        </>)
    }
导航菜单
1、导入图片:
    // 导入所需图片
    import nav1 from "../assets/images/nav-1.png";
    import nav2 from "../assets/images/nav-2.png";
    import nav3 from "../assets/images/nav-3.png";
    import nav4 from "../assets/images/nav-4.png";
2、构建导航菜单数据:
    // 构建导航菜单数据
    const navData = [
        {
          id: 1,
          img: nav1,
          title: '整租',
          path: '/house'
        },
        {
          id: 2,
          img: nav2,
          title: '合租',
          path: '/house'
        },
        {
          id: 3,
          img: nav3,
          title: '地图找房',
          path: '/map'
        },
        {
          id: 4,
          img: nav4,
          title: '去出租',
          path: '/rent/add'
        }
      ]
3、编写页面内容:
    // 渲染导航菜单
    function renderNav(data, onClick) {
        return (<div className='home-nav'>
            {data.map((item) => {
                return <div className='home-nav-item' key={item.id} onClick={() => onClick(item)}>
                    <img src={item.img} alt=''></img>
                    <p>{item.title}</p>
                </div>
            })}
        </div>)
    }
4、调整 css 样式布局:
    /* 导航菜单 */
    .home-nav {
        display: flex;
        margin: 16px 0;
    }
    .home-nav-item {
        flex-grow: 1;
        text-align: center;
    }
    .home-nav-item img {
        width: 48px;
    }
    .home-nav-item p {
        font-size: 14px;
        margin: 0;
    }
5、调用渲染方法:
            {/* 导航菜单 */}
            { renderNavs(navData, item => navigate(item.path)) }
轮播图的问题
由于动态加载数据,有了数据才去渲染轮播图,轮播图从无到有导致轮播图下方的内容会产生一个从上被挤到下面的现象。
解决办法就是在轮播图的外层加一个div,给这个div设置高度:
    // 渲染轮播图
    function renderSwiper(data, indexChange, indexClick) {
        return <div className='swiper'>
            {data && <Swiper
            loop
            autoplay
            onIndexChange={ indexChange }
            >
                {data.body.map((item, index) => (
                    <Swiper.Item key={index}>
                        <div
                        className='content'
                        onClick={ (e) => indexClick(index, e) }
                        >
                            <img src={'http://127.0.0.1:8080' + item.imgSrc} style={{width: '100%'}} alt=''></img>
                        </div>
                    </Swiper.Item>
                ))}
            </Swiper>}
        </div>
    }

    /* 轮播图 css */
    .swiper {
        height: 212px;
    }
Sass的使用
- 打开脚手架文档,找到添加Sass样式
- 安装Sass:
npm i sass或yarn add sass - 创建后缀名为.scss 或者 .sass 的样式文件
- 在组件中导入Sass样式
修改 Home.css 为 Home.scss 文件,一并修改 Home 组件的导入 import './Home.scss',并修改 导航菜单 为如下样式:
    /* 导航菜单 */
    .home-nav {
        display: flex;
        margin: 16px 0;
        .home-nav-item {
            flex-grow: 1;
            text-align: center;
            img {
                width: 48px;
            }
            p {
                font-size: 14px;
                margin: 0;
            }
        }
    }
租房小组
根据当前地理位置展示不同小组信息,需要后台接口根据用户找房数据,推荐用户最感兴趣的内容(正常的逻辑是我们先获取到用户当前定位的信息,把信息发送给后台,后台根据定位信息获取对应的内容),前端只需要展示数据。
数据获取
在 Home 组件中调用接口获取数据:
        // 获取租房小组数据
        const { data: groupData } = useData.get('/home/groups', {params: {area: 'AREA%7C88cff55c-aaa4-e2e0'}})
        console.log('groupData: ', groupData);
页面结构
1、打开 antd-mobile 组件库的 Grid 组件文档,复杂核心代码并调整,封装为渲染函数:
    // 渲染租房小组
    function renderGroup(data) {
        return <div className='group'>
            <div className='top'>
                <div className='name'>租房小组</div>
                <div className='more'>更多</div>
            </div>
            <Grid columns={2} gap={[32, 16]}>
                {data && data.body.map((item) => {
                    return <Grid.Item key={item.id}>
                        <div className='item'>
                            <div className='left'>
                                <div className='title'>{item.title}</div>
                                <div className='desc'>{item.desc}</div>
                            </div>
                            <div className='right'>
                                <img className='picture' src={`http://127.0.0.1:8080${item.imgSrc}`} alt=''></img>
                            </div>
                        </div>
                    </Grid.Item>
                })}
            </Grid>
        </div>
    }
2、css 样式布局:
    // 租房小组
    .group {
        margin: 8px 0;
        .top {
            display: flex;
            justify-content: space-between;
            margin: 16px;
            .name {
                font-size: 15px;
                font-weight: bold;
            }
            .more {
                font-size: 14px;
                color: #999999;
            }
        }
        .adm-grid {
            margin: 8px 16px;
            .adm-grid-item {
                height: 75px;
                .item {
                    text-align: center;
                    height: 100%;
                    display: flex;
                    justify-content: space-between;
                    text-align: center;
                    padding: 0 8px;
                    .left {
                        display: flex;
                        flex-direction: column;
                        justify-content: center;
                        .title {
                            font-size: 13px;
                            font-weight: bold;
                            margin-bottom: 4px;
                        }
                        .desc {
                            font-size: 12px;
                            color: #999999;
                        }
                    }
                    .right {
                        display: flex;
                        flex-direction: column;
                        justify-content: center;
                        .picture {
                            width: 55px;
                            height: 53px;
                        }
                    }
                }
            }
        }
    }
3、在 Home 组件中调用渲染函数:
            {/* 租房小组 */}
            { renderGroup(groupData)}
最新资讯
略……(同租房小组)
解决内容被 TabBar 压住的问题
1、在 App 组件中将 Outlet 路由占位包裹在一个 div 中:
        <div className='app-content'>
          <Outlet></Outlet>
        </div>
2、调整相应样式,设置 app 底部 49 像素的内边距,让 app-content 超出父元素的内容滚动显示:
    #root {
      height: 100%;
    }
    .app {
      height: 100%;
      padding-bottom: 49px;
    }
    .app-content {
      height: 100%;
      overflow: scroll;
    }
顶部搜索功能
1、相关结构:
    // 渲染顶部搜索
    function renderHeaderSearch(cityName, onClickLoction, onClickSearch, onClickMap) {
        return <div className='headerSearch'>
            <div className='search'>
                <div className='location' onClick={onClickLoction}>
                    <span className="name">{cityName}</span>
                    <i className="iconfont icon-arrow" />
                </div>
                <div className='form' onClick={onClickSearch}>
                    <i className="iconfont icon-seach" />
                    <span className="text">请输入小区或地址</span>
                </div>
            </div>
            <div className="iconfont icon-map" onClick={onClickMap}></div>
        </div>
    }
2、css 样式布局:
    // 顶部搜索
    .headerSearch {
        position: absolute;
        padding: 0 16px;
        width: 100%;
        height: 44px;
        top: 34px;
        display: flex;
        justify-content: space-between;
        align-items: center;
        .search {
            height: 100%;
            padding: 0 8px;
            font-size: 14px;
            border-radius: 3px;
            background-color: white;
            margin-right: 8px;
            flex-grow: 1;
            display: flex;
            align-items: center;
            .location {
                i {
                    color: #7f7f80;
                    font-size: 12px;
                    margin-left: 2px;
                }
            }
            .form {
                margin-left: 24px;
                color: #9c9fa1;
                flex-grow: 1;
                display: flex;
                span {
                    margin-left: 8px;
                }
            }
        }
        .icon-map {
            font-size: 25px;
            color: white;
        }
    }
3、在 Home 组件中调用渲染函数:
            {/* 顶部搜索 */}
            { renderHeaderSearch('天津', () => navigate('/cityList'), () => navigate('/search'), () => navigate('/map')) }
定位相关
H5中地理定理定位API
在 Web 应用程序中获取地理位置(文档)
地理位置API 允许用户向 Web应用程序提供他们的位置,出于隐私考虑,报告地理位置前先会请求用户许可,地理位置的API是通过 navigator.geolocation 对象提供,通过getCurrentPosition方法获取。
获取到的地理位置跟 GPS、IP地址、WIFI和蓝牙的MAC地址、GSM/CDMS的ID有关,比如:手机优先使用GPS定位,笔记本等最准确的是定位是WIFI。
    navigator.geolocation.getCurrentPosition(position => {
    // position对象表示当前位置信息
    // 常用: latitude 纬度 / longitude 经度
    // 知道: accuracy 经纬度的精度 / altitude 海拔高度 / altitudeAccuracy 海拔高度的精
    度 / heading 设备行进方向 / speed 速度
    })
百度地图API
H5的地理位置API只能获取到对应经纬度信息,在实际开发中,会使用百度地图/高德地图来完成地理位置的相关功能。
1、参照百度地图文档,注册百度开发者账号,申请对应的AK
2、在 index.html 中引入百度地图 API 文件,替换自己申请好的密钥:
<script type="text/javascript" src="https://api.map.baidu.com/api?v=1.0&type=webgl&ak=你的密钥"></script>
3、新建 Map 组件文件,创建地图容器等基本结构,并参照文档创建地图:
    import { useEffect } from "react";
    import './Map.scss'

    export default function Map() {
        // 创建地图
        useEffect(() => {
            var map = new window.BMapGL.Map("container");          // 创建地图实例
            var point = new window.BMapGL.Point(116.404, 39.915);  // 创建点坐标
            map.centerAndZoom(point, 15);                 // 初始化地图,设置中心点坐标和地图级别
            map.enableScrollWheelZoom(true);     //开启鼠标滚轮缩放
            return () => map = null
        }, [])
        return <div className="map">
            <div id="container"></div>
        </div>
    }
4、css 样式布局:
    .map {
        height: 100%;
        #container {
            height: 100%;
        }
    }
5、在 index.js 中配置地图页面的路由:
<Route path='/map' element={<Map></Map>}></Route>
获取顶部搜索城市信息
1、通过IP定位获取到当前城市名称,调用服务器的接口,换取项目中的城市信息:
        // 百度地图 IP 定位,转换城市数据
        const [ city, setCity ] = useState(null);
        useEffect(() => {
            var ignore = false
            var localCity = new window.BMapGL.LocalCity();
            localCity.get((result) => {
                if (!ignore) {
                    console.log('LocalCity:', result);
                    axios.get('area/info?name=' + result.name).then((cityData) => {
                        if (!ignore) {
                            console.log('cityData:', cityData);
                            setCity(cityData.body.label)
                        }
                    })
                }
            });
            return () => ignore = true
        }, [])
2、修改顶部搜索栏渲染方法的调用,在城市信息获取之前使用 -- 占位符:
            {/* 顶部搜索 */}
            { renderHeaderSearch(city ? city : '--', () => navigate('/cityList'), () => navigate('/search'), () => navigate('/map')) }
城市选择模块
顶部导航栏
- 打开antd-mobile 组件库的NavBar 导航栏组件 文档
- 从文档中拷贝组件示例代码到项目中,让其正确运行
- 修改导航栏样式和结构
1、引入 组件库:
    import { NavBar } from 'antd-mobile'
    import { useNavigate } from "react-router-dom";
2、拷贝并修改代码结构:
    function CityList() {
        const navigate = useNavigate()

        return (<div className='city-list'>
            {/* 导航栏 */}
            <NavBar style={{
                '--height': '44px',
                '--border-bottom': '1px #eee solid',
                'color': '#333',
                'backgroundColor': '#f6f5f6'
              }} backIcon={<i className='iconfont icon-back'></i>} onBack={() => { navigate(-1)
            }}>城市列表</NavBar>
        </div>)
    }
3、新建并导入样式文件:
import './CityList.scss'
4、设置相应的样式:
    .city-list {
        padding-top: 44px;
        width: 100%;
        height: 100%;

        // 导航栏样式
        .adm-nav-bar {
            margin-top: -44px;
        }
        .adm-nav-bar-title {
            color: #333;
        }
    }
城市列表
获取处理数据
1、导入自定义获取数据的 HOOK import useData from '../utils/useData',根据接口文档提供的url进行网络请求,获取到相应的数据信息:
        // 获取城市列表数据
        const { data: cityData } = useData.get('/area/city', {params:{'level': '1'}})
        console.log('cityData: ', cityData);
2、需要把服务器返回的数据进行格式化处理,可以通过首字母来进行城市的定位,所以需要把格式转换成以下格式:
    // 接口返回的数据格式:
    [{ "label": "北京", "value": "", "pinyin": "beijing", "short": "bj" }]

    // 渲染城市列表的数据格式为:
    { a: [{}, {}], b: [{}, ...] }

    // 渲染右侧索引的数据格式为:
    ['a', 'b']
3、封装一个函数,来处理这个数据:
    // 城市列表数据处理
    function cityDataHandle(data) {
        if (data && data.body && Array.isArray(data.body) && data.body.length > 0) {
            // 有数据
            // 键是首字母,值是一个数组:对应首字母的城市信息
            const cityList = {}
            data.body.forEach(element => {
                const firstL = element.short[0]
                if (cityList[firstL]) {
                    cityList[firstL].push(element)
                } else {
                    cityList[firstL] = [element]
                }
            });
            const result = { cityList, cityKeys: Object.keys(cityList).sort() }
            return result
        } else {
            return {}
        }
    }
4、调用函数,来格式化数据:
        // 城市列表数据处理
        const { cityList, cityKeys } = cityDataHandle(cityData)
获取热门数据
导入所需 HOOK import { useEffect, useState } from "react";,获取数据并添加到 cityList和cityKeys中,注意,对象里面的属性是无序的,可以直接插入,但是数组是有序的需要添加到前面:
        // 获取热门城市数据
        const { data: hotData } = useData.get('/area/hot')
        console.log('hotData: ', hotData);
        if (cityList && cityKeys && hotData && hotData.body && Array.isArray(hotData.body) && hotData.body.length > 0) {
            cityList['hot'] = hotData.body
            cityKeys.unshift('hot')
        }
获取当前城市信息
将获取定位城市的代码封装到一个函数中,哪个页面需要获取定位城市,直接调用该方法即可:
- 在utils目录中,创建一个文件,在这个文件中进行封装
- 创建并且导出获取定位城市的函数 getCurrentCity
- 判断localStorage中是否有定位信息
- 如果没有,我们通过获取定位信息来获取当前定位城市,获取完了需要存到本地存储中
- 如果有,直接使用就好
    import axios from "axios";

    export default function requestCurrentCity() {
        // 获取本地存储中是否有
        const localCity = localStorage.getItem('localCity')
        console.log('localCity', localCity);
        if (localCity) {
            // 如果有,返回城市信息就好,返回一个成功的promis对象即可
            return Promise.resolve(JSON.parse(localCity))
        } else {
            return new Promise((resolve, reject) => {
                var localCity = new window.BMapGL.LocalCity();
                localCity.get(async (result) => {
                    console.log('LocalCity:', result);
                    try {
                        const city = await axios.get('area/info?name=' + result.name)
                        console.log('city: ', city);

                        if (city.status === 200) {
                            localStorage.setItem('localCity', JSON.stringify(city.body))
                            resolve(city.body)
                        } else {
                            console.error(city.description);
                            throw new Error(city.description);
                        }
                    } catch (error) {
                        reject(error)
                    }
                });
            })
        }
    }
将定位的城市信息添加到 cityList和cityIndex中:
        // 获取当前城市
        const [currentCity, setCurrentCity] = useState(null)
        useEffect(() => {
            let ignore = false
            requestCurrentCity().then((data) => {
                if (!ignore) {
                    setCurrentCity(data)
                }
            })
            return () => ignore = true
        }, [])
        if (currentCity && cityList) {
            cityList['#'] = [currentCity]
            cityKeys.unshift('#')
        }
        console.log('cityList: ', cityList);
        console.log('cityKeys: ', cityKeys);
长列表性能优化
在展示大型列表和表格数据的时候(城市列表、通讯录、微博等),会导致页面卡顿,滚动不流畅等性能问题,这样就会导致移动设备耗电加快,影响移动设备的电池寿命
产生性能问题的原因:大量DOM节点的重绘和重排
优化方案:懒渲染、可视区域渲染
懒加载,常见的长列表优化方案,常见于移动端:
- 原理:每次只渲染一部分,等渲染的数据即将滚动完时,再渲染下面部分
- 优点:每次渲染一部分数据,速度快
- 缺点:数据量大时,页面中依然存在大量DOM节点,占用内存过多,降低浏览器渲染性能,导致页面卡顿
- 使用场景:数据量不大的情况下
可视区渲染(React-virtualized):
- 原理:是只渲染页面可视区域的列表项,非可视区域的数据 完全不渲染(预加载前面几项和后面几项) ,在滚动列表时动态更新列表项
- 使用场景: 一次性展示大量数据的情况
react-virtualized 渲染城市列表
react-virtualized 是React组件,用来高效渲染大型列表和表格数据,GitHub地址: react-virtualized
1、安装: import i react-virtualized
2、在项目入口文件 index.js 中导入样式文件 import "react-virtualized/styles.css";
3、打开 文档, 点击List组件,进入List的文档中,拷贝示例中渲染每一行的代码到项目中并按需求修改:
        // 渲染每一行
        function rowRenderer({
                index, // 索引号
                isScrolling, // 当前项是否正在滚动中
                isVisible, // 当前项在List中是可见的
                key, // 渲染数组中行的唯一键
                parent, // 对父List(实例)的引用
                style, // 重点属性:一定要给每一个行数添加该样式
            }){
            let title = cityKeys[index]
            const citys = cityList[title]
            switch (title) {
                case '#':
                    title = '当前定位'
                    break;
                case 'hot':
                    title = '热门城市'
                    break
                default:
                    break;
            }

            return (
                <div key={key} style={style} className='city'>
                    <div className='title'>{title}</div>
                    {
                        citys.map((item, i) => {
                            return <div className='name' key={item.value}>{item.label}</div>
                        })
                    }
                </div>
            );
        }
4、渲染城市列表,利用 AutoSizer 组件来调整子元素的宽高
- 导入
AutoSizer、List组件import { List, AutoSizer } from "react-virtualized"; - 通过 render-props 模式,获取到
AutoSizer组件暴露的 width 和 height 属性 - 设置List组件的 width 和 height 属性
            {/* 城市列表 */}
            { cityKeys && <AutoSizer>
                { ({width, height}) => {
                    return <List
                        width={width}
                        height={height}
                        rowCount={cityKeys.length}
                        rowHeight={({index}) => {
                            console.log('index: ', index);
                            const key = cityKeys[index]
                            const section = cityList[key]
                            console.log('section: ', section);

                            return 20 + 44*section.length
                        }}
                        rowRenderer={rowRenderer}
                    />
                } }
            </AutoSizer> }
5、为城市列表设置样式:
    // 城市列表样式
    .city {
        .title {
            height: 20px;
            background-color: #e5e5e5;
            padding: 0 12px;
            font-size: 12px;
            line-height: 20px;
        }
        .name {
            height: 44px;
            padding: 0 16px;
            font-size: 14px;
            line-height: 44px;
        }
    }
渲染右侧索引列表
1、添加状态 activeIndex,用来指定当前高亮的索引:
        // 高亮索引
        const [activeIndex, setActiveIndex] = useState(0)
2、遍历cityIndex,渲染索引列表,将索引 hot 替换成 热:
            {/* 右侧索引 */}
            { cityKeys && <ul className='city-index'>
                {cityKeys.map((item, index) => <li className={activeIndex === index ? 'active' : ''} key={item}>{item === 'hot' ? '热' : item}</li>)}
            </ul> }
3、为索引列表添加样式:
    // 城市索引列表样式
    .city-index {
        position: absolute;
        right: 8px;
        height: 90%;
        list-style: none;
        margin: 0;
        padding: 5px;
        text-align: center;
        display: flex;
        flex-direction: column;
        justify-content: space-around;
        .active {
            color: #fff;
            background-color: #21b97a;
            width: 15px;
            height: 15px;
            font-size: 12px;
            text-align: center;
            line-height: 15px;
            border-radius: 100%;
        }
    }
4、城市索引列表高亮
给 List 组件添加onRowsRendered配置项,用于获取当前列表渲染的行信息,在里面就会有相应信息,通过参数 startIndex 获取到 起始行对应的索引号。判断 startIndex 和 activeIndex 不同时候,更新状态 activeIndex 为 startIndex:
                        onRowsRendered={({startIndex}) => {
                            console.log('startIndex: ', startIndex);

                            if (startIndex !== activeIndex) {
                                setActiveIndex(startIndex)
                            }
                        }}
5、点击索引置顶该索引城市
引入 useRef import { useRef } from "react";,并在组件顶部初始化 ref:
        // 列表 ref
        const listRef = useRef(null)
将创建好的ref对象,添加为List组件的ref属性,设置List组件的scrollToAlignment配置项值为start,保证点击行出现在页面顶部:
                    <List
                        ……
                        scrollToAlignment='start'
                        ref={listRef}
                    />
给索引列表绑定点击事件,在点击事件中。通过 index 获取到当前项索引号通过 ref 的 current 属性,获取到组件实例,再调用组件的scrollToRow方法让List组件滚动到指定行:
            {/* 右侧索引 */}
            { cityKeys && <ul className='city-index'>
                {cityKeys.map((item, index) => <li className={activeIndex === index ? 'active' : ''} key={item} onClick={() => {
                    listRef.current.measureAllRows()
                    listRef.current.scrollToRow(index)
                }}>{item === 'hot' ? '热' : item}</li>)}
            </ul> }
对于点击索引无法正确定位的问题,在List组件调用 measureAllRows 方法之前调用 measureAllRows,提前计算高度来解决。
切换城市
- 给城市列表项绑定事件
- 判断当前城市是否有房源数据,只有热门城市有房源数据
- 如果有房源数据,则保持当前城市数据到本地缓存中,并返回上一页
- 如果没有房源数据,则使用
antd-mobile中的 Toast 组件提示用户:改城市暂无房源数据,不执行任何操作
        // 渲染每一行
        function rowRenderer({
                index, // 索引号
                isScrolling, // 当前项是否正在滚动中
                isVisible, // 当前项在List中是可见的
                key, // 渲染数组中行的唯一键
                parent, // 对父List(实例)的引用
                style, // 重点属性:一定要给每一个行数添加该样式
            }){
            let title = cityKeys[index]
            const citys = cityList[title]
            switch (title) {
                case '#':
                    title = '当前定位'
                    break;
                case 'hot':
                    title = '热门城市'
                    break
                default:
                    break;
            }

            return (
                <div key={key} style={style} className='city'>
                    <div className='title'>{title}</div>
                    {
                        citys.map((item, i) => {
                            return <div className='name' key={item.value} onClick={() => {
                                const hotList = cityList['hot']
                                let contain = false
                                for (const i in hotList) {
                                    const v = hotList[i]
                                    if (v.label === item.label) {
                                        contain = true
                                        break
                                    }
                                }
                                if (contain) {
                                    // 热门城市才有房源数据
                                    localStorage.setItem('localCity', JSON.stringify({'label': item.label, 'value': item.value}))
                                    navigate(-1)
                                } else {
                                    Toast.show({ content: '该城市暂无房源数据', duration: 2000 })
                                }
                            }}>{item.label}</div>
                        })
                    }
                </div>
            );
        }


 1068
1068

 被折叠的 条评论
为什么被折叠?
被折叠的 条评论
为什么被折叠?
 到【灌水乐园】发言


