import 'package:flutter/material.dart';
/*
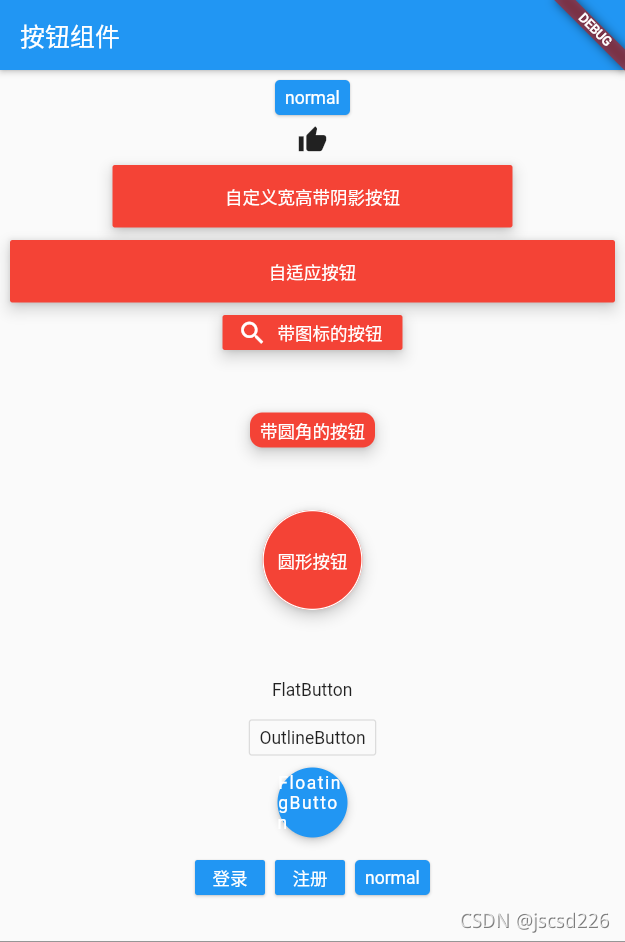
*flutter 按钮组件详解
*/
void main() {
runApp(MyApp());
}
class MyApp extends StatelessWidget {
@override
Widget build(BuildContext context) {
return MaterialApp(
title: "按钮组件",
home: Scaffold(
appBar: AppBar(
title: Text("按钮组件"),
),
body: HomeContext(),
),
);
}
}
//自定义的Widget
class HomeContext extends StatelessWidget {
@override
Widget build(BuildContext context) {
return Button();
}
}
//按钮练习,Flutter里分为4个按钮 FloatingActionButton,RaisedButton,FlatButton,OutlineButton
class Button extends StatelessWidget {
@override
Widget build(BuildContext context) {
return Padding(
///不想让他靠边,所以加了个padding
padding: const EdgeInsets.all(8.0),
child: Column(
children: <Widget>[
Row(
mainAxisAlignment: MainAxisAlignment.center, //主轴(水平)对齐
children: <Widget>[
Container(
///由于按钮无法设置大小,想要设置按钮的大小就需要在按钮外面包围一个container
///设置这个containet的宽度和高度,里面的按钮会自动填充containet
height: 50,
width: 320,
child: RaisedButton(
child: Text("自定义宽高带阴影按钮"),
onPressed: () {
print("自定义宽高带阴影按钮被点击了");
},
color: Colors.red, //按钮的背景颜色
textColor: Colors.white, //字体颜色
elevation: 10.0, //阴影
),
),
],
),
SizedBox(
height: 10,
),
Row(
children: <Widget>[
Expanded(
///这个是一个自适应按钮,他会根据屏幕的大小自动适应,只需要在按钮外面增加一个Expanded即可
///如果想改变他的高度可以在Expanded里面在防止一个container设置他的高度即可
///这里要注意,如果用的是row布局,你们他的自适应方向是水平的,如果用的是columu布局他的方向就是垂直的自适应
child: Container(
height: 50, //按钮的高度
child: RaisedButton(
child: Text("自适应按钮"),
onPressed: () {
print("自适应按钮被点击了");
},
color: Colors.red, //按钮的背景颜色
textColor: Colors.white, //字体颜色
elevation: 10.0, //阴影
),
),
),
],
),
SizedBox(
height: 10,
),
Row(
mainAxisAlignment: MainAxisAlignment.center,
children: <Widget>[
RaisedButton.icon(
///带图标的按钮 注意格式的RaisedButton.icon
icon: Icon(Icons.search),
label: Text("带图标的按钮"),
color: Colors.red, //按钮的背景颜色
textColor: Colors.white, //字体颜色
elevation: 10.0, //阴影
onPressed: () {
print("图标按钮被点击了");
},
),
],
),
SizedBox(height: 50),
Row(
mainAxisAlignment: MainAxisAlignment.center,
children: <Widget>[
RaisedButton(
child: Text("带圆角的按钮"),
onPressed: () {
print("圆角按钮被点击了");
},
color: Colors.red, //按钮的背景颜色
textColor: Colors.white, //字体颜色
elevation: 10.0, //阴影
shape: RoundedRectangleBorder(
//设置圆角
borderRadius: BorderRadius.circular(10)),
),
],
),
SizedBox(height: 50),
Row(
mainAxisAlignment: MainAxisAlignment.center,
children: <Widget>[
Container(
height: 80, //设置圆形按钮的大小
child: RaisedButton(
child: Text("圆形按钮"),
onPressed: () {
print("圆形按钮被点击了");
},
color: Colors.red, //按钮的背景颜色
textColor: Colors.white, //字体颜色
elevation: 10.0, //阴影
splashColor: Colors.blue, //点击后的水波纹的颜色一般不改这里知道就可以了
shape: CircleBorder(
//设置 圆形
side: BorderSide(
//默认圆形的变宽为黑色
color: Colors.white //所以要在这里设置下边框颜色
)),
),
),
],
),
SizedBox(height: 50),
FlatButton(
///扁平化按钮,和上面的突起按钮用法一样,只是展示效果不一样而已
child: Text("FlatButton"),
onPressed: () {
print("FlatButton被点击了");
},
),
SizedBox(
height: 10,
),
OutlineButton(
//带边框的按钮,用法和突起按钮一样
child: Text("OutlineButton"),
onPressed: () {
print("OutlineButton被点击了");
},
),
SizedBox(
height: 10,
),
FloatingActionButton(
child: Text("FloatingButton"),
onPressed: () {
print("FloatingButton被点击了");
},
),
SizedBox(
height: 10,
),
Row(
mainAxisAlignment: MainAxisAlignment.center,
children: [
ButtonBar(
children: [
RaisedButton(
child: Text('登录'),
color: Colors.blue,
textColor: Colors.white,
onPressed: () {
print('登录');
}),
RaisedButton(
child: Text('注册'),
color: Colors.blue,
textColor: Colors.white,
onPressed: () {
print('注册');
})
],
)
],
)
],
),
);
}
}


 601
601


 被折叠的 条评论
为什么被折叠?
被折叠的 条评论
为什么被折叠?
 到【灌水乐园】发言


