


 本文详细介绍了ARM32和ARM64架构的内存布局,包括用户和内核地址空间的划分。在ARM32中,内核通过线性映射和remap利用全部4G空间,而用户空间仅使用3G。ARM64则拥有更大的48位虚拟地址空间。文章还探讨了虚拟地址的建立,如通过mmap函数进行映射和munmap解除映射,并展示了文件映射的基本流程。此外,还提到了vm_area_struct在进程中的作用以及如何遍历vma。
Memory layout
ARM32 memory layout

ARM32 虚拟地址设定:
- 用户地址空间: 0~3G
- 内核地址空间:3G+16M ~ 4G
内核的虚拟地址只有 1G空间,对于需要访问4G 范围地址是不够的,因此对于内核而言,kmalloc, vmalloc 建立ZONE_DMA, ZONE_NORMAL 的线性映射,而对于剩下的部分,内核需要时 remap 到ZONE_HIGHMEM, 用完释放掉以便其它模块复用,从而利用4G 空间。
用户空间,则实际只访问了3G 空间,它映射到 ZONE_HIGNMEM 物理地址空间。
ARM64 memory layout

ARM64 的虚拟地址足够大,通常使用 48bit 来描述地址范围
用户地址:0x0000 0000 0000 0000 0000 0000 0000 0000 ~ 0x0000 7fff ffff ffff ffff ffff ffff ffff
内核地址:0xffff 8000 0000 0000 0000 0000 0000 0000 ~ 0xffff ffff ffff ffff ffff ffff ffff ffff
如果地址落在上面两个范围之外,则说明地址异常。
虚拟地址描述
加载ELF 创建 vm_area_struct
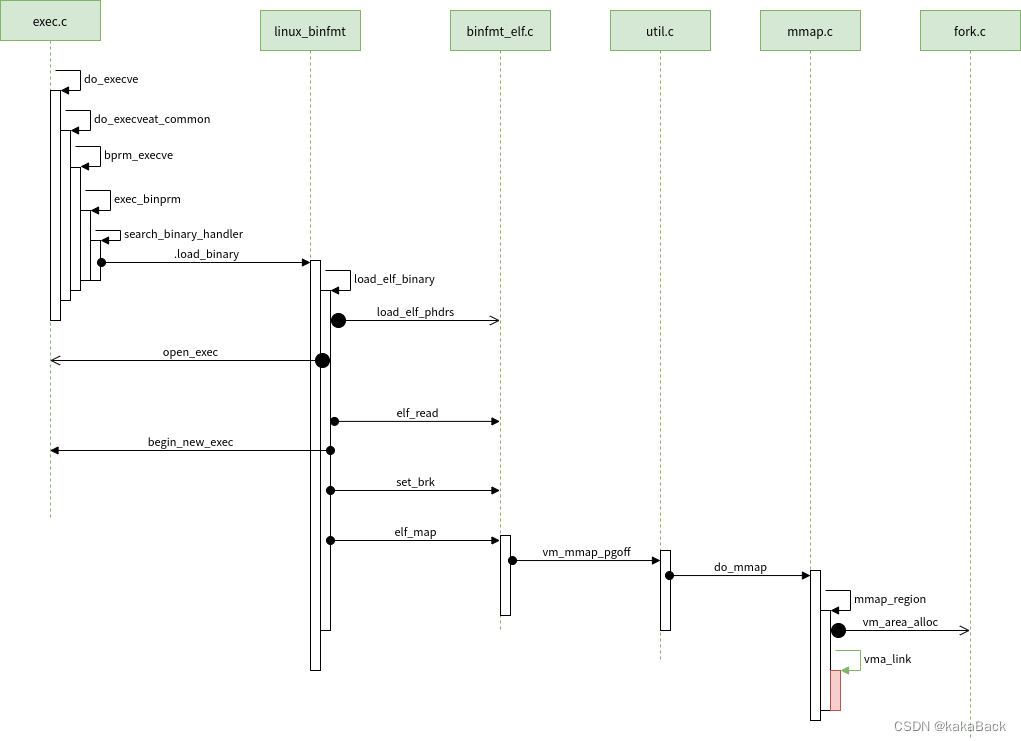
对于一个进程,其虚拟地址的 vma ,如 stack, heap, data, bin 等都是在 load elf binary 过程中加载实现的,对于 stack, heap, bss 这些是通过 map anonymous memory 建立 vma, 而对于 data,text 则主要是 map file 实现的。
vm_area_struct 在进程中描述
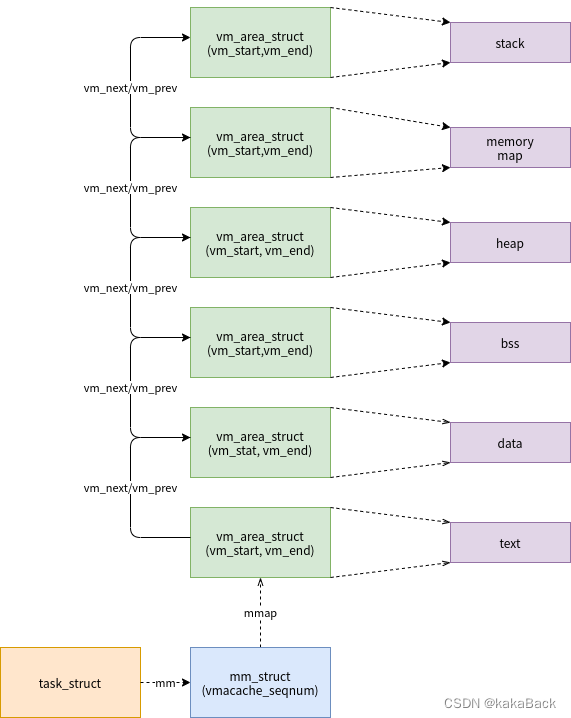
Linux 对于每个线程,它用 task_struct 来进行描述,对于除了 Kthread的线程之外,都有一个 mm_struct, 它描述进程的虚拟内存空间,对于虚拟地址中的每个部分,都使用一个结构体 struct vm_area_struct 来描述。
在进程中, vm_area_struct 彼此之间通过双向链表关联起来,同时在 mm_struct 中 mm_rb用来快速查找一个 vma.
- 遍历 vma 方式
static void dump_task_vma(struct task_struct *tsk)
{
   struct mm_struct *mm = tsk->mm;
   struct vm_area_struct *vma;
   unsigned long flags;
   char perm[BUFLEN] = {0};
   int count;

   for (vma = mm->mmap; vma; vma = vma->vm_next) {

   }
mmap
函数
void *mmap(void *addr, size_t length, int prot, int flags,
                  int fd, off_t offset);

int munmap(void *addr, size_t length);
建立函数的映射和解除映射。
对于映射,其参数解释:
- Addr: 映射地址
- Length: 映射内存长度
- Prot: 映射内存属性
- Flags: 映射的 map shared 还是 map private
- Fd: 映射的文件
- Offset: 映射的文件的偏移,anonymous 映射时一般为0
映射示意
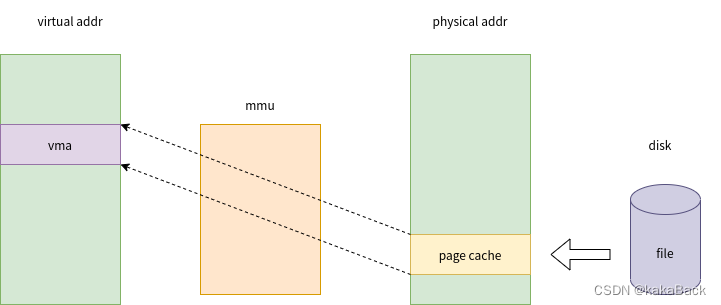
对于文件映射,其基本流程是:
- File 读到 dram 作为 page cache
- 通过 mmu 建立 physical address 和 virtual address 的映射
- 用户通过指针即可对文件进行读写操作
对于mmap 本身而言,read/write 是需要用户自己进行并发控制的。
映射时序
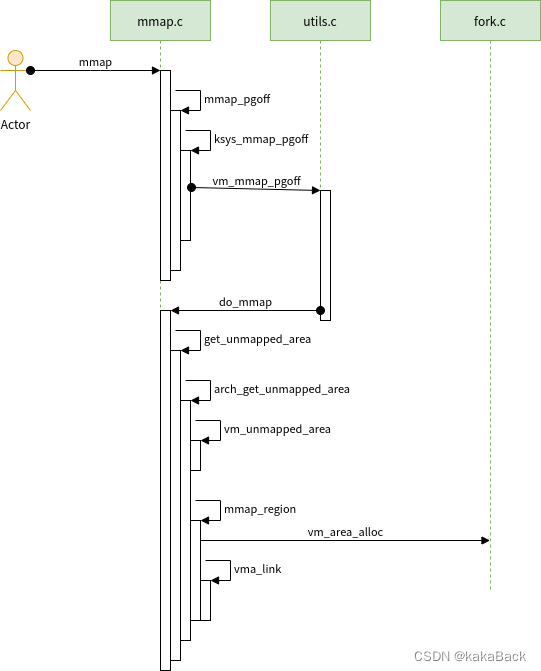
建立映射基本要点:
- 通过 mmap 传递的 fd, offset, length, prot, flags 等参数,在 virtual memory area 中找到一个 gap 满足需求的地址范围
- 使用 vm_area_alloc 分配一个 vma
- 将 vma 添加到 rbtree 中去
Vma 如何分配 page?
Pagefault 映射

这里仅从宏观上分析vma 的page建立方式, 关于pgfault 具体细节分析,我们下次继续。


 1172
1172

 被折叠的 条评论
为什么被折叠?
被折叠的 条评论
为什么被折叠?
 到【灌水乐园】发言


