


文档:
https://docs.python.org/zh-cn/3/library/tkinter.html
https://wiki.python.org/moin/TkInter
文档中的代码:
import tkinter as tk

class Application(tk.Frame):
    def __init__(self, master=None):
        super().__init__(master)
        self.master = master
        self.pack()
        self.create_widgets()

    def create_widgets(self):
        self.hi_there = tk.Button(self)
        self.hi_there["text"] = "Hello World\n(click me)"
        self.hi_there["command"] = self.say_hi
        self.hi_there.pack(side="top")

        self.quit = tk.Button(self, text="QUIT", fg="red",
                              command=self.master.destroy)
        self.quit.pack(side="bottom")

    def say_hi(self):
        print("hi there, everyone!")

root = tk.Tk()
app = Application(master=root)
app.mainloop()
执行结果(我给拉大了一点)

点QUIT就退出界面了
点”Hello World(click me)“会输出:hi there, everyone!

参考:https://www.runoob.com/python/python-gui-tkinter.html
| 属性 | 描述 |
| Dimension | 控件大小; |
| Color | 控件颜色; |
| Font | 控件字体; |
| Anchor | 锚点; |
| Relief | 控件样式; |
| Bitmap | 位图; |
| Cursor | 光标; |
| 控件 | 描述 |
|---|---|
| Button | 按钮控件;在程序中显示按钮。 |
| Canvas | 画布控件;显示图形元素如线条或文本 |
| Checkbutton | 多选框控件;用于在程序中提供多项选择框 |
| Entry | 输入控件;用于显示简单的文本内容 |
| Frame | 框架控件;在屏幕上显示一个矩形区域,多用来作为容器 |
| Label | 标签控件;可以显示文本和位图 |
| Listbox | 列表框控件;在Listbox窗口小部件是用来显示一个字符串列表给用户 |
| Menubutton | 菜单按钮控件,用于显示菜单项。 |
| Menu | 菜单控件;显示菜单栏,下拉菜单和弹出菜单 |
| Message | 消息控件;用来显示多行文本,与label比较类似 |
| Radiobutton | 单选按钮控件;显示一个单选的按钮状态 |
| Scale | 范围控件;显示一个数值刻度,为输出限定范围的数字区间 |
| Scrollbar | 滚动条控件,当内容超过可视化区域时使用,如列表框。. |
| Text | 文本控件;用于显示多行文本 |
| Toplevel | 容器控件;用来提供一个单独的对话框,和Frame比较类似 |
| Spinbox | 输入控件;与Entry类似,但是可以指定输入范围值 |
| PanedWindow | PanedWindow是一个窗口布局管理的插件,可以包含一个或者多个子控件。 |
| LabelFrame | labelframe 是一个简单的容器控件。常用与复杂的窗口布局。 |
| tkMessageBox | 用于显示你应用程序的消息框。 |
打开图片
参考:
https://zhuanlan.zhihu.com/p/75872830?from_voters_page=true
from tkinter import *
from tkinter import filedialog
from PIL import Image, ImageTk
import os

window = Tk()
window.title("Open picture")
def clicked():
    file = filedialog.askopenfilenames(initialdir=os.path.dirname(os.path.abspath(__file__)))
    return file

file = clicked()
filePosition = file[0]

img = Image.open(filePosition)  # 打开图片
photo = ImageTk.PhotoImage(img)  # 用PIL模块的PhotoImage打开
imglabel = Label(window, image=photo)
imglabel.grid(row=0, column=0, columnspan=3)

window.mainloop()
执行结果:


灰度图像
参考:https://www.jb51.net/article/173339.htm
from tkinter import *
from tkinter import filedialog
from PIL import Image, ImageTk
import os

window = Tk()
window.title("Open picture")
def clicked():
    file = filedialog.askopenfilenames(initialdir=os.path.dirname(os.path.abspath(__file__)))
    return file

file = clicked()
filePosition = file[0]

img = Image.open(filePosition)  # 打开图片
img = img.convert('L')

photo = ImageTk.PhotoImage(img)  # 用PIL模块的PhotoImage打开
imglabel = Label(window, image=photo)
imglabel.grid(row=0, column=0, columnspan=3)

window.mainloop()
结果:

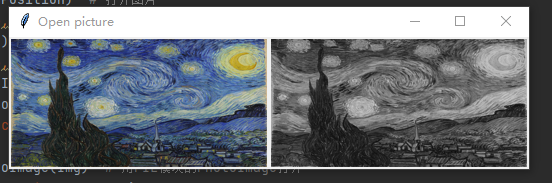
如果两张图片一起显示:
from tkinter import *
from tkinter import filedialog
from PIL import Image, ImageTk
import os

window = Tk()
window.title("Open picture")
def clicked():
    file = filedialog.askopenfilenames(initialdir=os.path.dirname(os.path.abspath(__file__)))
    return file

file = clicked()
filePosition = file[0]

img = Image.open(filePosition)  # 打开图片
Img = img.convert('L')

photo = ImageTk.PhotoImage(img)  # 用PIL模块的PhotoImage打开
imglabel = Label(window, image=photo)
imglabel.grid(row=0, column=0, columnspan=3)

photo1 = ImageTk.PhotoImage(Img)  # 用PIL模块的PhotoImage打开
imglabel = Label(window, image=photo1)
imglabel.grid(row=0, column=3, columnspan=3)

window.mainloop()
结果:

图片缩放
参考:
from tkinter import *
from tkinter import filedialog
from PIL import Image, ImageTk
import os

window = Tk()
window.title("Open picture")
def clicked():
    file = filedialog.askopenfilenames(initialdir=os.path.dirname(os.path.abspath(__file__)))
    return file

file = clicked()
filePosition = file[0]

img = Image.open(filePosition)  # 打开图片
img = img.resize((256,128))
Img = img.convert('L')
Img = Img.resize((256,128))
photo = ImageTk.PhotoImage(img)  # 用PIL模块的PhotoImage打开
imglabel = Label(window, image=photo)
imglabel.grid(row=0, column=0, columnspan=3)

photo1 = ImageTk.PhotoImage(Img)  # 用PIL模块的PhotoImage打开
imglabel = Label(window, image=photo1)
imglabel.grid(row=0, column=3, columnspan=3)

window.mainloop()
结果:
________________________________________________________________________
题外话,刚刚实操了一下加噪声(多亏我之前弯路走的足够多,现在连新模块都不用安装了,泪目)
照抄:https://blog.csdn.net/qq_38395705/article/details/106311905
import cv2
import random
import numpy as np
from matplotlib import pyplot as plt

def gasuss_noise(image, mean=0, var=0.001):
    '''
        添加高斯噪声
        mean : 均值
        var : 方差
    '''

    image = np.array(image / 255, dtype=float)
    noise = np.random.normal(mean, var ** 0.5, image.shape)
    out = image + noise
    if out.min() < 0:
        low_clip = -1.
    else:
        low_clip = 0.
    out = np.clip(out, low_clip, 1.0)
    out = np.uint8(out * 255)

    return out


def sp_noise(image,prob):

    '''
    添加椒盐噪声
    prob:噪声比例
    '''

    output = np.zeros(image.shape,np.uint8)
    thres = 1 - prob

    for i in range(image.shape[0]):
        for j in range(image.shape[1]):
            rdn = random.random()
            if rdn < prob:
                output[i][j] = 0
            elif rdn > thres:
                output[i][j] = 255
            else:
                output[i][j] = image[i][j]

    return output

img = cv2.imread("starry-night.jpg")

# 添加椒盐噪声,噪声比例为 0.02
out1 = sp_noise(img, prob=0.02)

# 添加高斯噪声,均值为0,方差为0.01
out2 = gasuss_noise(img, mean=0, var=0.01)


# 显示图像
titles = ['Original Image', 'Add Salt and Pepper noise','Add Gaussian noise']
images = [img, out1, out2]

plt.figure(figsize = (20, 15))
for i in range(3):
    plt.subplot(1,3,i+1)
    plt.imshow(images[i],'gray')
    plt.title(titles[i])
    plt.xticks([]),plt.yticks([])
plt.show()
结果:

另外,还有一个功能实现,见AttributeError: ‘Image‘ object has no attribute ‘shape‘
(打开文件之后,对文件进行加噪声的处理,再显示出来)


 500
500


 被折叠的 条评论
为什么被折叠?
被折叠的 条评论
为什么被折叠?
 到【灌水乐园】发言


