


 文章目录一、View视图二、常见布局0.布局的通用属性1.线性布局 (水平/垂直方向排列)2.相对布局(通过相对定位排列)3.帧布局(开辟空白区域,帧力的控件(层)叠加)4.表格布局(表格形式排列)5.约束布局(可视化的方式编写布局)提示:以下是本篇文章正文内容,下面案例可供参考一、View视图所有UI元素都是通过View和ViewGroup构建的。二、常见布局0.布局的通用属性属性名称功能描述android:id设置布局的标识android:layout_wi
文章目录
提示:以下是本篇文章正文内容,下面案例可供参考
一、View视图
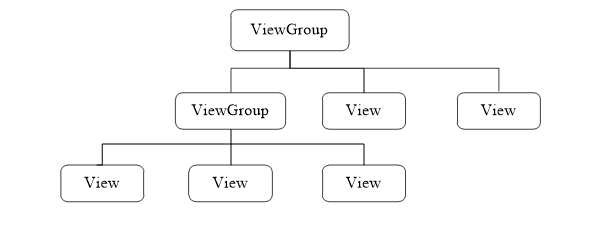
所有UI元素都是通过View和ViewGroup构建的。
二、常见布局
0.布局的通用属性
| 属性名称 | 功能描述 |
|---|---|
| android:id | 设置布局的标识 |
| android:layout_width | 设置布局的宽度 |
| android:layout_width | 设置布局的宽度 |
| android:layout_heigh | 设置布局的高度 |
| android:background | 设置布局的背景 |
| android:layout_margin | 设置当前布局与屏幕编辑或与周围控件的距离 |
| android:padding | 设置当前布局与该布局中控件的距离 |
1.线性布局 (水平/垂直方向排列)
LinearLayout
| 控件属性 | 功能描述 |
|---|---|
| android:id | 属性 |
| android:layout_width | 宽 |
| android:layout_height | 高 |
| android:background | 背景颜色 |
| android:orientation=“horizontal” | 水平 |
| android:orientation=“vertical” | 垂直 |
| android:layout_marginRight | 右外边距 |
| android:layout_marginLeft | 左外边距 |
| android:layout_marginTop | 上外边距 |
| android:layout_marginBottom | 下外边距 |
| android:padding | 内边距 (与控件的边距) |
| android:layout_weight=“1” | 权重 |
当控件使用权重属性式,布局宽度属性通常设置为0dp
2.相对布局(通过相对定位排列)
**RelativeLayout**
| 控件属性 | 功能描述 |
|---|---|
| android:layout_centerInParent | 设置当前控件位于父布局的中央位置 |
| android:layout_centerVerical | 设置当前控件位于父布局的垂直居中位置 |
| android:layout_centerHorizontal | 设置当前控件位于父布局的水平居中位置 |
| android:layout_above | 设置当前控件位于某控件上方 |
| android:layout_below | 设置当前控件位于某控件下方 |
| android:layout_toLeftOf | 设置当前控件位于某控件左侧 |
| android:layout_toRightOf | 设置当前控件位于某控件右侧 |
| android:layout_alignParentTop | 设置当前控件是否与父控件顶端对齐 |
| android:layout_alignParentLeft | 设置当前控件是否与父控件左对齐 |
| android:layout_alignParentRight | 设置当前控件是否与父控件右对齐 |
| android:layout_alignParentBotttom | 设置当前控件是否与父控件底端对齐 |
| android:layout_aligbTop | 设置当前控件的上边界与某控件的上边界对齐 |
| android:layout_aligbBottom | 设置当前控件的下边界与某控件的下边界对齐 |
| android:layout_aligbLeft | 设置当前控件的左边界与某控件的左边界对齐 |
| android:layout_aligbRight | 设置当前控件的右边界与某控件的右边界对齐 |
3.帧布局(开辟空白区域,帧力的控件(层)叠加)
FrameLayout
android:foregroundGravity="left"
 最低0.47元/天 解锁文章


 4292
4292


 被折叠的 条评论
为什么被折叠?
被折叠的 条评论
为什么被折叠?
 到【灌水乐园】发言


