


以下是 Qwen2.5-VL-7B 本地部署的完整方案,涵盖硬件要求、环境配置、模型下载、推理部署及可视化交互:
1. 硬件要求
· GPU:至少 16GB显存(如RTX 3090/4090或A100)
· CPU:8核以上(推荐Intel Core i7/i9或AMD Ryzen 7/9)
· 内存:32GB以上(推荐64GB)
· 存储:20GB以上可用空间(模型文件约14GB)
2. 环境配置
基础依赖
# 创建Python虚拟环境(推荐Python 3.10+)
conda create -n qwen python=3.10
conda activate qwen
# 安装PyTorch(CUDA 12.1+)
pip install torch torchvision torchaudio --index-url https://download.pytorch.org/whl/cu121
# 安装HuggingFace库
pip install transformers==4.37.0 accelerate
多模态工具链
# 安装模型依赖
pip install qwen-vl-utils[decord] # 视频处理支持
pip install modelscope # 模型下载工具
pip install vllm
3. 模型下载
从 ModelScope 下载模型(需约14GB空间):
modelscope download --model Qwen/Qwen2.5-VL-7B-Instruct --local_dir ./qwen2.5-vl-7b
或通过 HuggingFace(需代理):
git lfs install
git clone https://huggingface.co/Qwen/Qwen2.5-VL-7B-Instruct
4. 推理部署
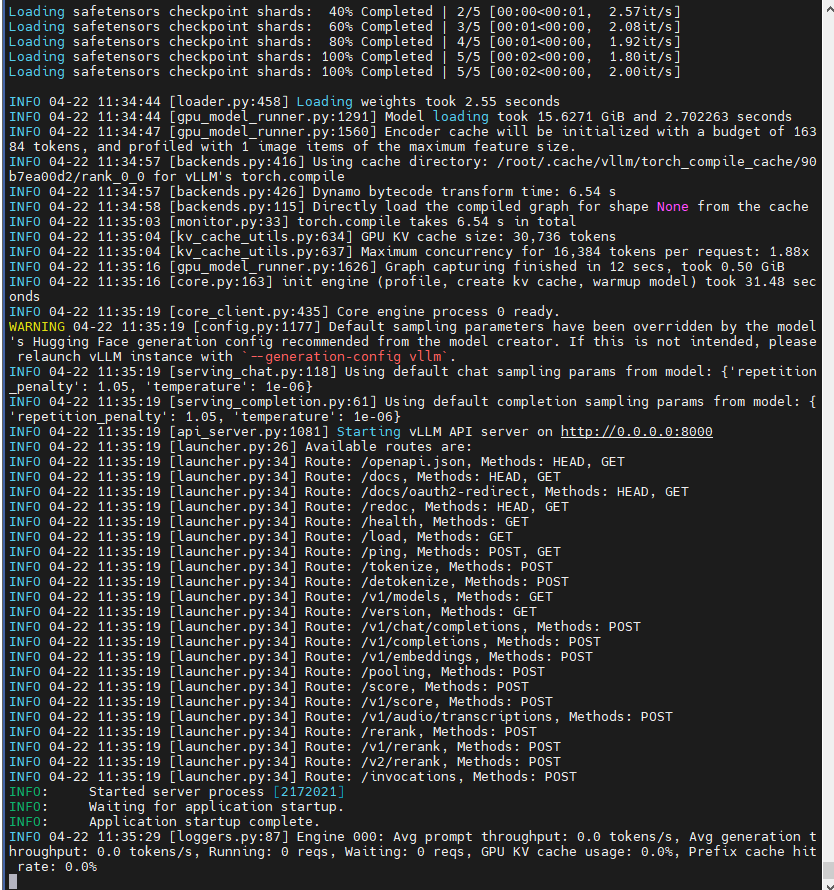
方案一:vLLM高性能服务
# 启动vLLM服务(支持多卡并行)
CUDA_VISIBLE_DEVICES=0 vllm serve ./Qwen2.5-VL-7B-Instruct/ --served-model-name Qwen2.5-VL-7B-Instruct \ --dtype bfloat16 --max-model-len 16384
参数说明:
· --limit-mm-per-prompt:限制每请求的多媒体输入数量
· --dtype bfloat16:节省显存并保持精度
显存不足,修改命令:
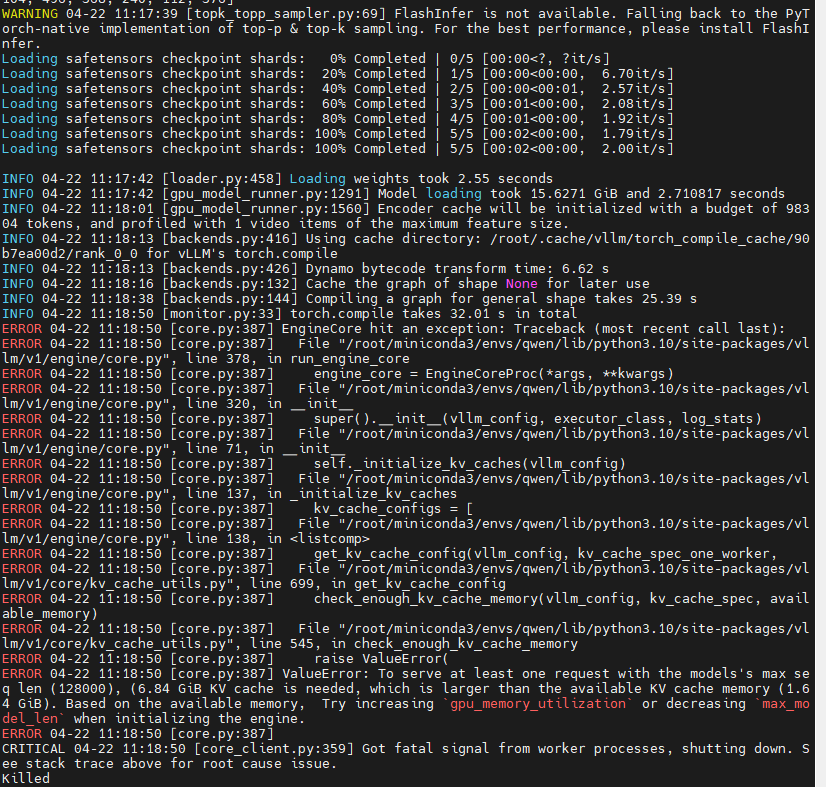
CUDA_VISIBLE_DEVICES=0,1,2 vllm serve ./Qwen2.5-VL-7B-Instruct/ --served-model-name Qwen2.5-VL-7B-Instruct \ --dtype bfloat16 --max-model-len 16384
配合AnythingLLM的使用可以参考:
AnythingLLM:linux部署体验_anything llm for linux-CSDN博客
方案二:直接使用huaggingface的样例代码
使用第二张卡 cuda:1
在线图片识别
from transformers import Qwen2_5_VLForConditionalGeneration, AutoTokenizer, AutoProcessor
from qwen_vl_utils import process_vision_info

# default: Load the model on the available device(s)
instruct = "/data-nvme/Qwen2.5-VL-7B-Instruct"
model = Qwen2_5_VLForConditionalGeneration.from_pretrained(
    instruct, torch_dtype="auto", device_map="cuda:1"
)

# We recommend enabling flash_attention_2 for better acceleration and memory saving, especially in multi-image and video scenarios.
# model = Qwen2_5_VLForConditionalGeneration.from_pretrained(
#     "Qwen/Qwen2.5-VL-7B-Instruct",
#     torch_dtype=torch.bfloat16,
#     attn_implementation="flash_attention_2",
#     device_map="auto",
# )

# default processer
processor = AutoProcessor.from_pretrained(instruct)

# The default range for the number of visual tokens per image in the model is 4-16384.
# You can set min_pixels and max_pixels according to your needs, such as a token range of 256-1280, to balance performance and cost.
# min_pixels = 256*28*28
# max_pixels = 1280*28*28
# processor = AutoProcessor.from_pretrained("Qwen/Qwen2.5-VL-7B-Instruct", min_pixels=min_pixels, max_pixels=max_pixels)

messages = [
    {
        "role": "user",
        "content": [
            {
                "type": "image",
                "image": "https://qianwen-res.oss-cn-beijing.aliyuncs.com/Qwen-VL/assets/demo.jpeg",
            },
            {"type": "text", "text": "Describe this image."},
        ],
    }
]

# Preparation for inference
text = processor.apply_chat_template(
    messages, tokenize=False, add_generation_prompt=True
)
image_inputs, video_inputs = process_vision_info(messages)
inputs = processor(
    text=[text],
    images=image_inputs,
    videos=video_inputs,
    padding=True,
    return_tensors="pt",
)
inputs = inputs.to("cuda:1")

# Inference: Generation of the output
generated_ids = model.generate(**inputs, max_new_tokens=128)
generated_ids_trimmed = [
    out_ids[len(in_ids) :] for in_ids, out_ids in zip(inputs.input_ids, generated_ids)
]
output_text = processor.batch_decode(
    generated_ids_trimmed, skip_special_tokens=True, clean_up_tokenization_spaces=False
)
print(output_text)
运行效果:

视频分析
报错:RuntimeError: Expected all tensors to be on the same device, but found at least two devices, cuda:0 and cpu!
解决方法:
新增关键代码:解决张量在cpu上的冲突问题;
second_per_grid_ts = inputs.pop('second_per_grid_ts')

second_per_grid_ts = [float(s) for s in second_per_grid_ts]

inputs.update({
    'second_per_grid_ts': second_per_grid_ts
})
5. API集成示例
使用 Flask 快速构建REST接口:
from flask import Flask, request, jsonify
from transformers import AutoProcessor, AutoModelForCausalLM
import torch
app = Flask(__name__)
model_path = "./qwen2.5-vl-7b"
processor = AutoProcessor.from_pretrained(model_path)
model = AutoModelForCausalLM.from_pretrained(model_path, device_map="auto")
@app.route('/predict', methods=['POST'])
def predict():
data = request.json
inputs = processor(data["text"], images=data.get("image"), return_tensors="pt").to("cuda")
outputs = model.generate(**inputs)
return jsonify({"result": processor.decode(outputs[0])})
if __name__ == "__main__":
app.run(host="0.0.0.0", port=8080)
6. 可视化与监控
· OpenWebUI:
pip install open-webui
open-webui serve --model ./qwen2.5-vl-7b
访问 http://localhost:8080 管理模型交互
· Prometheus+Grafana:通过vLLM的指标接口监控显存、吞吐量等
注意事项
1. 低显存优化:
· 使用 --dtype float16 或量化版本(如GPTQ-Int4)
· 限制输入分辨率(如--max-pixels 1024x1024)
2. 多模态支持:确保安装 decord 和 Pillow 处理视频/图像
3. 网络问题:国内推荐使用ModelScope镜像加速下载
部署成功后,可通过上传图片测试多模态能力,例如分析发票或生成图像描述。


 2万+
2万+

 被折叠的 条评论
为什么被折叠?
被折叠的 条评论
为什么被折叠?
 到【灌水乐园】发言


