Android 基于SurfaceTexture shader的类动漫+波浪形图像处理
- 基本环境
- SurfaceTexture基础介绍
- Shader图像处理基本算法
- 程序
- 效果图
基本环境
1、Win7 & Android-Studio
2、Nexus 5 测试手机
3、API-level 21以上
SurfaceTexture基础介绍
根据Google官网的介绍
Captures frames from an image stream as an OpenGL ES texture.
该类可以从一个图像流中抓取帧并可以作为GLES的texture。这样我们就可以把Camera的数据输出到SurfaceTexture中,然后利用GLES进行图像渲染。
1、本次使用到的API
① SurfaceTexture(int texName)
Construct a new SurfaceTexture to stream images to a given OpenGL texture.
② setDefaultBufferSize(int width, int height)
Set the default size of the image buffers.
③ updateTexImage()
Update the texture image to the most recent frame from the image stream.
使用③的时候需要注意
Update the texture image to the most recent frame from the image stream. This may only be called while the OpenGL ES context that owns the texture is current on the calling thread. It will implicitly bind its texture to the GL_TEXTURE_EXTERNAL_OES texture target.
即只能在GLES线程中使用,绑定texture的时候不是GL_TEXTURE_2D而是GL_TEXTURE_EXTERNAL_OES
在Shader中的使用时,参照下面
 #extension GL_OES_EGL_image_external : require\n
 precision mediump float;\n
 uniform samplerExternalOES s_texture;\n
Shader图像处理基本算法
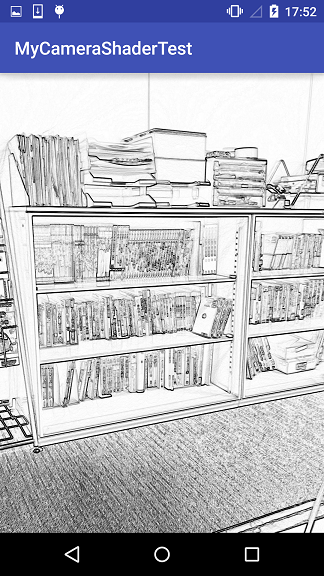
一 、类漫画处理
我认为的漫画效果由基本人物和物体的线条组成,然后剩下的部分填充淡灰色或者黑色。
所以第一步是将图像的边缘轮廓取出来
核心想法是将一个像素两边的像素进行相减,如果颜色相近说明不是边缘,相减的结果接近RGB(0,0,0)。如果颜色不相近,说明是边缘,相减的结果也是一个不是黑色的RGB值。
- X方向上的系数如下
-1 0 1
-1 0 1
-1 0 1 - Y方向上的系数如下
-1 -1 -1
0 0 0
1 1 1
中间的像素点为基准点,让基准点左右和上下两边的像素进行相减,然后取绝对值相加
- shader代码如下
1、周边基准点坐标 vertexShaderCode
textureCoordinate:texture坐标
dx= 1.0 / imgWidth
dy= 1.0 / imgHeight
"varying vec2 offset[9];\n"
"void main()\n" +
.....
"offset[0] = vec2(textureCoordinate.x-1.0*dx,textureCoordinate.y-1.0*dy);\n"+
"offset[1] = vec2(textureCoordinate.x,textureCoordinate.y-1.0*dy);\n"+
"offset[2] = vec2(textureCoordinate.x+1.0*dx,textureCoordinate.y-1.0*dy);\n"+
"offset[3] = vec2(textureCoordinate.x-1.0*dx,textureCoordinate.y);\n"+
"offset[4] = vec2(textureCoordinate.x,textureCoordinate.y);\n"+
"offset[5] = vec2(textureCoordinate.x+1.0*dx,textureCoordinate.y);\n"+
"offset[6] = vec2(textureCoordinate.x-1.0*dx,textureCoordinate.y+1.0*dy);\n"+
"offset[7] = vec2(textureCoordinate.x,textureCoordinate.y+1.0*dy);\n"+
"offset[8] = vec2(textureCoordinate.x+1.0*dx,textureCoordinate.y+1.0*dy);\n"+
2、计算 fragmentShaderCode
"varying vec2 offset[9];\n"+
"vec3 col = vec3(0.0);\n"+
"vec3 colX = vec3(0.0);\n"+
"vec3 colY = vec3(0.0);\n"+
"colX =texture2D(s_texture,offset[5]).rgb - texture2D(s_texture,offset[3]).rgb;\n "+
"colX +=texture2D(s_texture,offset[2]).rgb - texture2D(s_texture,offset[0]).rgb;\n "+
"colX +=texture2D(s_texture,offset[8]).rgb - texture2D(s_texture,offset[6]).rgb;\n "+
"colY =texture2D(s_texture,offset[6]).rgb - texture2D(s_texture,offset[0]).rgb;\n "+
"colY +=texture2D(s_texture,offset[7]).rgb - texture2D(s_texture,offset[1]).rgb;\n "+
"colY +=texture2D(s_texture,offset[8]).rgb - texture2D(s_texture,offset[2]).rgb;\n "+
"col = abs(colX) + abs(colY);\n"+
二、去除杂色
相减的结果会是一个边缘线条有一定彩色的图像,所以要进行灰度化处理,利用现成的参数0.299, 0.587, 0.114与每个像素相乘
" col = vec3(dot(col, vec3(0.299, 0.587, 0.114)));\n"+三、最后取反
边缘以外的部分主要是黑色,所以取反变成白色
" col = vec3(1.0) - col;\n"+
"gl_FragColor = vec4(col, 1.0);\n"+
该部分FragmentShader整体
"#extension GL_OES_EGL_image_external : require\n"+
"precision mediump float;\n" +
"varying vec2 textureCoordinate;\n" +
"uniform samplerExternalOES s_texture;\n" +

"varying vec2 offset[9];\n"+
"void main() {\n"+


"vec3 col = vec3(0.0);\n"+
"vec3 colX = vec3(0.0);\n"+
"vec3 colY = vec3(0.0);\n"+

"colX =texture2D(s_texture,offset[5]).rgb - texture2D(s_texture,offset[3]).rgb;\n "+
"colX +=texture2D(s_texture,offset[2]).rgb - texture2D(s_texture,offset[0]).rgb;\n "+
"colX +=texture2D(s_texture,offset[8]).rgb - texture2D(s_texture,offset[6]).rgb;\n "+
"colY =texture2D(s_texture,offset[6]).rgb - texture2D(s_texture,offset[0]).rgb;\n "+
"colY +=texture2D(s_texture,offset[7]).rgb - texture2D(s_texture,offset[1]).rgb;\n "+
"colY +=texture2D(s_texture,offset[8]).rgb - texture2D(s_texture,offset[2]).rgb;\n "+
"col = abs(colX) + abs(colY);\n"+
" col = vec3(dot(col, vec3(0.299, 0.587, 0.114)));\n"+
" col = vec3(1.0) - col;\n"+

  " vec3 col = texture2D(s_texture,textureCoordinate).rgb;\n"+
"gl_FragColor = vec4(col, 1.0);\n"+

"}";
效果图
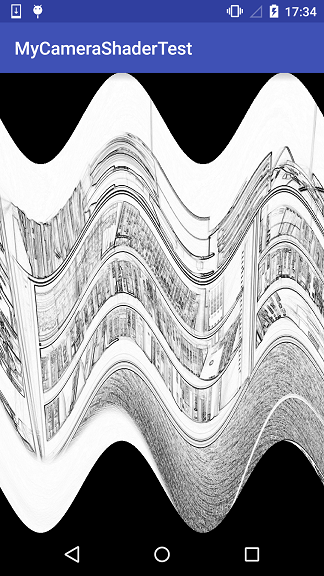
四、波浪处理
首先将上面的Shader处理结果保存到FBO中,将其作为波浪处理的输入进行图形变换
- 基本想法
在数学中和波形相似的函数图形为三角函数sin和cos,所以采用sin作为变换的核心
因为有波形,所以将主体图像放在屏幕中间,即缩放后移动
shader代码
" vec2 colCoor = vec2(0.0);\n"+
" colCoor.x = textureCoordinate.x;\n"+
" colCoor.y = textureCoordinate.y / 0.8-0.25/2.0;\n"+
colCoor.y的部分就是在Y方向上缩小到0.8倍,然后上移
然后将Y的坐标根据当前X的位置,如sin图

shader:
" colCoor.y = colCoor.y + 0.25/2.0*sin(4.0*3.1415*textureCoordinate.x+angle);\n"+- 整体shader
"void main() {\n"+

" vec2 colCoor = vec2(0.0);\n"+
" colCoor.x = textureCoordinate.x;\n"+
" colCoor.y = textureCoordinate.y / 0.8-0.25/2.0;\n"+
" colCoor.y = colCoor.y + 0.25/2.0*sin(4.0*3.1415*textureCoordinate.x+angle);\n"+
" vec3 col;\n"+
" if(colCoor.y > 1.0 || colCoor.y < 0.0)\n"+
" col = vec3(1.0,1.0,1.0);\n"+
" else col = texture2D(s_texture,colCoor).rgb;\n"+

"gl_FragColor = vec4(col, 1.0);\n"+

"}";
程序下载
上传的代码为Android-Studio中app文件,其他文件请自行添加
CSDN下载分为10分
http://download.csdn.net/detail/kof0101/9558943
github 下载:
https://github.com/larry-kof/wave_cartoon_shader_android_app/archive/master.zip


 481
481

 被折叠的 条评论
为什么被折叠?


