


Win32 Window Hierarchy and Styles
Kyle Marsh
Microsoft Developer Network Technology GroupCreated: September 29, 1993
Click to view or copy the Styles sample application files for this technical article.
Abstract
This article describes the desktop, top-level, and child windows provided in the Win32® versions of the Microsoft® Windows™ operating system and their hierarchical relationships. It explains how applications can navigate the window structure and control the style and appearance of a window on the desktop.
Window Hierarchy
The basic building block for displaying information in the Microsoft® Windows™ graphical environment is the window. Microsoft Windows manages how each window relates to all other windows in terms of visibility, ownership, and parent/child relationship. Windows uses this relationship information when creating, destroying, or displaying a window. The Windows window manager controls how windows relate to one another and stores the relationship information it needs by linking the window instance information of each window into a hierarchy known as the window manager's list.
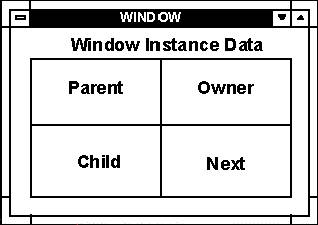
Within each window's instance information structure are four elements that the window manager uses to build the window manager's list:
- A handle to the window's child window
- A handle to the next window in the list of child windows (the next sibling)
- A handle to the window's parent
- A handle to the window's owner
Figure 1.
When Windows initializes, it creates a window, known as the desktop window, that is sized to cover the entire display area and upon which all other windows are displayed. The window manager uses the desktop window as the top of the window manager's list. Thus, the desktop window is the top of the window hierarchy.
Windows that form the next level of the window hierarchy are called top-level windows. A top-level window is any window that is not a child window. Top-level windows do not have the WS_CHILD style. The window manager connects top-level windows to the desktop window by connecting the top-level windows into a linked list with the head of the link list stored in the desktop window's child window handle, and by using each top-level window's next sibling handle to form the list. The linked list is known as a child window list because it is attached to the child window handle of a window. All windows connected to a child window list are considered siblings; therefore, all top-level windows are siblings of one another. The order of the child window list (first to last) also denotes the top to bottom order (the Z order) of the windows as seen on the display. The window manager uses this Z order to decide which windows and which parts of windows are visible on the display and which windows or parts of windows are hidden by other windows. When a window appears on the display below another window, it appears after that window in the child window list.
All top-level windows are also connected to the desktop window through the parent window handle in the window instance information. Top-level windows are connected to the desktop window as if they were child windows of the desktop, and can be considered children of the desktop in that parent/child navigation techniques can be used to move between a top-level window and the desktop window.
The window manager places top-level windows at the top of the Z order when they are created, and thus the entire window is visible. The window manager inserts the window at the head of the desktop window's child window list. An extended style, WS_EX_TOPMOST, controls where the window manager places a newly created window in the window manager's list. The window manager places windows without the WS_EX_TOPMOST style after any windows that have the WS_EX_TOPMOST style. Thus, windows with the WS_EX_TOPMOST style always display above windows without the WS_EX_TOPMOST style.
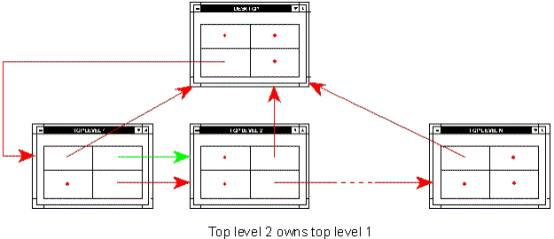
Figure 2.
Another type of relationship can exist between top-level windows: Top-level windows can own or be owned by other top-level windows. An owned window is always above its owner in the Z order and is hidden when its owner is minimized. Owned windows are not hidden when their owner is hidden. Thus, if Window A owns Window B, which in turn owns Window C, and if Window A is minimized, Window B is hidden but Window C remains visible. An application creates an owned window relationship by passing the window handle to the owner window in the hwndParent parameter of the CreateWindow (or CreateWindowEx) function when the application creates the owned window. If the window whose handle is in hwndParent is not a top-level window, Windows finds the top-level window for the given window and makes that top-level window the owner of the created window. The passed-in window is stored in the owned window's instance data parent field, and the top-level owner of the window is stored in the owner field. Windows creates dialog boxes as owned windows unless an application specifically declares a dialog box to be a child window.
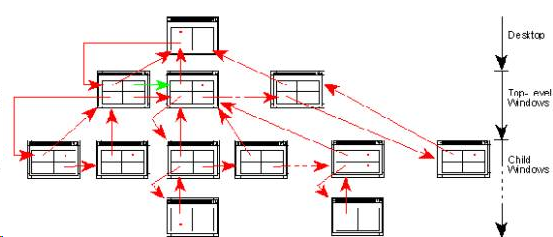
Figure 3.
The desktop window occupies the first level of the windows hierarchy and top-level windows occupy the second level. Child windows, which are windows created with the WS_CHILD style, occupy all other levels. The window manager connects child windows to their parent window in the same way it connects top-level windows to the desktop window.
Figure 4.
Child windows are displayed within the client area of their parent. The window manager uses the first-to-last order of the child window list to determine the Z order of child windows. This method is the same as that used for top-level windows. All top-level windows are displayed in the client area of the desktop window and thus behave as if they were children of the desktop for display purposes.
So What's Different in Win32?
The relationships among the desktop window, top-level windows, owned windows, and child windows described in the previous section are identical in Win32® and Win16. This ensures a high degree of compatibility between Win16 and Win32, and allows applications that take advantage of the windows hierarchy to work in both environments. The two differences between the Win16 and Win32 environments involve security and multiple threads.
Windows NT™ adds a new level to the window hierarchy: Each computer that runs Windows NT has a corresponding object called the WindowStation object. This object forms the first level of security for a workstation and is the source of inheritable security for all user objects. A WindowStation object can, in turn, have any number of desktop objects. Each desktop object is a desktop window, as described in the previous section. Windows NT uses two desktops: One desktop handles the logon screen, CTRL+ALT+DEL screen, locked workstation screen, and screen saver, and the other desktop is used for the rest of the system. Currently, applications cannot create or delete desktops.
Another difference between Win16 and Win32 involves using multiple threads. Win16 does not support multiple threads, so the application developer does not need to consider threading when an application creates a window. In Win32, whenever a parent/child or owner/owned relationship exists between windows, the threads that own the windows share an input queue. The developer must remember that sharing an input queue counteracts the benefits of using threads—only one thread can process a message at any given time, while other threads sharing the input queue must wait for GetMessage or PeekMessage to return. Wherever possible, make sure that parent/child windows or owner/owned windows belong to the same thread.
Win32 defines two new window types that are not part of the window hierarchy: foreground windows and background windows. The foreground window is the window that the user is currently working in. All other windows are background windows. Developers should normally let the user set the foreground window; however, Win32 does supply two functions to handle the foreground window, SetForegroundWindow and GetForegroundWindow.
Navigating the Window Manager's List
An application navigates the window manager's list by getting the owner, parent, child, or next window from the window manager or by having Windows call an application-supplied callback function for a set of windows. The functions listed below navigate the window manager's list.
EnumChildWindows
An application can use this function to have Windows call an application-supplied callback function for each child window of a given window. Windows enumerates all child windows, including children of child windows. Windows does not call the callback function for any child windows created after EnumChildWindows is called but before it returns.
EnumThreadWindows
An application can use this function to have Windows call an application-supplied callback function for each window belonging to a given thread. Windows enumerates all top-level windows for a thread, including owned and non-owned top-level windows, child windows, and children of child windows. Windows does not call the callback function for windows created after EnumTaskWindows is called but before it returns.
EnumWindows
An application can use this function to have Windows call an application-supplied callback function for each top-level window. Windows enumerates all top-level windows, including owned and non-owned windows. Windows does not call the callback function for any top-level windows created after EnumWindows is called but before it returns.
FindWindow
An application can use this function to locate the first top-level window in the Z order that matches the given class and window title. The application can specify a particular class, a particular title, both, or neither. If the application specifies neither a class name nor a window title, the FindWindow function returns the top-level window, which is the highest in the Z order. An application cannot use the FindWindow function to locate windows farther down in the Z order after the first matching window is found.
GetDesktopWindow
This function returns the handle to the desktop window.
GetNextWindow
Win16 defined this function separately from GetWindow (see below). Win32 does not implement this function, but the WINUSER.H header file defines a macro that replaces calls to GetNextWindow with GetWindow.
GetParent
This function returns a handle to a given window's parent, if a parent exists. If the window is a child window, the function returns the handle to the parent window. If the window is a top-level window, the function returns the handle to the window's owner, if an owner exists. To find the handle to the window that was passed to CreateWindow or to CreateWindowEx when an owned window was created, use GetWindowWord(GWW_HWNDPARENT). This window handle is different from the value returned by GetParent if the window whose handle was passed to CreateWindow or CreateWindowEx was not a top-level window. This situation occurs when a dialog box is created with a child window in its hwndParent parameter to CreateWindow or CreateWindowEx.
GetThreadDesktop
This function returns the handle to the desktop for the given thread.
GetTopWindow
This function returns the given window's first child. The first child window is always at the top of the Z order for the given window. If no window is specified, the passed-in window handle is NULL, and this function returns the highest top-level window in the Z order.
GetWindow
An application can use this function to navigate the window manager's list. GetWindow takes two parameters—a handle to a window (HWND) and fwRel (WORD)—specifying the relationship from the given window to the desired window. The following relationships can be obtained:
- GW_HWNDNEXT: GetWindow returns the handle to the given window's next sibling. When an application calls GetWindow with GW_HWNDNEXT, it receives the same result that calling GetNextWindow with GW_HWNDNEXT returns.
- GW_HWNDFIRST: GetWindow returns the handle to the given window's topmost sibling in the Z order. This is the most visible sibling window. When an application calls GetWindow with GW_HWNDFIRST, it receives the same result that calling GetTopWindow returns.
- GW_HWNDLAST: GetWindow returns the given window's bottommost sibling in the Z order. This is the least visible sibling.
- GW_HWNDPREV: GetWindow returns the handle to the given window's previous sibling. When an application calls GetWindow with GW_HWNDPREV, it receives the same result that calling GetNextWindow with GW_HWNDPREV returns.
- GW_OWNER: GetWindow returns the handle to the given window's owner. If the given window has no owner, GetWindow returns NULL.
- GW_CHILD: GetWindow returns the handle to the given window's first child window. The first child window is at the top of the given window's Z order. If the given window has no child window, the GetWindow function returns NULL.
IsChild
IsChild takes two handles to windows as its arguments: hWndParent and hWnd. IsChild returns TRUE if hWnd is a child or another descendant of hWndParent. hWnd is a descendant of hWndParent if hWndParent is found by stepping from a given window's parent to its parent, and so on. IsChild returns FALSE if hWnd is the same as hWndParent.
Window Styles
When an application creates a window with the CreateWindow or CreateWindowEx function, it assigns the window certain style attributes in the dwStyle parameter. The style attributes determine the type of window, the functionality of the window, and the initial state of the window. Win32 contains no new, changed, or deleted styles; Win32 styles are identical to Win16 styles.
Window Type Styles
WS_OVERLAPPED
Overlapped windows are top-level windows and are connected to the desktop window's child windows list. Applications usually use overlapped windows as their main window. Overlapped windows always have a caption, even if WS_CAPTION is not specified. Because an overlapped window always has a caption, it also always has a border. See WS_CAPTION below for more information about border styles. Overlapped windows may own other top-level windows or be owned by other top-level windows or both. All overlapped windows have the WS_CLIPSIBLINGS style, even if it was not specified.
Windows can set the initial size and position for overlapped windows. To have Windows set the window's initial position, an application uses CW_USEDEFAULT for the X parameter to CreateWindow or CreateWindowEx. When an application uses CW_USEDEFAULT to set an overlapped window's position and uses the WS_VISIBLE style to have the window visible when it is created, Windows passes the Y parameter of CreateWindow or CreateWindowEx to ShowWindow. Thus, when an application uses CW_USEDEFAULT for the X parameter to CreateWindow or CreateWindowEx, the Y parameter must be one of the following:
- SW_HIDE
- SW_SHOWNORMAL
- SW_NORMAL
- SW_SHOWMINIMIZED
- SW_SHOWMAXIMIZED
- SW_MAXIMIZE
- SW_SHOWNOACTIVATE
- SW_SHOW
- SW_MINIMIZE
- SW_SHOWMINNOACTIVE
- SW_SHOWNA
- SW_RESTORE
Usually an application should use SW_SHOW for the Y parameter because SW_SHOW allows the proper functioning for WS_MAXIMIZE and WS_MINIMIZE styles.
To have Windows set the window's initial size, an application uses CW_USEDEFAULT for the nWidth parameter to CreateWindow or CreateWindowEx. When an application uses CW_USEDEFAULT to have Windows set the window's initial size, the nHeight parameter to CreateWindow or CreateWindowEx is ignored.
WS_POPUP
Pop-up windows are top-level windows and are connected to the desktop window's child windows list. Applications usually use pop-up windows for dialog boxes. The main difference between pop-up and overlapped windows is that pop-up windows need not have captions and overlapped windows must have captions. When a pop-up window does not have a caption, it can be created without a border. Pop-up windows may own other top-level windows or be owned by other top-level windows or both. All pop-up windows have the WS_CLIPSIBLINGS style, even if it was not specified. Pop-up windows must not be created with the CW_USEDEFAULT value for either the position or the size of the window. Pop-up windows that use CW_USEDEFAULT will exist but will have no size or no position or both.
WS_CHILD
Child windows must have a parent window and are confined to the client area of their parent. This is the major distinction between child windows and overlapped and pop-up windows. Child window parents can be top-level windows or other child windows. Child windows are positioned from their parent window's upper-left corner and not from the upper-left of the screen as are top-level windows. Child windows are clipped to the client area of their parent. Controls in a dialog box are child windows whose parent is the dialog box. Child windows must not be created with the CW_USEDEFAULT value for either the position or size of the window. Child windows that use CW_USEDEFAULT will exist but will have no size or position or both.
Window Functional and Appearance Styles
WS_CAPTION
When this style is enabled, Windows assigns a rectangular area at the top of the window to display the window's text or title. Overlapped windows always have a caption. The application can assign the window's text in the CreateWindow or CreateWindowEx function and can change the text by calling the SetWindowText function. If a window has a caption, it can also have a maximize box (WS_MAXIMIZEBOX), a minimize box (WS_MINIMIZEBOX), and a System menu (WS_SYSMENU). If a window does not have a caption, Windows does not create these elements even if they are explicitly specified.
Windows without captions cannot have menus because the menu system relies on the caption's existence to place the menu.
When a window has a caption, the user can move the window with a mouse. If the window does not have a caption, the user cannot move the window because a System menu is required to move the window and a System menu cannot exist without the window having a caption.
Windows with captions always have either a regular single-line border or a thick sizable border. If neither a WS_BORDER (single line) nor a WS_THICKFRAME (sizable) border is specified, the window gets the single-line border. The WS_CAPTION constant is actually the combination of WS_BORDER and WS_DLGFRAME constants (WS_BORDER | WS_DLGFRAME), which makes it impossible to distinguish between a thin border and a dialog border for windows with captions. As a result, windows with captions cannot have the dialog box border style unless the WS_EX_DLGMODALFRAME extended style is used.
WS_MINIMIZEBOX
When this style is enabled, Windows places the minimize box bitmap in the upper-right corner of the window. If a maximize box exists for the window, Windows places the minimize button to the left of the maximize box. The minimize box cannot exist unless the window has a caption. When the minimize box exists, the user can minimize the window by clicking on the minimize bitmap or by using the System menu. If the minimize box does not exist, the user cannot minimize the window.
WS_MAXIMIZEBOX
When this style is enabled, Windows places the maximize box bitmap in the upper-right corner of the window. The maximize box cannot exist unless the window has a caption. When the maximize box exists, the user can maximize the window by clicking the bitmap or by using the System menu. If the maximize box does not exist, the user cannot maximize the window.
WS_SYSMENU
When this style is enabled, Windows places the System menu bitmap at the upper-left corner of the window. The System menu provides an interface for the user to perform the following system commands:
- Restore a minimized window
- Move the window with the keyboard
- Size the window with the keyboard
- Minimize the window
- Maximize the window
- Close the window
- Switch to another task
When a window has a System menu, the user can bring up the System menu by clicking the menu bitmap, by entering the ALT+SPACEBAR combination on the keyboard, or by clicking the window's icon when the window is minimized. If a window does not have a System menu, the user cannot use the keyboard to perform system commands unless the application provides a specific keyboard interface to do so.
The System menu is also important for maximized windows that take up the entire screen. When a maximized window that takes up the entire screen has a System menu, the window cannot be moved until the window is restored to its previous nonmaximized size. If the window does not have a System menu, it can be moved without restoring the window's previous nonmaximized size when the window is maximized to the size of the screen. When a window is maximized to the size of the screen, Windows disables the Move, Size, and Maximize items on the System menu to prevent their use. Thus, when a window with a System menu is maximized to the entire screen, it cannot be moved; when a window without a System menu is maximized to the entire screen, it can be moved.
WS_HSCROLL
When this style is enabled, Windows places a horizontal scroll bar along the bottom of the window. Windows does not automatically scroll the window. For a window to allow horizontal scrolling, the window procedure for the window must process the WM_HSCROLL messages, and the window must be created with the WS_HSCROLL style.
WS_VSCROLL
When this style is enabled, Windows places a vertical scroll bar along the right side of the window. Windows does not automatically scroll the window. For a window to allow vertical scrolling, the window procedure for the window must process the WM_VSCROLL messages, and the window must be created with the WS_VSCROLL style.
WS_BORDER
When this style is enabled, Windows draws a single-line border around the window. If no border style is specified, Windows uses a single-line border for all windows that have a caption. Windows created with this style cannot be sized with either the mouse or the keyboard.
WS_DLGFRAME
When this style is enabled, Windows draws a dialog frame, a single line, and a thick colored line around the window. This border style is normally associated with a dialog box, but it can be used on any window that does not have a caption. The dialog frame style can be used for a window with a caption only if the WS_EX_DLGMODALFRAME extended style is specified. Windows created with this style cannot be sized with either the mouse or the keyboard.
WS_THICKFRAME
When this style is enabled, Windows draws a sizable frame, a thick colored line between two single lines, around the window. This border style is usually used for an application's main window. Windows created with this style can be sized with the mouse and through the System menu with the keyboard.
WS_CLIPCHILDREN
This style is used on a window that has child windows and causes Windows to clip the area that a child window occupies from the client area of the parent. Drawing performed by the parent window does not overwrite any of the window's child windows. Windows created without the WS_CLIPCHILDREN style can overwrite any of the window's child windows. Performance degrades slightly; so do not use this style if the application does not draw to the window.
WS_CLIPSIBLINGS
When this style is enabled, Windows clips the client areas of sibling windows from one another. Thus, a window cannot draw in the client area of any of the window's siblings. Windows forces the WS_CLIPSIBLINGS style on all top-level windows (pop-up and overlapped windows), so top-level windows cannot draw on any other top-level window. By default, Windows does not clip sibling windows, thus allowing one child window to draw on another. Performance degrades slightly; so do not use this style if sibling windows cannot draw over one another.
Window Initial State Styles
WS_VISIBLE
When this style is enabled, Windows makes the window visible when it is created. By default, the application must call the ShowWindow function to make a window visible.
WS_DISABLED
When this style is enabled, Windows creates a window that is initially disabled. The window cannot accept user input until it is enabled. The application must provide a method to enable the window. This style is usually used for control windows.
WS_MAXIMIZE
When this style is enabled, Windows creates a window of maximum size. An application can control the maximum size for the window by responding to the WM_GETMINMAXINFO message. By default, Windows sets the maximum size of top-level windows to be the size of the screen and the maximum size of child windows to be the size of the child window's parent's client area. An application must also ensure that ShowWindow is correctly called for the WS_MAXIMIZE style to be effective.
WS_MINIMIZE (WS_ICONIC)
When this style is enabled, Windows creates a window of minimum size, that is, an iconic window. An application must also ensure that ShowWindow is correctly called for the WS_MINIMIZE style to be effective.
Window Standard Styles
The Microsoft Windows Software Development Kit (SDK) supplies some standard styles for window types. These styles are usually combinations of the basic styles. Using them can be easier than specifying each style individually.
WS_CHILDWINDOW
This style is equivalent to WS_CHILD. Usually, child windows should be created with the WS_CLIPSIBLINGS style as well as with WS_CHILD or WS_CHILDWINDOW.
WS_OVERLAPPEDWINDOW
This style is equivalent to WS_OVERLAPPED | WS_CAPTION | WS_SYSMENU | WS_THICKFRAME | WS_MINIMIZEBOX | WS_MAXIMIZEBOX. This is the style usually used for the main window for applications.
WS_POPUPWINDOW
This style is equivalent to WS_POPUP | WS_BORDER | WS_SYSMENU. Even though this style includes the WS_SYSMENU style, the System menu cannot be added to a window unless it has a caption (WS_CAPTION).
Extended Window Styles
Extended window styles were added to Windows starting with Windows version 3.0. To create a window with extended styles, an application must use the CreateWindowEx function instead of the CreateWindow function.
WS_EX_DLGMODALFRAME
When this style is enabled, Windows uses a dialog border on a window that has a caption. When used, the WS_EX_DLGMODALFRAME style overrides the WS_BORDER and WS_THICKFRAME styles, producing a window with a dialog frame. This extended style is normally used on dialog boxes, but it can be used for any window to get a dialog frame.
WS_EX_NOPARENTNOTIFY
This style is used for child windows. When this style is enabled, Windows does not send WM_NOTIFY messages to the child window's parent. By default, Windows sends WM_NOTIFY messages to a child window's parent when a child window is created or destroyed.
The following extended Window styles were added starting with Windows version 3.1.
WS_EX_TOPMOST
This style applies only to top-level windows; it is ignored for child windows. When this style is enabled, Windows places the window above any windows that do not have the WS_EX_TOPMOST style. Beginning with Windows version 3.1, there are two classes of top-level windows: topmost top-level windows and top-level windows. Topmost top-level windows always appear above top-level windows in the Z order. Top-level windows can be made topmost top-level windows by calling the SetWindowPos function with the handle to the window and –1 for the hwndInsertAfter parameter. Topmost top-level windows can become regular top-level windows by calling SetWindowPos with the window handle and 1 for the hwndInsertAfter parameter.
WS_EX_ACCEPTFILES
Windows that can accept dragged objects must be created with this style so that Windows can determine that the window will accept objects and can change the drag/drop cursor as the user drags an object over the window.
WS_EX_TRANSPARENT
The WS_EX_TRANSPARENT style makes a window transparent; that is, the window can be seen through, and anything under the window is still visible. Transparent windows are not transparent to mouse or keyboard events. A transparent window receives paint messages when anything under it changes. Transparent windows are useful for drawing drag handles on top of other windows or for implementing "hot-spot" areas without having to hit test because the transparent window receives click messages.
Send feedback to MSDN. Look here for MSDN Online resources.
Win32 Window Hierarchy and Styles , Kyle Marsh
最新推荐文章于 2021-05-18 18:48:55 发布


 5472
5472

 被折叠的 条评论
为什么被折叠?
被折叠的 条评论
为什么被折叠?
 到【灌水乐园】发言


