


【流程引擎-flowable 二】springboot集成
一、环境
- jdk 11
- springboot 2.7.6
- flowable 6.8.0
- mysql 8.0.27
二、画流程图
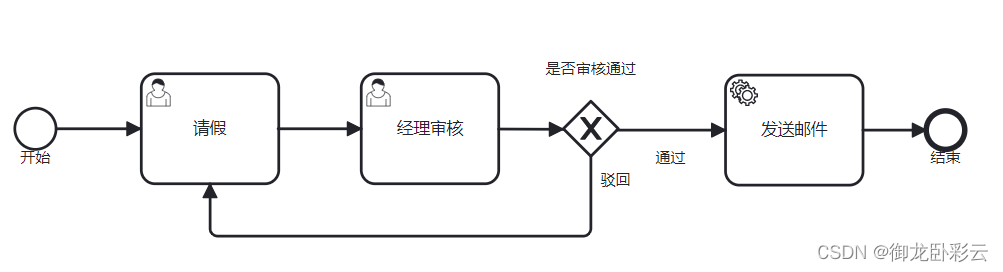
1、通过在线工具画简单的请假流程
- 工具地址:http://www.bpmnmodeler.com/
- 流程图:
2、完成后的流程图xml文件
<?xml version="1.0" encoding="UTF-8"?>
<definitions xmlns="http://www.omg.org/spec/BPMN/20100524/MODEL"
             xmlns:xsi="http://www.w3.org/2001/XMLSchema-instance"
             xmlns:bpmndi="http://www.omg.org/spec/BPMN/20100524/DI"
             xmlns:omgdc="http://www.omg.org/spec/DD/20100524/DC"
             xmlns:omgdi="http://www.omg.org/spec/DD/20100524/DI"
             xmlns:flowable="http://flowable.org/bpmn"
             targetNamespace="http://bpmn.io/schema/bpmn">
  <process id="Leave" name="LeaveProcess" isExecutable="true">
    <userTask id="LeaveTask" name="请假" flowable:assignee="${leaveTask}">
      <incoming>RejectFlow</incoming>
    </userTask>
    <userTask id="ManagerTask" name="经理审核" flowable:assignee="${managerTask}" />
    <exclusiveGateway id="ManagerJudgeTask" name="是否审核通过" />
    <endEvent id="EndLeave" name="结束">
      <incoming>EndFlow</incoming>
    </endEvent>
    <startEvent id="StartLeave" name="开始" />
    <sequenceFlow id="ModeFlow" sourceRef="LeaveTask" targetRef="ManagerTask" />
    <sequenceFlow id="StartFlow" sourceRef="StartLeave" targetRef="LeaveTask" />
    <sequenceFlow id="JugdeFlow" sourceRef="ManagerTask" targetRef="ManagerJudgeTask" />
    <sequenceFlow id="PassFlow" name="通过" sourceRef="ManagerJudgeTask" targetRef="MailTask">
      <conditionExpression xsi:type="tFormalExpression">${checkResult=='通过'}</conditionExpression>
    </sequenceFlow>
    <sequenceFlow id="RejectFlow" name="驳回" sourceRef="ManagerJudgeTask" targetRef="LeaveTask">
      <conditionExpression xsi:type="tFormalExpression">${checkResult=='驳回'}</conditionExpression>
    </sequenceFlow>
    <serviceTask id="MailTask" name="发送邮件" flowable:class="com.hw.flowable.service.SendPassMail">
      <incoming>PassFlow</incoming>
      <outgoing>EndFlow</outgoing>
    </serviceTask>
    <sequenceFlow id="EndFlow" sourceRef="MailTask" targetRef="EndLeave" />
  </process>
  <bpmndi:BPMNDiagram id="BPMNDiagram_process">
    <bpmndi:BPMNPlane id="BPMNPlane_process" bpmnElement="Leave">
      <bpmndi:BPMNShape id="BPMNShape_leaveTask" bpmnElement="LeaveTask">
        <omgdc:Bounds x="304.60807973558974" y="122.00000000000001" width="100" height="79.99999999999999" />
      </bpmndi:BPMNShape>
      <bpmndi:BPMNShape id="BPMNShape_managerTask" bpmnElement="ManagerTask">
        <omgdc:Bounds x="465" y="122" width="100" height="80" />
      </bpmndi:BPMNShape>
      <bpmndi:BPMNShape id="BPMNShape_managerJudgeTask" bpmnElement="ManagerJudgeTask" isMarkerVisible="true">
        <omgdc:Bounds x="611.5" y="142" width="40" height="40" />
        <bpmndi:BPMNLabel>
          <omgdc:Bounds x="599" y="112" width="66" height="14" />
        </bpmndi:BPMNLabel>
      </bpmndi:BPMNShape>
      <bpmndi:BPMNShape id="BPMNShape_endLeave" bpmnElement="EndLeave">
        <omgdc:Bounds x="876" y="149" width="28" height="28" />
        <bpmndi:BPMNLabel>
          <omgdc:Bounds x="879" y="177" width="22" height="14" />
        </bpmndi:BPMNLabel>
      </bpmndi:BPMNShape>
      <bpmndi:BPMNShape id="BPMNShape_startLeave" bpmnElement="StartLeave">
        <omgdc:Bounds x="213.2256558149128" y="147" width="30" height="30" />
        <bpmndi:BPMNLabel>
          <omgdc:Bounds x="217" y="177" width="22" height="14" />
        </bpmndi:BPMNLabel>
      </bpmndi:BPMNShape>
      <bpmndi:BPMNShape id="Activity_0dja4xa_di" bpmnElement="MailTask">
        <omgdc:Bounds x="730" y="123" width="100" height="80" />
      </bpmndi:BPMNShape>
      <bpmndi:BPMNEdge id="BPMNEdge_modeFlow" bpmnElement="ModeFlow">
        <omgdi:waypoint x="404.60807973558974" y="162" />
        <omgdi:waypoint x="465" y="162" />
      </bpmndi:BPMNEdge>
      <bpmndi:BPMNEdge id="BPMNEdge_flowStart" bpmnElement="StartFlow">
        <omgdi:waypoint x="243.2256558149128" y="162" />
        <omgdi:waypoint x="304.60807973558974" y="162" />
      </bpmndi:BPMNEdge>
      <bpmndi:BPMNEdge id="BPMNEdge_jugdeFlow" bpmnElement="JugdeFlow">
        <omgdi:waypoint x="565" y="162.21367521367523" />
        <omgdi:waypoint x="611.9141630901288" y="162.41416309012877" />
      </bpmndi:BPMNEdge>
      <bpmndi:BPMNEdge id="BPMNEdge_flowEnd" bpmnElement="PassFlow">
        <omgdi:waypoint x="651" y="163" />
        <omgdi:waypoint x="730" y="163" />
        <bpmndi:BPMNLabel>
          <omgdc:Bounds x="679" y="177" width="22" height="14" />
        </bpmndi:BPMNLabel>
      </bpmndi:BPMNEdge>
      <bpmndi:BPMNEdge id="BPMNEdge_rejectFlow" bpmnElement="RejectFlow">
        <omgdi:waypoint x="632" y="182" />
        <omgdi:waypoint x="632" y="240" />
        <omgdi:waypoint x="355" y="240" />
        <omgdi:waypoint x="355" y="202" />
        <bpmndi:BPMNLabel>
          <omgdc:Bounds x="639" y="193" width="22" height="14" />
        </bpmndi:BPMNLabel>
      </bpmndi:BPMNEdge>
      <bpmndi:BPMNEdge id="Flow_0v5yrrm_di" bpmnElement="EndFlow">
        <omgdi:waypoint x="830" y="163" />
        <omgdi:waypoint x="876" y="163" />
      </bpmndi:BPMNEdge>
    </bpmndi:BPMNPlane>
  </bpmndi:BPMNDiagram>
</definitions>
三、创建springboot项目
1、pom文件依赖
<properties>
    <project.build.sourceEncoding>UTF-8</project.build.sourceEncoding>
    <project.reporting.outputEncoding>UTF-8</project.reporting.outputEncoding>
    <java.version>11</java.version>
    <spring-boot.version>2.7.6</spring-boot.version>
    <flowable.version>6.8.0</flowable.version>
</properties>
<dependencies>
    <dependency>
        <groupId>org.springframework.boot</groupId>
        <artifactId>spring-boot-starter-web</artifactId>
    </dependency>
    <dependency>
        <groupId>com.mysql</groupId>
        <artifactId>mysql-connector-j</artifactId>
        <scope>runtime</scope>
    </dependency>
    <!--flowable 依赖-->
    <dependency>
        <groupId>org.flowable</groupId>
        <artifactId>flowable-spring-boot-starter</artifactId>
        <version>${flowable.version}</version>
    </dependency>
</dependencies>
<dependencyManagement>
    <dependencies>
        <dependency>
            <groupId>org.springframework.boot</groupId>
            <artifactId>spring-boot-dependencies</artifactId>
            <version>${spring-boot.version}</version>
            <type>pom</type>
            <scope>import</scope>
        </dependency>
    </dependencies>
</dependencyManagement>
2、springboot配置文件
连接流程库,并配置流程相关属性
server:
  port: 8088
spring:
  datasource:
    username: root
    password: 123456
    url: jdbc:mysql://localhost:3306/flowable?serverTimezone=Asia/Shanghai&useSSL=false
flowable:
  activity-font-name: 宋体
  label-font-name: 宋体
  annotation-font-name: 宋体

logging:
  level:
    org.flowable: DEBUG
3、流程准备
- 创建流程库:flowable
- 将流程文件放置到springboot项目的类路径下:resources/processes/Leave-2.bpmn20.xml
暂时不要启动程序,因为在程序启动时会在数据库中自动创建相关的表,并将类路径下的流程文件进行部署,在数据表中生成默认的流程数据。
四、流程功能实现
1、创建流程操作的Controller,并编写以下操作接口
import lombok.extern.slf4j.Slf4j;
import org.flowable.engine.*;
import org.flowable.engine.history.HistoricActivityInstance;
import org.flowable.engine.repository.Deployment;
import org.flowable.engine.repository.ProcessDefinition;
import org.flowable.engine.runtime.ProcessInstance;
import org.flowable.task.api.Task;
import org.flowable.task.api.TaskQuery;
import org.springframework.util.ObjectUtils;
import org.springframework.web.bind.annotation.PathVariable;
import org.springframework.web.bind.annotation.PostMapping;
import org.springframework.web.bind.annotation.RequestMapping;
import org.springframework.web.bind.annotation.RestController;

import javax.annotation.Resource;
import java.util.ArrayList;
import java.util.HashMap;
import java.util.List;
import java.util.Map;
import java.util.stream.Collectors;

/**
 * @Program: flowable-start
 * @author: hewei
 * @Date: 2024-01-26 16:23
 * @Description: 流程使用实例
 **/

@Slf4j
@RestController
@RequestMapping("/flowable")
public class ProcessController {

    @Resource
    RuntimeService runtimeService;
    @Resource
    TaskService taskService;
    @Resource
    RepositoryService repositoryService;
    @Resource
    ProcessEngine processEngine;
    @Resource
    HistoryService historyService;

    /**
     * 流程部署,每部署一次就增加一条数据库记录
     * */
    @PostMapping("/deployProcess")
    public Map deployProcess() {
        Deployment deploy = repositoryService.createDeployment()    //创建部署对象
                .addClasspathResource("processes/Leave-2.bpmn20.xml")   //添加流程部署文件
                .name("请假流程")   //流程部署的名称
                .deploy();

        Map<String, Object> map = new HashMap<>(){{
            put("deployID",deploy.getId());
            put("deployName",deploy.getName());
        }};
        log.info("流程部署ID:" + deploy.getId());
        log.info("流程部署名称:" + deploy.getName());
        return map;
    }

    /**
     * 查询流程定义信息
     * 通过部署ID查询流程定义信息,部署每个新的流程定义都会在表中增加一条记录
     * */
    @PostMapping("/definitionInfo/{deploymentId}")
    public ProcessDefinition deploymentInfo(@PathVariable("deploymentId") String deploymentId){
        // 获取流程定义对象
        ProcessDefinition processDefinition = repositoryService.createProcessDefinitionQuery()
                .deploymentId(deploymentId)
                .singleResult();
        return processDefinition;
    }
    /**
     * @param user 申请人
     * @param manager 审核人
     * @Author hewei
     * @Date 2024/1/26 16:24
     * @Description: 启动流程
     */
    @PostMapping(value = "startProcess/{user}/{manager}")
    public String startLeaveProcess(
            @PathVariable("user") String user,
            @PathVariable("manager") String manager
            ) {
        HashMap<String, Object> map = new HashMap<>();
        map.put("leaveTask", user); // 向请假任务 id="LeaveTask" 中的变量 leaveTask 传递用户名,表示某个用户发起请假
        map.put("managerTask", manager); // 向审批任务 id="ManagerTask" 中的变量 managerTask 传递用户名,表示需要某个用户进行审批
        // 启动ID为"Leave"的流程,传入流程参数集合 map。
        ProcessInstance processInstance = runtimeService.startProcessInstanceByKey("Leave", map);
        StringBuilder sb = new StringBuilder();
        sb.append("创建请假流程 processInstanceId:" + processInstance.getId()+"\n");
        List<Task> tasks = taskService.createTaskQuery().taskAssignee(user).orderByTaskCreateTime().desc().list();
        for (Task task : tasks) {
            sb.append("任务taskId:" + task.getId()).append("\n");
        }
        log.info(sb.toString());
        return sb.toString();
    }

    /**
     * @param taskId
     * @param action 流程的动作条件参数
     * @param assignee 当前流程的用户
     * @description 流程执行
     */
    @PostMapping(value = {"taskAction/{action}/{assignee}/{taskId}","taskAction/{action}/{assignee}"})
    public String taskAction(
            @PathVariable("action") String action,
            @PathVariable("assignee") String assignee,
            @PathVariable(value = "taskId",required = false) String taskId) {
        HashMap<String, Object> map = new HashMap<>();
        map.put("checkResult", action);
        if (!ObjectUtils.isEmpty(taskId)) {
            taskService.complete(taskId, map);
            String.format("流程:%s 执行 %s 成功!",taskId,action);
        }
        TaskQuery tq=taskService.createTaskQuery();
        //查询用户的流程任务
        List<Task> tasks=tq.taskAssignee(assignee).list();
        for (Task task : tasks) {
            //执行流程任务,传入流程参数
            taskService.complete(task.getId(), map);
        }
        return String.format("流程:%s 执行 %s 成功!",tasks.stream().map(Task::getId).collect(Collectors.joining(",")),action);
    }

    /**
     * 查看用户任务
     * @param taskId 任务id
     * @param user 用户名
     * */
    @PostMapping({"/queryTask/{taskId}/{user}","/queryTask/{user}"})
    public List<Map<String,Object>> queryTask(
            @PathVariable(value = "taskId",required = false) String taskId,
            @PathVariable(value = "user") String user
            ){
        /*查询 用户流程下的任务*/
        List<Task> list = taskService.createTaskQuery()
                .processDefinitionKey("Leave") //processDefinitionKey就是xml中process标签的id,在本实例中就是“Leave”
//                .taskId(taskId) // 任务ID
                .taskAssignee(user) // 用户任务,在这里对应ID为”leaveTask“的用户任务中的 flowable:assignee 中设置的任务值
                .list();
        List<Map<String,Object>> tasks= new ArrayList<>();
        for (Task task : list) {
            Map<String, Object> map = new HashMap<>();
            map.put("taskId",task.getId());
            map.put("taskName",task.getName());
            map.put("assignee",task.getAssignee());
            map.put("taskKey",task.getTaskDefinitionKey());
            map.put("owner",task.getOwner());
            map.put("createTime",task.getCreateTime());
            tasks.add(map);
        }
        return tasks;
    }
    /**
     * 删除部署的流程
     * */
    @PostMapping("/deleteProcess/{deploymentId}")
    public void deleteProcess(@PathVariable("deploymentId") String deploymentId){
//        repositoryService.deleteDeployment(deploymentId);
        /*级联删除*/
        repositoryService.deleteDeployment(deploymentId,true);
        log.info("流程已删除:{}",deploymentId);
    }

    /**
     * 查看历史信息
     */
    @PostMapping("/queryHistory/{definitionId}")
    public List<HistoricActivityInstance> queryHistory(@PathVariable("definitionId") String definitionId){
        List<HistoricActivityInstance> list = historyService.createHistoricActivityInstanceQuery()
                .processDefinitionId(definitionId)
                .finished()
                .orderByHistoricActivityInstanceEndTime().asc()
                .list();
        return list;
    }
}
2、创建流程图查看的Controller,编写以下接口
package com.hw.flowable.controller;

import lombok.extern.slf4j.Slf4j;
import org.flowable.bpmn.model.BpmnModel;
import org.flowable.engine.*;
import org.flowable.engine.repository.ProcessDefinition;
import org.flowable.engine.runtime.Execution;
import org.flowable.engine.runtime.ProcessInstance;
import org.flowable.image.ProcessDiagramGenerator;
import org.springframework.web.bind.annotation.GetMapping;
import org.springframework.web.bind.annotation.PathVariable;
import org.springframework.web.bind.annotation.RequestMapping;
import org.springframework.web.bind.annotation.RestController;

import javax.annotation.Resource;
import javax.servlet.http.HttpServletResponse;
import java.io.InputStream;
import java.io.OutputStream;
import java.util.ArrayList;
import java.util.List;

/**
 * @Program: flowable-start
 * @author: hewei
 * @Date: 2024-01-26 16:23
 * @Description: 流程查看
 **/

@Slf4j
@RestController
@RequestMapping("/flowable")
public class ViewController {

    /*连线名称是否显示*/
    private final boolean SEQUENCE_LABEL = true;
    @Resource
    RuntimeService runtimeService;
    @Resource
    RepositoryService repositoryService;
    @Resource
    ProcessEngine processEngine;

    /**
     * @param resType 需要返回的资源类型,分别为png图形或者xml文件
     * @param definitionId 流程定义ID
     * 查看已经部署的流程图定义,不包括任务办理实际流转信息
     */
    @GetMapping("shwoDefinition/{resType}/{definitionId}")
    public void shwoDefinition(HttpServletResponse response,@PathVariable("resType") String resType,@PathVariable("definitionId") String definitionId){
        ProcessDefinition processDefinition = repositoryService.createProcessDefinitionQuery().processDefinitionId(definitionId).singleResult();
        String resourceName = "";
        if (resType.equals("png")) {
            //image/png 类型的资源获取
            resourceName = processDefinition.getDiagramResourceName();
        } else if (resType.equals("xml")) {
            //text/xml 类型资源获取
            resourceName = processDefinition.getResourceName();
        }
        try(
                InputStream resourceAsStream = repositoryService.getResourceAsStream(processDefinition.getDeploymentId(), resourceName);
                OutputStream resout=response.getOutputStream();
        ){
            byte[] b = new byte[1024];
            int len = -1;
            while ((len = resourceAsStream.read(b, 0, 1024)) != -1) {
                resout.write(b, 0, len);
            }
        }catch (Exception e){
            log.error("流程定义显示异常:",e);
        }
    }

    /**
     * @param instanceId 流程实例ID
     * @Description 查看流程待办图
     */
    @GetMapping("/showProcess/{instanceId}")
    public void showProcess(HttpServletResponse resp,@PathVariable("instanceId") String instanceId) {
        resp.setCharacterEncoding("UTF-8");
        ProcessInstance pi = runtimeService.createProcessInstanceQuery().processInstanceId(instanceId).singleResult();
        if (pi == null) {
            return;
        }
        /*获取任务节点*/
        List<Execution> executions = runtimeService.createExecutionQuery().processInstanceId(instanceId).list();
        List<String> activityIds = new ArrayList<>();
        List<String> flows = new ArrayList<>();
        for (Execution exe : executions) {
            List<String> ids = runtimeService.getActiveActivityIds(exe.getId());
            activityIds.addAll(ids);
        }

        /*生成流程图*/
        BpmnModel bpmnModel = repositoryService.getBpmnModel(pi.getProcessDefinitionId());
        ProcessEngineConfiguration engconf = processEngine.getProcessEngineConfiguration();
        ProcessDiagramGenerator diagramGenerator = engconf.getProcessDiagramGenerator();
        byte[] buf = new byte[1024];
        int legth = 0;
        try (
                InputStream in = diagramGenerator.generateDiagram(bpmnModel, "png", activityIds, flows, engconf.getActivityFontName(), engconf.getLabelFontName(), engconf.getAnnotationFontName(), engconf.getClassLoader(), 1.0, SEQUENCE_LABEL);
                OutputStream out = resp.getOutputStream();
        ){
            while ((legth = in.read(buf)) != -1) {
                out.write(buf, 0, legth);
            }
        }catch (Exception e) {
            log.error("待办流程显示异常:",e);
        }
    }
}
五、流程功能验证
启动应用程序,会在数据库表中生成默认的流程文件的部署信息。本实例不使用程序默认生成的流程信息,将默认生成的数据删除。自己通过接口功能进行部署。
1、部署流程:localhost:8088/flowable/deployProcess


调用流程接口部署以后,会在act_re_procdef 中生成流程定义信息,在act_re_deployment中生成流程部署数据,在act_ge_bytearray 中生成流程文件的图片和原始xml信息。
2、查看流程定义:localhost:8088/flowable/shwoDefinition/png/Leave:1:e43e351c-c0cb-11ee-aaaa-005056c00008

Leave:1:e43e351c-c0cb-11ee-aaaa-005056c00008 这是流程文件部署后自动生成的流程定义数据的ID。
3、启动流程:localhost:8088/flowable/startProcess/yd/hw
此接口的功能是启动一个流程:由用户“yd”发起请假,由“hw”进行审批。

启动流程后会在 act_ru_execution 表中生成流程实例信息,并在act_ru_task表中生成实例任务信息。
4、待办流程:
localhost:8088/flowable/queryTask/yd: 查询用户“yd”的待办任务列表。

localhost:8088/flowable/showProcess/4e962d0d-c0cc-11ee-aaaa-005056c00008:查看实时流程图

5、执行流程
- 执行请假任务:
localhost:8088/flowable/taskAction/请假/yd
返回:流程:4e9bab54-c0cc-11ee-aaaa-005056c00008 执行 请假 成功! - 查看实时流程图
发现此时到了审核节点。

- 执行审核任务:
localhost:8088/flowable/taskAction/通过/hw
返回:流程:9543539a-c0cd-11ee-aaaa-005056c00008 执行 通过 成功!
同时程序会打印:
com.hw.flowable.service.SendPassMail : 流程9543539a-c0cd-11ee-aaaa-005056c00008: [请假通过,安心休假吧!]
SendPassMail 自定义类,是通过 类型为ServiceTask的流程任务自动触发的。我们在流程审批通过流程后添加一个ServiceTask 任务,模拟邮件通知,ServiceTask 任务会调用 SendPassMail 类的实现。SendPassMail代理类需要实现JavaDelegate接口的execute方法,代码如下:
package com.hw.flowable.service;

import lombok.extern.slf4j.Slf4j;
import org.flowable.engine.delegate.DelegateExecution;
import org.flowable.engine.delegate.JavaDelegate;

import java.util.Optional;

/**
 * @Program: flowable-start
 * @Author: hewei
 * @Date: 2024-01-31 16:30
 * @Description:
 * serviceTask:通过实现 JavaDelegate,在流程到达 serviceTask时触发此功能
 **/

@Slf4j
public class SendPassMail implements JavaDelegate {
    /**
     * 触发发送邮件的操作
     */
    @Override
    public void execute(DelegateExecution delegateExecution) {
        Optional.ofNullable(delegateExecution)
                .ifPresentOrElse(
                        e->log.info("流程{}: [请假通过,安心休假吧!]",e.getId()),
                        ()->log.info("发送邮件异常")
                );
    }
}
同时需要在流程文件中的任务标签中添加代理实现类的全路径,如下内容:
<serviceTask id="MailTask" name="发送邮件" flowable:class="com.hw.flowable.service.SendPassMail">
      <incoming>PassFlow</incoming>
      <outgoing>EndFlow</outgoing>
    </serviceTask>
6、查询历史
请求接口:localhost:8088/flowable/queryHistory/Leave:1:e43e351c-c0cb-11ee-aaaa-005056c00008
返回请假流程执行的历史信息。历史信息存储在表 act_hi 开头的相关表中。

原创文章,引用请注明出处!


 9172
9172


 被折叠的 条评论
为什么被折叠?
被折叠的 条评论
为什么被折叠?
 到【灌水乐园】发言


