


水晶按钮
对于用c#编写一个水晶按钮难度并不是很高,已经有很多人写过晶按钮。如果大家通过baidu or google. 一定找到很多水晶按钮的网页,而且是很早以前写的啦!
把我找到的地址贴一下:
这个地址写挺详细:http://dev.yesky.com/msdn/32/2626032.shtml
cnblogs的一个链接
http://blog.csdn.net/loveyong488/archive/2007/06/15/1653263.aspx
可能用到的,画圆角矩形地址:
http://www.cnblogs.com/xujh/archive/2007/04/17/717433.html
下面是我把图形直接画在窗体上,并没有写成控件。一些事件也没处理。贴图片让大家看一下
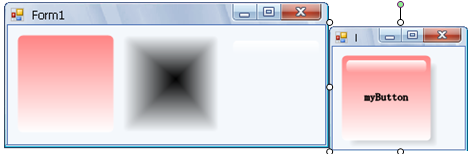
应该说是在照写原作者代码的啦!我把代码定成vb.net 。现在很多人都在学习c#可看vb.net 头会大,如果大家学习c#网上有大把是c#的代码。大家照学习吸收一下这些东西就是你自己的了。
涉及到GDI+画图,大家可以看一下这本书:
]
下面是我粗略的vb.net 代码:
Imports System.Drawing
Imports System.Drawing.Drawing2D
Imports System.Drawing.Imaging
Public Class Form1
Protected Overrides Sub OnPaint(ByVal e As System.Windows.Forms.PaintEventArgs)
MyBase.OnPaint(e)
Dim bit As New Bitmap( 200 , 200 )
Dim g As Graphics = Graphics.FromImage(bit) ' 实现双缓冲画图
' 缓冲画图其实挺简单的道理,先要要绘制的图形画在自定义的一个内在空间里面
' 其实就是一个bitmap对象或都image对象
g.Clear(SystemColors.ButtonFace) ' 清除控件上面的颜色
g.SmoothingMode = SmoothingMode.HighQuality ' 消除锯齿
' -----------------------------
Dim rc As New Rectangle( 10 , 10 , 100 , 100 )
Dim path1 As New GraphicsPath
path1 = GetgraphicPath(rc, 5 )
Dim br1 As New LinearGradientBrush(New Point( 0 , - 100 ), New Point( 0 , 111 ), Color.Red, Color.White)
' ----------------------------
' 创建控件阴影的部分
Dim rc2 As Rectangle = rc
rc2.Offset( 8 , 8 ) ' 偏移图形的位置
Dim path2 As New GraphicsPath
path2 = GetgraphicPath(rc2, 5 )
Dim br2 As New PathGradientBrush(path2)
br2.CenterColor = Color.Black
br2.SurroundColors = New Color() {SystemColors.ButtonFace}
' -----------------------------
' 创建控件白色部分
Dim rc3 As Rectangle = rc
rc3.Inflate( - 5 , - 5 ) ' 缩放控件水平坐标
rc3.Height = 15 ' 设置矩形高度
' rc3.Offset(220, 0)
Dim path3 As New GraphicsPath
path3 = GetgraphicPath(rc3, 5 )
Dim br3 As New LinearGradientBrush(rc3, Color.FromArgb( 255 , Color.White), Color.FromArgb( 0 , Color.White), LinearGradientMode.Vertical)
' 绘制文本
Dim path4 As New GraphicsPath
Dim path1bounds As RectangleF = path1.GetBounds
Dim rcText As New Rectangle(CInt(path1bounds.X), CInt(path1bounds.Y), CInt(path1bounds.Width), CInt(path1bounds.Height))
Dim strformat As New StringFormat
strformat.Alignment = StringAlignment.Center
strformat.LineAlignment = StringAlignment.Center
path4.AddString( " myButton " , Me.Font.FontFamily, CInt(Font.Style), Font.Size, rcText, strformat)
Dim txtpen As New Pen(ForeColor, 1 )
' 这几个绘制顺序是要区分的要,不会被覆盖
g.FillPath(br2, path2)
g.FillPath(br1, path1)
g.FillPath(br3, path3)
g.DrawPath(txtpen, path4)
' Dim rgn As New Region(path1)
' rgn.Union(path2)
' Me.Region = rgn
Dim gg As Graphics = e.Graphics
gg.DrawImage(bit, 0 , 0 )
End Sub
' 绘制绘图路径对象
' 其实我们想画的一个圆角的矩形
Public Function GetgraphicPath(ByVal rect As Rectangle, ByVal cornerRadius As Integer) As GraphicsPath
Dim drawpath As New GraphicsPath
drawpath.AddArc(rect.X, rect.Y, cornerRadius * 2 , cornerRadius * 2 , 180 , 90 )
drawpath.AddLine(rect.X + cornerRadius, rect.Y, rect.Right - cornerRadius * 2 , rect.Y)
drawpath.AddArc(rect.X + rect.Width - cornerRadius * 2 , rect.Y, cornerRadius * 2 , cornerRadius * 2 , 270 , 90 )
drawpath.AddLine(rect.Right, rect.Y + cornerRadius * 2 , rect.Right, rect.Y + rect.Height - cornerRadius * 2 )
drawpath.AddArc(rect.X + rect.Width - cornerRadius * 2 , rect.Y + rect.Height - cornerRadius * 2 , cornerRadius * 2 , cornerRadius * 2 , 0 , 90 )
drawpath.AddLine(rect.Right - cornerRadius * 2 , rect.Bottom, rect.X + cornerRadius * 2 , rect.Bottom)
drawpath.AddArc(rect.X, rect.Bottom - cornerRadius * 2 , cornerRadius * 2 , cornerRadius * 2 , 90 , 90 )
drawpath.AddLine(rect.X, rect.Bottom - cornerRadius * 2 , rect.X, rect.Y + cornerRadius * 2 )
drawpath.CloseFigure()
Return drawpath
End Function
End Class


 2907
2907


 被折叠的 条评论
为什么被折叠?
被折叠的 条评论
为什么被折叠?
 到【灌水乐园】发言


