


问题1:在IScroll中都是使用同样的方法对scrollbars和indicators进行初始化
 if ( this.options.scrollbars || this.options.indicators ) {
		this._initIndicators();
}问题2:scrollX和scrollY表示的是什么?
       this.options.scrollY = this.options.eventPassthrough == 'vertical' ? false : this.options.scrollY;
       this.options.scrollX = this.options.eventPassthrough == 'horizontal' ? false : this.options.scrollX;
问题3:如何创建滚动条
创建滚动条和滚动槽是通过下面的方法来完成的:
function createDefaultScrollbar (direction, interactive, type) {
	var scrollbar = document.createElement('div'),
		indicator = document.createElement('div');
          //如果含有滚动条,那么我们给滚动条设置absolute定位
	if ( type === true ) {
		scrollbar.style.cssText = 'position:absolute;z-index:9999';
		indicator.style.cssText = '-webkit-box-sizing:border-box;-moz-box-sizing:border-box;box-sizing:border-box;position:absolute;background:rgba(0,0,0,0.5);border:1px solid rgba(255,255,255,0.9);border-radius:3px';
	}
         //indicator含有className为iScrollIndicator
	indicator.className = 'iScrollIndicator';
        //如果方向是水平的滚动条同时也有滚动条
	if ( direction == 'h' ) {
		if ( type === true ) {
			scrollbar.style.cssText += ';height:7px;left:2px;right:2px;bottom:0';
			indicator.style.height = '100%';
		}
		scrollbar.className = 'iScrollHorizontalScrollbar';
	} else {
		//如果是垂直方向的滚动条
		if ( type === true ) {
			scrollbar.style.cssText += ';width:7px;bottom:2px;top:2px;right:1px';
			indicator.style.width = '100%';
		}
		scrollbar.className = 'iScrollVerticalScrollbar';
	}

	scrollbar.style.cssText += ';overflow:hidden';

       //如果interactive为false表示不允许响应事件,那么为scrollbar元素的style添加pointerEvents为"none"就可以了,默认是""空字符串
	if ( !interactive ) {
		scrollbar.style.pointerEvents = 'none';
	}
      //scrollbar添加子元素为indicator元素
	scrollbar.appendChild(indicator);
	return scrollbar;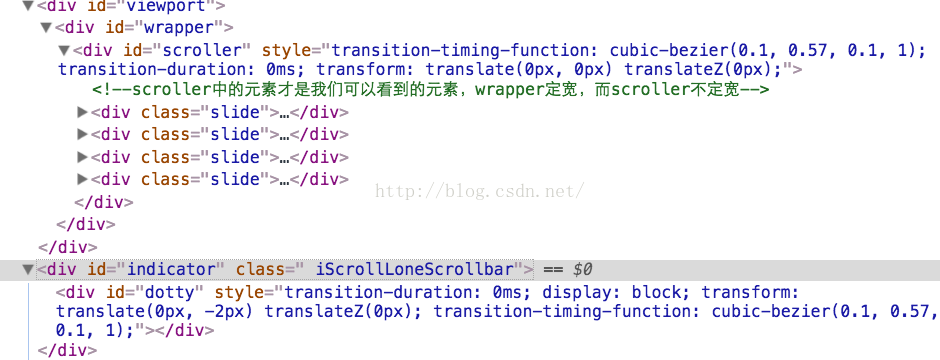
}问题4:到底什么是indicators?
解答:滚动条(非滚动槽);自定义指示元素
看个demo源码:
<div id="viewport">
	<div id="wrapper">
		<div id="scroller">
		<!--scroller中的元素才是我们可以看到的元素,wrapper定宽,而scroller不定宽-->
			<div class="slide">
				<div class="painting giotto"></div>
			</div>
			<div class="slide">
				<div class="painting leonardo"></div>
			</div>
			<div class="slide">
				<div class="painting gaugin"></div>
			</div>
			<div class="slide">
				<div class="painting warhol"></div>
			</div>
		</div>
	</div>
</div>

<div id="indicator">
	<div id="dotty"></div>
</div>var myScroll;
function loaded () {
myScroll = new IScroll('#wrapper', {
scrollX: true,
scrollY: false,
momentum: false,
snap: true,
snapSpeed: 400,
keyBindings: true,
//可以通过indicators来指定自己的Indicator,而滚动条也有自己的Indicator。iScroll会把两者结合起来然后逐个
//创建Indicator元素
indicators: {
el: document.getElementById('indicator'),
resize: false
}
});
}
document.addEventListener('touchmove', function (e) { e.preventDefault(); }, false);
我们看看Indicator的构造函数主要做了什么:
//注意:这里创建Indicator是基于上面对滚动条的创建来完成的,其中Indicator的wrapper属性就是对滚动条的包裹元素,即scrollbar滚动槽元素的引用!
function Indicator (scroller, options) {
	this.wrapper = typeof options.el == 'string' ? document.querySelector(options.el) : options.el;
	//wrapper自己指定(此处的wrapper是Indicator对象具有的wrapper)。返回的DOM结构为<div id="scrollbar"><div id="indicator"></div></div>,也就是wrapper对象就是内部的scrollbar元素DOM。
	//因为这里构造的是Indicator对象,所以其wrapper当然就是scrollbar元素。如果是创建指示元素那么其wrapper就表示我们自己通过el指定
	this.wrapperStyle = this.wrapper.style;
	//scrollbar元素的style属性
	this.indicator = this.wrapper.children[0];
	//获取indticator属性,也是一个DOM
	this.indicatorStyle = this.indicator.style;
	//获取indicator的style属性
	this.scroller = scroller;
    //indicator的scroller属性持有的就是iScroll元素的引用
	this.options = {
		listenX: true,//表示监听X轴
		listenY: true,//表示监听Y轴
		interactive: false,//可以操作
		resize: true,//滚动条的大小是基于wrapper和scroller的width/height来设定的,通过设置resizeScrollbars可以把滚动条设置为一个指定的大小
		defaultScrollbars: false,
		shrink: false,
		fade: false,//fade
		speedRatioX: 0,//指示元素的移动速度是根据sroller的大小来设定的。默认情况下是自动设置的,一般yuansu不需要改变这个值
		speedRatioY: 0//指示元素的移动速度是根据sroller的大小来设定的。默认情况下是自动设置的,一般不需要改变这个值
	};
     //绑定listenX,listenY,speedRatioX,speedRatioY,shrink,fade属性等
	for ( var i in options ) {
		this.options[i] = options[i];
	}

	this.sizeRatioX = 1;
	this.sizeRatioY = 1;
	this.maxPosX = 0;
	this.maxPosY = 0;

	if ( this.options.interactive ) {
		//如果可以是touch事件,那么我们为Indicator添加touchstart,touchend事件
		if ( !this.options.disableTouch ) {
			utils.addEvent(this.indicator, 'touchstart', this);
			utils.addEvent(window, 'touchend', this);
		}
		//如果可以有pointer事件,我们为Indicator添加pointerdown,pointerup事件
		if ( !this.options.disablePointer ) {
			utils.addEvent(this.indicator, utils.prefixPointerEvent('pointerdown'), this);
			utils.addEvent(window, utils.prefixPointerEvent('pointerup'), this);
		}
		//为Indicator添加mousedown,mouseup事件
		if ( !this.options.disableMouse ) {
			utils.addEvent(this.indicator, 'mousedown', this);
			utils.addEvent(window, 'mouseup', this);
		}
	}
    //如果没有操作滚动条就消失,fade对应于this.options.fadeScrollbars
	if ( this.options.fade ) {
		//为iscrollbar元素添加transform属性,也就是启动硬件加速
		this.wrapperStyle[utils.style.transform] = this.scroller.translateZ;
		var durationProp = utils.style.transitionDuration;
		if(!durationProp) {
			return;
		}
		//为scrollbar元素添加transition-duration属性
		this.wrapperStyle[durationProp] = utils.isBadAndroid ? '0.0001ms' : '0ms';
		// remove 0.0001ms
		var self = this;
		if(utils.isBadAndroid) {
			rAF(function() {
				if(self.wrapperStyle[durationProp] === '0.0001ms') {
					self.wrapperStyle[durationProp] = '0s';
				}
			});
		}
		//为我们的scrollbar元素添加opaitcity,然后让它开始执行transform动画
		this.wrapperStyle.opacity = '0';
	}
}创建了Indicator后,我们需要做的就是为他绑定各种事件,不过在这之前我们看看一个方法:
          fade: function (val, hold) {
			//如果hold为true同时当前元素是不可见的,那么不会调用fade放啊
			if ( hold && !this.visible ) {
				return;
			}

			clearTimeout(this.fadeTimeout);
			this.fadeTimeout = null;
			var time = val ? 250 : 500,
				delay = val ? 0 : 300;
				//如果没有传递val

			val = val ? '1' : '0';
			this.wrapperStyle[utils.style.transitionDuration] = time + 'ms';
			//下面是一个立即执行函数
			this.fadeTimeout = setTimeout((function (val) {
				this.wrapperStyle.opacity = val;
				this.visible = +val;
			}).bind(this, val), delay);
}if ( this.options.fadeScrollbars ) {
this.on('scrollEnd', function () {
_indicatorsMap(function () {
this.fade();
//默认time是500(也就是anmation-durantion),delay为300,val(也就是opacity)为"0"(表示完全透明)。
//就是使用val参数来指定animation-duration和animation-delay属性的值,其中iScroll元素的visible属性也是通过val来指定的
//如果第一个参数没有指定那么就是0,否则就是1
});
});
this.on('scrollCancel', function () {
_indicatorsMap(function () {
this.fade();
//调用Indicator的prototype上的fade方法。
});
});
this.on('scrollStart', function () {
_indicatorsMap(function () {
this.fade(1);
//scrollstart表示开始滚动,这时候opacity就是1,也就是要让它显示出来
});
});
this.on('beforeScrollStart', function () {
_indicatorsMap(function () {
this.fade(1, true);
//beforeScrollStart还没有开始滚动
});
});
}
       //绑定refresh事件
		this.on('refresh', function () {
			_indicatorsMap(function () {
				this.refresh();
			});
		});
//绑定destroy事件
this.on('destroy', function () {
_indicatorsMap(function () {
this.destroy();
});
delete this.indicators;
});从上面我们可以清楚的看到,我们为iScroll对象绑定了refresh事件
//绑定refresh事件
this.on('refresh', function () {
			_indicatorsMap(function () {
				this.refresh();
			});
});//刷新:refresh做的事情就是获取水平垂直可以滚动的距离,然后触发refresh事件
refresh: function () {
utils.getRect(this.wrapper);
//首先获取到包裹元素矩形对象的clientWidth/clientHeight,clientWidth=width+2*borderWidth
this.wrapperWidth = this.wrapper.clientWidth;
this.wrapperHeight = this.wrapper.clientHeight;
//获取scroller元素的矩形对象,也就是他的width/height属性
var rect = utils.getRect(this.scroller);
this.scrollerWidth = rect.width;
this.scrollerHeight = rect.height;
//maxScrollX,maxScrollY表示的最大的滚动距离,其值为父元素的clientWidth-子元素的width
//wrapper可以设置width,但是scroll是不可以设置宽度的,所以maxScrollX如果为负数,那么表示scroll特别宽,这时候表示可以往左边移动,也就是是负数
//wrapper可以设置height,但是scroll是不可以设置高度的,所以maxScrollY如果为负数,表示元素可以往上面移动
this.maxScrollX = this.wrapperWidth - this.scrollerWidth;
this.maxScrollY = this.wrapperHeight - this.scrollerHeight;
this.hasHorizontalScroll = this.options.scrollX && this.maxScrollX < 0;
this.hasVerticalScroll = this.options.scrollY && this.maxScrollY < 0;
//如果指定了scrollX,同时maxScrollX<0。那么这时候表示有水平的滚动条,如果>=0肯定是没有水平滚动条的
//如果指定了scrollY,同时maxScrollY<0。那么这时候表示有垂直的滚动条,如果>=0肯定是没有垂直滚动条的
if ( !this.hasHorizontalScroll ) {
this.maxScrollX = 0;
this.scrollerWidth = this.wrapperWidth;
}
//如果没有垂直滚动条,那么maxScrollY就是0,同时scroll的高度和wrap的高度是一样的
if ( !this.hasVerticalScroll ) {
this.maxScrollY = 0;
this.scrollerHeight = this.wrapperHeight;
}
this.endTime = 0;
this.directionX = 0;
this.directionY = 0;
this.wrapperOffset = utils.offset(this.wrapper);
//获取wrapper元素的offset值,一直往上计算,一直到该元素没有offsetParent为止,同时要记住:这是逐级往上计算的,而且这是负数,通过这种方式可以简单的获取到距离document的距离!
this._execEvent('refresh');
//触发refresh事件
this.resetPosition();
}//重新设置位置,以time作为参数
//that.resetPosition(that.options.bounceTime)
resetPosition: function (time) {
//this.x、this.y表示iScroll对象当前所在的位置
var x = this.x,
y = this.y;
time = time || 0;
//如果没有水平滚动条或者this.x>0那么x=0
if ( !this.hasHorizontalScroll || this.x > 0 ) {
x = 0;
//如果this.x<this.maxScrollX那么水平方法可以滚动的距离为this.maxScrollX
} else if ( this.x < this.maxScrollX ) {
x = this.maxScrollX;
}
//没有垂直滚动条y=0,如果有垂直滚动条那么就是this.maxScrollY
if ( !this.hasVerticalScroll || this.y > 0 ) {
y = 0;
} else if ( this.y < this.maxScrollY ) {
y = this.maxScrollY;
}
if ( x == this.x && y == this.y ) {
return false;
}
//滚动到x,y的坐标,时间为time,函数为this.options.bounceEasing。调用对象为该iScroll对象
this.scrollTo(x, y, time, this.options.bounceEasing);
return true;
}this.on('refresh', function () {
_indicatorsMap(function () {
this.refresh();
});
});
参考文献:


 2976
2976

 被折叠的 条评论
为什么被折叠?
被折叠的 条评论
为什么被折叠?
 到【灌水乐园】发言


