


第1章 模板渲染解决方案
学习目标
能够说出模板引擎thymeleaf与前端框架vue.js的不同
完成首页广告轮播图渲染
完成首页分类导航渲染
完成商品详细页的静态渲染
项目序列-9:https://github.com/Jonekaka/javaweb-qingcheng-9-84
1. 模板引擎thymeleaf
1.1 thymeleaf简介
Thymeleaf是一个适用于Web和独立环境的现代服务器端Java模板引擎。

Thymeleaf的主要目标是为开发工作流程带来优雅的自然模板 -
Spring Framework模块与工具的大量集成,插入自己所需的功能
官网:https://www.thymeleaf.org/
官方文档:https://www.thymeleaf.org/doc/tutorials/2.1/thymeleafspring.html#preface
1.2 为什么要使用thymeleaf
1.2.1 thymeleaf PK Vue.js
已经有了vue.js这样的前端框架,为什么还要在项目中使用thymeleaf ?
首先说这两种技术本质上属于不同类型的产品。vue.js属于前端框架,而thymeleaf 属于模板引擎。虽然它们可以实现相同的功能(比如一个列表),但是它们的工作过程却是不同: vue.js通过异步方式请求数据,后端给前端返回json,前端通过
vue指令循环渲染列表。thymeleaf 则是在后端实现页面的渲染,将渲染后的页面直接给浏览器展示。
那什么时候使用vue.js,什么使用thymeleaf 呢?
一般来说,管理后台我们会使用前端框架,因为前端框架就能满足需求,对加载时延也无要求,而网站前台的部分有些页面会使用thymeleaf。
原因有两点:
(1)因为使用vue.js由于是异步请求,从页面打开到信息的展示会出现延迟,页面先打开,然后数据缓慢加载,而使
用thymeleaf,页面打开会立刻看到页面的信息。
(2)异步加载的数据不会被搜索引擎抓取。vue.js的数据是动态的,搜索引擎会抓取静态的数据,所以当我们希望数据被搜索引擎收录,就需要使用thymeleaf这样的模板引擎。
1.2.2 thymeleaf PK JSP
thymeleaf和jsp都是属于服务端渲染技术。
thymeleaf比jsp功能强大许多,spring boot 官方推荐的模板引擎就是thymeleaf。
1.3 thymeleaf快速入门
1.3.1 最简单案例
(1)创建测试工程,引入依赖
<dependencies>
        <dependency>
            <groupId>org.thymeleaf</groupId>
            <artifactId>thymeleaf</artifactId>
            <version>3.0.11.RELEASE</version>
        </dependency>
    </dependencies>
(2)创建模板。在resources目录下创建test.html
生成页面的原材料
引入命名空间,使用其中的组件
<!DOCTYPE html>
<html xmlns:th="http://www.thymeleaf.org">
<head>
    <meta charset="UTF‐8">
    <title>thymeleaf入门demo</title>
</head>
<body>
<span th:text="${name}"></span>
</body>
</html>
(3)创建测试类,编写代码
public class test {
public static void main(String[] args) throws FileNotFoundException, UnsupportedEncodingException {
/*准备上下文,数据模型*/
Context context = new Context();
Map dataModel= new HashMap();
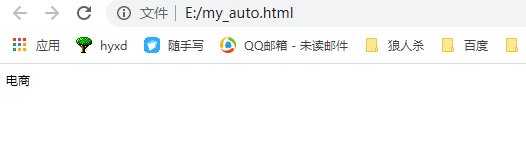
dataModel.put("name", "电商");
context.setVariables(dataModel);
/*准备文件*/
File fileTest = new File("E:/my_auto.html");
PrintWriter printWriter = new PrintWriter(fileTest, "UTF-8");
/*生成页面,利用数据模型,文件,以及定义的模板*/
/*新建引擎,引擎需要有配置,设置模板解析器来配置引擎*/
ClassLoaderTemplateResolver resolver = new ClassLoaderTemplateResolver();//模板解析器
resolver.setTemplateMode(TemplateMode.HTML);//模板模型
resolver.setSuffix(".html");//后缀
TemplateEngine engine = new TemplateEngine();//创建模板引擎
engine.setTemplateResolver(resolver);//设置模板解析器
/*指定模板名称,注意和资源文件下的html一致,指定数据模型,指定输出者*/
engine.process("MyShow", context, printWriter);//执行模板引擎
}
}
此时html页面已经自动生成
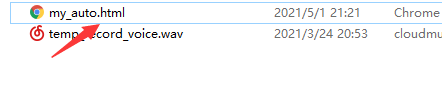
页面中的变量已经被替换了
<!DOCTYPE html>
<html>
<head>
    <meta charset="UTF‐8">
    <title>thymeleaf入门demo</title>
</head>
<body>
<span>电商</span>
</body>
</html>
如此来看似乎也没有什么特殊的,但是通过与springmvc集成后,可以通过配置来完成页面,自动化程度高
1.3.2 常用th标签

2. 首页广告轮播图渲染
2.1 需求分析
使用Thymeleaf实现首页广告轮播图的渲染
当然这些是从数据库中取出的,后台增删改查,前台这里作为显示

后台

2.2 表结构分析
tb_ad (广告表)

position:系统定义的广告位置
index_lb 首页轮播图
index_amusing 有趣区
index_ea_lb 家用电器楼层轮播图
index_ea 家用电器楼层广告
index_mobile_lb 手机通讯楼层轮播图
index_mobile 手机通讯楼层广告
…
得到了位置,如果想要取轮播图,根据地址查就行
url点击图片跳转的链接
2.3 代码实现
2.3.1 搭建网站前台工程
(1)新建qingcheng_web_portal工程,此工程为网站前台工程,pom.xml参照
qingcheng_web_manager工程,另外再添加thymeleaf-spring5依赖:
<dependency>
<groupId>org.thymeleaf</groupId>
<artifactId>thymeleaf‐spring5</artifactId>
<version>3.0.11.RELEASE</version>
</dependency>
(2)qingcheng_web_portal工程新建web.xml
<?xml version="1.0" encoding="UTF-8"?>
<web-app xmlns:xsi="http://www.w3.org/2001/XMLSchema-instance"
         xmlns="http://java.sun.com/xml/ns/javaee"
         xsi:schemaLocation="http://java.sun.com/xml/ns/javaee http://java.sun.com/xml/ns/javaee/web-app_2_5.xsd"
         version="2.5">
  <!-- 解决post乱码 -->
  <filter>
    <filter-name>CharacterEncodingFilter</filter-name>
    <filter-class>org.springframework.web.filter.CharacterEncodingFilter</filter-class>
    <init-param>
      <param-name>encoding</param-name>
      <param-value>utf-8</param-value>
    </init-param>
    <init-param>
      <param-name>forceEncoding</param-name>
      <param-value>true</param-value>
    </init-param>
  </filter>
  <filter-mapping>
    <filter-name>CharacterEncodingFilter</filter-name>
    <url-pattern>/*</url-pattern>
  </filter-mapping>


  <servlet>
    <servlet-name>springmvc</servlet-name>
    <servlet-class>org.springframework.web.servlet.DispatcherServlet</servlet-class>
    <!-- 指定加载的配置文件 ,通过参数contextConfigLocation加载-->
    <init-param>
      <param-name>contextConfigLocation</param-name>
      <param-value>classpath*:applicationContext*.xml</param-value>
    </init-param>
  </servlet>

  <servlet-mapping>
    <servlet-name>springmvc</servlet-name>
    <url-pattern>*.do</url-pattern>
  </servlet-mapping>

  <welcome-file-list>
    <welcome-file>/index.do</welcome-file>
  </welcome-file-list>

</web-app>
(3)qingcheng_web_portal工程resources下新建配置文件dubbo.properties
dubbo.application=portal
(4)qingcheng_web_portal工程resources下新建配置文件applicationContextthymeleaf.xml
解决模板放在哪儿
用哪个模板
什么字符
应该用哪个前端模型解析
用什么模板引擎
用什么解析器
<?xml version="1.0" encoding="UTF-8"?>
<beans xmlns="http://www.springframework.org/schema/beans"
       xmlns:xsi="http://www.w3.org/2001/XMLSchema-instance"
       xsi:schemaLocation="http://www.springframework.org/schema/beans http://www.springframework.org/schema/beans/spring-beans.xsd">
<!--spring整合的资源模板解析器,配置模板引擎-->
    <bean id="templateResoler"
        class="org.thymeleaf.spring5.templateresolver.SpringResourceTemplateResolver">
        <!--模板前缀,目录,模板文件在哪里-->
        <property name="prefix" value="/WEB-INF/templaters/"/>
        <!--模板后缀,扩展名,根据扩展名寻找模板文件-->
        <property name="suffix" value=".html"/>
        <!--字符集,配置使用什么字符解析-->
        <property name="characterEncoding" value="UTF-8"/>
        <!--模式,配置用什么模式解析,html5-->
        <property name="templateMode" value="HTML5"/>
    </bean>
    <!--配置模板引擎-->
    <bean id="templateEngine"
            class="org.thymeleaf.spring5.SpringTemplateEngine">
        <!--引用引擎配置进行初始化-->
        <property name="templateResolver" ref="templateResoler"/>

    </bean>
    <!--模板视图解析器-->
    <bean id="viewResolver" class="org.thymeleaf.spring5.view.ThymeleafViewResolver">
        <!--引用模板引擎-->
        <property name="templateEngine" ref="templateEngine"/>
        <!--解析器所用解码格式-->
        <property name="characterEncoding" value="UTF-8"/>

    </bean>
</beans>
SpringResourceTemplateResolver:spring资源模板解析器
SpringTemplateEngine: spring整合的模板引擎
ThymeleafViewResolver:Thymeleaf视图解析器
(5)webapp/WEB-INF下创建templates文件夹用于存放模板文件
(6)将相关文件建立到webapp下

2.3.2 渲染广告轮播图
(1)服务接口AdService新增方法定义
定义服务接口
/**
 * 根据广告位置查询广告列表
 * @param position
 * @return
 */
public List<Ad> findByPosition(String position);
(2)服务类AdServiceImpl实现方法
 public List<Ad> findByPosition(String position) {
        /*类,创建条件,内部组件sql语句*/
        Example example = new Example(Ad.class);
        Example.Criteria criteria = example.createCriteria();
        /*位置相等*/
        criteria.andEqualTo("position", position);
        /*开始时间小于或者等于当前时间,圈定当前时间范围*/
        criteria.andLessThanOrEqualTo("startTime", new Date());
        criteria.andGreaterThanOrEqualTo("endTime", new Date());
        criteria.andEqualTo("status", "1");

        return adMapper.selectByExample(example);
    }
(3)qingcheng_web_portal工程新建包com.qingcheng.controller,包下创建类
/*为什么不是restcontroller呢?因为这里不返回rest的json数据,而是使用跳转的方式,模板渲染方式*/
@Controller
public class IndexController {
    /**
     * @Description 调用远程数据,serice实现
     **/
    @Reference
    private AdService adService;
    /**
     * @Description 返回渲染名称
     * @Param [model]
     * @return java.lang.String
     **/
    @GetMapping("/index")
    public String index(Model model) {
        /*得到首页轮播图广告列表*/
        List<Ad> lbList = adService.findByPosition("index_lb");
        model.addAttribute("lbt", lbList);
        /*返回模板文件名字*/
        return "index";
    }
}
(4)模板编写:书写index.html,放置qingcheng_web_portal工程的WEB-INF/templates下。修改广告轮播图部
分代码
<!--加入命名空间-->
<html xmlns="http://www.thymeleaf.org" xmlns:th="http://www.w3.org/1999/xhtml">
...

<!‐‐让点显示自动判断有多少图片,让图片和地址自动动态添加‐‐>
<!--banner轮播-->
				<div id="myCarousel" data-ride="carousel" data-interval="4000" class="sui-carousel slide">
					<ol class="carousel-indicators">
						<!--三个点也不一定,根据轮播图的数量来确定,对于第一个也需要激活,使用三元运算符判断
						代码自动生成-->
						<li data-target="#myCarousel" th:data-slide-to="${iterStat.index}" th:class="${iterStat.index==0?'active':''}" th:each="ad,iterStat:${lbt}"></li>
					</ol>
					<!--三张图片-->
					<div class="carousel-inner">
						<!--第一个有active,如果不把他激活,第一张就是空白-->
						<!--轮播图的属性lbt从contoller的add属性中来
						model.addAttribute("lbt", lbList);-->
						<!--对于class也需要判断,如果是第一次,就激活,其他不用,
						三元运算符-->
						<div th:class="${iterStat.index==0?'active item':'item'}" th:each="ad,iterStat:${lbt}">
							<a th:href="${ad.url}">
								<img th:src="${ad.image}" />
							</a>
						</div>
					</div>
					<a href="#myCarousel" data-slide="prev" class="carousel-control left">‹</a>
					<a href="#myCarousel" data-slide="next" class="carousel-control right">›</a>
				</div>
iterStat是状态变量,有 index,count,size,current,even,odd,first,last等属性,如果没有
显示设置状态变量.thymeleaf会默认给个“变量名+Stat"的状态变量。
http://localhost:9102/index.do
可以进入页面
此时查看源代码可以看到图片url自动补全了,从数据库中填充的
进入数据库将状态改为0
则数据库中的三条数据仅有两条可用,此时刷新页面只有两张图片
然而进一步的需求是进入页面就能看到前端主界面
设定欢迎页为index.do
 <welcome-file-list>
    <welcome-file>/index.do</welcome-file>
  </welcome-file-list>
用数据库中的数据取代模板中的数据,做到动态变化
3. 首页分类导航渲染
3.1 需求分析
使用Thymeleaf实现首页分类导航渲染
当点击一级分类的时候还会实现二级目录的展现
还需要从数据库中加载数据完成页面渲染

3.2 表结构分析
tb_category (商品分类表)

3.3 实现思路
(1)后端代码,查询is_show为1的记录,使用递归逻辑转换为树状数据,结构如下:
[
        {
        name:"一级菜单"
        menus:[
        {
        name:"二级菜单"
        menus:[
        {
        name:"三级菜单"
        },
        .......
        ]
        },
        .......
        ]
        },
        .......
        ]
(2)模板使用th:each循环菜单数据(三层嵌套)
3.4 代码实现
(1)CategoryService接口新增方法定义
此属于goods
/**
 * 查询分类(树形结构)
 * @return
 */
public List<Map> findCategoryTree();
(2)CategoryServiceImpl是实现此方法
public List<Map> findCategoryTree() {
        Example example=new Example(Category.class);
        Example.Criteria criteria = example.createCriteria();
        criteria.andEqualTo("isShow","1");//显示
        example.setOrderByClause("seq");//排序
        List<Category> categories = categoryMapper.selectByExample(example);
        return findByParentId(categories,0);
        }
private List<Map> findByParentId(List<Category> categoryList, Integer parentId){
        List<Map> mapList=new ArrayList<Map>();
        for(Category category:categoryList){
	        if(category.getParentId().equals(parentId)){
		        Map map =new HashMap();
		        map.put("name",category.getName());
		        //通过递归将数据树形加载,类似于后台菜单的生成
		        map.put("menus",findByParentId(categoryList,category.getId()));
		        mapList.add(map);
	        }
        }
        return mapList;
   }
(3)修改IndexController的index方法
@Reference
private CategoryService categoryService;
/**
 * 网站首页
 * @return
 */
@GetMapping("/index")
public String index(Model model){
//查询首页轮播图
        List<Ad> lbtList = adService.findByPosition("index_lb");
        model.addAttribute("lbt",lbtList);
//查询商品分类
        List<Map> categoryList = categoryService.findCategoryTree();
        model.addAttribute("categoryList",categoryList);
        return "index";
        }
(4)修改模板文件index.html
从数据库拉取数据,树形结构,
<div class="yui3-u Left all-sort">
						<h4>全部商品分类</h4>
					</div>
					<div class="sort">
						<div class="all-sort-list2">
							<!--一级分类-->
							<div class="item" th:each="category1:${categoryList}">
								<h3>
									<a href="" th:text="${category1.name}"></a>
								</h3>
								<div class="item-list clearfix">
									<div class="subitem">
										<!--二级分类-->
										<dl class="fore" th:each="category2:${category1.menus}">
											<dt>
												<a href=""  th:text="${category2.name}"></a>
											</dt>
											<dd>
												<!--三级分类-->
												<em th:each="category3:${category2.menus}">
													<a href="" th:text="${category3.name}"></a>
												</em>
											</dd>
										</dl>
									</div>
								</div>
							</div>

						</div>
					</div>
				</div>

4. 商品详细页静态渲染
4.1 需求分析
商品详细页通过thymeleaf静态渲染为html页面。
为什么要静态渲染为html页面而不是动态渲染呢?
(1) 避免在每次打开商品详细页都查询数据库,可以极大减轻数据的访问压力。
(2)可以把生成的html放入nginx运行。动态的html只能放入tomcat这样的容器,而tomcat最高并发几百个,但nginx可以高达五万并发, 极大提升网站的访问速度 ,解决电商网站高并发的问题 。
前面的菜单是变化的,但是商品页一般不变,变化之后重新渲染即可
我们是将每一个spu生成一个页面,还是将每个sku生成一个页面呢?
京东的做法是每个sku一个页面,点击规格后跳转页面。我们青橙的实现方式与京东相同。
为每个sku生成一个页面,显示spu,点击不同规格后跳转
商品标题,价格,各种规格,图片,等等都可以渲染

4.2 代码实现
4.2.1 基本信息
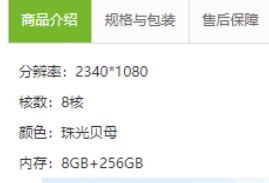
需求:生成SKU名称、SPU副标题、价格、商品介绍、售后服务等信息
实现步骤:
(1)qingcheng_web_portal工程创建ItemController
@RestController
@RequestMapping("/item")
public class ItemController {
@Reference
private SpuService spuService;
@Autowired
private TemplateEngine templateEngine;
@Value("${pagePath}")
private String pagePath;
/**
* 生成商品详细页
* @param id
*/
@GetMapping("/createPage")
public void createPage(String id){
//查询商品信息
Goods goods = spuService.findGoodsById(id);
//获取SPU 信息
Spu spu = goods.getSpu();
//获取sku列表
List<Sku> skuList = goods.getSkuList();
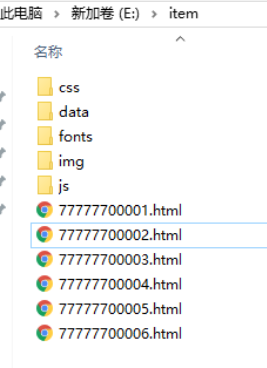
//创建页面(每个SKU为一个页面)
for(Sku sku:skuList){
// 1.上下文
Context context = new Context();
//创建数据模型
Map<String, Object> dataModel =new HashMap();
dataModel.put("spu",spu);
dataModel.put("sku",sku);
context.setVariables(dataModel);
// 2.准备文件,路径不能写死,因为实际部署是在linux,但是开发在win,因此应该配置
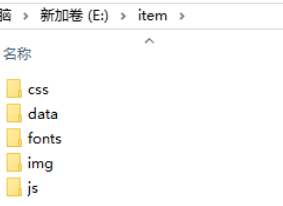
File dir = new File(pagePath);
if (!dir.exists()) {
dir.mkdirs();
}
File dest = new File(dir, sku.getId() + ".html");
// 3.生成页面
try {
PrintWriter writer = new PrintWriter(dest, "UTF‐8");
//根据哪个模板生成,内容,其实就是从数据库中得到数据填充到模板中
templateEngine.process("item", context, writer);
} catch (Exception e) {
e.printStackTrace();
}
}
}
}
(2)resources下添加配置文件config.properties
pagePath=d:/item/
(3)将模板item.html拷贝到 templates文件夹 ,修改部分代码
<html xmlns:th="http://www.thymeleaf.org">
标题模板
<div class="sku‐name">
<h4 th:text="${sku.name}"></h4>
</div>
<div class="news">
<span th:text="${spu.caption}"></span>
</div>
价格模板,存的都是分
保留两位小数
#numbers.formatDecimal(原始数据,整数位,保留几位小数) 。
注意:指定整数位不为0,表示位数不足用0补齐,比如3,补位为03
例: #numbers.formatDecimal(3.456,2,2) 结果为 03.45
<div class="fl title">
<i>价 格</i>
</div>
<div class="fl price">
<i>¥</i>
<em th:text="${#numbers.formatDecimal(sku.price/100,0,2)}"></em>
<span>降价通知</span>
</div>
渲染商品介绍
<div id="one" class="tab‐pane active">
<div class="intro‐detail" th:utext="${spu.introduction}">
</div>
</div>
<div id="two" class="tab‐pane">
<ul class="goods‐intro unstyled">
<li>规格参数</li>
</ul>
</div>
<div id="three" class="tab‐pane">
<p th:text="${spu.saleService}">售后保障</p>
</div>
需要注意的是,应该有样式文件,否则html无法展现无样式
此时sku已经全部生成

目录下为sku命名的文件
4.2.2 商品分类
(1)修改createPage方法,添加代码,根据分类id查询分类名称
//查询商品分类
List<String> categoryList=new ArrayList<String>();
        categoryList.add(categoryService.findById(spu.getCategory1Id()).getName());//一级分类
        categoryList.add(categoryService.findById(spu.getCategory2Id()).getName());//二级分类
        categoryList.add(categoryService.findById(spu.getCategory3Id()).getName());//三级分类
将三级分类放入到数据模型中
dataModel.put(“categoryList”,categoryList);//商品分类面包屑
(2)修改模板商品分类面包屑部分
<ul class="sui‐breadcrumb">
<li th:each="category:${categoryList}">
<a href="#" th:text="${category}"></a>
</li>
</ul>
4.2.3 商品图片
商品图片地址来自:spu和sku的参数image列表,抽出数据赋值即可
只要有一个中间件能把账算明白就行
图片来自spu和sku的图片列表,
sku有image,images而且是多张图,用逗号分开
为什么两者都有图片呢?
因为spu的图片是sku共用的,相当于封面
后端都要把他们取出来,循环两次即可
需求:商品详细页的图片列表为SKU的图片列表+SPU的图片列表
(1)修改createPage方法,为数据模型添加SKU图片列表和SPU图片列表
dataModel.put("skuImages", sku.getImages().split(","));//SKU图片列表
 dataModel.put("spuImages", spu.getImages().split(","));//SPU图片列表
(2)修改模板图片列表部分
如果图片太大,控制宽高
<!‐‐放大镜效果‐‐>
<div class="zoom">
<!‐‐默认第一个预览‐‐>
<div id="preview" class="spec‐preview">
<span class="jqzoom">
<img th:jqimg="${sku.image}" th:src="${sku.image}" />
</span>
</div>
<!‐‐下方的缩略图‐‐>
<div class="spec‐scroll">
<a class="prev"><</a>
<!‐‐左右按钮‐‐>
<div class="items">
<ul>
<li th:each="img:${skuImages}">
<img th:src="${img}" th:bimg="${img}"
onmousemove="preview(this)" />
</li>
<li th:each="img:${spuImages}">
<img th:src="${img}" th:bimg="${img}"
onmousemove="preview(this)" />
</li>
</ul>
</div>
<a class="next">></a>
</div>
</div>

4.2.4 规格参数列表
知道数据在哪里就好办,读取出来,然后再页面赋值
需求:商品的显示规格和参数列表
实现步骤:
(1)修改createPage方法,为数据模型添加规格和参数
Map paraItems = JSON.parseObject(spu.getParaItems());//SPU参数列表
        dataModel.put("paraItems", paraItems);
        Map specItems = JSON.parseObject(sku.getSpec());//当前SKU规格
        dataModel.put("specItems", specItems);
(2)修改模板item.html规格参数部分
<div id="two" class="tab‐pane">
<!‐‐ 参数列表‐‐>
<ul class="goods‐intro unstyled">
<li th:each="para:${paraItems}"
        th:text="${para.key+':'+para.value}"></li>
</ul>
<!‐‐ 规格列表‐‐>
<ul class="goods‐intro unstyled">
<li th:each="spec:${specItems}"
        th:text="${spec.key+':'+spec.value}"></li>
</ul>
</div>
4.2.5 规格面板
需求:渲染规格面板,当前SKU的规格呈现于选中的状态

实现思路:
(1)规格面板的数据来自spu的specItems,颜色,内存等等
(2)逻辑较为复杂,我们可以分步骤来写。
第一步先实现规格和规格选项的显示,key,value
第二步再考虑选中状态的处理。
4.2.5.1 规格面板显示
实现步骤:
(1)修改createPage方法,为数据模型添加规格和参数
//规格选择面板
// {"颜色":["天空之境","珠光贝母"],"内存":
["8GB+64GB","8GB+128GB","8GB+256GB"]}
        Map<String,List> specMap = (Map) JSON.parse(spu.getSpecItems());
        dataModel.put("specMap", specMap);//规格面板
(2)修改模板item.html规格面板部分
什么颜色
<i th:text="${specValue}"></i>
单独画出来,不会影响下面的text操作
<div id="specification" class="summary‐wrap clearfix">
<dl th:each="spec:${specMap}">
<dt>
<div class="fl title">
<i th:text="${spec.key}"></i>
</div>
</dt>
<dd th:each="specValue:${spec.value}">
<a href="javascript:;" >
<i th:text="${specValue}"></i>
<span title="点击取消选择"> </span>
</a>
</dd>
</dl>
</div>

4.2.5.2 选中状态处理
对于规格的选中当然不能是全选,而是部分选中部分处理
思路分析:
如果页面上要呈现每个规格选项的选中状态,必然要存在这个属性,而我们刚才返回的
数据只有规格选项的文本,所以我们需要在代码中循环每个规格选项,判断是否为当前
sku的规格选项,补充是否选中的属性。模板拿到这个属性就可以通过三元运算符来处理
规格选项的样式。
实现步骤:
(1)修改createPage方法,为数据模型添加规格和参数
 //{"颜色":["天空之境","珠光贝母"],"内存":["8GB+64GB","8GB+128GB","8GB+256GB"]}
            //{"颜色":[{ 'option':'天空之境',checked:true },{ 'option':'珠光贝母',checked:false }],.....}最后应该是这种样式
            Map<String,List> specMap =  (Map)JSON.parseObject(spu.getSpecItems());//规格和规格选项
            for(String key :specMap.keySet()  ){  //循环规格,循环map集合
                List<String> list = specMap.get(key);//["天空之境","珠光贝母"]
                List<Map> mapList=new ArrayList<>();//新的集合  //[{ 'option':'天空之境',checked:true },{ 'option':'珠光贝母',checked:false }]
                //循环规格选项,判断是否选中
                for(String value:list){
                    Map map=new HashMap();
                    map.put("option",value);//规格选项
                    if(specItems.get(key).equals(value) ){  // 如果和当前sku的规格相同,就是选中
                        map.put("checked",true);//是否选中
                    }else{
                        map.put("checked",false);//是否选中
                    }
                    Map<String,String>  spec= (Map)JSON.parseObject(sku.getSpec()) ;//当前的Sku
                    spec.put(key,value);
                    String specJson = JSON.toJSONString(spec , SerializerFeature.MapSortField);
                    map.put("url",urlMap.get(specJson));
                    mapList.add(map);
                }
                specMap.put(key,mapList);//用新的集合替换原有的集合
            }

            dataModel.put("specMap" ,specMap);

            context.setVariables(dataModel);
(2)修改模板item.html规格面板部分
<div id="specification" class="summary‐wrap clearfix">
<dl th:each="spec:${specMap}">
<dt>
<div class="fl title">
<i th:text="${spec.key}"></i>
</div>
</dt>
<dd th:each="specValue:${spec.value}">
三元运算符,判断是否选中
<a href="javascript:;"
th:class="specValue.checked?'selected':''}">
<i th:text="${specValue.option}"></i>
<span title="点击取消选择"> </span>
</a>
</dd>
</dl>
</div>
4.2.6 页面跳转
4.2.6.1 url列表创建与提取
目的在于选中新的规格以后跳转到相应规格的url,sku
需求:点击规格面板的规格选项,实现商品详细页之间的跳转。
思路分析:
我们在模板中要渲染URL,数据模型中就必须有URL,与选中状态的思路类似,我们要在
循环规格选项时添加url属性。那么如果获取这个URL呢?我们可以先创建一个SKU地址
列表(MAP),以规格的JSON字符串作为KEY,以URL地址作为值。然后我们在循环规
格选项时就可以从SKU地址列表中取出我们要的URL。
代码实现:
(1)修改createPage方法,在创建页面的循环前添加以下代码
//生成SKU地址列表
Map urlMap=new HashMap();
for(Sku sku:skuList){
//对规格json字符串进行排序
String specJson= JSON.toJSONString(
JSON.parseObject(sku.getSpec()), SerializerFeature.MapSortField );
urlMap.put(specJson,sku.getId()+".html");
}
//创建页面(每个SKU为一个页面)
......
此代码的作用是生成SKU地址的列表,以规格JSON字符串作为KEY,商品详细页的地址
(id)作为值。为了能够保证规格JSON字符串能够在查询的时候匹配,需要使用
SerializerFeature.SortField.MapSortField进行排序。
(2)修改createPage方法,在创建页面的循环体中添加代码
//创建页面(每个SKU为一个页面)
for(Sku sku:skuList){
//.............
        for(String key:specMap.keySet() ){//循环规格名称
// ........
        for(String value:list ){//循环规格选项值
// .......
//商品详细页地址 (添加以下代码)
        Map spec= JSON.parseObject(sku.getSpec());//当前SKU规格
        spec.put(key,value);
        String specJson= JSON.toJSONString( spec,
        SerializerFeature.MapSortField );
        map.put("url",urlMap.get(specJson));
//.......
        }
//.......
        }
//.......
        }
(3)修改模板item.html的规格面板部分,添加链接
<a th:href="${specValue.url}"
        th:class="${specValue.checked?'selected':''}">
4.2.6.2 不可选规格组合
比如卖完了
需求:有的规格组合不存在,我们需要让其显示为不可选样式。
思路分析:生成url列表时判断SKU状态,只生成状态为1的。模板判断如果url为null则显
示为不可选样式。
代码实现:
(1)添加判断,筛选有效sku
//sku地址列表
Map<String,String> urlMap=new HashMap<>();
        for(Sku sku:skuList){
        if("1".equals(sku.getStatus())){
        String specJson = JSON.toJSONString(
        JSON.parseObject(sku.getSpec()), SerializerFeature.MapSortField);
        urlMap.put(specJson,sku.getId()+".html");
        }
        }
(2)修改模板:
<a th:href="${specValue.url}"
        th:class="${specValue.url==null?'locked':
        (specValue.checked?'selected':'')}">


 1万+
1万+


 被折叠的 条评论
为什么被折叠?
被折叠的 条评论
为什么被折叠?
 到【灌水乐园】发言


