


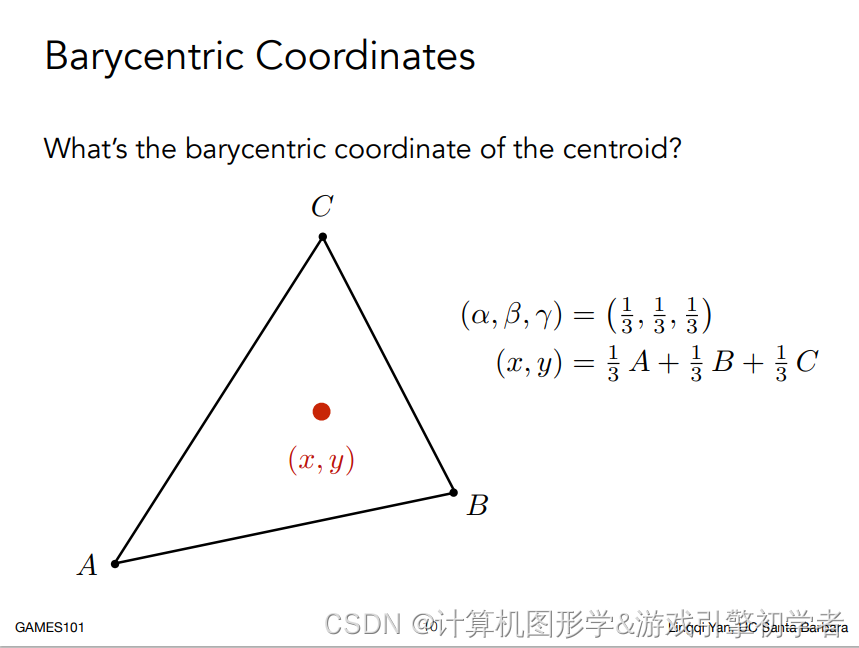
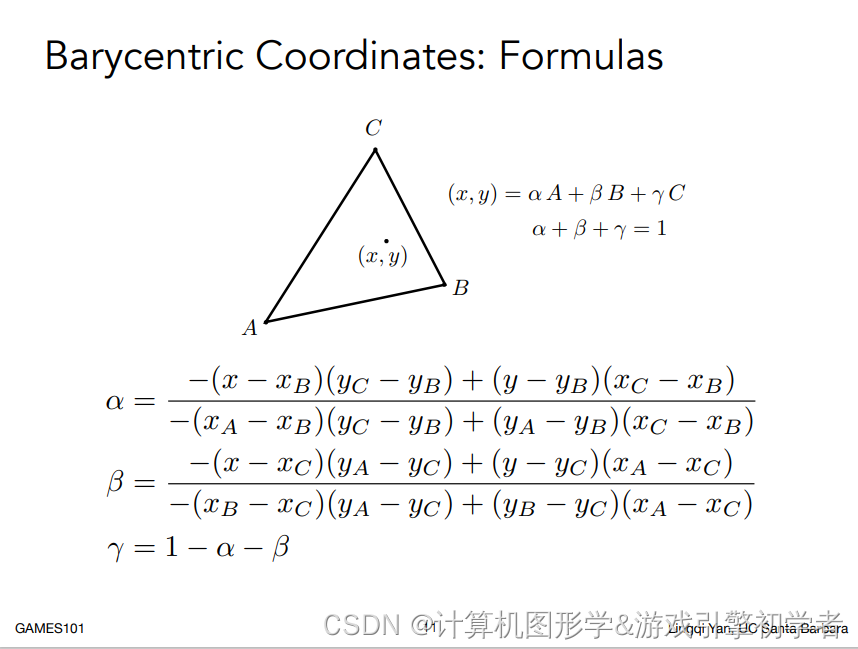
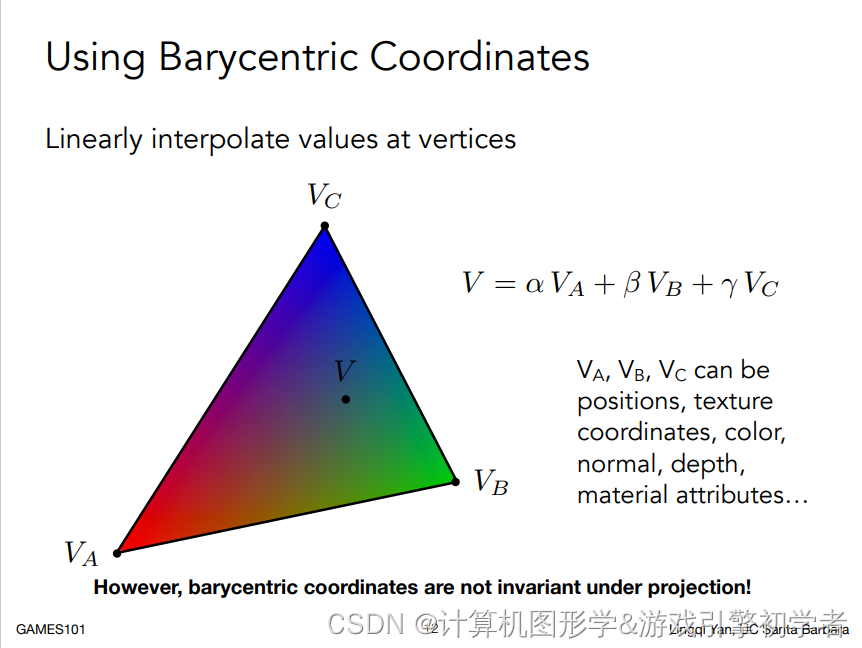
食用指南:把代码复制进对应位置,看注释加上课程视频就能看懂
任务1
修改函数
rasterize_triangle(const Triangle& t)
in rasterizer.cpp:
在此处实现与作业 2
类似的插值算法,实现法向量、颜色、纹理颜色的插值。
PPT截图:


//Screen space rasterization
void rst::rasterizer::rasterize_triangle(const Triangle& t, const std::array<Eigen::Vector3f, 3>& view_pos)
{
    // TODO: From your HW3, get the triangle rasterization code.
    // TODO: Inside your rasterization loop:
    //    * v[i].w() is the vertex view space depth value z.
    //    * Z is interpolated view space depth for the current pixel
    //    * zp is depth between zNear and zFar, used for z-buffer

    // float Z = 1.0 / (alpha / v[0].w() + beta / v[1].w() + gamma / v[2].w());
    // float zp = alpha * v[0].z() / v[0].w() + beta * v[1].z() / v[1].w() + gamma * v[2].z() / v[2].w();
    // zp *= Z;

    // TODO: Interpolate the attributes:
    // auto interpolated_color
    // auto interpolated_normal
    // auto interpolated_texcoords
    // auto interpolated_shadingcoords

    // Use: fragment_shader_payload payload( interpolated_color, interpolated_normal.normalized(), interpolated_texcoords, texture ? &*texture : nullptr);
    // Use: payload.view_pos = interpolated_shadingcoords;
    // Use: Instead of passing the triangle's color directly to the frame buffer, pass the color to the shaders first to get the final color;
    // Use: auto pixel_color = fragment_shader(payload);
    auto v = t.toVector4();//把三角形面片的顶点坐标装入容器

    //记录这三个顶点占据的二维平面的取值范围,以得到接下来需要历遍的边界
    float f_x_min = std::min(v[0][0], std::min(v[1][0], v[2][0]));
    float f_y_min = std::min(v[0][1], std::min(v[1][1], v[2][1]));

    float f_x_max = std::max(v[0][0], std::max(v[1][0], v[2][0]));
    float f_y_max = std::max(v[0][1], std::max(v[1][1], v[2][1]));

    //对决定取值范围的大小数据进行取整,方便进行光栅化历遍,floor()是在数轴上向0取整,ceil()是向0之外取整
    int i_x_min = std::floor(f_x_min);
    int i_y_min = std::floor(f_y_min);

    int i_x_max = std::ceil(f_x_max);
    int i_y_max = std::ceil(f_y_max);

    //开始历遍各个像素点,以x和y表示像素点的坐标
    for (int x = i_x_min; x < i_x_max; x++)
    {
        for (int y = i_y_min; y < i_y_max; y++)
        {
            if (insideTriangle(x, y, t.v))//如果该像素点在三角形内,那么就需要光栅化到屏幕上
            {
                auto [alpha, beta, gamma] = computeBarycentric2D(x + 0.5, y + 0.5, t.v);//根据三角形重心坐标计算权重alpha, beta, gamma

                //根据权重计算该像素点的空间深度zp
                float Z = 1.0 / (alpha / v[0].w() + beta / v[1].w() + gamma / v[2].w());
                float zp = alpha * v[0].z() / v[0].w() + beta * v[1].z() / v[1].w() + gamma * v[2].z() / v[2].w();
                zp *= Z;//这个才是我们要拿到的最终结果——空间深度zp


                    //这里我补充介绍一下,深度缓冲算法(Z - buffer)不然看不懂。

                    //因为在透视投影中,可以得到每个像素的深度信息z,

                    //深度缓冲的算法过程如下:

                    //1.首先分配一个数组buffer,数组的大小为像素的个数,数据中的每个数据都表示深度,初始深度值为无穷大

                    //2. 随后遍历每个三角形上的每个像素点[x, y],如果该像素点的深度值z < zbuffer[x, y]中的值,
                        //则更新zbuffer[x, y]值为该点深度值z,并更新该像素点[x, y]的颜色为该三角形上像素点上的颜色。


                if (zp < depth_buf[get_index(x, y)])//之前历遍得到的那些像素点的深度值都存在数组depth_buf里面了,该数组的大小等于视口像素点的数量,
                                                                       //如果该像素点的深度值小于之前该位置像素点,那么就更新它。近的质点就排到了前面显示
                                                                       //
                {
                    auto interpolated_color = interpolate(alpha, beta, gamma, t.color[0], t.color[1], t.color[2], 1);//根据权重对颜色插值
                    auto interpolated_normal = interpolate(alpha, beta, gamma, t.normal[0], t.normal[1], t.normal[2], 1).normalized();//根据权重对法向量进行插值
                    auto interpolated_texcoords = interpolate(alpha, beta, gamma, t.tex_coords[0], t.tex_coords[1], t.tex_coords[2], 1);//对纹理坐标插值


                    //view_pos[]即view_position是指该三角形顶点在摄像机空间中的坐标,插值后可以得到该三角形内个质点在摄像机空间中的坐标
                    auto interpolated_shadingcoords = interpolate(alpha, beta, gamma, view_pos[0], view_pos[1], view_pos[2], 1);//对阴影坐标插值

                    //生成fragment_shader_payload类的实例payload,用来传递插值结果
                    //把插值结果传到payload里,进行渲染
                    fragment_shader_payload payload(interpolated_color, interpolated_normal, interpolated_texcoords, texture ? &*texture : nullptr);//这里暂时缺省纹理信息
                    payload.view_pos = interpolated_shadingcoords;
                    auto pixel_color = fragment_shader(payload);

                    depth_buf[get_index(x, y)] = zp;//更新深度数组,或者说深度图
                    set_pixel(Eigen::Vector2i(x, y), pixel_color);//更新像素

                }

            }
        }
    }
}
任务2:
修改函数
get_projection_matrix()
in main.cpp:
将你自己在之前的实验中实现的投影矩阵填到此处,此时你可以运行 ./Rasterizer output.png normal
来观察法向量实现结果。
此处代码已经在之前的作业完成,不必过多介绍
Eigen::Matrix4f get_projection_matrix(float eye_fov, float aspect_ratio, float zNear, float zFar)
{
    // TODO: Use the same projection matrix from the previous assignments
    Eigen::Matrix4f projection = Eigen::Matrix4f::Identity();

    Eigen::Matrix4f pto = Eigen::Matrix4f::Identity();
    pto << zNear, 0, 0, 0,
        0, zNear, 0, 0,
        0, 0, (zNear + zFar), (-1 * zFar * zNear),
        0, 0, 1, 0;

    //float halfAngle = eye_fov/2.0 * MY_PI /180.0f;
    //float top = -1.0f * tan(halfAngle) * zNear;
    //float bottom = -1.0f * top;
    //float right = top * aspect_ratio;
    //float left = -1.0f * right;

    float halfAngle = eye_fov * MY_PI / 180.0f;
    float height = zNear * tan(halfAngle) * 2;
    float width = height * aspect_ratio;

    auto top = -zNear * tan(halfAngle / 2);
    auto right = top * aspect_ratio;
    auto left = -right;
    auto bottom = -top;


    Eigen::Matrix4f m_s = Eigen::Matrix4f::Identity();
    m_s << 2 / (right - left), 0, 0, 0,
        0, 2 / (top - bottom), 0, 0,
        0, 0, 2 / (zNear - zFar), 0,
        0, 0, 0, 1;

    Eigen::Matrix4f m_t = Eigen::Matrix4f::Identity();
    m_t << 1, 0, 0, -(right + left) / 2,
        0, 1, 0, -(top + bottom) / 2,
        0, 0, 1, -(zFar + zNear) / 2,
        0, 0, 0, 1;

    projection = m_s * m_t * pto * projection;
    return projection;
}
这里按照官方文档说的修改运行参数,就可以看到法相图了!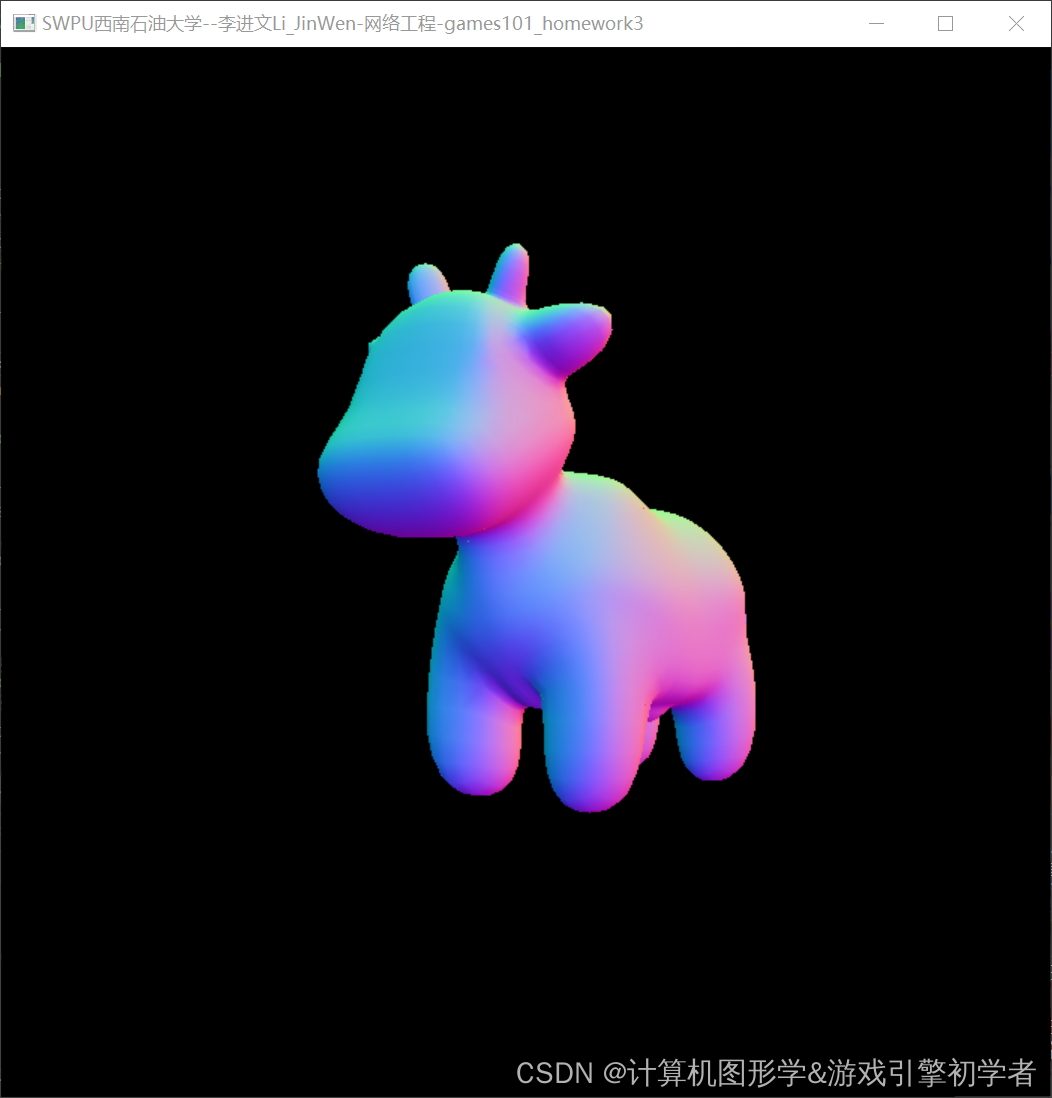
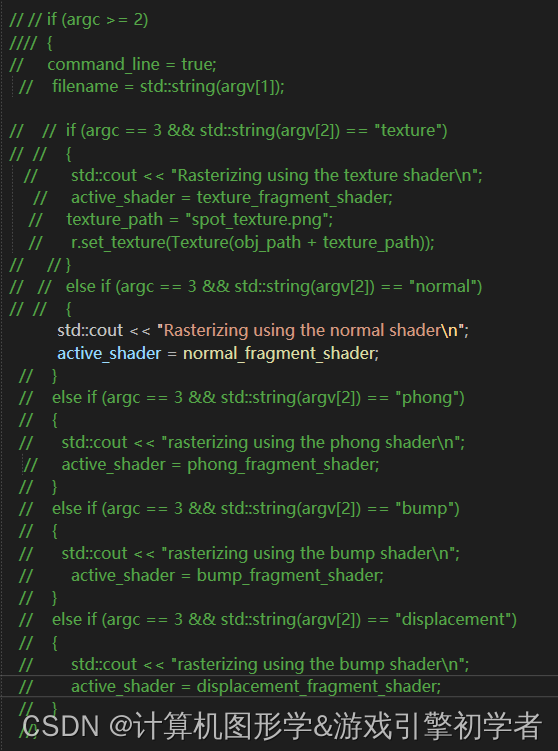
值得一提的是,不少人是在windows10环境下用vs2019做的games101作业,与官方要求的虚拟机环境不同,所以经常出现问题。
我用window10做作业三按着官方文档说的通过修改运行参数实现更改渲染模式,这样每次都要输入一长串字符串特别麻烦,所以我选择直接在主函数中把其余分支注释化掉,只留下我想要的渲染模式的方法来实现我想要执行的渲染方式的。简单粗暴(~ ̄▽ ̄)~
任务3
修改函数
phong_fragment_shader()
in main.cpp:
实现
Blinn-Phong
模型计算 Fragment Color.
Eigen::Vector3f phong_fragment_shader(const fragment_shader_payload& payload)
{
Eigen::Vector3f ka = Eigen::Vector3f(0.005, 0.005, 0.005);
Eigen::Vector3f kd = payload.color;
Eigen::Vector3f ks = Eigen::Vector3f(0.7937, 0.7937, 0.7937);
auto l1 = light{{20, 20, 20}, {500, 500, 500}};
auto l2 = light{{-20, 20, 0}, {500, 500, 500}};
std::vector<light> lights = {l1, l2};
Eigen::Vector3f amb_light_intensity{10, 10, 10};
Eigen::Vector3f eye_pos{0, 0, 10};
float p = 150;
Eigen::Vector3f color = payload.color;
Eigen::Vector3f point = payload.view_pos;
Eigen::Vector3f normal = payload.normal;
Eigen::Vector3f result_color = {0, 0, 0};
for (auto& light : lights)
{
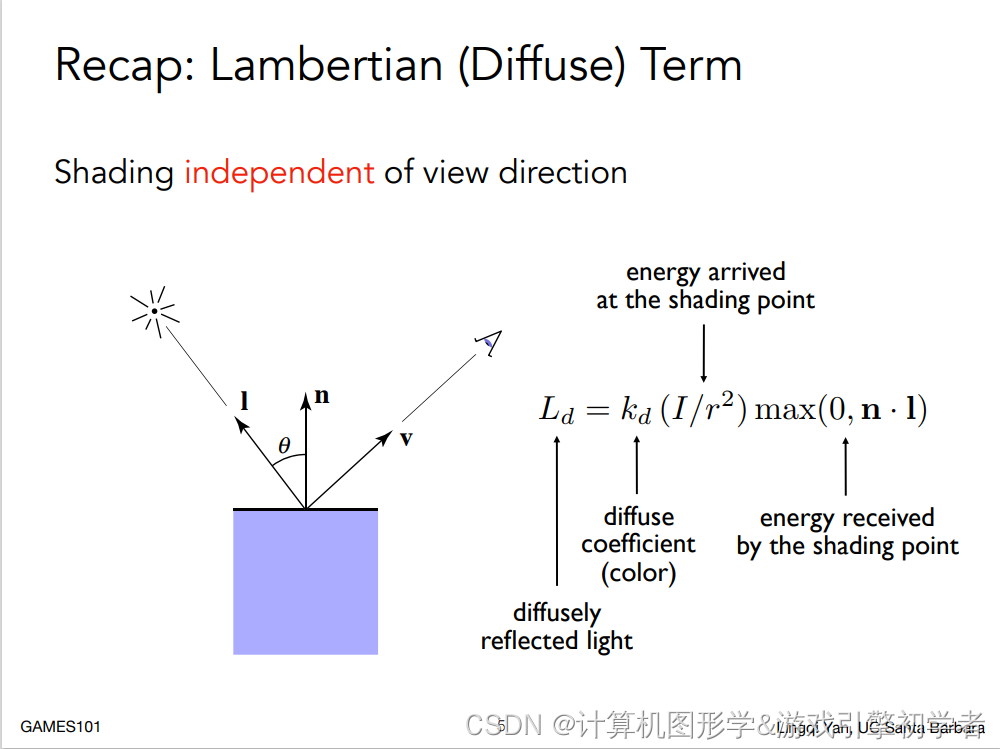
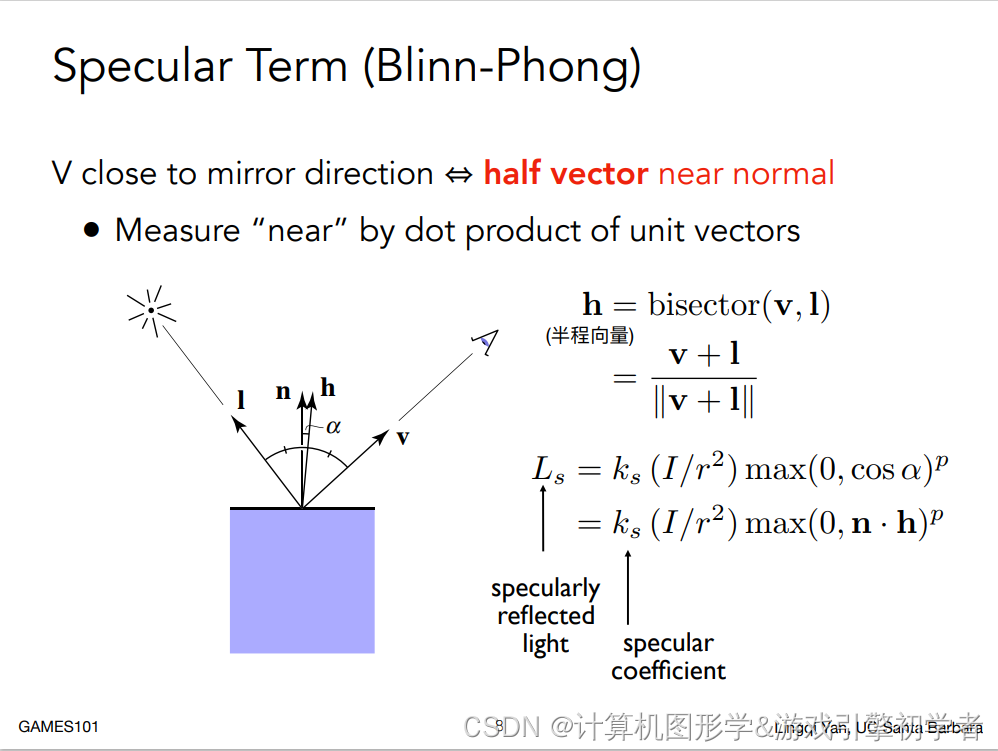
// TODO: For each light source in the code, calculate what the *ambient*, *diffuse*, and *specular*
// components are. Then, accumulate that result on the *result_color* object.
//光照方向的反向量,normalized()的作用是把向量归一化,也就是方向不变,但模长变成为1
Eigen::Vector3f light_direction = (light.position - point).normalized();
//视线向量
Eigen::Vector3f view_direction = (eye_pos - point).normalized();
//两个向量加起来归一化得到半程向量
Eigen::Vector3f half_vector = (light_direction + view_direction).normalized();
//视角与反射角之间存在一定的夹角造成了光强的衰减,影响反射强度,如果点乘出来的结果为负数,说明视线与法线不在同侧,就看不到该像素点,反射强度就为0
float reflection_intensity = std::max(0.0f, half_vector.dot(normal));
//计算随着距离增大造成的光线强度的衰减,即衰减系数,它是光源到反射点的距离的平方值
float light_intensity_attenuation = (light.position - point).dot(light.position - point);
//计算漫反射,kd为漫反射系数,cwiseProduct()是矩阵点对点相乘,即哪行那列的数值乘以哪行哪列
Eigen::Vector3f diffuse_reflection = kd.cwiseProduct(light.intensity / light_intensity_attenuation);
diffuse_reflection *= reflection_intensity;
//计算高光,ks为高光系数
Eigen::Vector3f high_lights = ks.cwiseProduct(light.intensity / light_intensity_attenuation);
high_lights *= std::pow(reflection_intensity,p);
//漫反射、高光两个因素叠加得到最终效果
result_color += (diffuse_reflection + high_lights);
}
//计算环境光造成的反射, ka为环境光反射强度系数,因为环境光只有一个,所以最后才加上来,最终得到漫反射、高光、环境光三个因素叠加实现的渲染效果
Eigen::Vector3f ambient_light_reflection = ka.cwiseProduct(amb_light_intensity);
result_color += ambient_light_reflection;
return result_color * 255.f;
}渲染效果为:
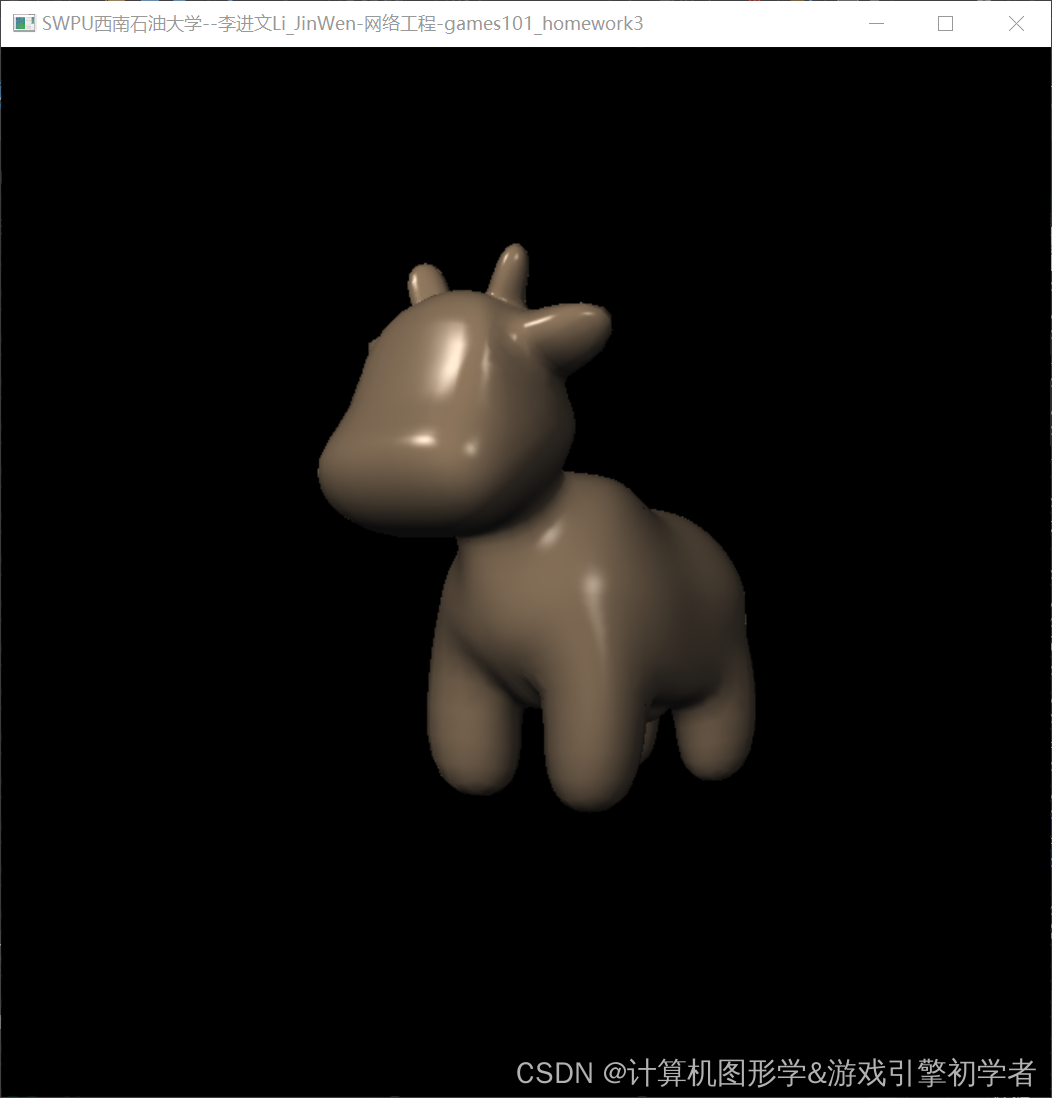
显然,这是没有基础色,只有漫反射、高光、环境光影响下实现的渲染效果,接下来就是加上基础色,每个像素点的基础色储存在材质UV图这个数据结构中。
任务4就是干这个。
任务4
修改函数
texture_fragment_shader()
in main.cpp:
在实现
Blinn-Phong
的基础上
,将纹理颜色视为公式中的
kd
,实现
Texture Shading Fragment Shader.
Eigen::Vector3f texture_fragment_shader(const fragment_shader_payload& payload)
{
    Eigen::Vector3f return_color = {0, 0, 0};
    if (payload.texture)
    {
        // TODO: Get the texture value at the texture coordinates of the current fragment
        return_color = payload.texture->getColor(payload.tex_coords.x(), payload.tex_coords.y());
    }
    Eigen::Vector3f texture_color;
    texture_color << return_color.x(), return_color.y(), return_color.z();

    Eigen::Vector3f ka = Eigen::Vector3f(0.005, 0.005, 0.005);
    Eigen::Vector3f kd = texture_color / 255.f;//颜色RGB值归一化
    Eigen::Vector3f ks = Eigen::Vector3f(0.7937, 0.7937, 0.7937);

    auto l1 = light{{20, 20, 20}, {500, 500, 500}};
    auto l2 = light{{-20, 20, 0}, {500, 500, 500}};

    std::vector<light> lights = {l1, l2};
    Eigen::Vector3f amb_light_intensity{10, 10, 10};
    Eigen::Vector3f eye_pos{0, 0, 10};

    float p = 150;

    Eigen::Vector3f color = texture_color;
    Eigen::Vector3f point = payload.view_pos;
    Eigen::Vector3f normal = payload.normal;

    Eigen::Vector3f result_color = {0, 0, 0};

    for (auto& light : lights)
    {
        // TODO: For each light source in the code, calculate what the *ambient*, *diffuse*, and *specular*
        // components are. Then, accumulate that result on the *result_color* object.
         // TODO: For each light source in the code, calculate what the *ambient*, *diffuse*, and *specular*
        // components are. Then, accumulate that result on the *result_color* object.


        //光照方向的反向量,normalized()的作用是把向量归一化,也就是方向不变,但模长变成为1
        Eigen::Vector3f light_direction = (light.position - point).normalized();

        //视线向量
        Eigen::Vector3f view_direction = (eye_pos - point).normalized();

        //两个向量加起来归一化得到半程向量
        Eigen::Vector3f half_vector = (light_direction + view_direction).normalized();

        //视角与反射角之间存在一定的夹角造成了光强的衰减,影响反射强度,如果点乘出来的结果为负数,说明视线与法线不在同侧,就看不到该像素点,反射强度就为0
        float reflection_intensity = std::max(0.0f, half_vector.dot(normal));

        //计算随着距离增大造成的光线强度的衰减,即衰减系数,它是光源到反射点的距离的平方值
        float light_intensity_attenuation = (light.position - point).dot(light.position - point);


        //计算漫反射,kd为漫反射系数,cwiseProduct()是矩阵点对点相乘,即哪行那列的数值乘以哪行哪列
        Eigen::Vector3f diffuse_reflection = kd.cwiseProduct(light.intensity / light_intensity_attenuation);
        diffuse_reflection *= reflection_intensity;

        //计算高光,ks为高光系数
        Eigen::Vector3f high_lights = ks.cwiseProduct(light.intensity / light_intensity_attenuation);
        high_lights *= std::pow(reflection_intensity, p);


        //漫反射、高光两个因素叠加得到最终效果
        result_color += (diffuse_reflection + high_lights);
    }

    //计算环境光造成的反射,  ka为环境光反射强度系数,因为环境光只有一个,所以最后才加上来
    Eigen::Vector3f ambient_light_reflection = ka.cwiseProduct(amb_light_intensity);

    result_color += ambient_light_reflection;

    return result_color * 255.f;
}
同时,我们还需要对贴图类的getColor方法进行修改,让uv图的坐标值在[0,1]区间
class Texture{
private:
    cv::Mat image_data;

public:
    Texture(const std::string& name)
    {
        image_data = cv::imread(name);
        cv::cvtColor(image_data, image_data, cv::COLOR_RGB2BGR);
        width = image_data.cols;
        height = image_data.rows;
    }

    int width, height;

    Eigen::Vector3f getColor(float u, float v)
    {
        // 坐标限定,把u,v坐标值的范围限制为[0,1]区间
        if (u < 0) u = 0;
        if (u > 1) u = 1;
        if (v < 0) v = 0;
        if (v > 1) v = 1;

        auto u_img = u * width;
        auto v_img = (1 - v) * height;
        auto color = image_data.at<cv::Vec3b>(v_img, u_img);
        return Eigen::Vector3f(color[0], color[1], color[2]);
    }

};
最终按官方文档指示修改运行参数,得到渲染图如下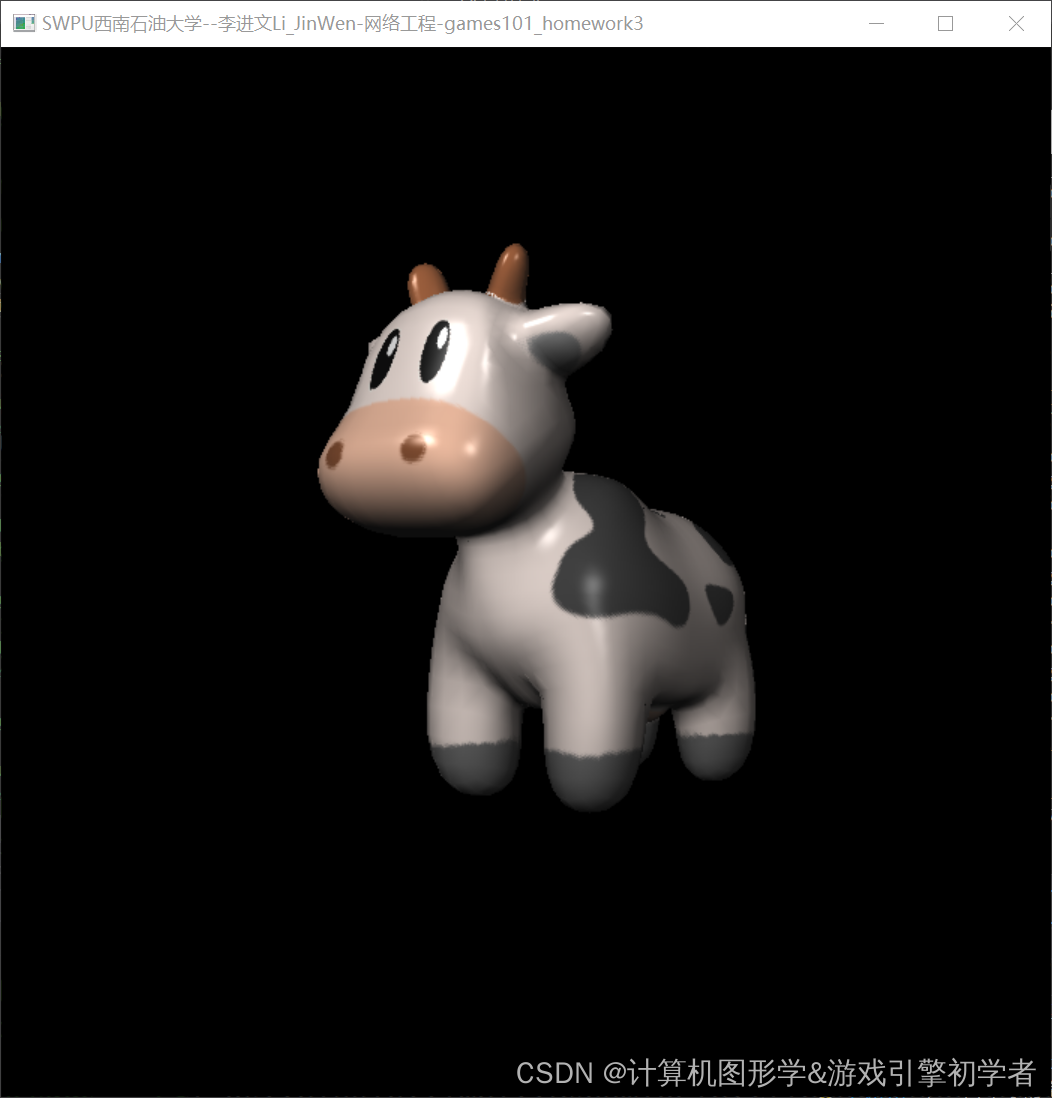
后续两个函数的学习笔记,会慢慢更新


 8590
8590

 被折叠的 条评论
为什么被折叠?
被折叠的 条评论
为什么被折叠?
 到【灌水乐园】发言


