


接《iOS的像素绘制》,上篇主要指摘录了原文章中自己觉得重要的部分。接下来,我们来真正从性能方面看看离屏渲染对性能的影响(hiahia)。
先建一个空的项目,Single View Application就好。注意在开始进行应用程序性能分析的时候,一定要使用真机,模拟器运行在mac上,mac上的CPU运行性能远高于iOS设备。硬件上mac的GPU也和iOS的完全不一样。
另外在性能分析的时候,最好是release模式,而不是debug模式。发release模式打包模式下,编译器会引入一系列提高性能的优化,例如去掉调试符号或者移除并重新组织代码,另外iOS也引入了Watch Dog机制,它会检测应用的性能,如果场景出现异常,“看门狗”会强制终止这个应用的进程。开发者可以通过crashlog看到设备上对应的日志。但是Xocde在调试配置下会禁用“Watch Dog”(以前不知道,有时候测试机直接run后怎么都拿不到crashlog,是因为run默认是debug模式,禁用了Watch Dog)
我们想用Time Profile测试下启动时间。Time profile时间分析工具用来检测APP的CPU使用情况。可以看到APP各个方法消耗的CPU时间,使用大量的CPU不一定是个问题,但是CPU某个时刻超负荷后,APP会发出内存警告,有可能终止APP运行,在页面交互上也影响用户体验。新建项目以release模式run在真机上(iphone6 plus),发现纯净的项目启动时间是10ms。
这里简单介绍下Time profile
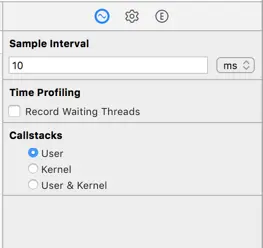
Sample Interval :样本周期,设置堆栈跟踪的频率。系统默认10ms
Time Profiling:控制哪些线程进行采样,默认为正在运行的线程。打对勾后对所有的线程采样
Callstacks:控制被采样的堆栈跟踪的类型。选择用户,内核或用户的核心单选按钮
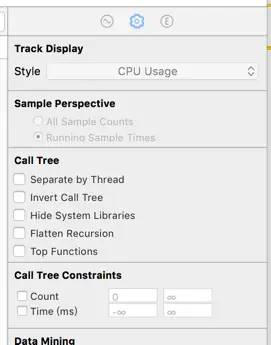
Separate By Thread:线程分离,只有这样才能在调用路径中能够清晰看到占用CPU最大的线程.
Invert Call Tree:从上到下跟踪堆栈信息.这个选项可以快捷的看到方法调用路径最深方法占用CPU耗时,比如FuncA{FunB{FunC}},勾选后堆栈以C->B->A把调用层级最深的C显示最外面.
Hide Missing Symbols:如果dSYM无法找到你的APP或者调用系统框架的话,那么表中将看到调用方法名只能看到16进制的数值,勾选这个选项则可以隐藏这些符号,便于简化分析数据.
Hide System Libraries:这个就更有用了,勾选后耗时调用路径只会显示app耗时的代码,性能分析普遍我们都比较关系自己代码的耗时而不是系统的.基本是必选项.注意有些代码耗时也会纳入系统层级,可以进行勾选前后前后对执行路径进行比对会非常有用.
圆角的秘密
接下来,我们有两组demo
第一组,添加三个圆角,一个UILabel ,一个UIButton,一个UIimage,一个UIView在打开Time profile发现时间有增加但是影响不大,平均在15ms。给每一个控件的仅仅设置layer.cornerRadius=10,发现只有Button有了圆角(思考为什么)。

这里发现UIButton有点例外,所以有了我们的第二组:分别是无标题无图片的Button、仅有标题的Button,仅有backgroundImage的Button、仅有前景图image的Button。
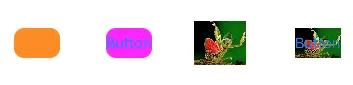
上面两组Demo对比我们发现在不设置ClipToBounds/maskToBounds,仅仅对控件的layer设置圆角cornerRadius的话只有UIButton在没有设置图片的时候(前景图/后景图)设置圆角才会有效,仔细看Apple对cornerRadius的描述:
Setting the radius to a value greater than0.0causes the layer to begin drawing rounded corners on its background. By default, the corner radius does not apply to the image in the layer’s contents property; it applies only to the background color and border of the layer. However, setting the masksToBounds property to YES causes the content to be clipped to the rounded corners.
也就是说默认情况下cornerRadius仅仅适用于背景色和边框,如果控件内部有内容(貌似不包括Button的Title)的话就要设置masksToBounds为YES才可以(其实也可以配合ClipToBounds)。
所以重要的要说三遍、说三遍、说三遍:UIView、UILable、有图片的UIButton设置cornerRadius是没有用的,必须配合ClipToBounds/maskToBounds一起使用才生效。
ClipToBounds VS maskToBounds
咦,这两个属性配合cornerRadius都可以达到裁剪的的作用?那他们之间有什么区别么?
文档是这么解释的
masksToBounds
Property
A Boolean indicating whether sublayers are clipped to the layer’s bounds. Animatable.
Discussion
When the value of this property isYES, Core Animation creates an implicit clipping mask that matches the bounds of the layer and includes any corner radius effects. If a value for the mask property is also specified, the two masks are multiplied to get the final mask value.
The default value of this property is NO.
clipsToBounds
Property
A Boolean value that determines whether subviews are confined to the bounds of the view.
Discussion
This property is inherited from the UIView parent class. This class changes the default value of this property toYES.
大意是masksToBounds是作用在layer上,clipsToBounds是作用在UIView上,masksToBounds/clipsToBounds要求子layer/view不可以超过父layer/view的边界。这个裁剪动作是是可以做动画的。所以这两个本质上是一样的效果,但是masksToBounds作用在layer上可以对于动画可以有更多的选择。
但是遗憾的是,如果设置了masksToBounds=YES之后确实可以显示图片圆角效果,但却无法设置阴影效果。因为masksToBounds=YES就意味着外边框不能显示,而阴影恰恰作为外边框绘制的,这样两个设置就产生了矛盾。要解决这个问题不妨换个思路:使用两个大小一样的图层,下面的图层负责绘制阴影,上面的图层用来显示图片。这个问题我们放在下一节讲。
通过Time profile 和 CoreAnimation 看添加一个两个对性能的损耗还是比较小,掉帧也不明显。现在我们以Tableview为例子。设置大量圆角会是什么效果(tableView100行)。
view.clipsToBounds = YES;
view.layer.cornerRadius = 10;
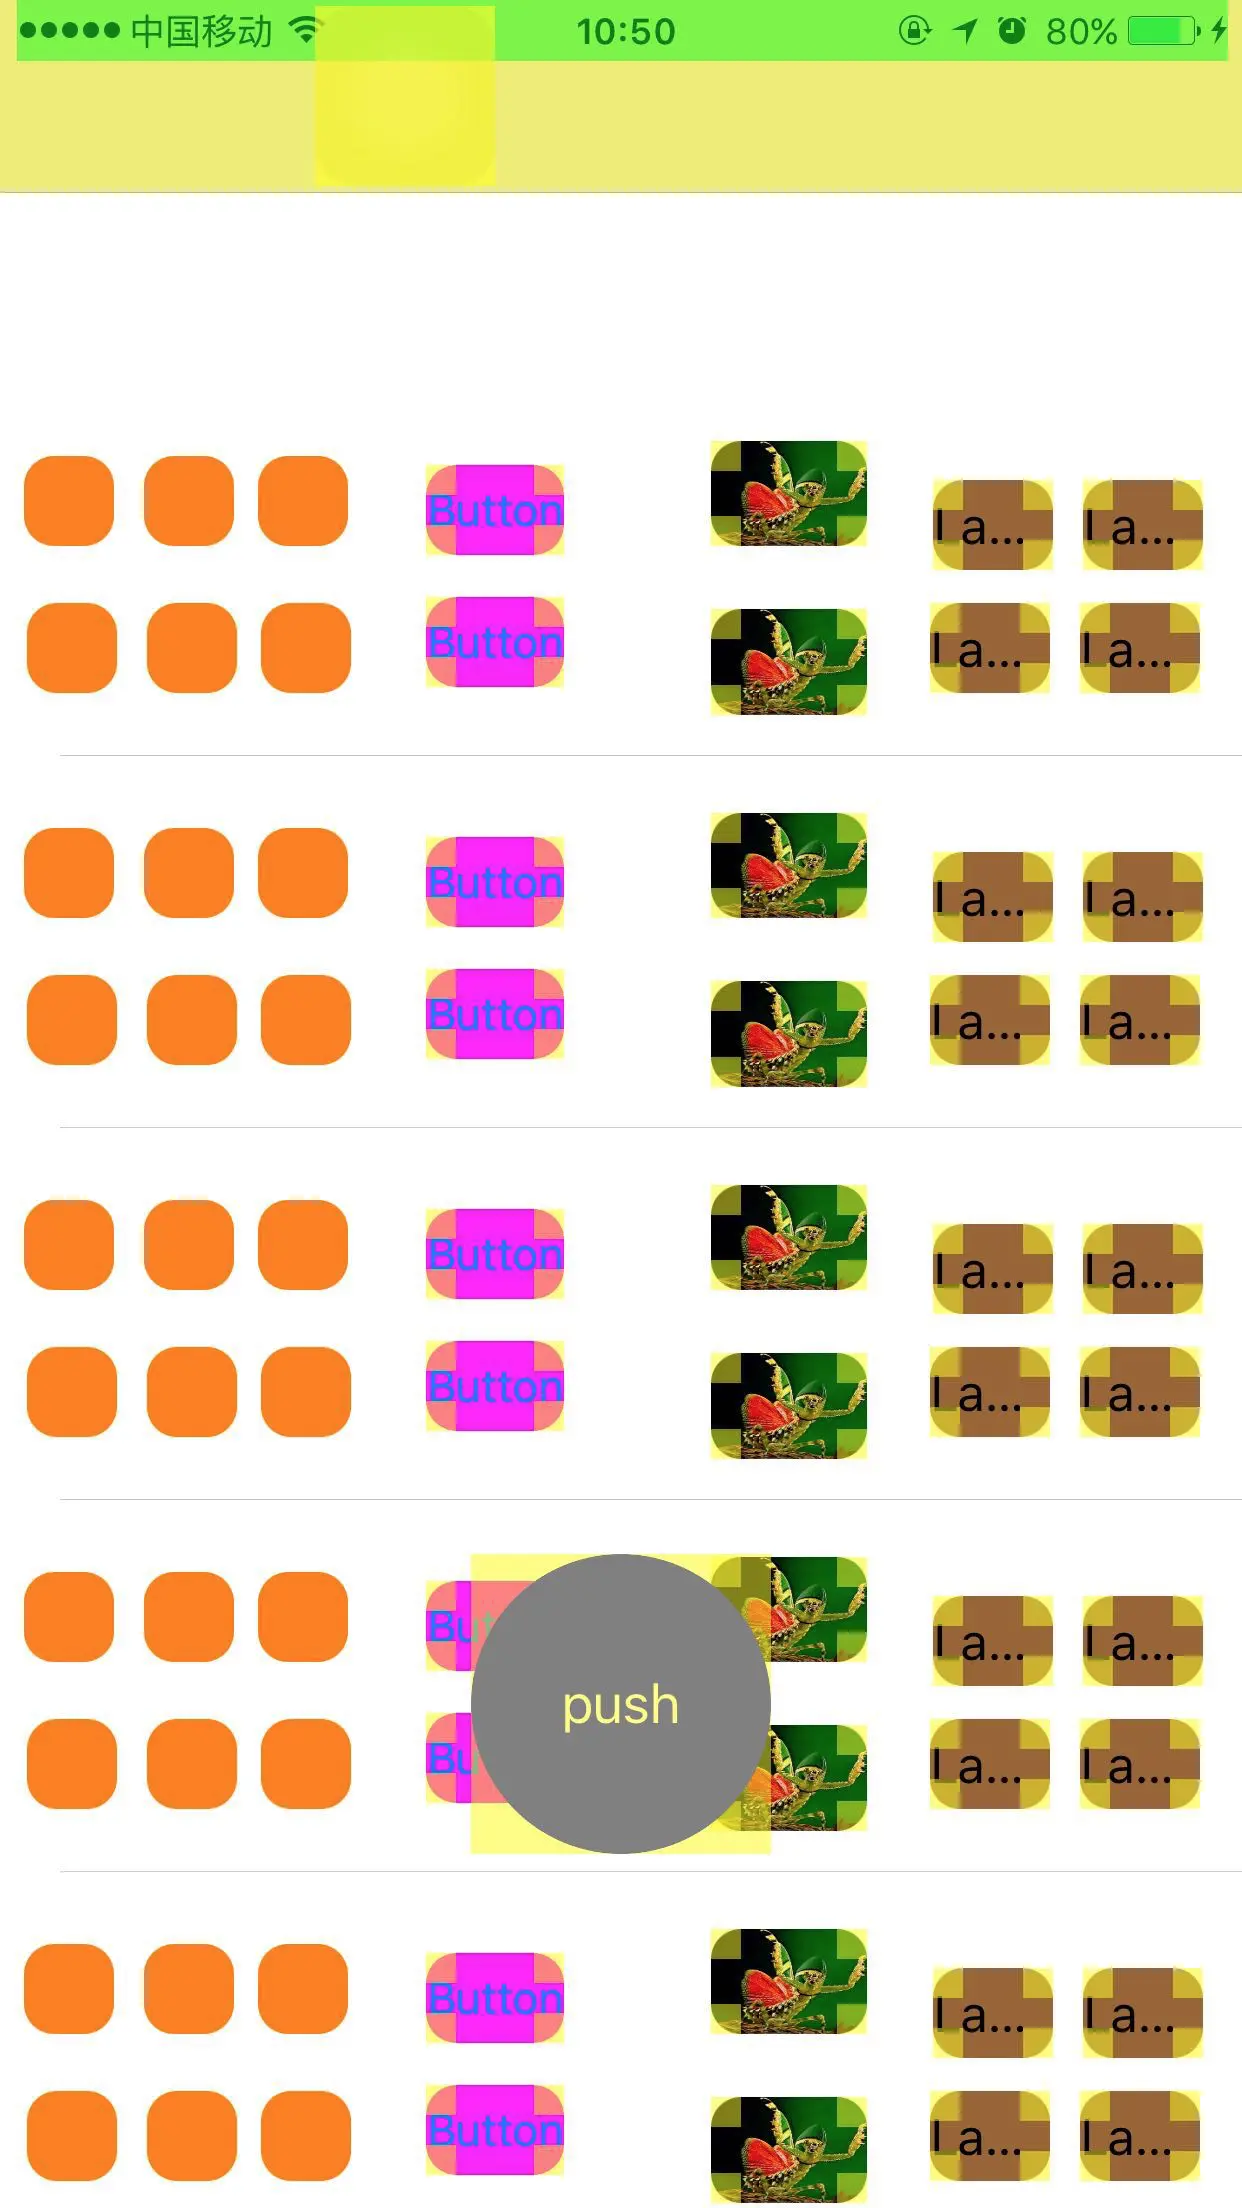
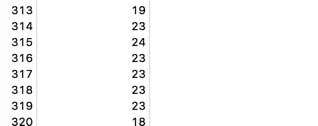
此时,Time prifile 检测到的启动时间如下图,启动时间竟然到了惊人的1492ms。

Core Animation 检测滑动table的时候除了UIView(惊掉了下巴,UIView即使设置了clipsToBounds,竟然不发生离屏渲染,可惜我身边没有iOS9以下的设备无法验证9一下的状态,可能Apple做了优化),其他的包括UIBUtton,UIlabel都掉帧极其严重,平均都不到30帧,基本是卡出翔的感觉。另外我勾选了Color Offscreen -Rendered Yellow复选框,可以清楚的看见最左侧的UIView以外,其余的圆角无一例外,都发生了离屏渲染。造成了性能的下降。
怎样高效的设置圆角
第一种重写drawRect方法,事实上这是一种错的离谱的方法。大量的绘制在drawRect里实现的时候,导致内存的暴增。drawRect会开辟一个后备存储空间。这个空间是有限制的,苹果暗示大概有屏幕大小两倍的空间来存储 rasterized layer。
滑动tableView后,掉帧降到了10帧,已经逆天了!!!忘掉这种写法吧,下面介绍正确的高效设置圆角的姿势。
为 UIView 添加圆角
这里为了避免离屏渲染(iOS9下UIView设置圆角并不发生离屏渲染,我们还是介绍一种通用的方式化圆角,兼容低版本),我们不用masksToBounds,我们可以通过Core Graphics/贝塞尔曲线来画一个UIView。核心代码如下:
- (UIImage*)lc_drawRectWithRoundedCorner:(CGFloat)radius borderWidth:(CGFloat)borderWidth backgroundColor:(UIColor*)backgroundColor borderColor:(UIColor*)borderColor{
CGSizesizeToFit =CGSizeMake(self.bounds.size.width,self.bounds.size.height);
CGFloathalfBorderWidth = borderWidth /2.0;
UIGraphicsBeginImageContextWithOptions(sizeToFit,false, [UIScreenmainScreen].scale);
CGContextRefcontext =UIGraphicsGetCurrentContext();
CGContextSetLineWidth(context, borderWidth);
CGContextSetStrokeColorWithColor(context, borderColor.CGColor);
CGContextSetFillColorWithColor(context, backgroundColor.CGColor);
CGFloatwidth = sizeToFit.width;
CGFloatheight = sizeToFit.height;
CGContextMoveToPoint(context, width - halfBorderWidth, radius + halfBorderWidth);//开始坐标右边开始
CGContextAddArcToPoint(context, width - halfBorderWidth, height - halfBorderWidth, width - radius - halfBorderWidth, height - halfBorderWidth, radius);//右下角角度
CGContextAddArcToPoint(context, halfBorderWidth, height - halfBorderWidth, halfBorderWidth, height - radius - halfBorderWidth, radius);//左下角角度
CGContextAddArcToPoint(context, halfBorderWidth, halfBorderWidth, width - halfBorderWidth, halfBorderWidth, radius);//左上角
CGContextAddArcToPoint(context, width - halfBorderWidth, halfBorderWidth, width - halfBorderWidth, radius + halfBorderWidth, radius);//右上角
CGContextDrawPath(UIGraphicsGetCurrentContext(),kCGPathFillStroke);
UIImage*output =UIGraphicsGetImageFromCurrentImageContext();
UIGraphicsEndImageContext();
returnoutput;
}
得到画出的UIImage后,我们创建一个UIimageView插入到视图的最上层:
- (void)lc_addCorner:(CGFloat)radius borderWidth:(CGFloat)borderWidth backgroundColor:(UIColor*)backgroundColor borderColor:(UIColor*)borderColor{
UIImageView*imageView= [[UIImageView alloc]initWithImage:[self lc_drawRectWithRoundedCorner:radius borderWidth:borderWidth backgroundColor:backgroundColor borderColor:borderColor]];
[self insertSubview:imageView atIndex:0];
}
就可以得到圆角view
UIImageView 添加圆角
与UIView不同的是这里需要对image进行截图,而且由于绘制先后问题,这句话在layoutSubviews/updateConstraints里绘制才会生效(暂时还不知道为什么,谁知道告诉我一下啦)
直接调用
[imageView lc_cornerRadiusWithImage:[UIImage imageNamed:@"test"]cornerRadius:10rectCornerType:UIRectCornerAllCorners];并不会生效
而UIView并不会这样,直接调用和写在layoutSubviews/updateConstraints都会生效
[view lc_cornerRadiusWithCornerRadius:100]可以画出圆角,在layoutSubviews/updateConstraints也可以画出圆角。
- (void)lc_cornerRadiusWithImage:(UIImage*)image cornerRadius:(CGFloat)cornerRadius rectCornerType:(UIRectCorner)rectCornerType {
CGSizesize =self.bounds.size;
CGFloat scale = [UIScreen mainScreen].scale;
CGSizecornerRadii =CGSizeMake(cornerRadius, cornerRadius);
dispatch_async(dispatch_get_global_queue(DISPATCH_QUEUE_PRIORITY_DEFAULT,0), ^{
UIGraphicsBeginImageContextWithOptions(size,NO, scale);
if(nil==UIGraphicsGetCurrentContext()) {
return;
}
UIBezierPath*cornerPath = [UIBezierPath bezierPathWithRoundedRect:self.bounds byRoundingCorners:rectCornerType cornerRadii:cornerRadii];
[cornerPath addClip];
[image drawInRect:self.bounds];
UIImage*processedImage =UIGraphicsGetImageFromCurrentImageContext();
UIGraphicsEndImageContext();
dispatch_async(dispatch_get_main_queue(), ^{
objc_setAssociatedObject(processedImage, &kZYProcessedImage,@(1),OBJC_ASSOCIATION_RETAIN_NONATOMIC);
self.image= processedImage;
});
});
}
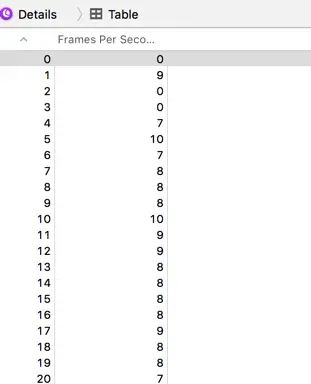
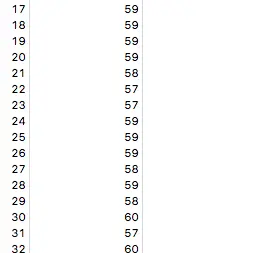
最后,我们用新的方式绘制圆角,看看最终的效果,这里我们添加了圆角,对性能几乎没造成什么影响,掉帧几乎可以忽略。顺带我看了Time profile在整个启动时间的消耗,对CPU几乎没什么影响。

Core Animation 勾选上Color Offscreen-Rendered Yellow的选项和Color Hits Green and Misses Red选项。黄色表示已经被渲染到屏幕外缓冲区的区域标注为,绿色代表无论何时一个屏幕外缓冲区被复用,而红色代表当缓冲区被重新创建。可以看到现在的圆角周围已经没有黄色区域了。
如果我们迫不得已用了离屏渲染的话,如果图层没发生变化,设置shouldRasterize为YES,可以将屏幕外缓冲区缓存起来,避免重复渲染造成GPU性能的浪费。
参考文献:http://zyden.vicp.cc/zycornerradius/
Demo地址:https://github.com/Monkshae/LCPixelDemo 欢迎您提出宝贵的意见。
原文链接:http://www.jianshu.com/p/27f2552fdb6b
著作权归作者所有,转载请联系作者获得授权,并标注“简书作者”。


 1893
1893

 被折叠的 条评论
为什么被折叠?
被折叠的 条评论
为什么被折叠?
 到【灌水乐园】发言


