


这一章我们开始分析ActivityManagerService,在后面的介绍中,我们简称为AMS。AMS并不是只用于管理所有的Activity的生命周期,它同时也管理着系统的service、broadcast以及provider等。我们首先还是从AMS的启动开始分析,它的构造以及运行都是在SystemServer当中:
context = ActivityManagerService.main(factoryTest);

ActivityManagerService.setSystemProcess();

ActivityManagerService.installSystemProviders();

ActivityManagerService.self().setWindowManager(wm);

ActivityManagerService.self().systemReady(new Runnable()

ActivityManagerService.self().startObservingNativeCrashes();
在SystemServer当中主要调用AMS的上面几个方法,其中通过AMS的main方法返回的context提供给其它Service上下文使用。我们接下来一个个分析上面几个函数,首先来看main方法:
ActivityManagerService的main方法
    public static final Context main(int factoryTest) {
        AThread thr = new AThread();
        thr.start();
        synchronized (thr) {
            while (thr.mService == null) {
                try {
                    thr.wait();
                } catch (InterruptedException e) {
                }
            }
        }
        ActivityManagerService m = thr.mService;
        mSelf = m;
        ActivityThread at = ActivityThread.systemMain();
        mSystemThread = at;
        Context context = at.getSystemContext();
        context.setTheme(android.R.style.Theme_Holo);
        m.mContext = context;
        m.mFactoryTest = factoryTest;
        m.mIntentFirewall = new IntentFirewall(m.new IntentFirewallInterface());
        m.mStackSupervisor = new ActivityStackSupervisor(m, context, thr.mLooper);
        m.mBatteryStatsService.publish(context);
        m.mUsageStatsService.publish(context);
        m.mAppOpsService.publish(context);
        synchronized (thr) {
            thr.mReady = true;
            thr.notifyAll();
        }
        m.startRunning(null, null, null, null);
        return context;
    }
AThread继承于Thread,主要用于初始化Looper并构造AMS对象赋值给它的成员变量mService,我们首先来看AMS的构造函数:
    private ActivityManagerService() {
        Slog.i(TAG, "Memory class: " + ActivityManager.staticGetMemoryClass());
        mFgBroadcastQueue = new BroadcastQueue(this, "foreground", BROADCAST_FG_TIMEOUT, false);
        mBgBroadcastQueue = new BroadcastQueue(this, "background", BROADCAST_BG_TIMEOUT, true);
        mBroadcastQueues[0] = mFgBroadcastQueue;
        mBroadcastQueues[1] = mBgBroadcastQueue;
        mServices = new ActiveServices(this);
        mProviderMap = new ProviderMap(this);
        File dataDir = Environment.getDataDirectory();
        File systemDir = new File(dataDir, "system");
        systemDir.mkdirs();
        mBatteryStatsService = new BatteryStatsService(new File(
                systemDir, "batterystats.bin").toString());
        mBatteryStatsService.getActiveStatistics().readLocked();
        mBatteryStatsService.getActiveStatistics().writeAsyncLocked();
        mOnBattery = DEBUG_POWER ? true
                : mBatteryStatsService.getActiveStatistics().getIsOnBattery();
        mBatteryStatsService.getActiveStatistics().setCallback(this);
        mProcessStats = new ProcessStatsService(this, new File(systemDir, "procstats"));
        mUsageStatsService = new UsageStatsService(new File(systemDir, "usagestats").toString());
        mAppOpsService = new AppOpsService(new File(systemDir, "appops.xml"));
        mGrantFile = new AtomicFile(new File(systemDir, "urigrants.xml"));
        mHeadless = "1".equals(SystemProperties.get("ro.config.headless", "0"));
        // User 0 is the first and only user that runs at boot.
        mStartedUsers.put(0, new UserStartedState(new UserHandle(0), true));
        mUserLru.add(Integer.valueOf(0));
        updateStartedUserArrayLocked();
        GL_ES_VERSION = SystemProperties.getInt("ro.opengles.version",
            ConfigurationInfo.GL_ES_VERSION_UNDEFINED);
        mConfiguration.setToDefaults();
        mConfiguration.setLocale(Locale.getDefault());
        mConfigurationSeq = mConfiguration.seq = 1;
        mCompatModePackages = new CompatModePackages(this, systemDir);
        // Add ourself to the Watchdog monitors.
        Watchdog.getInstance().addMonitor(this);
    }
PMS的构造函数主要初始化一些成员变量,并在/data/system下面建立一些文件(夹)供系统统计数据用,现将一些文件及其作用列在下面的表格中,我们以后使用在再来分析:
| Service | 文件路径 | 描述 |
| BatteryStatsService | /data/system/batterystats.bin | 管理电池使用状态 |
| ProcessStatsService | /data/system/procstats | 管理进程状态 |
| UsageStatsService | /data/system/usagestats | 管理用户使用状态 |
| AppOpsService | /data/system/appops.xml | 管理进程状态 |
| AtomicFile | /data/system/urigrants.xml | 管理系统URI权限 |
回到main方法中,接着调用ActivityThread的systemMain方法去构造一个ActivityThread对象,ActivityThread是所有Application运行的主线程。这里通过systemMain去获得一个SystemContext,而一般应用程序则通过ActivityThread的main方法开始执行,我们将在后面分析到:
    public static ActivityThread systemMain() {
        HardwareRenderer.disable(true);
        ActivityThread thread = new ActivityThread();
        thread.attach(true);
        return thread;
    }

    private void attach(boolean system) {
        sCurrentActivityThread = this;
        mSystemThread = system;
        if (!system) {

        } else {
            android.ddm.DdmHandleAppName.setAppName("system_process",
                                                    UserHandle.myUserId());
            try {
                mInstrumentation = new Instrumentation();
                ContextImpl context = new ContextImpl();
                context.init(getSystemContext().mPackageInfo, null, this);
                Application app = Instrumentation.newApplication(Application.class, context);
                mAllApplications.add(app);
                mInitialApplication = app;
                app.onCreate();
            } catch (Exception e) {
                throw new RuntimeException(
                        "Unable to instantiate Application():" + e.toString(), e);
            }
        }
        ViewRootImpl.addConfigCallback(new ComponentCallbacks2() {
            @Override
            public void onConfigurationChanged(Configuration newConfig) {
                synchronized (mResourcesManager) {
                    if (mResourcesManager.applyConfigurationToResourcesLocked(newConfig, null)) {
                        if (mPendingConfiguration == null ||
                                mPendingConfiguration.isOtherSeqNewer(newConfig)) {
                            mPendingConfiguration = newConfig;

                            sendMessage(H.CONFIGURATION_CHANGED, newConfig);
                        }
                    }
                }
            }
            @Override
            public void onLowMemory() {
            }
            @Override
            public void onTrimMemory(int level) {
            }
        });
    }
在ActivityThread的systemMain方法中,首先构造一个ActivityThread对象,然后调用它的attach方法。传入到attach方法的参数为true,我们先只看attach system的ActivityThread的流程。attach方法首先构造一个ContextImpl对象,然后调用getSystemContext来获取一个SystemContext上下文,这里成为SystemContext是因为它加载了系统中包名为"android"的应用,也就是framework-res.apk,并且mSystemContext会返回给systemServer中其它的服务使用:
    public ContextImpl getSystemContext() {
        synchronized (this) {
            if (mSystemContext == null) {
                ContextImpl context =
                    ContextImpl.createSystemContext(this);
                LoadedApk info = new LoadedApk(this, "android", context, null,
                        CompatibilityInfo.DEFAULT_COMPATIBILITY_INFO);
                context.init(info, null, this);
                context.getResources().updateConfiguration(mResourcesManager.getConfiguration(),
                        mResourcesManager.getDisplayMetricsLocked(Display.DEFAULT_DISPLAY));
                mSystemContext = context;
            }
        }
        return mSystemContext;
    }
首先来看一下ContextImpl的createSystemContext方法:
    static ContextImpl createSystemContext(ActivityThread mainThread) {
        final ContextImpl context = new ContextImpl();
        context.init(Resources.getSystem(), mainThread, Process.myUserHandle());
        return context;
    }

    final void init(Resources resources, ActivityThread mainThread, UserHandle user) {
        mPackageInfo = null;
        mBasePackageName = null;
        mOpPackageName = null;
        mResources = resources;
        mMainThread = mainThread;
        mContentResolver = new ApplicationContentResolver(this, mainThread, user);
        mUser = user;
    }
在ContextImpl中有很多init函数,我们要根据它的参数来看正确的init函数。这里的init函数主要初始化一些成员变量。然后在getSystemContext构造LoadedApk对象,LoadedApk用于描述一个加载进来的APK文件:
    public LoadedApk(ActivityThread activityThread, String name,
            Context systemContext, ApplicationInfo info, CompatibilityInfo compatInfo) {
        mActivityThread = activityThread;
        mApplicationInfo = info != null ? info : new ApplicationInfo();
        mApplicationInfo.packageName = name;
        mPackageName = name;
        mAppDir = null;
        mResDir = null;
        mSharedLibraries = null;
        mDataDir = null;
        mDataDirFile = null;
        mLibDir = null;
        mBaseClassLoader = null;
        mSecurityViolation = false;
        mIncludeCode = true;
        mClassLoader = systemContext.getClassLoader();
        mResources = systemContext.getResources();
        mDisplayAdjustments.setCompatibilityInfo(compatInfo);
    }
然后再调用ContextImpl的init方法来初始化mSystemContext的一些成员:
    final void init(LoadedApk packageInfo, IBinder activityToken, ActivityThread mainThread) {
        init(packageInfo, activityToken, mainThread, null, null, Process.myUserHandle());
    }

    final void init(LoadedApk packageInfo, IBinder activityToken, ActivityThread mainThread,
            Resources container, String basePackageName, UserHandle user) {
        mPackageInfo = packageInfo;
        if (basePackageName != null) {

        } else {
            mBasePackageName = packageInfo.mPackageName;
            ApplicationInfo ainfo = packageInfo.getApplicationInfo();
            if (ainfo.uid == Process.SYSTEM_UID && ainfo.uid != Process.myUid()) {

            } else {
                mOpPackageName = mBasePackageName;
            }
        }
        mResources = mPackageInfo.getResources(mainThread);
        mResourcesManager = ResourcesManager.getInstance();

        CompatibilityInfo compatInfo =
                container == null ? null : container.getCompatibilityInfo();
        if (mResources != null &&
                ((compatInfo != null && compatInfo.applicationScale !=
                        mResources.getCompatibilityInfo().applicationScale)
                || activityToken != null)) {

        } else {
            mDisplayAdjustments.setCompatibilityInfo(packageInfo.getCompatibilityInfo());
            mDisplayAdjustments.setActivityToken(activityToken);
        }
        mMainThread = mainThread;
        mActivityToken = activityToken;
        mContentResolver = new ApplicationContentResolver(this, mainThread, user);
        mUser = user;
    }
这里的mBasePackageName和mOpPackageName都是"android"。回到ActivityThread的attach方法中,接着调用Instrumentation的newApplication构造一个Application对象并将它设置为mInitialApplication,并添加到mAllApplications数组中,由此我们也可以看出,一个ActivityThread(也就是一个进程)中可以运行多个application,这里application都保存在mAllApplications,其中第一个运行的application保存在mInitialApplication。最后调用Application的oncreate方法:
    static public Application newApplication(Class<?> clazz, Context context)
            throws InstantiationException, IllegalAccessException,
            ClassNotFoundException {
        Application app = (Application)clazz.newInstance();
        app.attach(context);
        return app;
    }

    /* package */ final void attach(Context context) {
        attachBaseContext(context);
        mLoadedApk = ContextImpl.getImpl(context).mPackageInfo;
    }
在ActivityThread的attach方法的最后,向ViewRootImpl注册一个callback用于接收ConfigurationChanged事件(例如横竖屏切换、输入法弹出等),我们将在介绍WindowsManager的时候来分析如果dispatch这些事件到具体的activity当中。回到AMS的main方法中,接着将getSystemContext设置为刚创建的ActivityThread,并设置AMS中mContext为ActivityThread中的mSystemContext,然后向ServiceManager注册三个service后就调用AMS的startRunning开始AMS的运行:
    public final void startRunning(String pkg, String cls, String action,
            String data) {
        synchronized(this) {
            if (mStartRunning) {
                return;
            }
            mStartRunning = true;
            mTopComponent = pkg != null && cls != null
                    ? new ComponentName(pkg, cls) : null;
            mTopAction = action != null ? action : Intent.ACTION_MAIN;
            mTopData = data;
            if (!mSystemReady) {
                return;
            }
        }
        systemReady(null);
    }
因为进入startRunning时mStartRunning和mSystemReady都为false,所以这里只是设置mStartRunning为true,mTopComponent为null,mTopAction为Intent.ACTION_MAIN,mTopData为null就直接返回。到这里AMS的main方法就介绍完了,回到systemServer调用AMS的第二个函数是setSystemProcess:
ActivityManagerService的setSystemProcess方法
    public static void setSystemProcess() {
        try {
            ActivityManagerService m = mSelf;
            ServiceManager.addService(Context.ACTIVITY_SERVICE, m, true);
            ServiceManager.addService(ProcessStats.SERVICE_NAME, m.mProcessStats);
            ServiceManager.addService("meminfo", new MemBinder(m));
            ServiceManager.addService("gfxinfo", new GraphicsBinder(m));
            ServiceManager.addService("dbinfo", new DbBinder(m));
            if (MONITOR_CPU_USAGE) {
                ServiceManager.addService("cpuinfo", new CpuBinder(m));
            }
            ServiceManager.addService("permission", new PermissionController(m));
            ApplicationInfo info =
                mSelf.mContext.getPackageManager().getApplicationInfo(
                            "android", STOCK_PM_FLAGS);
            mSystemThread.installSystemApplicationInfo(info);
            synchronized (mSelf) {
                ProcessRecord app = mSelf.newProcessRecordLocked(info,
                        info.processName, false);
                app.persistent = true;
                app.pid = MY_PID;
                app.maxAdj = ProcessList.SYSTEM_ADJ;
                app.makeActive(mSystemThread.getApplicationThread(), mSelf.mProcessStats);
                mSelf.mProcessNames.put(app.processName, app.uid, app);
                synchronized (mSelf.mPidsSelfLocked) {
                    mSelf.mPidsSelfLocked.put(app.pid, app);
                }
                mSelf.updateLruProcessLocked(app, false, null);
                mSelf.updateOomAdjLocked();
            }
        } catch (PackageManager.NameNotFoundException e) {
            throw new RuntimeException(
                    "Unable to find android system package", e);
        }
    }
这里首先向ServiceManager注册几个服务,然后PMS的getApplicationInfo去获取packageName为"android"的信息,我们知道包名为"android"的APK其实就是"framework-res.apk",PMS的getApplicationInfo比较简单,都是获取在scanPackageLI保存的mAndroidApplication对象,然后调用mSystemThread的installSystemApplicationInfo将前面获取到的"framework-res.apk"的ApplicantionInfo绑定到mSystemThread的Context上。接着setSystemProcess调用newProcessRecordLocked方法创建一个ProcessRecord对象,ProcessRecord描述一个进程的信息,这里代表framework-res.apk所在的进程信息(也就是systemServer的进程):
    final ProcessRecord newProcessRecordLocked(ApplicationInfo info, String customProcess,
            boolean isolated) {
        String proc = customProcess != null ? customProcess : info.processName;
        BatteryStatsImpl.Uid.Proc ps = null;
        BatteryStatsImpl stats = mBatteryStatsService.getActiveStatistics();
        int uid = info.uid;
        return new ProcessRecord(stats, info, proc, uid);
    }

    ProcessRecord(BatteryStatsImpl _batteryStats, ApplicationInfo _info,
            String _processName, int _uid) {
        mBatteryStats = _batteryStats;
        info = _info;
        isolated = _info.uid != _uid;
        uid = _uid;
        userId = UserHandle.getUserId(_uid);
        processName = _processName;
        pkgList.put(_info.packageName, null);
        maxAdj = ProcessList.UNKNOWN_ADJ;
        curRawAdj = setRawAdj = -100;
        curAdj = setAdj = -100;
        persistent = false;
        removed = false;
        lastStateTime = lastPssTime = nextPssTime = SystemClock.uptimeMillis();
    }
ProcessRecord记录了当前ApplicationInfo的uid号、processName、以及进程优先级等,并且在pkgList保存了所有在当前进程中的package信息。回到setSystemProcess中将刚创建的ProcessRecord设置为常驻内存,pid号设置为systemServer的进程号。app.makeActive方法用于调用ProcessStatsService开始记录process的状态:
    public void makeActive(IApplicationThread _thread, ProcessStatsService tracker) {
        if (thread == null) {
            final ProcessStats.ProcessState origBase = baseProcessTracker;
            if (origBase != null) {

            }
            baseProcessTracker = tracker.getProcessStateLocked(info.packageName, info.uid,
                    processName);
            baseProcessTracker.makeActive();
            for (int i=0; i<pkgList.size(); i++) {
                ProcessStats.ProcessState ps = pkgList.valueAt(i);
                if (ps != null && ps != origBase) {
                    ps.makeInactive();
                }
                ps = tracker.getProcessStateLocked(pkgList.keyAt(i), info.uid, processName);
                if (ps != baseProcessTracker) {
                    ps.makeActive();
                }
                pkgList.setValueAt(i, ps);
            }
        }
        thread = _thread;
    }
makeActive中调用两次getProcessStateLocked去获取ProcessState,其实这两次中的参数完全一样,所以pkgList保持的"system"对应的ProcessState也就是baseProcessTracker。先来看ProcessStatsService的getProcessStateLocked方法:
public ProcessStats.ProcessState getProcessStateLocked(String packageName,
int uid, String processName) {
return mProcessStats.getProcessStateLocked(packageName, uid, processName);
}
public ProcessState getProcessStateLocked(String packageName, int uid, String processName) {
final PackageState pkgState = getPackageStateLocked(packageName, uid);
ProcessState ps = pkgState.mProcesses.get(processName);
if (ps != null) {
return ps;
}
ProcessState commonProc = mProcesses.get(processName, uid);
if (commonProc == null) {
commonProc = new ProcessState(this, packageName, uid, processName);
mProcesses.put(processName, uid, commonProc);
if (DEBUG) Slog.d(TAG, "GETPROC created new common " + commonProc);
}
if (!commonProc.mMultiPackage) {
if (packageName.equals(commonProc.mPackage)) {
ps = commonProc;
if (DEBUG) Slog.d(TAG, "GETPROC also using for pkg " + commonProc);
} else {
}
} else {
}
pkgState.mProcesses.put(processName, ps);
if (DEBUG) Slog.d(TAG, "GETPROC adding new pkg " + ps);
return ps;
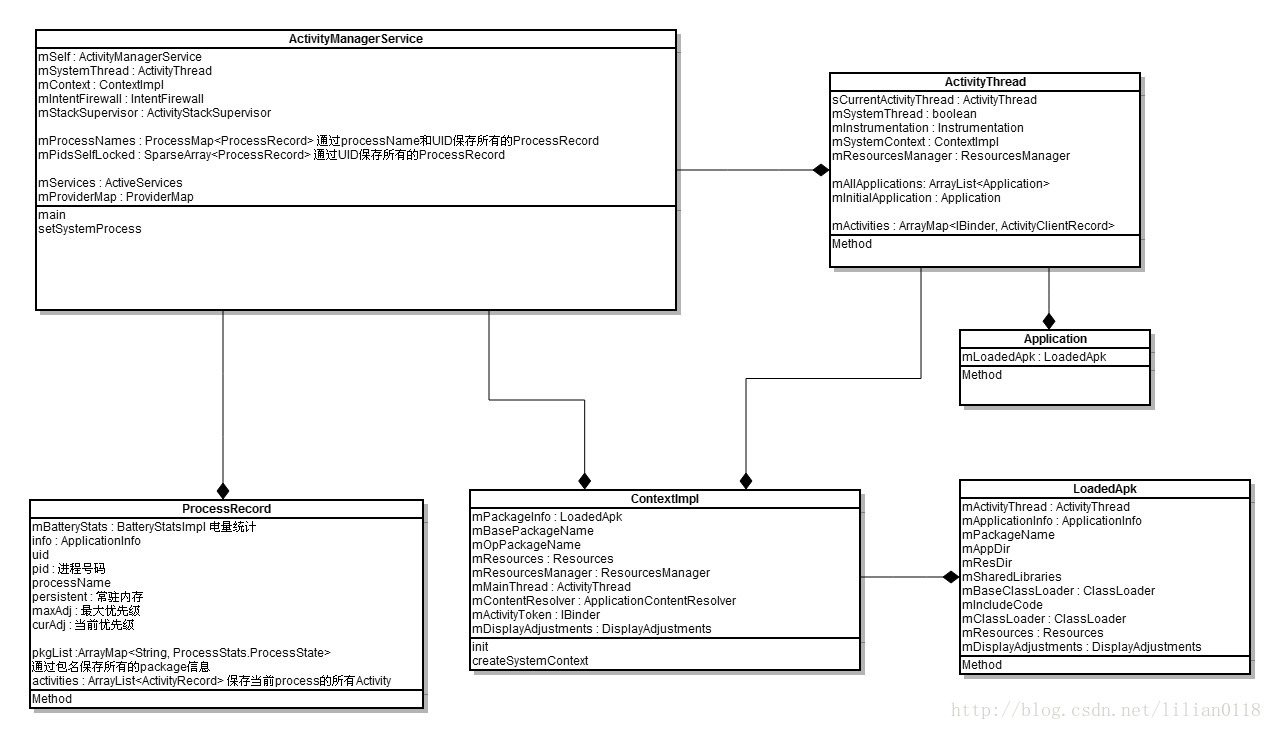
}这里会构造PackageState和ProcessState,并分别添加到mPackages和mProcesses数组中,并将ProcessState添加到PackageState的mProcesses数组中,从这里可以看到,一个Package可以运行在几个process里面,通过一个process也可以运行几个package。下面是上述几个类的结构图:
最后将当前ProcessRecord加入到mProcessNames和mPidsSelfLocked数据结构当中。updateLruProcessLocked用于调整系统优先级,updateOomAdjLocked用于low memory killer,我们将在后面再来介绍。
我们再来看systemServer调用AMS的第三个方法installSystemProviders,这个方法其实就是用来安装SettingsProvider:
ActivityManagerService的installSystemProviders方法
    public static final void installSystemProviders() {
        List<ProviderInfo> providers;
        synchronized (mSelf) {
            ProcessRecord app = mSelf.mProcessNames.get("system", Process.SYSTEM_UID);
            providers = mSelf.generateApplicationProvidersLocked(app);
            if (providers != null) {
                for (int i=providers.size()-1; i>
最低0.47元/天 解锁文章


 7110
7110

 被折叠的 条评论
为什么被折叠?
被折叠的 条评论
为什么被折叠?
 到【灌水乐园】发言


