


网上关于OkHttp的使用教程已经有很多了,先来贴一片网上的使用教程: http://blog.csdn.net/chenzujie/article/details/46994073
然后直接进入正题。
看完上面这篇文章,主要理解的几个点:
- 外部通过构造Request,初始化OkHttpClient,并由两者共同构造出Call。
- 访问网络通过Call,Call支持两种模式:同步和异步。同步使用execute,该方法会立即返回一个response,该response中包含结果。异步使用enqueue,也要传入callback来接受请求结果。
- OkHttp还支持拦截器,拦截器分两种,请求前拦截和网络返回前拦截。
- OkHttp还支持host检查、证书检查等等。并且还支持http1.0、http1.1、http2.0、SPDY协议。
先给一张关系图,呕心沥血之作。(这图请放大看)
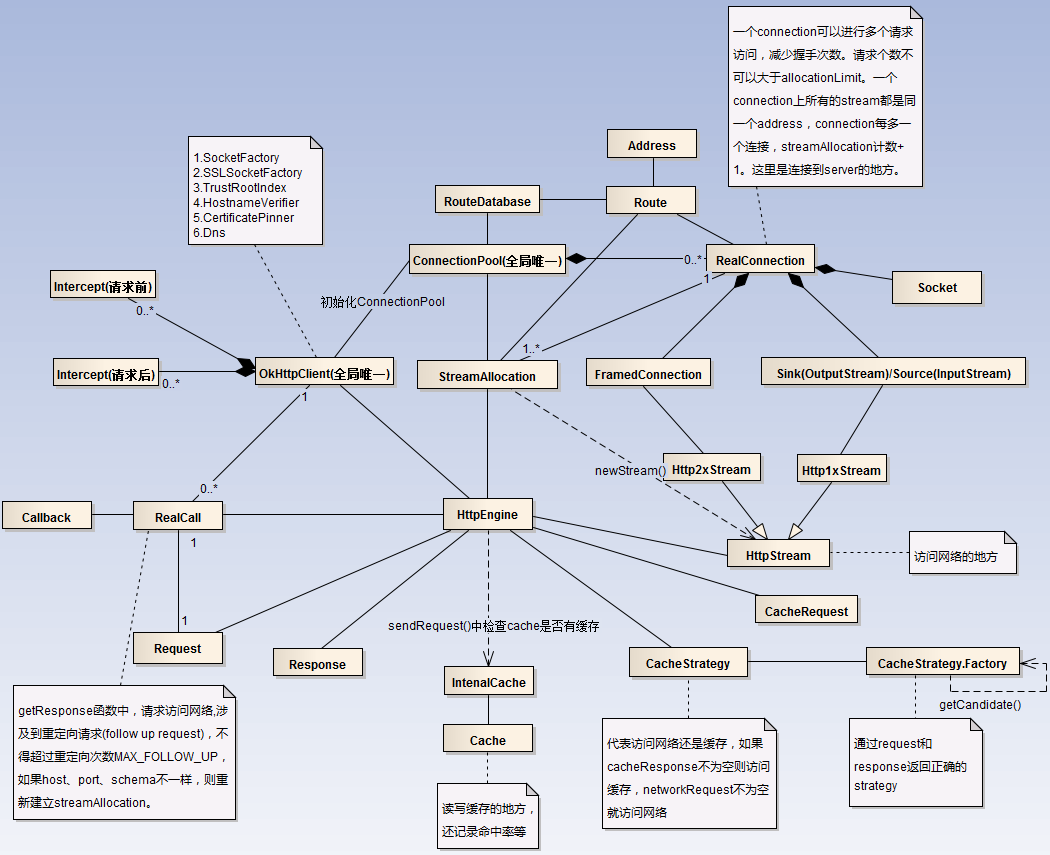
接下来代码的讲解都是同步请求的情况(其实同步异步没区别啦),根据这张图来讲解一个请求的流程。
先来看下Request,这个类里面很简单,只是记录了一些基本的参数,例如url、method、header、requestBody等信息。
再看下OkHttpClient这个类,这个里面也很简单,没有什么复杂的逻辑,只是一个中转站。在这个里面记录了一些全局的东西(当然OkHttpClient这个也是全局唯一的,但不是单例,你可以创建多个OkHttpClient,不同的请求在不同的OkHttpClient中,共享的资源也不一样,例如下面提到的一些资源),例如List<Interceptor>(包括请求前和返回前的拦截),Cache相关的一些类、ConnectionPool,还有一些安全方面的类,例如SocketFactory、SocketSSLFactory、TrustRootIndex(验证书)、HostnameVerifier、CertificatePinner等,这些概念不懂可以参考这篇文章HTTP、HTTPS、SSL的关系。ConnectionPool这个很重要,看名字就知道这是连接池,主要用来存放当前处于连接状态的各个connection,和线程池是一个概念。当需要网络连接时,会先从该pool中取得一个connection,这个稍后会继续解释,暂时先这么理解。ConnectionPool只有在OkHttpClient里面初始化,并且全局引用到connectionPool都从OkHttpClient中引用。
基本了解完这个类之后,来看下如何构造出call,调用的是OkHttpClient.newCall(..)方法:
@Override public Call newCall(Request request) {
    return new RealCall(this, request);
  }
该方法返回的是RealCall对象,RealCall是接下来需要介绍的一个类,这个类是继承自Call。该类记录了初始传进来的request,还有HttpEngine(这里暂时理解为网络访问的入口,通过HttpEngine来建立连接并返回数据)。刚刚提到了RealCall同步执行execute会立即返回一个response:
@Override public Response execute() throws IOException {
    synchronized (this) {
      if (executed) throw new IllegalStateException("Already Executed");
      executed = true;
    }
    try {
      client.dispatcher().executed(this);
      Response result = getResponseWithInterceptorChain(false);
      if (result == null) throw new IOException("Canceled");
      return result;
    } finally {
      client.dispatcher().finished(this);
    }
  }
看Response result = getResponseWithInterceptorChain(false);这句,这里需要说明下刚刚提到的拦截器,拦截器分为请求前和返回前拦截,所以这里是请求前拦截。看下getResponseWithInterceptorChain(..)这个函数:
private Response getResponseWithInterceptorChain(boolean forWebSocket) throws IOException {
    Interceptor.Chain chain = new ApplicationInterceptorChain(0, originalRequest, forWebSocket);
    return chain.proceed(originalRequest);
}
这个函数很简单,创建了一个拦截器链,来处理这个请求。
这里先解释下拦截器Interceptor和拦截器链Chain:
public interface Interceptor {
  Response intercept(Chain chain) throws IOException;

  interface Chain {
    Request request();

    Response proceed(Request request) throws IOException;

    Connection connection();
  }
}
拦截器的接口很简单,只有一个intercept方法,用来处理该拦截器想要如何处理请求。Chain的接口也很简单,request方法该链中被处理的请求。proceed也很简单,返回当前被处理后的response。至于最后个方法,暂时不清楚。所以Chain的作用就是让request从头至尾经历拦截器的Intercept方法。
在上面方法中,创建的是ApplicationInterceptorChain这个链,让我们看下这个链proceed的具体实现:
@Override public Response proceed(Request request) throws IOException {
      // If there's another interceptor in the chain, call that.
      if (index < client.interceptors().size()) {
        Interceptor.Chain chain = new ApplicationInterceptorChain(index + 1, request, forWebSocket);
        Interceptor interceptor = client.interceptors().get(index);
        Response interceptedResponse = interceptor.intercept(chain);

        if (interceptedResponse == null) {
          throw new NullPointerException("application interceptor " + interceptor
              + " returned null");
        }

        return interceptedResponse;
      }

      // No more interceptors. Do HTTP.
      return getResponse(request, forWebSocket);
    }
这个方法中就是遍历client中所有的intercepts(请求前拦截),这里要注意的是client中的拦截器是每个request都要经历的。当走完所有的拦截器后,就去调用getResponse访问网络。看下getResponse中具体的实现:
Response getResponse(Request request, boolean forWebSocket) throws IOException {
    // Copy body metadata to the appropriate request headers.
    RequestBody body = request.body();
    if (body != null) {
      Request.Builder requestBuilder = request.newBuilder();

      MediaType contentType = body.contentType();
      if (contentType != null) {
        requestBuilder.header("Content-Type", contentType.toString());
      }

      long contentLength = body.contentLength();
      if (contentLength != -1) {
        requestBuilder.header("Content-Length", Long.toString(contentLength));
        requestBuilder.removeHeader("Transfer-Encoding");
      } else {
        requestBuilder.header("Transfer-Encoding", "chunked");
        requestBuilder.removeHeader("Content-Length");
      }

      request = requestBuilder.build();
    }

    // Create the initial HTTP engine. Retries and redirects need new engine for each attempt.
    engine = new HttpEngine(client, request, false, false, forWebSocket, null, null, null);

    int followUpCount = 0;
    while (true) {
      if (canceled) {
        engine.releaseStreamAllocation();
        throw new IOException("Canceled");
      }

      boolean releaseConnection = true;
      try {
        engine.sendRequest();
        engine.readResponse();
        releaseConnection = false;
      } catch (RequestException e) {
        // The attempt to interpret the request failed. Give up.
        throw e.getCause();
      } catch (RouteException e) {
        // The attempt to connect via a route failed. The request will not have been sent.
        HttpEngine retryEngine = engine.recover(e.getLastConnectException(), null);
        if (retryEngine != null) {
          releaseConnection = false;
          engine = retryEngine;
          continue;
        }
        // Give up; recovery is not possible.
        throw e.getLastConnectException();
      } catch (IOException e) {
        // An attempt to communicate with a server failed. The request may have been sent.
        HttpEngine retryEngine = engine.recover(e, null);
        if (retryEngine != null) {
          releaseConnection = false;
          engine = retryEngine;
          continue;
        }

        // Give up; recovery is not possible.
        throw e;
      } finally {
        // We're throwing an unchecked exception. Release any resources.
        if (releaseConnection) {
          StreamAllocation streamAllocation = engine.close();
          streamAllocation.release();
        }
      }

      Response response = engine.getResponse();
      Request followUp = engine.followUpRequest();

      if (followUp == null) {
        if (!forWebSocket) {
          engine.releaseStreamAllocation();
        }
        return response;
      }

      StreamAllocation streamAllocation = engine.close();

      if (++followUpCount > MAX_FOLLOW_UPS) {
        streamAllocation.release();
        throw new ProtocolException("Too many follow-up requests: " + followUpCount);
      }

      if (!engine.sameConnection(followUp.url())) {
        streamAllocation.release();
        streamAllocation = null;
      }

      request = followUp;
      engine = new HttpEngine(client, request, false, false, forWebSocket, streamAllocation, null,
          response);
    }
  }
该方法中首先是根据request中的参数重新构建一个request,在request的头部中加入了一些参数。然后就根据HttpEngine来访问网络了。
首先根据request和OkHttpClient创建了一个HttpEngine(当然还有其他的参数,稍后解释),然后就进入了一个while(true)的循环。这个循环中先判断该request是不是被cancel了。然后就调用了HttpEngine的sendRequest方法(后面讲解,这理解为就是发送请求),然后在调用HttpEngine的readResponse方法来读取访问结果。如果访问时发生了错误,例如RouteException、IOException,则会尝试重连,调用HttpEngine的recover方法,重新生成一个HttpEngine来访问,然后重新进入刚刚的循环。如果访问成功,则调用getResponse方法来获取访问结果,调用followUpRequest来获取重定向请求,这里需要了解下重定向的概念。
一个简单的重定向例子就是一个网站,登陆的用户分为两种:管理员和游客,同一个url,对于不同身份的人来说访问到的页面可能不一样,这里就是用了重定向功能,例如该网站的某个页面,如果管理员访问是长某某样子(网页A),游客访问是长某某样子(网页B),这两个网页对应的url也不同,但是初始访问的url都是一样的,这是通过服务器对url和用户解析,返回一个新的url让用户去访问。不知道这么讲大家懂了没。。。一个简单的请求,重定向可以多次,不同的浏览器支持不同的次数。OkHttp框架中重定向最大次数由HttpEngine.MAX_FOLLOW_UPS决定:
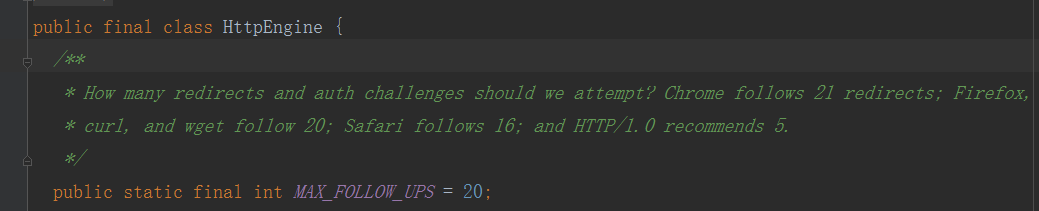
回到正题,刚刚讲到如果访问成功,则调用getResponse方法来获取访问结果,调用followUpRequest来获取重定向请求。这里要了解的是,如果服务器发现要重定向,此次response返回3XX(http网络结果结果码详情),在response中还会包含下个重定向的url等信息。所以拿到response前需要检测是否需要重定向,如果要重定向还要检测是否超过最大值,因为刚刚说到这是在一个while(true)的循环里,重定向可能多次。如果发现followUpRequest为空,则说明response已拿到,直接返回。若不为空,则先检测是否超过最大值,若不超过,则新生成一个httpEngine来访问。
上面这段代码基本讲解完毕,但是在代码中,还看到一个概念StreamAllocation,将这个词分开来看,stream和allocation。解释下stream,是流的概念,和我们平时用InputStream和outputStream是一样的概念,我不知道该怎么解释http中的stream,就暂且把stream看成是一个请求在http中输入输出的流,一个stream代表一个请求。allocation比较简单,就是分配的概念,合起来看的话就是记录一个stream分配。StreamAllocation是一个比较重要的概念,首先先要了解下http版本。
http版本从最初的1.0版本,到后续的1.1版本,再到后续Google推出了SPDY,后来在推出了2.0版本,http协议越来越完善,下面几篇资料是讲述http协议的一个发展以及优化的过程。
HTTP1.0和HTTP1.1的区别 ———- http://blog.csdn.net/elifefly/article/details/3964766/
HTTP2.0的讲解 ———- http://www.open-open.com/lib/view/open1455796649605.html
HOL排头阻塞(head of line blocking) – http://baike.baidu.com/link?url=o2BnfuFRd-5jaIlcfAPMolg8nU-U4FUcjlK3jBA9PqI8iffnw3Q7nqx4EzNnjp9BKQDrTWuHFhLGquwxCH1DIa
socket讲解————–http://blog.csdn.net/semillon/article/details/7515926
上面这几篇文章一定要看,特别是http2.0的讲解和socket讲解这篇文章,阅读完该篇文章才能理解后续的讲解以及OkHttp设计的一个思想。
看完上述几篇文章,主要的一个核心思想就是http2.0和http1.0/1.1的主要区别,而OkHttp也是根据2.0和1.0/1.1作为区分,实现了两种连接机制。2.0解决了老版本(后续成1.0和1.1为老版本)最重要的两个问题:连接无法复用和head of line blocking问题。2.0使用了多路复用的技术,多个stream可以共用一个tcp连接,每个tcp连接都是通过一个socket来完成的,socket对应一个host和一个port,如果有多个stream(也就是多个request)都是连接到同一个host和port上,那么他们就可以共同使用一个socket。这样做的好处是减少TCP的一个三次握手的时间。 那在OkHttp里,记录一次连接的是RealConnection,这个就是负责连接的,在这个类中用socket来连接,还有HandShake来处理握手。
这里要说明下,OkHttp和HttpUrlConnection以及Volley的区别。虽然这三个都是可以用来访问网络的,但是还是不同的。我们最熟悉的肯定是HttpUrlConnection,这是google官方提供的用来访问网络,但是HttpUrlConnection实现的比较简单,只支持1.0/1.1,并没有上面讲的多路复用,如果碰到app大量网络请求的时候,性能比较差,而且HttpUrlConnection底层也是用Socket来实现的。而Volley是一个开源库,它只是封装了访问网络的一些操作,但是底层还是使用HttpUrlConnection。但是OkHttp不同,在看源码之前,一直以为OkHttp和Volley一样,是用HttpUrlConnection,但是找了半天代码,都没看到HttpUrlConnection和InputStream(OutputStream),倒是反而看到socket和sink(source)这些,后来才搞明白,原来OkHttp像HttpUrlConnection一样,实现了一个网络连接的过程。所以按照层级来说,OkHttp和HttpUrlConnection是一级的,用socket实现了网络连接,只是OkHttp更强大,而Volley只是一个引用了HttpUrlConnection,它并不关心网络连接过程,只是封装了请求的过程而已。刚刚提到HttpUrlConnection在IO方面用到的是InputStream和OutputStream,但是OkHttp用的是sink和source,这两个是在Okio这个开源库里的,sink相当于outputStream,source相当于是inputStream。sink和source比InputStream和OutputStream更加强大,单拿sink举例,他的子类有BufferedSink(支持缓冲)、GzipSink(支持Gzip压缩)、ForwardingSink和InflaterSink(后面这两者服务于GzipSink),source对应的也有,具体的可以自行上网查找。
刚刚我们讲到多个相同host和port的stream可以共同使用一个socket,而RealConnection就是处理连接的,那也就是说一个RealConnection上可能有很多个Stream,所以在RealConnection上记录了List<Reference<StreamAllocation>> allocations = new ArrayList<>(); 而StreamAllocation就是记录当前这个Stream是被分配到哪个RealConnection上,所以在StreamAllocation里也有一个变量记录了哪个RealConnection上。当然,每次生成一个RealConnection都要放入ConnectionPool里面,方便新的请求到达后,若能复用则复用池里的connection。
再回到刚刚那个函数的最后一点代码:
if (!engine.sameConnection(followUp.url())) {
    streamAllocation.release();
    streamAllocation = null;
}

request = followUp;
engine = new HttpEngine(client, request, false, false, forWebSocket, streamAllocation, null,response);
当发现需要重定向的时候,就会执行这段代码,首先先检测重定向的url和刚刚的请求是不是同一个Connection,看下sameConnection函数:
public boolean sameConnection(HttpUrl followUp){
    HttpUrl url = userRequest.url();
    return url.host().equals(followUp.host())
        && url.port() == followUp.port()
        && url.scheme().equals(followUp.scheme());
}
这函数很简单,只是看下这两个url的host、port、scheme是不是一样。如果发现不一样,就释放HttpEngine原来的streamAllocation,并置空,如果发现一样,则重用刚刚的stream。HttpEngine的构造函数里面会判断传入的StreamAllocation是不是为空,若为空则创建一个根据request,并传入ConnectionPool,创建一个streamAllocation,并且从ConnectionPool中取出Connection,并将该Connection记录到StreamAllocation中,如果没有可用的RealConnection,就创建个新的,然后再放到ConnectionPool中。
讲到这里,应该还是比较清楚的,目前已经讲清楚几个类了:OkHttpClient、RealCall、StreamAllocation、RealConnection、ConnectionPool。
接下来看下HttpEngine。这个类还是比较复杂的,刚刚在RealCall中只是看到调用了HttpEngine的一些函数,大致明白这些函数的意义,那现在继续看看这些函数内部实现。
先看下sendRequest函数:
public void sendRequest() throws RequestException, RouteException, IOException {
    if (cacheStrategy != null) return; // Already sent.
    if (httpStream != null) throw new IllegalStateException();

    Request request = networkRequest(userRequest);

    InternalCache responseCache = Internal.instance.internalCache(client);
    Response cacheCandidate = responseCache != null
        ? responseCache.get(request)
        : null;

    long now = System.currentTimeMillis();
    cacheStrategy = new CacheStrategy.Factory(now, request, cacheCandidate).get();
    networkRequest = cacheStrategy.networkRequest;
    cacheResponse = cacheStrategy.cacheResponse;

    if (responseCache != null) {
      responseCache.trackResponse(cacheStrategy);
    }

    if (cacheCandidate != null && cacheResponse == null) {
      closeQuietly(cacheCandidate.body()); // The cache candidate wasn't applicable. Close it.
    }

    // If we're forbidden from using the network and the cache is insufficient, fail.
    if (networkRequest == null && cacheResponse == null) {
      userResponse = new Response.Builder()
          .request(userRequest)
          .priorResponse(stripBody(priorResponse))
          .protocol(Protocol.HTTP_1_1)
          .code(504)
          .message("Unsatisfiable Request (only-if-cached)")
          .body(EMPTY_BODY)
          .build();
      return;
    }

    // If we don't need the network, we're done.
    if (networkRequest == null) {
      userResponse = cacheResponse.newBuilder()
          .request(userRequest)
          .priorResponse(stripBody(priorResponse))
          .cacheResponse(stripBody(cacheResponse))
          .build();
      userResponse = unzip(userResponse);
      return;
    }

    // We need the network to satisfy this request. Possibly for validating a conditional GET.
    boolean success = false;
    try {
      httpStream = connect();
      httpStream.setHttpEngine(this);

      if (writeRequestHeadersEagerly()) {
        long contentLength = OkHeaders.contentLength(request);
        if (bufferRequestBody) {
          if (contentLength > Integer.MAX_VALUE) {
            throw new IllegalStateException("Use setFixedLengthStreamingMode() or "
                + "setChunkedStreamingMode() for requests larger than 2 GiB.");
          }

          if (contentLength != -1) {
            // Buffer a request body of a known length.
            httpStream.writeRequestHeaders(networkRequest);
            requestBodyOut = new RetryableSink((int) contentLength);
          } else {
            // Buffer a request body of an unknown length. Don't write request headers until the
            // entire body is ready; otherwise we can't set the Content-Length header correctly.
            requestBodyOut = new RetryableSink();
          }
        } else {
          httpStream.writeRequestHeaders(networkRequest);
          requestBodyOut = httpStream.createRequestBody(networkRequest, contentLength);
        }
      }
      success = true;
    } finally {
      // If we're crashing on I/O or otherwise, don't leak the cache body.
      if (!success && cacheCandidate != null) {
        closeQuietly(cacheCandidate.body());
      }
    }
  }
代码还是很长的,先来看下第五行,先是调用了一个networkRequest返回了一个request,这个函数就是对原来我们外部传进去的request做了一个封装,封装成一个真正访问网络请求的request。在HttpEngine中有两个request,一个叫userRequest,一个是networkRequest,第一个是外部传入的,未经OkHttp修改的,第二个是根据userRequest封装的一个request,用来访问网络。接下来就是获取InternalCache,Internal.instance是一个单例,该单例初始化是在OkHttpClient里面,可以看到调用Internal.instance.internalCache(client)函数只是调用了client(OkHttpClient)的internalCache,这个函数是返回了我们传入OkHttpClient的cache,如果你创建OkHttpClient的时候,没有传入,那么这里就会返回空。
得到了InternalCache后,尝试根据request去获取response,当然可能为空。接下来就到CacheStrategy了,CacheStrategy是一个决定访问网络还是访问缓存的类。CacheStrategy.Factory是工厂类,通过传入request和刚刚internalCache中获取到的response,去get一个CacheStrategy,Factory.get函数主要是对request和response做了一个检查,会根据response合不合法、是否过期、request的参数来判断,最后返回一个CacheStrategy。CacheStrategy很简单,里面有两个变量,一个是networkRequest,一个是cacheResponse(这个变量和传入Factory的response可能是不一样的哦!)。返回到刚刚的HttpEngine.sendRequest函数中看第17行,如果InternalCache不为空,就调用trackResponse,这个函数很简单,就是记录下缓存读取命中率这些数据。然后如果从InternalCache中response不为空,但是cacheStrategy的response为空,则说明刚刚InternalCache取出来的response无效,则需要关掉。如果CacheStrategy的networkRequest不为空,则说明需要进行网络访问,如果cacheResponse不为空,则说明访问缓存足以。根据这个理论,下面一直到第47行的代码不成问题,就不解释了。接下来看网络访问的部分。
网络访问主要是通过HttpStream来实现,HttpStream这是一个接口,里面定义了一些函数,这些函数是负责读取网络数据、输出数据等。实现该接口的有两个类,一个是Http2xStream,一个是Http1xStream。第一个是专门负责Http2.0版本的,第二个是负责Http1.x版本的,两者内部实现机制不一样。Http2xStream是通过一个FramedConnection,至于对FramedConnection的理解,可以看前面关于Http2.0讲解的文章,看完那个你应该比较能够大概清楚的理解他了,我就不解释了,这里我也没深入去看。而Http1xStream则是通过sink和source来实现的,这个前面讲过了,具体自己看吧,不解释了。
再次返回代码,connect函数返回了一个HttpStream,看下具体实现:
private HttpStream connect() throws RouteException, RequestException, IOException {
    boolean doExtensiveHealthChecks = !networkRequest.method().equals("GET");
    return streamAllocation.newStream(client.connectTimeoutMillis(),
        client.readTimeoutMillis(), client.writeTimeoutMillis(),
        client.retryOnConnectionFailure(), doExtensiveHealthChecks);
}
主要还是调用了stream.newStream,接下来的源码就不看了,实在太多,感觉这篇文章可以绕地球三圈了。
newStream的函数里面,首先就是去创建一个RealConnection,然后根据返回的RealConnection里的参数去判断,如果RealConnection.framedConnection不为空,则返回Http2xStream(这里面包含connection的framedConnection),如果为空,则返回Http1xStream(这里包含connection的sink和source),所以这和我前面讲到的一样,RealConnection只是负责连接到服务器,具体的数据传输读取还是通过HttpStream。
那streamAllocation如何创建一个RealConnection呢,这个前面讲过,先看看StreamAllocation自己是否已经有一个connection,如果有则返回,若没有继续。根据StreamAllocation里面的address去connectionPool里面去取Connection,如果发现有则返回,如果没有就新创建一个,创建之后放入connectionPool中,并连接!!这点很重要,放入连接池的或者已经记录在StreamAllocation中的都是已连接的。
创建完HttpStream后就是数据流的进行了,后面应该就可以自己看懂了,不解释了。
如果一个stream结束了,需要release,并且关闭sink和source、framedConnection,还要释放RealConnection的list的一个,总之就是收尾工作要做好。然后HttpEngine的readResponse也就不解释了,对了在这里还有结果返回前的一个拦截,和之前拦截差不多一个原理,也不解释了。
还有就是Route和RouteDatabase,这两个类的意思就是记住当前已经走过的弯路,后续不要再走了。
最后还要讲一个东西,就是线程。 讲到网络访问,线程可是很重要的东西,因为android是不允许在主线程访问网络的,否则会抛出android.os.NetworkOnMainThreadException。刚刚在OkHttp外部使用的时候,并没有处理线程,而是直接调用,那么看来OkHTTP应该是在内部做了线程调度。
那看下异步情况下是如何进行线程调度的。先看下enqueue函数:
  void enqueue(Callback responseCallback, boolean forWebSocket) {
    synchronized (this) {
      if (executed) throw new IllegalStateException("Already Executed");
      executed = true;
    }
    client.dispatcher().enqueue(new AsyncCall(responseCallback, forWebSocket));
  }
就是封装了一个asyncCall传给了client下的dispatcher。看下Dispatcher的类说明:
/**
 * Policy on when async requests are executed.
 *
 * <p>Each dispatcher uses an {@link ExecutorService} to run calls internally. If you supply your
 * own executor, it should be able to run {@linkplain #getMaxRequests the configured maximum} number
 * of calls concurrently.
 */
看到了吧,这里说明dispatcher主要是用来给异步的请求做线程调度的,和同步没什么关系。那我们再看下Dispatcher中的enqueue函数
  synchronized void enqueue(AsyncCall call) {
    if (runningAsyncCalls.size() < maxRequests && runningCallsForHost(call) < maxRequestsPerHost) {
      runningAsyncCalls.add(call);
      executorService().execute(call);
    } else {
      readyAsyncCalls.add(call);
    }
  }
在Dispatcher中记录了三个变量
  /** Ready async calls in the order they'll be run. */
  private final Deque<AsyncCall> readyAsyncCalls = new ArrayDeque<>();

  /** Running asynchronous calls. Includes canceled calls that haven't finished yet. */
  private final Deque<AsyncCall> runningAsyncCalls = new ArrayDeque<>();

  /** Running synchronous calls. Includes canceled calls that haven't finished yet. */
  private final Deque<RealCall> runningSyncCalls = new ArrayDeque<>();
这三个变量记录什么已经很明显了,在Dispatcher中同时进行的call有数量要求,不能超过maxRequests。再返回看下enqueue函数,第一步先检测当前运行的request是不是超过maxRequest。部分call可能是连接到同一个host去的,检查加入的call连接到同个host的数量是不是超过maxRequestsPerHost,如果这两者都未超过,则加入runningAsyncCalls,并用executorService来运行它。否则就先加入readyAsyncCall去等待。ExecutorService是一个创建新线程运行runnable的地方,这就是保证了异步请求使用子线程请求的重要地方,刚刚传入的AsyncCall其实是实现了Runnable接口。看下AsyncCall的具体实现。
final class AsyncCall extends NamedRunnable {
    private final Callback responseCallback;
    private final boolean forWebSocket;

    private AsyncCall(Callback responseCallback, boolean forWebSocket) {
      super("OkHttp %s", originalRequest.url().toString());
      this.responseCallback = responseCallback;
      this.forWebSocket = forWebSocket;
    }
    //中间的函数都忽略

    @Override protected void execute() {
      boolean signalledCallback = false;
      try {
        Response response = getResponseWithInterceptorChain(forWebSocket);
        if (canceled) {
          signalledCallback = true;
          responseCallback.onFailure(RealCall.this, new IOException("Canceled"));
        } else {
          signalledCallback = true;
          responseCallback.onResponse(RealCall.this, response);
        }
      } catch (IOException e) {
        if (signalledCallback) {
          // Do not signal the callback twice!
          logger.log(Level.INFO, "Callback failure for " + toLoggableString(), e);
        } else {
          responseCallback.onFailure(RealCall.this, e);
        }
      } finally {
        client.dispatcher().finished(this);
      }
    }
  }

public abstract class NamedRunnable implements Runnable {
  protected final String name;

  public NamedRunnable(String format, Object... args) {
    this.name = String.format(format, args);
  }

  @Override public final void run() {
    String oldName = Thread.currentThread().getName();
    Thread.currentThread().setName(name);
    try {
      execute();
    } finally {
      Thread.currentThread().setName(oldName);
    }
  }

  protected abstract void execute();
}
看asyncCall中的Execute函数其实和RealCall的execute函数几乎一样,当executorService.execute(asyncCall)的时候,就会调用AsyncCall的execute函数,然后就执行网络请求。
但是注意的是,同步情况下调用execute是不会有新线程的,就在外部调用realcall.execute的地方用一个线程,所以如果你在主线程上,调用execute的话,会抛出android.os.NetworkOnMainThreadException,这是需要注意的。


 2280
2280


 被折叠的 条评论
为什么被折叠?
被折叠的 条评论
为什么被折叠?
 到【灌水乐园】发言


