


本系列用于Bert模型实践实际场景,分别包括分类器、命名实体识别、选择题、文本摘要等等。(关于Bert的结构和详细这里就不做讲解,但了解Bert的基本结构是做实践的基础,因此看本系列之前,最好了解一下transformers和Bert等)
本篇主要讲解单选题应用场景。本系列代码和数据集都上传到GitHub上:https://github.com/forever1986/bert_task
目录
1 环境说明
1)本次实践的框架采用torch-2.1+transformer-4.37
2)另外还采用或依赖其它一些库,如:evaluate、pandas、datasets、accelerate等
2 前期准备
Bert模型是一个只包含transformer的encoder部分,并采用双向上下文和预测下一句训练而成的预训练模型。可以基于该模型做很多下游任务。
2.1 了解Bert的输入输出
Bert的输入:input_ids(使用tokenizer将句子向量化),attention_mask,token_type_ids(句子序号)、labels(结果)
Bert的输出:
last_hidden_state:最后一层encoder的输出;大小是(batch_size, sequence_length, hidden_size)
pooler_output:这是序列的第一个token(classification token)的最后一层的隐藏状态,输出的大小是(batch_size, hidden_size),它是由线性层和Tanh激活函数进一步处理的。(通常用于句子分类,至于是使用这个表示,还是使用整个输入序列的隐藏状态序列的平均化或池化,视情况而定)。(注意:这是关键输出,本次选择任务就需要获取该值,并进行一次线性层处理)
hidden_states: 这是输出的一个可选项,如果输出,需要指定config.output_hidden_states=True,它也是一个元组,它的第一个元素是embedding,其余元素是各层的输出,每个元素的形状是(batch_size, sequence_length, hidden_size)
attentions:这是输出的一个可选项,如果输出,需要指定config.output_attentions=True,它也是一个元组,它的元素是每一层的注意力权重,用于计算self-attention heads的加权平均值。
2.2 数据集与模型
1)数据集来自:c3
2)模型权重使用:bert-base-chinese
2.3 任务说明
1)单选题其实就是根据给定的文本内容、题目、选项,最终返回一个得分最高的选项。可以当做一个文本匹配,也可以当做一个分类问题,这里使用分类方式来解决
2)将内容、题目、选项(假设是4个选项)都组装成4条句子,如下:
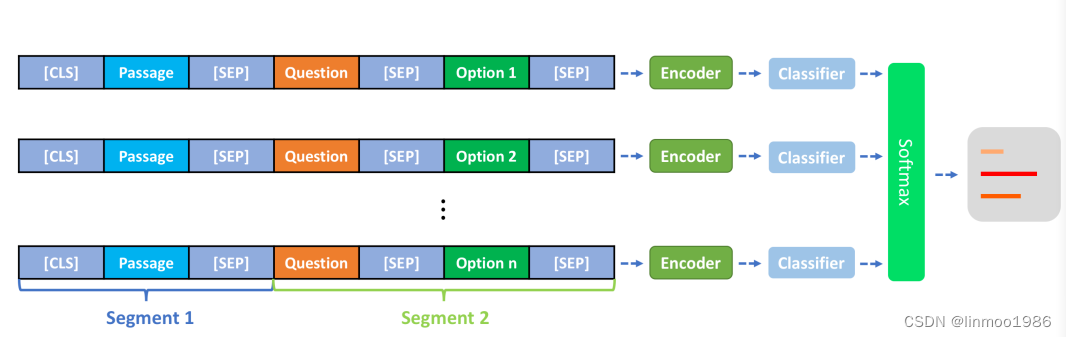
然后通过每条句子做一个classifier分类,得到的结果在通过softmax取出最佳的结果。
2.4 实现关键
1)每道题都将其组装成4个句子,如果不够4个选项,补充到4个选项,可以使用“不知道”选项补充
2)将所有句子都放入bert选项,增加一个线性层,将其结果映射为41,将通过转换为14矩阵,通过softmax得到最佳答案
3 关键代码
3.1 数据集处理
# 1. 将每条问题的contex、question分别和4个选项组成4条句子,也就是4倍的datas数量*max_length
# 2. 将输入内容变成 datas数量*4*max_length
def process_function(datas):
    context = []
    question_choice = []
    labels = []
    for idx in range(len(datas["context"])):
        ctx = "\n".join(datas["context"][idx])
        question = datas["question"][idx]
        choices = datas["choice"][idx]
        for choice in choices:
            context.append(ctx)
            question_choice.append(question + " " + choice)
        if len(choices) < 4:
            for _ in range(4 - len(choices)):
                context.append(ctx)
                question_choice.append(question + " " + "不知道")
        labels.append(choices.index(datas["answer"][idx]))
    tokenized_datas = tokenizer(context, question_choice, truncation="only_first", max_length=256, padding="max_length")
    # 将原先的4个选项都是自身组成一条句子,token之后是一个2维的向量:4倍的datas数量*max_length,这里需要将其变成3维:datas数量*4*max_length
    tokenized_datas = {key: [data[i: i + 4] for i in range(0, len(data), 4)] for key, data in tokenized_datas.items()}
    tokenized_datas["labels"] = labels
    return tokenized_datas
3.2 模型加载
model = BertForMultipleChoice.from_pretrained(model_path)
注意:这里使用的是transformers中的BertForMultipleChoice,该类对bert模型进行封装。如果我们不使用该类,需要自己定义一个model,继承bert,增加分类线性层。另外使用AutoModelForMultipleChoice也可以,其实AutoModel最终返回的也是BertForMultipleChoice,它是根据你config中的model_type去匹配的。
这里列一下BertForMultipleChoice的关键源代码说明一下transformers帮我们做了哪些关键事情
# 在__init__方法中增加增加了线性层,其映射为1
self.dropout = nn.Dropout(classifier_dropout)
self.classifier = nn.Linear(config.hidden_size, 1)
# 1. 获取到num_choices的数量,因为数据处理后,input_ids的shape是datas数量*4*max_length
num_choices = input_ids.shape[1] if input_ids is not None else inputs_embeds.shape[1]
# 2.将input_ids、attention_mask、token_type_ids、position_ids 都转换为2维,因为bert接受的是2为向量,因此又变成4倍的datas数量*max_length
input_ids = input_ids.view(-1, input_ids.size(-1)) if input_ids is not None else None
attention_mask = attention_mask.view(-1, attention_mask.size(-1)) if attention_mask is not None else None
token_type_ids = token_type_ids.view(-1, token_type_ids.size(-1)) if token_type_ids is not None else None
position_ids = position_ids.view(-1, position_ids.size(-1)) if position_ids is not None else None
inputs_embeds = (
    inputs_embeds.view(-1, inputs_embeds.size(-2), inputs_embeds.size(-1))
    if inputs_embeds is not None
    else None
)

outputs = self.bert(
    input_ids,
    attention_mask=attention_mask,
    token_type_ids=token_type_ids,
    position_ids=position_ids,
    head_mask=head_mask,
    inputs_embeds=inputs_embeds,
    output_attentions=output_attentions,
    output_hidden_states=output_hidden_states,
    return_dict=return_dict,
)
# 3. 获取pooler_output,这时它的shape是4倍的datas数量*hidden_size
pooled_output = outputs[1]

pooled_output = self.dropout(pooled_output)
# 4. 通过一个线性层,将结果变成(4倍的datas数量*1)的矩阵
logits = self.classifier(pooled_output)
# 5. 通过view,将其变成(datas数量*4)
reshaped_logits = logits.view(-1, num_choices)
3.3 评估函数
这里采用evaluate库加载accuracy准确度计算方式来做评估,本次实验将accuracy的计算py文件下载下来,因此也是本地加载
# 评估函数:此处的评估函数可以从https://github.com/huggingface/evaluate下载到本地
accuracy = evaluate.load("./evaluate/metric_accuracy.py")


def evaluate_function(prepredictions):
    predictions, labels = prepredictions
    predictions = numpy.argmax(predictions, axis=-1)
    return accuracy.compute(predictions=predictions, references=labels)
4 整体代码
"""
基于BERT做单选题
1)数据集来自:c3
2)模型权重使用:bert-base-chinese
"""
# step 1 引入数据库
import numpy
import torch
import evaluate
from typing import Any
from datasets import DatasetDict
from transformers import BertForMultipleChoice, TrainingArguments, Trainer, BertTokenizerFast
model_path = "./model/tiansz/bert-base-chinese"
data_path = "data/c3"
# step 2 数据集处理
datasets = DatasetDict.load_from_disk(data_path)
# test数据集没有答案answer,因此去除,也不做模型评估
datasets.pop("test")
tokenizer = BertTokenizerFast.from_pretrained(model_path)
def process_function(datas):
context = []
question_choice = []
labels = []
for idx in range(len(datas["context"])):
ctx = "\n".join(datas["context"][idx])
question = datas["question"][idx]
choices = datas["choice"][idx]
for choice in choices:
context.append(ctx)
question_choice.append(question + " " + choice)
if len(choices) < 4:
for _ in range(4 - len(choices)):
context.append(ctx)
question_choice.append(question + " " + "不知道")
labels.append(choices.index(datas["answer"][idx]))
tokenized_datas = tokenizer(context, question_choice, truncation="only_first", max_length=256, padding="max_length")
# 将原先的4个选项都是自身组成一条句子,token之后是一个2维的向量:4倍的datas数量*max_length,这里需要将其变成3维:datas数量*4*max_length
tokenized_datas = {key: [data[i: i + 4] for i in range(0, len(data), 4)] for key, data in tokenized_datas.items()}
tokenized_datas["labels"] = labels
return tokenized_datas
new_datasets = datasets.map(process_function, batched=True)
# step 3 加载模型
model = BertForMultipleChoice.from_pretrained(model_path)
# step 4 评估函数:此处的评估函数可以从https://github.com/huggingface/evaluate下载到本地
accuracy = evaluate.load("./evaluate/metric_accuracy.py")
def evaluate_function(prepredictions):
predictions, labels = prepredictions
predictions = numpy.argmax(predictions, axis=-1)
return accuracy.compute(predictions=predictions, references=labels)
# step 5 创建TrainingArguments
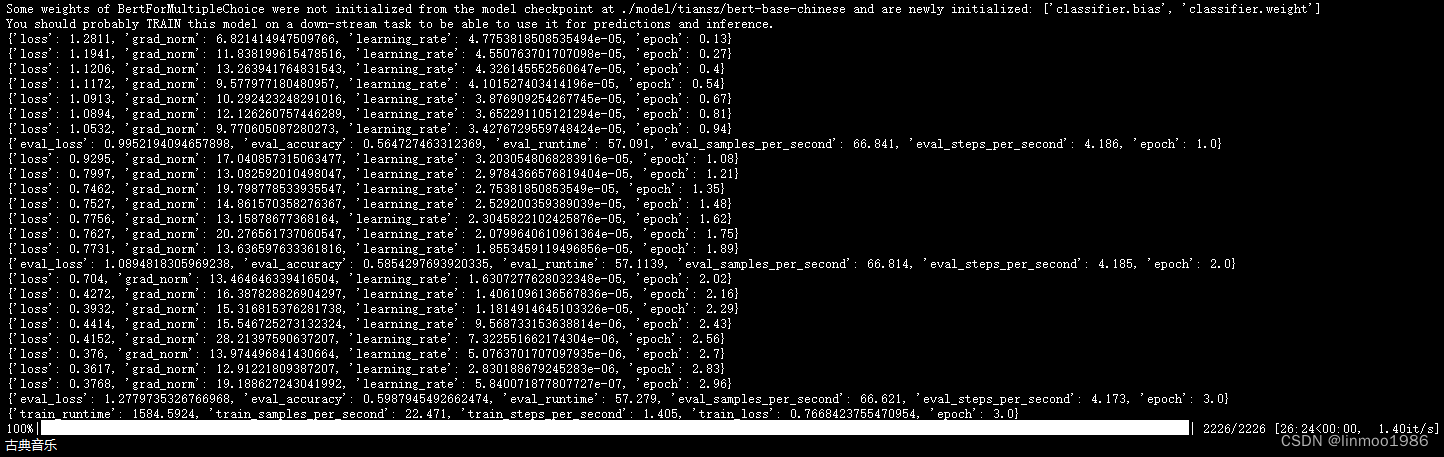
# train是11869条数据,batch_size=16,因此每个epoch的step=742,总step=2226
train_args = TrainingArguments(output_dir="./checkpoints", # 输出文件夹
per_device_train_batch_size=16, # 训练时的batch_size
per_device_eval_batch_size=16, # 验证时的batch_size
num_train_epochs=3, # 训练轮数
logging_steps=100, # log 打印的频率
evaluation_strategy="epoch", # 评估策略
save_strategy="epoch", # 保存策略
save_total_limit=3, # 最大保存数
load_best_model_at_end=True # 训练完成后加载最优模型
)
# step 6 创建Trainer
trainer = Trainer(model=model,
args=train_args,
train_dataset=new_datasets["train"],
eval_dataset=new_datasets["validation"],
compute_metrics=evaluate_function,
)
# step 7 训练
trainer.train()
# step 8 模型预测
class MultipleChoicePipeline:
def __init__(self, model, tokenizer) -> None:
self.model = model
self.tokenizer = tokenizer
self.device = model.device
def preprocess(self, context, quesiton, choices):
cs, qcs = [], []
for choice in choices:
cs.append(context)
qcs.append(quesiton + " " + choice)
return tokenizer(cs, qcs, truncation="only_first", max_length=256, return_tensors="pt")
def predict(self, inputs):
inputs = {k: v.unsqueeze(0).to(self.device) for k, v in inputs.items()}
return self.model(**inputs).logits
def postprocess(self, logits, choices):
predition = torch.argmax(logits, dim=-1).cpu().item()
return choices[predition]
def __call__(self, context, question, choices) -> Any:
inputs = self.preprocess(context, question, choices)
logits = self.predict(inputs)
result = self.postprocess(logits, choices)
return result
pipe = MultipleChoicePipeline(model, tokenizer)
res = pipe("男:还是古典音乐好听,我就受不了摇滚乐,实在太吵了。女:那是因为你没听过现场,流行乐和摇滚乐才有感觉呢。",
"男的喜欢什么样的音乐?", ["古典音乐", "摇滚音乐", "流行音乐", "乡村音乐"])
print(res)
5 运行效果
注:本文参考来自大神:https://github.com/zyds/transformers-code


 被折叠的 条评论
为什么被折叠?
被折叠的 条评论
为什么被折叠?
 到【灌水乐园】发言


