


Tensorflow学习日常,记录点滴,updating……</font color>
读取图片并显示
import matplotlib.pyplot as plt
import tensorflow as tf

image_data = tf.gfile.FastGFile(image_name_path, 'rb').read()

with tf.Session() as sess:
    # Decode image
    image_show = tf.image.decode_jpeg(image_data)
    #Or you can change the image's dtype
    image_show = tf.image.convert_image_dtype(image_show, dtype=tf.uint8)

    # Show it
    plt.figure(1)
    plt.imshow(img_data_jpg.eval())
    plt.show()
量化
准备工作,在TensorFlow官方github下载tensorflow,解压之后所在文件夹为tensorflow-master,打开终端,进入tensorflow-master,运行以下指令:
bazel build tensorflow/tools/graph_transforms:transform_graph
然后需要对训练好的模型进行freeze_graph生成.pb格式的模型,相关内容详见Tensorflow部署到移动端的有关部分。
mobilenet_v1的量化:
bazel-bin/tensorflow/tools/graph_transforms/transform_graph \
--in_graph=/home/lg/Desktop/mobilenet_v1_100_224/frozen_mobilenet_v1_100_224.pb \
--out_graph=/home/lg/Desktop/mobilenet_v1_100_224/frozen_mobilenet_v1_100_224_quantized.pb \
--inputs=Placeholder \
--outputs=MobilenetV1/Predictions/Reshape_1 \
--transforms='quantize_weights'
inception_v3的量化:
bazel-bin/tensorflow/tools/graph_transforms/transform_graph \
--in_graph=/home/lg/Desktop/inception_v3/frozen_inception_v3_299.pb \
--out_graph=/home/lg/Desktop/inception_v3/frozen_inception_v3_299_quantized.pb \
--inputs=Placeholder \
--outputs=InceptionV3/Predictions/Reshape_1 \
--transforms='quantize_weights'
for循环中不断加入op
首先看两段代码,由此来说明在循环中不断加入op的严重缺陷。
代码片段一,有缺陷的做法:
"""Predict many images, and output the results to txt."""

from __future__ import absolute_import
from __future__ import division
from __future__ import print_function

import argparse
import os.path
import sys

import numpy as np
import tensorflow as tf
FLAGS = None

IMAGE_SIZE = 224
CHANNEL = 3

def create_graph():
  """Creates a graph from saved GraphDef file and returns a saver."""
  # Creates graph from saved graph_def.pb.
  with tf.gfile.FastGFile(os.path.join(FLAGS.model_dir,
                                       r'/home/lg/Desktop/mobilenet_v1_100_224/frozen_mobilenet_v1_100_224_quantized.pb'), 'rb') as f:
    graph_def = tf.GraphDef()
    graph_def.ParseFromString(f.read())
    _ = tf.import_graph_def(graph_def,return_elements=['MobilenetV1/Predictions/Reshape_1:0'], name='lg')

def run_inference_on_image(image_txt):
  """Runs inference on a list of images.
  Args:
    image_txt: The path of images list.
  Returns:
    Nothing
  """

  # Creates graph from saved GraphDef.
  create_graph()

  if not tf.gfile.Exists(image_txt):
    tf.logging.fatal('File does not exist %s', image_txt)

  # create the txt file to save predict results.
  f = open(r'/home/lg/Desktop/frozen_mobilenet_v1_100_224_quantized_prediction.txt','w')
  image_list = np.loadtxt(image_txt,dtype=str,delimiter=' ')
  # Read the labels from label.txt.
  label_path = os.path.join(FLAGS.model_dir, '/home/lg/Desktop/label.txt')
  label = np.loadtxt(fname=label_path, dtype=str)
  with tf.Session() as sess:
      for i in range(len(image_list)):
        image = image_list[i][0]
        image_data = tf.gfile.FastGFile(image, 'rb').read()
        img_data_jpg = tf.image.decode_jpeg(image_data)  # Decode image
        img_data_jpg = tf.image.convert_image_dtype(img_data_jpg, dtype=tf.float32)  # Change the image's dtype
        img_data_jpg = tf.image.resize_image_with_crop_or_pad(img_data_jpg, IMAGE_SIZE, IMAGE_SIZE)
        image_data = img_data_jpg.eval().reshape(-1,IMAGE_SIZE,IMAGE_SIZE,CHANNEL)
        softmax_tensor = sess.graph.get_tensor_by_name('lg/MobilenetV1/Predictions/Reshape_1:0')
        predictions = sess.run(softmax_tensor, {'lg/Placeholder:0': image_data})
        predictions = np.squeeze(predictions)
        #print('predictions: ',predictions)

        top_k = predictions.argsort()[-FLAGS.num_top_predictions:][::-1]
        for node_id in top_k:
          label_string = label[node_id]
          score = predictions[node_id]
          #print('%s (score = %.5f)' % (label_string, score))
        f.write(image + ' ' + label_string + ' ' + str(score) + '\n')
  f.close()
  print('Done!')


def main(_):
  image_txt = FLAGS.image_txt
  run_inference_on_image(image_txt)


if __name__ == '__main__':
  parser = argparse.ArgumentParser()
  # graph_def.pb: Binary representation of the GraphDef protocol buffer.
  # label.txt: the labels according to data tfrecord
  parser.add_argument(
      '--model_dir',
      type=str,
      default='/tmp/imagenet',
      help='Path to graph_def.pb and label.txt'
  )
  parser.add_argument(
      '--image_txt',
      type=str,
      default='/home/lg/Desktop/prediction_image_txt.txt',
      help='Absolute path to image txt file.'
  )
  parser.add_argument(
      '--num_top_predictions',
      type=int,
      default=1,
      help='Display this many predictions.'
  )
  FLAGS, unparsed = parser.parse_known_args()
  tf.app.run(main=main, argv=[sys.argv[0]] + unparsed)
代码片段二,较好的做法:
"""Predict many images, and output the results to txt."""

from __future__ import absolute_import
from __future__ import division
from __future__ import print_function

import argparse
import os.path
import sys

import numpy as np
import tensorflow as tf
FLAGS = None

IMAGE_SIZE = 224
CHANNEL = 3

def create_graph():
  """Creates a graph from saved GraphDef file and returns a saver."""
  # Creates graph from saved graph_def.pb.
  with tf.gfile.FastGFile(os.path.join(FLAGS.model_dir,
                                       r'/home/lg/Desktop/mobilenet_v1_100_224/frozen_mobilenet_v1_100_224_quantized.pb'), 'rb') as f:
    graph_def = tf.GraphDef()
    graph_def.ParseFromString(f.read())
    _ = tf.import_graph_def(graph_def,return_elements=['MobilenetV1/Predictions/Reshape_1:0'], name='lg')

def run_inference_on_image(image_txt):
  """Runs inference on a list of images.
  Args:
    image_txt: The path of images list.
  Returns:
    Nothing
  """

  # Creates graph from saved GraphDef.
  create_graph()

  if not tf.gfile.Exists(image_txt):
    tf.logging.fatal('File does not exist %s', image_txt)

  # create the txt file to save predict results.
  f = open(r'/home/lg/Desktop/frozen_mobilenet_v1_100_224_quantized_prediction.txt','w')
  image_list = np.loadtxt(image_txt,dtype=str,delimiter=' ')
  # Read the labels from label.txt. The labels are according to the labels that produce TFRecord.
  label_path = os.path.join(FLAGS.model_dir, '/home/lg/Desktop/label.txt')
  label = np.loadtxt(fname=label_path, dtype=str)

  image_placeholder = tf.placeholder(dtype=tf.string)
  img_data_jpg = tf.image.decode_jpeg(image_placeholder)  # Decode image
  img_data_jpg = tf.image.convert_image_dtype(img_data_jpg, dtype=tf.float32)  # Change the image's dtype
  img_data_jpg = tf.image.resize_image_with_crop_or_pad(img_data_jpg, IMAGE_SIZE, IMAGE_SIZE)

  with tf.Session() as sess:
      for i in range(len(image_list)):
        image = image_list[i][0]
        image_data = tf.gfile.FastGFile(image, 'rb').read()
        img_data_feed = sess.run(img_data_jpg,{image_placeholder:image_data})
        img_data_feed = img_data_feed.reshape(-1,IMAGE_SIZE,IMAGE_SIZE,CHANNEL)

        softmax_tensor = sess.graph.get_tensor_by_name('lg/MobilenetV1/Predictions/Reshape_1:0')
        predictions = sess.run(softmax_tensor, {'lg/Placeholder:0': img_data_feed})
        predictions = np.squeeze(predictions)
        #print('predictions: ',predictions)
        top_k = predictions.argsort()[-FLAGS.num_top_predictions:][::-1]

        for node_id in top_k:
          label_string = label[node_id]
          score = predictions[node_id]
          #print('%s (score = %.5f)' % (label_string, score))
        f.write(image + ' ' + label_string + ' ' + str(score) + '\n')
  f.close()
  print('Done!')


def main(_):
  image_txt = FLAGS.image_txt
  run_inference_on_image(image_txt)


if __name__ == '__main__':
  parser = argparse.ArgumentParser()
  # graph_def.pb: Binary representation of the GraphDef protocol buffer.
  # label.txt: the labels according to data tfrecord
  parser.add_argument(
      '--model_dir',
      type=str,
      default='/tmp/imagenet',
      help='Path to graph_def.pb and label.txt'
  )
  parser.add_argument(
      '--image_txt',
      type=str,
      default='/home/lg/Desktop/prediction_image_txt.txt',
      help='Absolute path to image txt file.'
  )
  parser.add_argument(
      '--num_top_predictions',
      type=int,
      default=1,
      help='Display this many predictions.'
  )
  FLAGS, unparsed = parser.parse_known_args()
  tf.app.run(main=main, argv=[sys.argv[0]] + unparsed)
在上面两段代码中,区别在于:
img_data_jpg = tf.image.decode_jpeg(image_data)  # Decode image
img_data_jpg = tf.image.convert_image_dtype(img_data_jpg, dtype=tf.float32)  # Change the image's dtype
img_data_jpg = tf.image.resize_image_with_crop_or_pad(img_data_jpg, IMAGE_SIZE, IMAGE_SIZE)
在代码片段一中这三句代码放在for循环里,就会不断地在计算图中加入新的op,这样计算就会随着for循环的进行迅速的减慢。
在代码片段二中使用了placeholder,把上面三句op放到了for循环外面,很好地解决了上面的问题。
有种验证代码片段一中for循环中不断加入新的op的方法是在tf.session()作用域里加入graph.finalize()企图锁定graph,运行的时候报错就说明程序在运行时动态地添加op导致运行的越来越慢。
TensorFlow collection
通过tf.global_variables()可获取当前计算图上所有变量;通过tf.trainable_variables()可获取当前计算图上所有可训练参数(变量)。
import tensorflow as tf

a_constant = tf.constant(3,dtype=tf.float32,name='ca')

a_variable = tf.Variable(initial_value=0.0,dtype=tf.float16,name='va',trainable=False)
b_variable = tf.Variable(initial_value=0.0,dtype=tf.float16,name='vb')

print(tf.global_variables())
print(tf.trainable_variables())
上段代码的输出是:
tf.clip_by_value()
通过tf.clip_by_value()可以把张量中的数值限制在一个范围内,这样是从数学的角度考虑,避免诸如分母为0,、 l o g 0 log{0} log0之类的错误。比如:
import tensorflow as tf
a = tf.constant([[-1,0,1],[2,3,4]],dtype=tf.float32,name='const_a')
b = tf.clip_by_value(a,0.5,2.5)

with tf.Session() as sess:
    print(sess.run(b))
输出为:
[[0.5,0.5,1.],[2.,2.5,2.5]]
自定义损失函数
假设在某个问题中损失函数如下:
l
o
s
s
(
x
,
y
)
=
∑
i
=
1
n
f
(
x
,
y
)
(1)
loss(x,y)=\sum_{i=1}^{n}f(x,y)\tag{1}
loss(x,y)=i=1∑nf(x,y)(1)
其中:
f
(
x
,
y
)
=
{
a
(
x
−
y
)
,
x
≥
y
b
(
y
−
x
)
,
x
<
y
(2)
f(x,y)=\begin{cases} a(x-y)\quad,x\geq y \\ b(y-x)\quad ,x<y \end{cases}\tag{2}
f(x,y)={a(x−y),x≥yb(y−x),x<y(2)
在TensorFlow中可以用下面的代码来实现该损失函数:
loss = tf.reduce_sum(tf.where(tf.greater(x,y), (x-y) * a, (y-x) * b))
下面以一个例子来说明函数tf.where()、tf.greater()的用法:
import tensorflow as tf
a = tf.constant([[1,2],[7,8]],dtype=tf.float32,name='const_a')
b = tf.constant([[3,4],[5,6]],dtype=tf.float32,name='const_b')

c = tf.greater(a,b)
d = tf.where(c,a,b)

with tf.Session() as sess:
    print('c: ', sess.run(c))
    print('d: ', sess.run(d))
输出的结果是:
c: [[False, False], [True, True]]
d: [[3., 4.], [7., 8.]]
需要注意的是tf.where()、tf.greater()都是在元素级别进行操作,要求被操作的张量shape相同。
tf.where()定义:
tf.where(condition, x=None, y=None, name=None)
满足condition则返回x中的元素,否则返回y中的元素,返回值的shape和x、y的shape相同。
tf.greater()定义:
tf.greater(x, y, name=None)
x>y则返回True,否则返回False,返回值的shape和x、y的shape相同。
正则化
一个带有正则化的损失函数可以定义为:
loss = tf.reduce_mean(tf.square(y, y_predict) +
       tf.contrib.layers.l1_l2_regularizer(scale_l1=1.0, scale_l2=1.0)(w))
损失函数共有两部分,第一部分是均方误差,第二部分是
L
1
−
L
2
L1-L2
L1−L2正则化项。
s
c
a
l
e
l
1
scale_l1
scalel1和
s
c
a
l
e
l
2
scale_l2
scalel2分别代表
L
1
L1
L1正则化、
L
2
L2
L2正则化的权重。
w
w
w即需要进行正则化限制的权重。
下面给出正则化的样例:
import tensorflow as tf

w = tf.Variable(initial_value=[[-2,1],[3,4]],dtype=tf.float32,name='w')

l1 = tf.contrib.layers.l1_regularizer(0.1)(w)
l2 = tf.contrib.layers.l2_regularizer(0.1)(w)
l1_l2 = tf.contrib.layers.l1_l2_regularizer(scale_l1 = 0.1, scale_l2 = 0.1)(w)

with tf.Session() as sess:
    sess.run(tf.global_variables_initializer())
    print('L1: ', sess.run(l1))         # (|-2| + |1| + |3| + |4|) * 0.1 = 1.0
    print('L2: ', sess.run(l2))         # ((-2)^2 + 1^2 + 3^2 + 4^2) * 0.1 / 2 = 1.5
    print('L1_L2: ', sess.run(l1_l2))   # 1.0 + 1.5 = 2.5
输出的结果是:
L1: 1.0
L2: 1.5
L1_L2: 2.5
需要注意的是对于 L 2 L2 L2正则化TensorFlow在实现中除以了2。一般情况下对于 L 2 L2 L2都会这么做,求导方便。
上面的代码片段仅仅对一个权重 w w w进行了约束,在卷积神经网络中权重是极其多的,当想对更多的权重进行约束的时候用上面的方法就会很臃肿,这时TensorFlow的collection就很方便了。例如:
import tensorflow as tf

y = [1,0,0]  # 真值
y_predict = [0.1,0.7,0.2] # 预测值
# 三个包含很多参数的变量w1,w2,w3
w1 = tf.Variable(initial_value=tf.random_normal(shape=[256,512],dtype=tf.float32),name='w1')
w2 = tf.Variable(initial_value=tf.random_uniform(shape=[512,2048],minval=2.,maxval=13.,dtype=tf.float32),name='w2')
w3 = tf.Variable(initial_value=tf.truncated_normal(shape=[2048,4096],mean=0.0,stddev=1.0,dtype=tf.float32),name='w3')
# 分别将对w1,w2,w3的约束加入'losses'集合
tf.add_to_collection('losses',tf.contrib.layers.l2_regularizer(scale=0.1)(w1))
tf.add_to_collection('losses',tf.contrib.layers.l2_regularizer(scale=0.1)(w2))
tf.add_to_collection('losses',tf.contrib.layers.l2_regularizer(scale=0.1)(w3))
# 真值与预测值直接的交叉熵损失
cross_entropy_loss = -tf.reduce_mean(y * tf.log(tf.clip_by_value(y_predict,clip_value_min=1e-10,clip_value_max=1.0)))
# 将交叉熵损失加入'losses'集合
tf.add_to_collection('losses',cross_entropy_loss)

with tf.Session() as sess:
    sess.run(tf.global_variables_initializer())
    # tf.get_collection('losses')获取'losses'集合中所有的元素,
    # tf.add_n()将所有元素相加得到最终的loss
    loss = tf.add_n(tf.get_collection('losses'))
    print('loss: ',sess.run(loss))
在本样例中用的是随机数,因此每次输出结果会不同,运行某一次的输出结果是:loss: 3807549.2。
滑动平均模型
滑动平均模型可使模型在测试集上的表现更加鲁棒。在使用随机梯度下降法训练神经网络时,使用滑动平均模型可以在一定程度上改善模型在测试集上的表现。
在TensorFlow中使用tf.train.ExponentialMovingAverage()来实现滑动平均模型。滑动平均模型需要有衰减率decay来控制模型更新的速度。滑动平均模型会为每个变量维护一个影子变量(shadow_variable),影子变量的初始值和对应变量的初始值相同,在每次运行变量更新时,影子变量会根据下式更新:
s
h
a
d
o
w
_
v
a
r
i
a
b
l
e
=
d
e
c
a
y
∗
s
h
a
d
o
w
_
v
a
r
i
a
b
l
e
+
(
1
−
d
e
c
a
y
)
∗
v
a
r
i
a
b
l
e
(3)
shadow\_variable=decay * shadow\_variable+(1-decay)*variable\tag{3}
shadow_variable=decay∗shadow_variable+(1−decay)∗variable(3)
由此可见decay越大模型更新的越慢,模型越趋于稳定,在实际应用中decay一般设置为非常接近于1的数,如0.999。可选的,还可以利用num_updates来动态地使用decay的值:min(decay, (1 + num_updates) / (10 + num_updates))。
下面的代码片段说明了tf.train.ExponentialMovingAverage()的使用方法:
import tensorflow as tf

# 变量
var = tf.Variable(initial_value=[0,1],dtype=tf.float32,trainable=True,name='var')
# 衰减系数decay
DECAY = 0.99
# 用训练时的step给num_updates赋值
step = tf.Variable(initial_value=0,dtype=tf.float32,trainable=False,name='num_updates')
# 定义滑动平均
ema = tf.train.ExponentialMovingAverage(decay=DECAY,num_updates=step)
# 指定被滑动平均操作的变量,每次运行下面的op被指定的变量的影子变量都会被更新
variables_averages_op = ema.apply(tf.trainable_variables())

with tf.Session() as sess:
    sess.run(tf.global_variables_initializer())
    print(sess.run([var,ema.average(var)]))

    sess.run(tf.assign(var,[1,2]))
    sess.run(variables_averages_op)
    print(sess.run([var,ema.average(var)]))

    sess.run(tf.assign(step,10000))
    sess.run(tf.assign(var,[0,10]))
    sess.run(variables_averages_op)
    print(sess.run([var,ema.average(var)]))
输出的结果是:

tf.Variable()与tf.get_variable()
tf.Variable()可定义名称相同的变量:
import tensorflow as tf

a = tf.Variable(3,dtype=tf.float32,name='v_a')
b = tf.Variable(2,dtype=tf.float32,name='v_a')
c = tf.Variable(1,dtype=tf.float32,name='v_a')

print(a)
print(b)
print(c)
输出的结果为:

tf.Variable()和tf.get_variable()一起可定义名称相同的变量,但是tf.get_variable()只能用一次:
import tensorflow as tf

a = tf.Variable(3,dtype=tf.float32,name='v_a')
b = tf.Variable(2,dtype=tf.float32,name='v_a')
c = tf.Variable(1,dtype=tf.float32,name='v_a')
ga = tf.get_variable(name='v_a',initializer=2.,dtype=tf.float32)

print(a)
print(b)
print(c)
print(ga)
输出结果为:

无法用tf.get_variable()定义名称相同的变量:
import tensorflow as tf

ga = tf.get_variable(name='v_a',initializer=2.,dtype=tf.float32)
gb = tf.get_variable(name='v_a',initializer=2.,dtype=tf.float32)

print(ga)
print(gb)
输出结果,报错:
在tf.variable_scope()中reuse=False时会创建变量,如果变量已存在会报错;reuse=True时会获取已创建的变量,如果不存在该变量则报错。
import tensorflow as tf

with tf.variable_scope(reuse=False,name_or_scope='v_scope'):
    ga = tf.get_variable(name='v_ga',initializer=3.,dtype=tf.float32)

with tf.variable_scope(reuse=True,name_or_scope='v_scope'):
    gb = tf.get_variable(name='v_ga',initializer=3.,dtype=tf.float32)

print(ga is gb)
输出的结果是True。说明第一段with语句中创建的变量ga和第二段语句中获取的变量gb是同一个变量。
如果在reuse=False时企图用tf.get_variable()创建名称相同的变量是会报错的:
import tensorflow as tf

with tf.variable_scope(reuse=False,name_or_scope='v_scope'):
    ga = tf.get_variable(name='v_ga',initializer=3.,dtype=tf.float32)

with tf.variable_scope(reuse=False,name_or_scope='v_scope'):
    gb = tf.get_variable(name='v_ga',initializer=3.,dtype=tf.float32)
报错如下:
而把创建变量的方式由tf.get_variable()换成tf.Variable()是不会出现任何问题的,但是也有缺点,就是如果定义了一些名称相同的变量会给自己造成混乱。并且tf.get_variable不要和tf.Variable()混用,如果是用tf.get_variable()创建的变量就要用tf.get_variable()去获取;用tf.Variable()创建的变量tf.get_variable()是获取不到的。例如,用tf.Variable()去创建变量,然后企图用tf.get_variable()去获取,会报图6的错误:
import tensorflow as tf

with tf.variable_scope(reuse=False,name_or_scope='v_scope'):
    a = tf.Variable(3.,name='v_a',dtype=tf.float32)

with tf.variable_scope(reuse=True,name_or_scope='v_scope'):
    b = tf.get_variable(initializer=3.,name='v_a',dtype=tf.float32)
下面的方式是正确的:
import tensorflow as tf

with tf.variable_scope(reuse=False,name_or_scope='v_scope'):
    a = tf.get_variable(initializer=3.,name='v_a',dtype=tf.float32)

with tf.variable_scope(reuse=True,name_or_scope='v_scope'):
    b = tf.get_variable(initializer=3.,name='v_a',dtype=tf.float32)

print(a is b)
输出结果是:True。
模型持久化
用TensorFlow进行模型训练是为了部署到产品,这时就需要保存训练的模型,用的时候加载模型。
保存模型:
import tensorflow as tf

v_a = tf.Variable(initial_value=2,dtype=tf.float32,name='v_a')
v_b = tf.Variable(initial_value=3,dtype=tf.float32,name='v_b')
result = v_a + v_b

saver = tf.train.Saver()

with tf.Session() as sess:
    sess.run(tf.global_variables_initializer())
    saver.save(sess,'./model/model.ckpt')
运行之后会在model文件夹下生成如图7所示的四个文件:

模型加载
import tensorflow as tf

a = tf.Variable(initial_value=2000000,dtype=tf.float32,name='v_a')
b = tf.Variable(initial_value=3000000,dtype=tf.float32,name='v_b')
result_ab = a + b

saver = tf.train.Saver()

with tf.Session() as sess:
    saver.restore(sess,'./model/model.ckpt')
    print(sess.run(result_ab))
运行会输出:5.0。
细心的人可以发现,在模型保存和模型加载中定义的变量有差异,在模型保存的代码片段中变量是v_a、v_b,初始值分别为2,3;而在模型加载的代码片段中变量是a、b,初始值分别为2000000,3000000。但是为什么没有进行初始化(没有进行sess.run(tf.global_variables_initializer()))代码可以正常运行,最后运行的值又为什么还是5.0呢?
首先,TensorFlow计算图中变量的标识是参数name,而不是变量的名称,因此上面两段代码片段中v_a和a都是指name=v_a的变量;v_b和b都是指name=v_b的变量。其次,模型加载之后进行运算时用到的是之前保存模型时变量的值(否则模型训练岂不是白做了),在模型加载的代码二中给出了初始值是因为tf.Variable()定义变量必须要给出初始值否则报错。
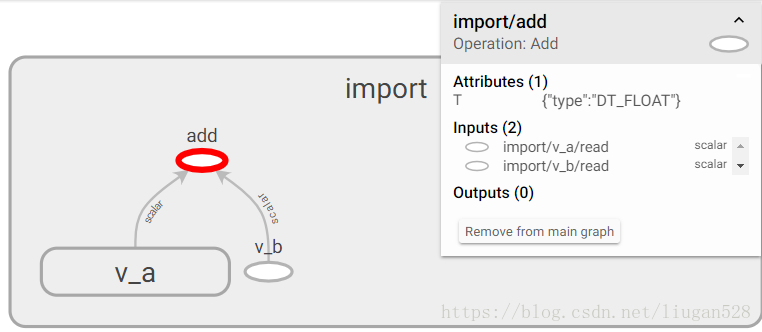
在上面的模型加载代码片段是通过再一次构造出计算图来进行restore的,还可以直接加载已经持久化的图:
import tensorflow as tf

saver = tf.train.import_meta_graph('./model/model.ckpt.meta')

with tf.Session() as sess:
    saver.restore(sess,'./model/model.ckpt')
    print(sess.run(tf.get_default_graph().get_tensor_by_name('add:0')))
运行会输出:5.0。
在tf.train.Saver()中可以指定var_list,默认的var_list=None表示保存或加载所有变量,也可以指定需要保存或加载的变量。比如:
import tensorflow as tf

a = tf.Variable(initial_value=2000000,dtype=tf.float32,name='v_a')
b = tf.Variable(initial_value=3000000,dtype=tf.float32,name='v_b')
result = a + b

saver = tf.train.Saver(var_list=[a,b])

with tf.Session() as sess:
    saver.restore(sess,'./model/model.ckpt')
    print(sess.run(result))
运行同样会输出:5.0。
需要注意的是如果只restore了一部分变量,而实际运行时需要的一些变量没restore则会报错,例如:
import tensorflow as tf

a = tf.Variable(initial_value=2000000,dtype=tf.float32,name='v_a')
b = tf.Variable(initial_value=3000000,dtype=tf.float32,name='v_b')
result = a + b

saver = tf.train.Saver(var_list=[a])

with tf.Session() as sess:
    saver.restore(sess,'./model/model.ckpt')
    print(sess.run(result))
会报如图8所示的错误:

变量重命名
TensorFlow支持变量重命名对于模型restore时使用变量的滑动平均值非常便利。
变量重命名例子:
import tensorflow as tf

a = tf.Variable(initial_value=2000000,dtype=tf.float32,name='v_a_alias')
b = tf.Variable(initial_value=3000000,dtype=tf.float32,name='v_b_alias')
result = a + b

saver = tf.train.Saver(var_list={'v_a':a,'v_b':b})

with tf.Session() as sess:
    saver.restore(sess,'./model/model.ckpt')
    print(sess.run(result))
运行同样会输出5.0。上面的代码片段中使用了dictvar_list={'v_a':a,'v_b':b}来指定restore时被重命名后的名字,代表的含义是在计算图中用v_a_alias代替v_a,用v_b_alias代替v_b。同样地,想使用变量的滑动平均值,可以用影子变量来代替变量。例如:
import tensorflow as tf
DECAY = 0.999

v = tf.Variable(initial_value=2.,dtype=tf.float32,name='v')
ema = tf.train.ExponentialMovingAverage(decay=DECAY)
ema_op = ema.apply(var_list=tf.global_variables())
# 不使用滑动平均时只有一个变量,
# 使用滑动平均后会有两个变量,一个是自身、另一个是影子变量
print(tf.global_variables())
# 同时保持变量v和其影子变量
saver = tf.train.Saver()

with tf.Session() as sess:
    sess.run(tf.global_variables_initializer())
    sess.run(tf.assign(v,10.))
    sess.run(ema_op)
    saver.save(sess,'./model/model.ckpt')
    print(sess.run([v, ema.average(v)]))
运行之后输出:
[<tf.Variable 'v:0' shape=() dtype=float32_ref>, <tf.Variable 'v/ExponentialMovingAverage:0' shape=() dtype=float32_ref>]
[10.0, 2.008]
为了方便的使用滑动平均变量,TensorFlow的tf.train.ExponentialMovingAverage类提供了variables_to_restore()方法直接生成变量与影子变量的字典。例如:
import tensorflow as tf
DECAY = 0.999

v = tf.Variable(initial_value=2.,dtype=tf.float32,name='v')
ema = tf.train.ExponentialMovingAverage(decay=DECAY)

print(ema.variables_to_restore())

save = tf.train.Saver(var_list=ema.variables_to_restore())
with tf.Session() as sess:
    # restore之前存储的变量
    save.restore(sess,'./model/model.ckpt')
    print(sess.run(v))
运行之后输出:
{'v/ExponentialMovingAverage': <tf.Variable 'v:0' shape=() dtype=float32_ref>}
2.008
2.008即变量v的影子变量的值。
常量的方式保存计算图(.pb格式)
前面介绍的加载模型的两种方法,其计算图中变量和变量值是分开的,不方便使用,下面介绍将计算图的变量和变量值一起保存的方法。TensorFlow中使用tf.graph_util.convert_variables_to_constants()可将计算图的变量和其取值保存在一个文件中:
import tensorflow as tf

v1 = tf.Variable(initial_value=1.,dtype=tf.float16,name='v1')
v2 = tf.Variable(initial_value=3.,dtype=tf.float16,name='v2')
sum_v = v1 + v2

with tf.Session() as sess:
    sess.run(tf.global_variables_initializer())
    graph_def = tf.get_default_graph().as_graph_def()
    output_graph_def = tf.graph_util.convert_variables_to_constants(
        sess,input_graph_def=graph_def,output_node_names=['add'])
    # 将模型写入文件
    with tf.gfile.GFile('./model/model.pb','wb') as f:
        f.write(output_graph_def.SerializeToString())
运行会在文件夹model下看到’model.pb’文件。
至于上面的add是如何得到的,如果计算图是比较简单的可直接通过print(变量名)来查看,比如上面的代码中加入print(sum_v)会打印出:Tensor("add:0", shape=(), dtype=float16),add后面的0表示该计算节点的第一个输出,而该变量名称本身是没有0的。对于复杂的计算图比如神经网络一般有两种方法,第一,可以通过先导出eval.pbtxt再用tensorboard进行查看,详见Tensorflow部署到移动端中相关部分。第二,通过tensorflow-master/python tensorflow/python/tools/import_pb_to_tensorboard.py代码来生成相应的events,然后通过tensorboard查看,代码例子如下:
python tensorflow-master/tensorflow/python/tools/import_pb_to_tensorboard.py \
       --model_dir ./model/model.pb \
       --log_dir ./log
运行上面代码之后会在log文件夹生成events文件,类似图9所示:
那么如何加载.pb文件呢?
import tensorflow as tf

with tf.Session() as sess:
    model_path = './model/model.pb'
    # 读取模型文件
    with tf.gfile.FastGFile(model_path,'rb') as f:
        graph_def = tf.GraphDef()
        graph_def.ParseFromString(f.read())
    sum_v = tf.import_graph_def(graph_def,return_elements=['add:0'])
    print(sess.run(sum_v))
输出结果为4.0。在计算name为add的变量sum_v时需要在add后加上0,代表该节点的第一个输出。
如果已经训练好了网络,并保存成了图7的格式,也是可以转换为.pb格式的,例如:
import tensorflow as tf

# 加载持久化的图
saver = tf.train.import_meta_graph('./model/model.ckpt.meta')

with tf.Session() as sess:
    # restore之前存储的变量
    saver.restore(sess,'./model/model.ckpt')
    graph_def = tf.get_default_graph().as_graph_def()
    output_graph_def = tf.graph_util.convert_variables_to_constants(
        sess,input_graph_def=graph_def,output_node_names=['add'])
    # 将模型写入文件
    with tf.gfile.GFile('./model/model.pb','wb') as f:
        f.write(output_graph_def.SerializeToString())
同样会在文件夹model中生成’model.pb’文件。
tf.map_fn的用法
示例1:
import numpy as np
import tensorflow as tf

elems = (np.array([1,2,3,4]), np.array([-1,1,3,5]))

rst = tf.map_fn(lambda x: x[0]*x[1], elems, dtype=tf.int32)
print(rst) # Tensor("map/TensorArrayStack/TensorArrayGatherV3:0", shape=(4,), dtype=int32)

with tf.Session() as sess:
    val = sess.run(rst)
    print(val) # [-1  2  9 20]
示例2:
import numpy as np
import tensorflow as tf

elems = [np.array([1,2,3,4]), np.array([-1,1,3,5]), np.array([2,6,-1,1])]

rst = tf.map_fn(lambda x: x[0]*x[1]*x[2], elems, dtype=tf.int32)
print(rst)  # Tensor("map/TensorArrayStack/TensorArrayGatherV3:0", shape=(4,), dtype=int32)

with tf.Session() as sess:
    val = sess.run(rst)
    print(val)  # [-2 12 -9 20]
示例3:
    import tensorflow as tf
    import numpy as np

    def func(x):
        a, b = x
        #res = []
        #for i in range(a.shape[0]):
        #    res.append(a[i] + b[i])
        return [[[0, 4, 8]]]

    a = np.array([[1,2,3,4,5],[-1,2,3,4,5],[1,-2,3,4,5],[1,2,-3,4,5],[1,2,-3,4,5],[1,2,-3,4,5]])
    b = np.array([[6,7,8,9,10],[6,-7,8,9,10],[6,7,-8,9,10],[6,7,8,-9,10],[6,7,8,-9,10],[6,7,8,-9,10]])

    out_dtype = [[[tf.int32, tf.int32, tf.int32]]]  # 此处的类型跟func的返回值类型对应
    result = tf.map_fn(func, elems=(a,b), dtype=out_dtype)

    with tf.Session() as sess:
        rst = sess.run(result)
        print(rst)
        print()
输出:
[[[array([0, 0, 0, 0, 0, 0]), array([4, 4, 4, 4, 4, 4]), array([8, 8, 8, 8, 8, 8])]]]
示例4:
    import tensorflow as tf
    import numpy as np

    def func(x):
        a, b = x
        #res = []
        #for i in range(a.shape[0]):
        #    res.append(a[i] + b[i])
        return [0, 4, 8]

    a = np.array([[1,2,3,4,5],[-1,2,3,4,5],[1,-2,3,4,5],[1,2,-3,4,5],[1,2,-3,4,5],[1,2,-3,4,5]])
    b = np.array([[6,7,8,9,10],[6,-7,8,9,10],[6,7,-8,9,10],[6,7,8,-9,10],[6,7,8,-9,10],[6,7,8,-9,10]])

    out_dtype = [tf.int32, tf.int32, tf.int32]  # 此处的类型跟func的返回值类型对应
    result = tf.map_fn(func, elems=(a,b), dtype=out_dtype)

    with tf.Session() as sess:
        rst = sess.run(result)
        print(rst)
        print()
输出:
[array([0, 0, 0, 0, 0, 0]), array([4, 4, 4, 4, 4, 4]), array([8, 8, 8, 8, 8, 8])]


 1084
1084

 被折叠的 条评论
为什么被折叠?
被折叠的 条评论
为什么被折叠?
 到【灌水乐园】发言


