


linux命令
ip add
查看linux系统里的ip地址 address
ip地址是标识每台电脑的地址,用来通信的地址,相当于我们的手机号码
[root@liwenqian ~]# ip add
1: lo: <LOOPBACK,UP,LOWER_UP> mtu 65536 qdisc noqueue state UNKNOWN
    link/loopback 00:00:00:00:00:00 brd 00:00:00:00:00:00
    inet 127.0.0.1/8 scope host lo
       valid_lft forever preferred_lft forever
    inet6 ::1/128 scope host
       valid_lft forever preferred_lft forever
2: eno16777736: <BROADCAST,MULTICAST,UP,LOWER_UP> mtu 1500 qdisc pfifo_fast state UP qlen 1000
    link/ether 00:0c:29:5b:ff:42 brd ff:ff:ff:ff:ff:ff
    inet 192.168.153.135/24 brd 192.168.153.255 scope global dynamic eno16777736
       valid_lft 1655sec preferred_lft 1655sec
    inet6 fe80::20c:29ff:fe5b:ff42/64 scope link
       valid_lft forever preferred_lft forever
ip route
查看网关(路由)
[root@lwq network-scripts]# ip route
default via 192.168.1.2 dev eno16777736  proto static  metric 100
192.168.1.0/24 dev eno16777736  proto kernel  scope link  src 192.168.1.128  metric 100
如果没有配置网关,使用ping命令访问外网时会出现网络不可达
配置了网关的情况
[root@lwq network-scripts]# ip route
default via 192.168.1.2 dev eno16777736  proto static  metric 100
192.168.1.0/24 dev eno16777736  proto kernel  scope link  src 192.168.1.128  metric 100
[root@lwq network-scripts]#  ping www.baidu.com
PING www.a.shifen.com (183.232.231.174) 56(84) bytes of data.
64 bytes from localhost (183.232.231.174): icmp_seq=1 ttl=128 time=19.6 ms
64 bytes from localhost (183.232.231.174): icmp_seq=2 ttl=128 time=21.6 ms
64 bytes from localhost (183.232.231.174): icmp_seq=3 ttl=128 time=21.2 ms
64 bytes from localhost (183.232.231.174): icmp_seq=4 ttl=128 time=20.3 ms
64 bytes from localhost (183.232.231.174): icmp_seq=5 ttl=128 time=20.4 ms
64 bytes from localhost (183.232.231.174): icmp_seq=6 ttl=128 time=139 ms
64 bytes from localhost (183.232.231.174): icmp_seq=7 ttl=128 time=20.6 ms
^C
--- www.a.shifen.com ping statistics ---
7 packets transmitted, 7 received, 0% packet loss, time 6013ms
rtt min/avg/max/mdev = 19.609/37.620/139.306/41.517 ms
ip route del default
删除默认网关
删除网关后
[root@lwq network-scripts]# ip route del default
[root@lwq network-scripts]# ping 183.232.231.174
connect: 网络不可达
ip route add default via 192.168.1.2 dev eno16777736
添加默认网关到eno16777736设备
[root@lwq network-scripts]# ip route add default via 192.168.1.2 dev eno16777736
[root@lwq network-scripts]# ping 183.232.231.174
PING 183.232.231.174 (183.232.231.174) 56(84) bytes of data.
64 bytes from 183.232.231.174: icmp_seq=1 ttl=128 time=424 ms
64 bytes from 183.232.231.174: icmp_seq=2 ttl=128 time=250 ms
64 bytes from 183.232.231.174: icmp_seq=3 ttl=128 time=219 ms
^C
--- 183.232.231.174 ping statistics ---
3 packets transmitted, 3 received, 0% packet loss, time 2006ms
rtt min/avg/max/mdev = 219.973/298.165/424.511/90.179 ms
cat /etc/resolv.conf
查看DNS服务器配置
如果没有配置DNS,使用ping命令时会出现无法解析域名的情况,但是直接可以ping ip地址
[root@lwq network-scripts]# cat /etc/resolv.conf
# Generated by NetworkManager
search localdomain sc.com
nameserver 192.168.1.2
nameserver 114.114.114.114
取消DNS配置后
[root@lwq network-scripts]# vim /etc/resolv.conf
[root@lwq network-scripts]# ping www.baidu.com
ping: unknown host www.baidu.com
[root@lwq network-scripts]# ping 183.232.231.172
PING 183.232.231.172 (183.232.231.172) 56(84) bytes of data.
64 bytes from 183.232.231.172: icmp_seq=1 ttl=128 time=362 ms
64 bytes from 183.232.231.172: icmp_seq=2 ttl=128 time=32.7 ms
64 bytes from 183.232.231.172: icmp_seq=3 ttl=128 time=131 ms
64 bytes from 183.232.231.172: icmp_seq=4 ttl=128 time=126 ms
64 bytes from 183.232.231.172: icmp_seq=5 ttl=128 time=33.3 ms
^C
--- 183.232.231.172 ping statistics ---
5 packets transmitted, 5 received, 0% packet loss, time 4010ms
rtt min/avg/max/mdev = 32.739/137.282/362.376/120.458 ms
配置网络
cd /etc/sysconfig/network-scripts/
vim ifcfg-eno16777736
[root@lwq network-scripts]# vim ifcfg-eno16777736

BOOTPROTO="dhcp"		#none或者static表示静态配置ip,dhcp表示动态配置ip,通过dhcp服务器的分配
NAME="eno16777736"		#网络连接的名字
DEVICE="eno16777736"	#设备名
ONBOOT="yes"			#yes表示开机是激活这个网络连接,no表示禁用这个网络连接
#IPADDR=192.168.81.123	#ip地址
#PREFIX=24				#子网掩码,也可以写为NETMASK=255.255.255.0
#GATEWAY=192.168.81.108	#默认网关
DNS1=114.114.114.114	#首先DNS服务器
DNS2=192.168.0.1		#备用DNS服务器
配置完需要刷新网络服务
service network restart
刷新网络服务
[root@lwq network-scripts]# service network restart
Restarting network (via systemctl):                    [  确定  ]
重启网络的三条命令
systemctl stop NetworkManager
systemctl diable NetworkManager
systemctl restart NetworkManager
ls
查看当前文件夹下的内容
[root@liwenqian ~]# ls
anaconda-ks.cfg  fxt.txt  l2  l4  lianxi  lwq.txt
a.py             l1       l3  li  lwq     xiaowei.txt
ll是查看指定目录下的内容(所有文件、文件夹的)
[root@lier lianxi]# ll 410
总用量 12
-rw-r--r--. 1 root root  784 3月  20 15:50 passwd.xz
-rw-r--r--. 1 root root  872 3月  20 15:50 passwd.zip
-rw-------. 1 root root 1963 3月  21 00:10 sshd_config.gz
ll -d 是查看指定文件、文件夹的信息
[root@lier lianxi]# ll -d 410
drwxr-xr-x. 2 root root 60 3月  21 00:10 410
mkdir
创建文件夹
可以同时创建多个文件夹:
[root@liwenqian lianxi]# mkdir hunan hebei shandong
mkdir -p /aa/bb/cc
命令 选项 文件夹
命令与参数之间需要空格,只要1个空格,多个空格效果相同
-p:可供选择的项目,可接可不接,但是接了有特殊作用
1,如果文件夹存在了,不报错
2,如果父文件夹不存在,就新建
[root@localhost wulin]# mkdir -p /aa/bb/cc/dd

[root@localhost wulin]# tree /aa

/aa

└── bb

└── cc

└── dd
tree
查看linux的树目录结构
[lier@root /]#tree /changsha
/changsha
├── li
├── lii
├── liu
├── wang
│   └── sc.txt
└── zhang
rm
[root@web1 /]# rm -rf world
删除文件夹及文件夹里面的东西
rm -rf
-rf 是选项,告诉rm这个命令强制删除,不给予提醒
world 具体删除的对象
df
df - report file system disk space usage
查看系统磁盘使用空间
-T, --print-type
print file system type
-h, --human-readable
[root@liwenqian lianxi]# df -Th
文件系统                类型      容量  已用  可用 已用% 挂载点
/dev/mapper/centos-root xfs        18G  1.3G   17G    8% /		-->默认情况下消耗的磁盘空间就是根分区
devtmpfs                devtmpfs  903M     0  903M    0% /dev
tmpfs                   tmpfs     913M     0  913M    0% /dev/shm
tmpfs                   tmpfs     913M  8.6M  904M    1% /run
tmpfs                   tmpfs     913M     0  913M    0% /sys/fs/cgroup
/dev/sda1               xfs       497M  125M  373M   25% /boot
tmpfs                   tmpfs     183M     0  183M    0% /run/user/0
[root@liwenqian lianxi]#
init 0
关机
uname
uname - print system information
-r, --kernel-release
print the kernel release
[root@liwenqian lianxi]# uname -r		查看linux内核的版本
3.10.0-327.el7.x86_64
echo
当定义的变量值里有空格时,建议使用双引号括起来,表示一个连续的字符串
$符号接变量名就是引用变量的值
echo 输出内容到屏幕
shell命令中=左右不要空格,否则出错
[root@localhost ~]# sg=lew			定义变量sg并赋值
[root@localhost ~]# echo $sg
lew
[root@localhost ~]#
echo后面需要一个空格,多个空格效果一样
[root@localhost ~]# sg1="sdd eee"
[root@localhost ~]# echo $sg1
sdd eee
[root@localhost ~]#
[root@localhost ~]# echo "hello world,$sg $sg1"
hello world,lew sdd eee
[root@localhost ~]#
set
查看当前终端里定义的变量,包括预定义变量和自定义变量
[root@localhost ~]# set

PS1='[\u@\h \W]\$ '
PS2='> '
PS4='+ '
PWD=/root
单引号和双引号的区别:
shell编程里:
单引号:所见即所得,不引用变量的值
双引号:使用$符号时引用变量的值
[root@localhost ~]# echo "hello world,sanchuang $sg $sg1"
hello world,sanchuang lew sdd eee
[root@localhost ~]# echo 'hello world,sanchuang $sg $sg1'
hello world,sanchuang $sg $sg1
Ctrl+l 清除屏幕
su
切换用户 替换用户
switch user
[root@localhost ~]# su - lier
[lier@localhost ~]$
[root@localhost ~]# su      不接用户,就是切换到自己重新登录
注销:退出用户,并且关闭这个用户打开的所有程序,不关闭系统
切换用户: 不会关闭之前打开的所有的程序,只是切换另一个用户登录
[lier@localhost ~]$ exit
登出
[root@localhost ~]#
root用户su到任何用户都不需要密码
普通用户切换到任何用户都需要密码

exit
注销用户
注销: 就是退出用户,并且关闭这个用户打开的所有的程序
不关闭系统
切换用户: 不会关闭之前用户打开的所有的程序, 只是切换到另外一个用户登录
[dengchao@localhost ~]$ exit 注销用户/退出用户 会返回到上一个切换之前的用户
登出
[root@localhost ~]#
id
查看用户id
[lwq@root ~]# id root
uid=0(root) gid=0(root) 组=0(root)
pwd
查看当前所在路径
[lier@localhost ~]$ pwd
/home/lier =》家目录~:用户登录进入系统时所在的文件夹
yum install
安装
yum install vim -y
yum 是 linux里的软件管理的命令
install 表示yum执行安装软件的操作
vim 具体安装的软件的名字
-y 表示yes ,自动安装,不需要询问了
vim
vim 是linux里的文本编辑工具,用来修改文件里的内容的–》相当于windows里的记事本
[root@localhost ~]# vim luoyawei.txt
步骤:
1.按i 进入输入模式
2.输入内容
3.按ESC离开输入模式,返回到命令模式
4.输入:wq 退出并且保存
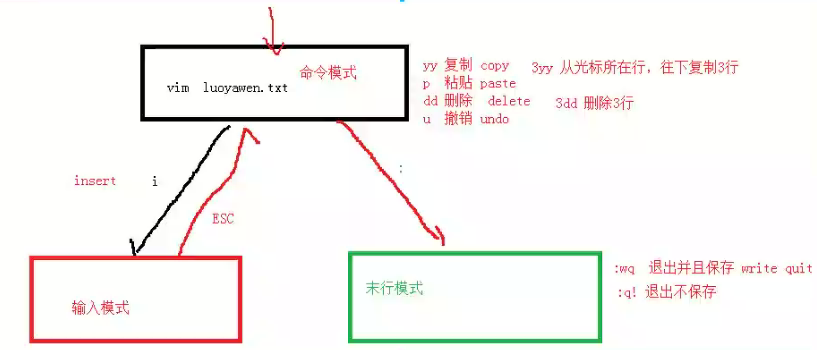
:wq 保存并退出
:q! 不保存退出
[root@localhost ~]# yum install vim -y 安装vim软件
命令模式下
先定位到需要缩进的行,然后按大写的V --》进入可视行 —>最后按shift+>可进行缩进
cat
查看文件里的内容
[root@lwq lianxi]# cat hello.c
#include<stdio.h>

int main(){
	printf("hello,world!\n");
	printf("sanchuang,teacher feng\n");
	return 0;
cat /etc/centos-release
查看centos系统的版本
[root@lwq network-scripts]# cat /etc/centos-release
CentOS Linux release 7.2.1511 (Core)
hostnamectl set-hostname lier
修改主机名
临时和永久都生效
修改了HOSTNAME变量的值,同时也修改了/etc/hostname文件里的内容
修改之后需要重启生效
[root@lwq ~]# hostnamectl set-hostname lier
[root@lwq ~]# su
[root@lier ~]#
hostname
临时修改了主机名后不会立马生效,需要重新登录或者切换用户才会在PS1变量里体现出来
重启会失效
hostname sanchuang
vim /etc/hostname
需要重启生效
[root@localhost ~]# cat   /etc/hostname   存放机器名的文件
localhost.localdomain
[root@localhost ~]# hostname
localhost.localdomain
[root@localhost ~]# vim  /etc/hostname
sanchuang
HOSTNAME=localhost.localdomain
hostname去修改主机名其实就是修改HOSTNAME这个变量
vim /etc/hostname文件,并没有去修改HOSTNAME这个变量
我们为什么需要修改主机名?都使用localhost不好吗?
区分开,标识
很多台机器
你觉得王者荣耀游戏服务器有多少台?
2亿用户
一台服务器抗多少用户?1万
2万
10万用户
cd
切换目录
[root@siyuxiang ~]# cd ~liwenqian	切换到liwenqian的家目录下
[root@siyuxiang liwenqian]# pwd
/home/liwenqian
cd … 返回上一级
cd / 根目录
cd ~ 进入当前用户的家目录
家目录: 用户登录进入linux系统就会进入的文件夹
root -->/root --》皇宫
普通用户 --》/home/用户名
cd 返回当前用户的家目录(回城)
cd - 返回上一个操作目录
[lier@root /]#cd -
/changsha
[lier@root changsha]#
passwd
修改用户密码
root用户可以给任何用户设置密码
[root@localhost ~]# passwd  dengchao
更改用户 dengchao 的密码 。
新的 密码:
无效的密码: 密码少于 8 个字符
重新输入新的 密码:
passwd:所有的身份验证令牌已经成功更新。
[root@localhost ~]#
Ubuntu里默认情况下root用户是禁用的,使用安装Ubuntu的时候新建的用户登录,哪个用户相当于root用户
sc@fengdeyong:~$ sudo passwd  root  给root用户设置密码,启用root用户
New password:
Retype new password:
passwd: password updated successfully
sc@fengdeyong:~$ su - root
Password:
root@fengdeyong:~#
在本地可以登陆,但是远程不可以,需要修改远程登陆服务的配置文件,允许root用户登陆
启用root用户远程登陆
root@fengdeyong:~# sudo vim /etc/ssh/sshd_config  修改ssh服务的配置文件
PermitRootLogin yes
root@fengdeyong:~# sudo  service sshd restart  重启刷新sshd服务,让刚刚修改的配置生效
练习
练习1:
1.进入/根目录
cd /
2.新建文件夹changsha,然后进入changsha
3.新建4个文件夹 liu zhang wang li
4.进入wang文件夹
5.显示当前所在的路径
6.新建用户yangmi,设置密码为123456,换到用户yangmi登陆系统
7.显示当前所在的路径,新建一个文件夹叫big_meinv,然后退出yangmi这个用户
8.查看当前主机的名字,修改主机名为yourself.sc.com yourself就是使用你自己的英文名或者汉语拼音
9.查询显示PS1变量的值
10.修改PS1变量的值,将用户名和主机名的顺序调换
11.使用vim编辑器新建一个文件sc.txt,内容如下:
i am learning linux vim
hunan changsha
nongda
复制前3行,粘贴到末尾
删除包含hunan changsha的行
删除第2行
撤销刚刚的删除操作
退出并且保存
12.查看sc.txt文件里的内容
13.查看root用户的uid号
14.重启linux系统
[root@liwenqian ~]# cd /
[root@liwenqian /]# mkdir changsha
[root@liwenqian /]# cd changsha
[root@liwenqian changsha]# mkdir liu zhang wang li
[root@liwenqian changsha]# cd wang
[root@liwenqian wang]# pwd
/changsha/wang
[root@liwenqian wang]# useradd yangmi
[root@liwenqian wang]# passwd yangmi
更改用户 yangmi 的密码 。
新的 密码:
无效的密码: 密码少于 8 个字符
重新输入新的 密码:
passwd:所有的身份验证令牌已经成功更新。
[root@liwenqian wang]# su - yangmi
[yangmi@liwenqian ~]$ pwd
/home/yangmi
[yangmi@liwenqian ~]$ mkdir big_meinv
[yangmi@liwenqian ~]$ exit
登出
[root@liwenqian wang]# hostname
liwenqian
[root@liwenqian wang]# hostnamectl set-hostname lier.sc.com
[root@liwenqian wang]# su
[root@lier wang]# echo $PS1
[\u@\h \W]\$
[root@lier wang]# PS1='[\h@\u \W]$'
[lier@root wang]$vim sc.txt
[lier@root wang]$cat sc.txt
i am learning linux vim
hunan changsha
nongda
i am learning linux vim
hunan changsha
nongda
[lier@root wang]$id root
uid=0(root) gid=0(root) 组=0(root)
[lier@root wang]$reboot
设置用户密码
交互式,一问一答
[root@master ~]# passwd  luoyawei
更改用户 luoyawei 的密码 。
新的 密码:
无效的密码: 密码少于 8 个字符
重新输入新的 密码:
passwd:所有的身份验证令牌已经成功更新。
[root@master ~]# tail -2 /etc/shadow
luoyawei:$6$WUfZpURR$Y1/Q.pES7zsewx7p.I37XsPJs.GjjW9WLXxlb3CdPXnLke.CTykuaDDzRIA7.Js1DJp0gvbg9EsPdEldcvWW6.:19133:0:99999:7:::
liziying123:!!:19133:0:99999:7:::
非交互式 --》写脚本使用
[root@master ~]# echo 123456|passwd  chenlin  --stdin
更改用户 chenlin 的密码 。
passwd:所有的身份验证令牌已经成功更新。
[root@master ~]#
| 管道 pipe : 将前面一个命令的输出送给后面的命令做输入
实现进程和进程之间通信的方式–stdin 标准输入 standard input --》从键盘输入 告诉passwd把管道传递过来的数据作为从键盘输入的数据使用
练习
写一个脚本:
新建用户,并且给用户设置密码 --》通过位置变量传递参数给脚本
bash create_user.sh liyili 123456li
$1 $2
[root@lier 524]# cat create_user.sh
#!/bin/bash

# 新建用户,并且给用户设置密码,通过位置变量传递参数

# 新建用户
# 不管命令执行是否正确,都不输出提示信息
# 实现如果用户不存在就新建,并且设置密码
if useradd $1 &>/dev/null;then
	# 给用户设置密码
	echo $2|passwd $1 --stdin &>/dev/null
	echo "用户创建成功,密码设置成功!"
# 如果用户存在就不新建,也不设置密码
else
	echo "用户已存在,不设置密码!"
	exit 9	#退出执行脚本的bash 给的返回值是9
fi
[root@lier 524]# bash create_user.sh liyili 123
用户创建成功,密码设置成功!

[root@lier 524]# id liyili
uid=7796(liyili) gid=7796(liyili) 组=7796(liyili)

[root@lier 524]# bash create_user.sh liyili 123
用户已存在,不设置密码!
exit 9 #退出执行脚本的bash 给的返回值是9
因为执行命令bash create_user.sh liyili 123时,系统会再开一个子进程用来执行脚本里面的内容,所以exit 9 就是退出执行脚本的bash,并且返回值是9
[root@lier 524]# bash create_user.sh liyili 123
用户已存在,不设置密码!
[root@lier 524]# echo $?
9
passwd命令
格式:passwd [选项]… 用户名
常用命令选项
-d:清空用户的密码,使之无需密码即可登录
-l:锁定用户帐号 lock -->禁用用户
-S:查看用户帐号的状态(是否被锁定)
-u:解锁用户帐号
–stdin:接收别的命令stdout做为stdin标准输入设置密码
root用户可以修改所有用户密码,不要求复杂性
普通用户只能改自己的密码,要求复杂性
-l
锁定用户账号,禁止用户登录
使用-l命令时系统默认在密码字段加 !! ,使得用户输入密码时系统不能正确的识别从而限制用户登录
[root@master 524]# tail -2 /etc/shadow
liuchang1234:$6$0/vjaUVw$QfrCAFwPztuHTOgBj0O/YCiDoWukk9A2eftrFC4m9XhIbnt6b3Qc.peKG8SApG.d29xwSwkU5WUfV.ZfMtxbI1:19136:0:99999:7:::
luo1:$6$GWIQhD8g$w9dF9oy9Wc7eQr.3a5BYbv6yl7qxMolRlouanlpbez67FhugjyAttwIii7nhI1ZWav7cJ2E73n87HZLYI5NyV1:19136:0:99999:7:::

[root@master 524]# passwd -l luo1
锁定用户 luo1 的密码 。
passwd: 操作成功

[root@master 524]# tail -2 /etc/shadow
liuchang1234:$6$0/vjaUVw$QfrCAFwPztuHTOgBj0O/YCiDoWukk9A2eftrFC4m9XhIbnt6b3Qc.peKG8SApG.d29xwSwkU5WUfV.ZfMtxbI1:19136:0:99999:7:::
luo1:!!$6$GWIQhD8g$w9dF9oy9Wc7eQr.3a5BYbv6yl7qxMolRlouanlpbez67FhugjyAttwIii7nhI1ZWav7cJ2E73n87HZLYI5NyV1:19136:0:99999:7:::
[root@master 524]#
使用-l锁定用户后,超级用户root还是可以登录
因为root用户登到普通用户时不用输入密码;而普通用户登到另一个用户需要输入密码,使用等到锁定用户时不能成功
[root@lier 524]# passwd -l liyili
锁定用户 liyili 的密码 。
passwd: 操作成功
[root@lier 524]# su - liyili
上一次登录:五 5月  6 16:31:33 CST 2022pts/0 上
[liyili@lier ~]$

[root@lier 524]# su - lwq
上一次登录:五 5月  6 16:31:26 CST 2022pts/0 上
[lwq@lier ~]$ su - liyili
密码:
su: 鉴定故障
通过更改/etc/shadow文件中的密码字段同样可以实现禁止用户登录
linux系统中一切皆文件
[root@lier 524]# tail -1 /etc/shadow
liyili:$6$pl//LkWi$07pSqTVl7BlsqYVh72c3ItmCPBoi4Ds/0H/BwEjAzHP3//.xAG9EqtTMj01sBlWjCTRiRp8u0fua8lXTYvjP2/:19118:0:99999:7:::
[root@lier 524]# su - lwq
上一次登录:五 5月  6 16:30:09 CST 2022pts/0 上
[lwq@lier ~]$ su - liyili
密码:
上一次登录:五 5月  6 16:29:10 CST 2022pts/0 上
[liyili@lier ~]$


[root@lier 524]# su - lwq
上一次登录:五 5月  6 12:58:25 CST 2022pts/4 上
[lwq@lier ~]$ su - liyili
密码:
su: 鉴定故障
[lwq@lier ~]$
-u
unlock,取消锁定用户
[root@lier 524]# tail -1 /etc/shadow
liyili:!!$6$WCskCO9S$Tpo7CLELqe62.9MmSo8fYbfG7/.oeeVAZjl5xL7.9EIhpP87dEkgKyAzNLX5100uwXwCOa/BKXTcQ2CRdpLKF1:19118:0:99999:7:::

[root@lier 524]# passwd -u liyili
解锁用户 liyili 的密码。
passwd: 操作成功
也可以通过修改/etc/shadow ,手动删除密码字段前的 !! 给用户解除锁定
which
查看命令的存放目录
[root@lb2 bin]# which ip
/usr/sbin/ip
[root@lb2 bin]# which mkdir
/usr/bin/mkdir
[root@lb2 bin]#
whereis
查看命令存放的路径以及man手册的路径
[root@lwq ~]# whereis mkdir
mkdir: /usr/bin/mkdir /usr/share/man/man1/mkdir.1.gz
练习1
编写一个程序,使用c语言写输出hello world的程序,并作为一个命令使用
编写程序
[root@lwq shenjiemi]# cat hello.c
#include <stdio.h>

int main(){
	printf("hello,world\n");
	printf("sanchuang fengdeyong\n");
	return 0;
}
编译成二进制程序
gcc 是linux里的编译器(翻译器),能将c语言代码翻译二进制程序
-o 指定编译输出的二进制程序的名字 output
[root@lb1 shenjiemi]# gcc -o hello  hello.c  将hello.c代码编译成hello的二进制程序

[root@lb1 shenjiemi]#
[root@lb1 shenjiemi]# ls
hello  hello.c
[root@lb1 shenjiemi]# ll
总用量 16
-rwxr-xr-x 1 root root 8360 3月  29 20:59 hello
-rw-r--r-- 1 root root  105 3月  29 20:58 hello.c
[root@lb1 shenjiemi]#
让which能找到我们自己编写的hello程序
将我们编写的程序复制到PATH变量的任何一个目录下 --》搭顺风车
[root@lb1 shenjiemi]# pwd
/shenjiemi
[root@lb1 shenjiemi]# ls
hello  hello.c
[root@lb1 shenjiemi]# cp hello /usr/local/sbin/
[root@lb1 shenjiemi]# which hello
/usr/local/sbin/hello
[root@lb1 shenjiemi]# hello
hello,world
sanchuang fengdeyong
[root@lb1 shenjiemi]# pwd
/shenjiemi
[root@lb1 shenjiemi]# cd /boot
[root@lb1 boot]# hello
hello,world
sanchuang fengdeyong
[root@lb1 boot]# which hello
/usr/local/sbin/hello
[root@lb1 boot]#
修改PATH变量的值,添加我们的程序所在的目录
[root@lb1 boot]# PATH=/shenjiemi:$PATH
[root@lb1 boot]# echo $PATH
/shenjiemi/:/usr/local/sbin:/usr/local/bin:/usr/sbin:/usr/bin:/root/bin:/usr/local/sclilin99/sbin:/root/bin
[root@lb1 boot]#
[root@lb1 boot]# which hello
/shenjiemi/hello
[root@lb1 boot]#
练习2
[root@lb1 boot]# mkdir  /liuchang
[root@lb1 boot]# cd /liuchang/
[root@lb1 liuchang]# vim  scliuchang.py
#!/usr/bin/python3

print("hello,world,liuchang ,sanchuang")

[root@lb1 liuchang]#
[root@lb1 liuchang]# chmod  +x scliuchang.py
[root@lb1 liuchang]# ll
总用量 4
-rwxr-xr-x 1 root root 62 3月  29 21:12 scliuchang.py
[root@lb1 liuchang]#
[root@lb1 liuchang]# which scliuchang.py
/usr/bin/which: no scliuchang.py in (/shenjiemi/:/usr/local/sbin:/usr/local/bin:/usr/sbin:/usr/bin:/root/bin:/usr/local/sclilin99/sbin:/root/bin)
[root@lb1 liuchang]#
[root@lb1 liuchang]# PATH=/liuchang:$PATH
[root@lb1 liuchang]# echo $PATH
/liuchang:/shenjiemi/:/usr/local/sbin:/usr/local/bin:/usr/sbin:/usr/bin:/root/bin:/usr/local/sclilin99/sbin:/root/bin
[root@lb1 liuchang]#
[root@lb1 liuchang]# which scliuchang.py
/liuchang/scliuchang.py
[root@lb1 liuchang]# scliuchang.py
hello,world,liuchang ,sanchuang
[root@lb1 liuchang]#
[root@lb1 liuchang]# cd /boot
[root@lb1 boot]# ls
config-3.10.0-1160.el7.x86_64                            initramfs-3.10.0-1160.el7.x86_64kdump.img
efi                                                      liyili.txt
grub                                                     symvers-3.10.0-1160.el7.x86_64.gz
grub2                                                    System.map-3.10.0-1160.el7.x86_64
initramfs-0-rescue-d0bc6df5a0e74d248da1b6d460cd2ded.img  vmlinuz-0-rescue-d0bc6df5a0e74d248da1b6d460cd2ded
initramfs-3.10.0-1160.el7.x86_64.img                     vmlinuz-3.10.0-1160.el7.x86_64
[root@lb1 boot]# scliuchang.py
hello,world,liuchang ,sanchuang
[root@lb1 boot]#
如何达到这个效果?
liuchang = scliuchang.py
定义别名
[root@lb1 boot]# alias liuchang=scliuchang.py  定义liuchang是scliuchang.py的别名
[root@lb1 boot]# liuchang
hello,world,liuchang ,sanchuang
[root@lb1 boot]#
[root@lb1 boot]# which liuchang  查看路径
alias liuchang='scliuchang.py'
	/liuchang/scliuchang.py
[root@lb1 boot]#
思路: 以后自己编写的程序,让人家能够找到,并且使用,推荐的方法:修改PATH变量和定义别名或者复制我们编写的程序到PATH变量
2.1 适应世界 --》将我们编写的程序复制到PATH变量的任何一个目录下 --》搭顺风车
2.2 改变世界 -->修改PATH变量的值,添加我们的程序所在的目录
echo
echo 是输出内容的,相当于python里的print函数

[root@lb2 bin]# echo   $SHELL
/bin/bash	指明linux里默认的shell是/bin/bash
[root@lb2 bin]#
/bin  是linux里存放二进制文件的 binary
SHELL这个变量属于预定义变量–》操作系统里自带的,不需要自定义的
env
查看当前linux终端的预先定义的环境变量–》终端里的所有的程序都可以使用
PATH=/usr/local/sbin:/usr/local/bin:/usr/sbin:/usr/bin:/root/bin:/usr/local/sclilin99/sbin:/root/bin
HOSTNAME=lb1
环境变量都是大写的
自定义变量一般都是小写–》推荐使用小写,也可以大写
[root@lb2 bin]# env  查看当前终端里定义的环境变量的  environment 环境变量:全局变量,系统自带的,不需要我们自定义的
XDG_SESSION_ID=2
HOSTNAME=lb2
TERM=xterm
SHELL=/bin/bash
HISTSIZE=1000
man
[root@lb2 lianxi]# man  mkdir   查看mkdir的使用手册  manual 手册,指南
按q退出   quit
chmod
chmod是授权权限的命令
+x 是可执行权限,可执行权限就是直接运行的权限 execute
[root@lb2 lianxi]# chmod +x create_dir.sh 授予create_dir.sh可执行权限 + 表示授权,增加 - 表示去除,删除
授权之后可以直接查看脚本文件
[root@lwq lianxi]# ./create_dir.sh
查看新建的文件夹
@@@@@@@@@@@@@@@@@@@@@@@@@@@@@@@@
sc1    sc17  sc25  sc33  sc41  sc5   sc58  sc66  sc74  sc82  sc90  sc99
sc10   sc18  sc26  sc34  sc42  sc50  sc59  sc67  sc75  sc83  sc91
sc100  sc19  sc27  sc35  sc43  sc51  sc6   sc68  sc76  sc84  sc92
sc11   sc2   sc28  sc36  sc44  sc52  sc60  sc69  sc77  sc85  sc93
sc12   sc20  sc29  sc37  sc45  sc53  sc61  sc7	 sc78  sc86  sc94
sc13   sc21  sc3   sc38  sc46  sc54  sc62  sc70  sc79  sc87  sc95
sc14   sc22  sc30  sc39  sc47  sc55  sc63  sc71  sc8   sc88  sc96
sc15   sc23  sc31  sc4	 sc48  sc56  sc64  sc72  sc80  sc89  sc97
sc16   sc24  sc32  sc40  sc49  sc57  sc65  sc73  sc81  sc9   sc98
脚本执行结束
@@@@@@@@@@@@@@@@@@@@@@@@@@@@@@@@
[root@lwq lianxi]#
ll
ll 是ls -l的别名
[root@lwq lianxi]# ll
总用量 32
-rwxr-xr-x. 1 root root  270 3月   7 10:43 create_dir.sh
-rw-r--r--. 1 root root  223 3月   7 14:55 create_file.sh
drwxr-xr-x. 3 root root   22 2月  28 08:58 guangdong
drwxr-xr-x. 2 root root    6 3月   6 17:38 hebei
-rwxr-xr-x. 1 root root 8511 3月  17 00:42 hello
-rw-r--r--. 1 root root  108 3月   7 10:58 hello.c
-rw-r--r--. 1 root root   75 3月   7 11:04 hello.py
drwxr-xr-x. 2 root root    6 3月   6 17:38 hunan
drwxr-xr-x. 2 root root    6 3月   6 17:38 shandong
-rw-r--r--. 1 root root   52 3月  16 20:40 xiaowei.txt
lrwxrwxrwx. 1 root root   10 2月  28 08:56 yue -> guangdong/
[root@lwq lianxi]#
r 代表读 read 读取文件里的内容
w 代表写 write 往文件里写入内容
x 代表执行 execute 运行文件里的命令
第1个root代表这个文件归root用户所有
第2个root代表这个文件归root组所有
alias
查看当前终端里定义的别名
别名,其实就是命令的快捷方式
作用:
快速的执行一个命令,少打字,提升效率
偷懒
ll = ls -l
[root@lwq lianxi]# alias
alias c='clear'
alias cp='cp -i'
alias egrep='egrep --color=auto'
alias fgrep='fgrep --color=auto'
alias grep='grep --color=auto'
alias l.='ls -d .* --color=auto'
alias lk='ls -a -l --color=auto'
alias ll='ls -l --color=auto'
alias ls='ls --color=auto'
alias mk='mkdir -p'
alias mv='mv -i'
alias rm='rm -i'
alias sc='mkdir -p'
alias which='alias | /usr/bin/which --tty-only --read-alias --show-dot --show-tilde'
[root@lb2 lianxi]# alias ls='ls --color=auto' 定义别名ls是ls --color=auto的别名
如果命令中间有空格,建议使用单引号扩起来
别名不能和已经存在的linux命令一样,不然会导致原来的命令不能使用
[root@lb2 lianxi]# alias c=clear 定义c是clear命令的别名--》临时定义,其他终端不会生效,重启系统也会失效
[root@lb2 lianxi]# unalias c  取消别名c
[root@lb2 lianxi]# c
-bash: c: 未找到命令
[root@lb2 lianxi]#
永久定义别名–》修改文件
[root@lb2 lianxi]# vim  /root/.bashrc

alias rm='rm -i'
alias cp='cp -i'
alias mv='mv -i'
alias taotao='ls --color=auto'  添加
alias c='clear'  添加
[root@lb2 lianxi]# su - root  重新登录下用户,就生效了或者重启系统
上一次登录:日 3月 13 15:21:51 CST 2022从 192.168.2.103pts/3 上
[root@lb2 ~]# taotao
anaconda-ks.cfg    feng          iptables.sh  luoyawei123   nginx-1.21.4.tar.gz            wangyutao
chenxia.txt        fuxintao.txt  liuchang     luoyawei1234  onekey_install_changjinghu.sh  wangyutao.txt
clear_iptables.sh  hello         luoyawei     luoyawei.txt  renhaodong                     weihong
[root@lb2 ~]#
touch
1.新建空文件–》文本文件,里面没有内容–》文件不存在就新建
2.更新文件的时间 --》如果文件存在就更新文件的创建时间–》还可以修改文件夹的时间
[root@lwq lianxi]# touch fu{1..100}.txt
[root@lwq lianxi]# ls
create_dir.sh   fu25.txt  fu42.txt  fu5.txt   fu77.txt  fu94.txt
create_file.sh  fu26.txt  fu43.txt  fu60.txt  fu78.txt  fu95.txt
fu100.txt       fu27.txt  fu44.txt  fu61.txt  fu79.txt  fu96.txt
fu10.txt        fu28.txt  fu45.txt  fu62.txt  fu7.txt   fu97.txt
fu11.txt        fu29.txt  fu46.txt  fu63.txt  fu80.txt  fu98.txt
fu12.txt        fu2.txt   fu47.txt  fu64.txt  fu81.txt  fu99.txt
fu13.txt        fu30.txt  fu48.txt  fu65.txt  fu82.txt  fu9.txt
fu14.txt        fu31.txt  fu49.txt  fu66.txt  fu83.txt  guangdong
fu15.txt        fu32.txt  fu4.txt   fu67.txt  fu84.txt  hebei
fu16.txt        fu33.txt  fu50.txt  fu68.txt  fu85.txt  hello
fu17.txt        fu34.txt  fu51.txt  fu69.txt  fu86.txt  hello.c
fu18.txt        fu35.txt  fu52.txt  fu6.txt   fu87.txt  hello.py
fu19.txt        fu36.txt  fu53.txt  fu70.txt  fu88.txt  hunan
fu1.txt         fu37.txt  fu54.txt  fu71.txt  fu89.txt  shandong
fu20.txt        fu38.txt  fu55.txt  fu72.txt  fu8.txt   xiaowei.txt
fu21.txt        fu39.txt  fu56.txt  fu73.txt  fu90.txt  yue
fu22.txt        fu3.txt   fu57.txt  fu74.txt  fu91.txt
fu23.txt        fu40.txt  fu58.txt  fu75.txt  fu92.txt
fu24.txt        fu41.txt  fu59.txt  fu76.txt  fu93.txt
[root@lwq lianxi]#
使用通用符删除fu开头的文件
[root@lwq lianxi]# rm -rf fu*
[root@lwq lianxi]# ls
create_dir.sh   guangdong  hello    hello.py  shandong     yue
create_file.sh  hebei      hello.c  hunan     xiaowei.txt
date
查看系统时间
[root@lwq lianxi]# date
2022年 03月 17日 星期四 01:22:17 CST
显示年月日
+%Y year 年
%m month 月
%d day 日
%H hour 小时
%M minute 分钟
%S seconde 秒
[root@lier luoyawei]# date +%Y
2022
[root@lier luoyawei]# date +%Y%m
202203
[root@lier luoyawei]# date +%Y%m%d
20220321
[root@lier luoyawei]# date +%Y%m%d%H%M%S
20220321013049
[root@lier luoyawei]# date +%Y%m%d
20220321
[root@lier luoyawei]# ctime=$(date +%Y%m%d)
[root@lier luoyawei]# echo $ctime
20220321
-s
设置日期,立马生效 —》纯手工设置时间
[root@master 417]# date -s "2022-4-30 10:53"
2022年 04月 30日 星期六 10:53:00 CST
[root@master 417]# date
2022年 04月 30日 星期六 10:53:01 CST
[root@master 417]#
[root@master 417]# date -s "2022-4-17 10:55:15"
2022年 04月 17日 星期日 10:55:15 CST
[root@master 417]# date
2022年 04月 17日 星期日 10:55:16 CST
[root@master 417]#
chrony
和互联网上的时间服务器同步时间
chrony 是一个到互联网上同步时间的服务
yum install chrony -y
service chronyd restart
启动服务
[root@master 417]# service chronyd restart
Redirecting to /bin/systemctl restart chronyd.service
[root@master 417]#
systemctl restart chronyd.service是新的启动同步时间服务的命令,service chronyd restart是旧命令,使用
service 是一个启动服务的命令
chronyd chrony deamon 守护进程: 就是一直在内存里运行的进程
chronyd是centos7/8/9里的服务
centos6里使用–》ntpupdate
ntp -->network time protocol
rm
rm 是linux里的删除命令 —》危险等级10级
remove
     rm - remove files or directories
-r 递归删除文件夹里的子文件或者子文件夹 --》株连九族
   -r, -R, --recursive
          remove directories and their contents recursively
-f 强制删除,不给予提醒
-f, --force
ignore nonexistent files and arguments, never prompt
-rf
rm -r -f fu*
rm -rf fu*
[root@lb2 feng]# rm -rf liuchang*
通配符:
*代表任意个任意字符 0~n
? 代表一个任意字符 1
[root@lwq lianxi]# mkdir .lwq  linux里.开头的文件是隐藏文件
[root@lwq lianxi]# ls -a
.   create_dir.sh   guangdong  hello    hello.py  .lwq      xiaowei.txt
..  create_file.sh  hebei      hello.c  hunan     shandong  yue

ls
	-l  long 详细信息
	--color=auto
	-a  all 所有的信息

[root@lb2 feng]# rm  -rf *  删除当前目录下所有的文件和文件夹,但是不删除隐藏文件
[root@lb2 feng]# rm  -rf .*  删除所有的隐藏文件和文件夹
rm -rf .* 删除所有的隐藏文件和文件夹,但是不会删除系统自定义的当前目录和上一级目录
[root@lwq lianxi]# rm -rf .*
rm: refusing to remove "." or ".." directory: skipping "."
rm: refusing to remove "." or ".." directory: skipping ".."
[root@lwq lianxi]# ls -a
.   create_dir.sh   guangdong  hello    hello.py  shandong     yue
..  create_file.sh  hebei      hello.c  hunan     xiaowei.txt
[root@lwq lianxi]#
危险的操作: 打死都不要去执行,会删除整个linux里的文件和文件夹
rm -rf /*
[root@lb2 feng]# cd  /
[root@lb2 /]# rm  -rf *
cp
复制文件和文件夹的命令
复制后,自动粘贴
[root@lb1 hunan]# mkdir  /china3
[root@lb1 hunan]# cd  /china3
[root@lb1 china3]# ls
[root@lb1 china3]# pwd
/china3
[root@lb1 china3]# cp   /etc/passwd   .
                        源文件       目的地
                        SOURCE       destination
[root@lb1 china3]# ls
passwd
[root@lb1 china3]#

[root@lb1 china3]# cp  --help   查看cp的使用方法
[root@lb1 china3]# man  cp   查看cp命令的手册
		q退出  quit
[root@lb1 china3]# rm --help
[root@lb1 china3]# mkdir --help
使用cp命令时,目的地如果已存在文件,会询问是否覆盖
[root@lb1 china3]# cp /etc/hosts  .
cp:是否覆盖"./hosts"? y
[root@lb1 china3]# cp /etc/hosts  .
cp:是否覆盖"./hosts"? n
[root@lb1 china3]#
原因:设置了别名cp=‘cp -i’
alias cp='cp -i'
-i, --interactive 交互式–》一问一答
prompt before overwrite (overrides a previous -n option)
cp命令的使用
1.复制文件
文件存放到文件夹(目录)
相对路径
[root@lb1 china3]# mkdir  hunan
[root@lb1 china3]# ls
boot  hosts  hunan  passwd
[root@lb1 china3]# touch liyili.txt
[root@lb1 china3]# ls
boot  hosts  hunan  liyili.txt  passwd
[root@lb1 china3]# cp  liyili.txt  hunan
[root@lb1 china3]# ls hunan
liyili.txt
绝对路径
[root@lb1 china3]# cp  /etc/passwd  /china3/hunan/
[root@lb1 china3]# cp  /etc/hostname   .
.代表当前目录
[root@lb1 china3]# ls
boot  hostname  hosts  hunan  liyili.txt  passwd
复制粘贴重命名一步到位
当目的目录中不存在指定目录文件时为重命名文件,存在时粘贴到子目录下
hunan文件目录下没有lyl.txt文件,所以此时为重命名
[root@lb1 china3]# cp liyili.txt hunan/lyl.txt 将当前目录下的liyilin.txt复制到hunan文件夹里改名为lyl.txt
[root@lwq china3]# ls
boot  hostname  hosts  hunan  liyili.txt  passwd  sc-hosts
[root@lwq china3]# cp passwd sc-passwd
[root@lwq china3]# ls
boot  hostname  hosts  hunan  liyili.txt  passwd  sc-hosts  sc-passwd
[root@lwq china3]#
2.复制多个文件
[root@lb1 china4]# cp dengchao1.txt  dengchao2.txt dengchao3.txt  deng
	                         前面的都是源文件                         目的地
[root@lwq china4]# cp sc-name dengchao{1..8}.txt deng
[root@lwq china4]# ls deng
dengchao1.txt  dengchao3.txt  dengchao5.txt  dengchao7.txt  sc-name
dengchao2.txt  dengchao4.txt  dengchao6.txt  dengchao8.txt
[root@lwq china4]#
3.复制文件夹
-r 复制文件夹的时候需要接的
-R, -r, --recursive 递归复制–》每一层子文件夹里的都复制 --》祖祖辈辈
copy directories recursively
[root@lwq china4]# cp dengchao yueyang
cp: 略过目录"dengchao"
[root@lb1 china4]# cp -r  dengchao  yueyang
[root@lb1 china4]# cp  dengchao  yueyang/dc -r  复制粘贴重命名
4.复制多个文件夹或者文件
[root@lb1 china4]# cp deng  dengchao yueyang/  sc-name   hunan -r
                        多个源文件和文件夹                           目的地
[root@lb1 china4]# cp dengchao/*  hubei -r 复制dengchao文件夹里的所有的文件或者文件夹 到hubei目录下,但是不复制dengchao文件夹
练习3:

练习4:

5.复制如何直接覆盖,不给予提醒
[root@lb1 jindafu]# alias  系统里已经定义了别名 cp='cp -i'
alias cp='cp -i'
[root@lb1 jindafu]# cp /etc/passwd .
cp:是否覆盖"./passwd"? y
[root@lb1 jindafu]#
 不想看到交互式的提醒,本质上就是不使用 -i 选项
方法1:取消别名
[root@lb1 jindafu]# unalias cp
[root@lb1 jindafu]# cp  /etc/passwd .
[root@lb1 jindafu]# cp  /etc/passwd .
[root@lb1 jindafu]# cp  /etc/passwd .
[root@lb1 jindafu]#
2.使用cp命令的绝对路径 --》推荐
首先通过which命令查看cp命令所在文件夹,再使用绝对路径复制文件
[root@lwq /]# which cp
alias cp='cp -i'
	/usr/bin/cp
[root@lb1 wuxia]# /usr/bin/cp /etc/passwd .
/usr --》存放linux下的安装了的程序的目录—》c:\program files
unix system resource --》linux 山寨的unix --》linux is very like unix
bin -->binary 二进制
linux系统里的绝大多数的命令,都是使用c语言编写–》编译二进制文件
/usr/bin 目录存放了我们很多的基本的linux命令
为什么使用绝对路径就可以绕过别名?
因为shell解释器在进行命令的解析的过程中绕过别名,因为我们没有使用别名,不进行别名的解析

例如cp /etc/passwd命令,首先shell解释器将指令分为命令,参数,选项三个部分,每个部分就是一个token
当检测到命令是别名时,可以继续划分为几个token

shell解释器
在终端里输入mkdir yangyongjie 命令回车,背后发生了什么?
操作的系统的知识: shell解释器,创建进程,进程的调度,磁盘的访问(文件系统)
file
file — determine file type
file 文件:查看文件类型
[root@lwq /]# file wuxia
wuxia: directory
[root@lwq /]# file /etc/passwd
/etc/passwd: ASCII text
du
du - estimate file space usage 计算文件使用空间
disk usage 磁盘使用情况
查看文件大小
-h, --human-readable 以人类看得懂的方式
print sizes in human readable format (e.g., 1K 234M 2G)
-s, --summarize 统计文件大小
display only a total for each argument
[root@lwq /]# du -sh /usr
983M	/usr
[root@lwq /]# du -s /usr
1005576	/usr
ll也可以查看文件大小,但是不够精确
[root@lwq /]# ll -h /usr
总用量 120K
mv
mv 移动或者重命名
移动--》剪切
move
 mv - move (rename) files
1.当后面接的文件存在就是移动
移动单个文件
移动多个文件
[root@lwq china5]# mv shenjiemi hunan
						源文件		目的地
[root@lwq china5]# ls hunan
shenjiemi
[root@lb1 china5]# mv lijunlin wang*.txt hunan
2.当后面接的文件不存在就是重命名
[root@lb1 china5]# touch  liyongqian
[root@lb1 china5]# ls
hubei  liyongqian
[root@lb1 china5]# mv  liyongqian   liwenqian
[root@lb1 china5]# mv e hubei

[root@lb1 china5]# mv   hubei   liwenqian      beijing
                      多个文件和文件夹移动       目的地
/dev/null
/dev/null 是linux系统里的黑洞文件,任何的内容往这个文件里输入都不保存,直接删除
将内容输出到/dev/null文件时,文件直接消失
rm
rm 删除
-rf 强制删除,不经过回收站
回收站: 临时存放文件或者文件夹的地方–》文件夹
编写脚本实现回收站功能
自己编写一个程序(脚本),实现回收站的功能
1.临时存放数据–》剪切过来 --》mv
2.记录了当时文件的路径,方便恢复–》记录当时的文件的路径到一个文件里,在恢复的时候查询使用
rm --》mv_back.sh -->mv
1.临时存放数据–》剪切过来 --》mv
1.编写脚本mv_back.sh
[root@lb1 china5]# vim  mv_back.sh
#!/bin/bash

#新建回收站目录
mkdir  -p  /backup
#剪切功能
mv   $1  /backup
2.授予可执行权限
chmod +x mv_back.sh
3.将脚本复制到PATH变量对应的某一个文件夹
cp  mv_back.sh  /usr/bin
4.定义别名rm等于mv_back.sh
alias  rm='mv_back.sh'
5.直接使用
rm   /china2
[root@lb1 china5]# ls -l
总用量 8
-rwxr-xr-x 1 root root  87 3月  20 15:07 mv_back.sh
-rw-r--r-- 1 root root 116 3月  20 15:10 post_var.sh
[root@lb1 china5]#

r 读  read
w 写  write
x 执行 execute  运行程序
#剪切功能
mv $1 /backup
$1 是位置变量 第1个位置变量 --》作用:就是往脚本里传递参数
[root@lb1 china5]# vim  post_var.sh

[root@lb1 china5]# cat post_var.sh
#!/bin/bash

echo  "第1个位置变量是 $1"
echo  "第2个位置变量是 $2"
echo  "第3个位置变量是 $3"
[root@lb1 china5]# bash post_var.sh  siyuxiang xiaowei yaolifan  执行脚本往里面传递3个参数
第1个位置变量是 siyuxiang
第2个位置变量是 xiaowei
第3个位置变量是 yaolifan
linux里输入的命令到哪里去查找了?
PATH变量: 定义了linux里哪些地方(目录)存放命令的
[root@lwq china5]# echo $PATH
/usr/local/sbin:/usr/local/bin:/usr/sbin:/usr/bin:/root/bin

[root@lb1 ~]# env  使用env查看PATH变量的定义
PATH=/usr/local/sbin:/usr/local/bin:/usr/sbin:/usr/bin:/root/bin:/usr/local/sclilin99/sbin:/root/bin
将脚本复制到PATH变量对应的某一个文件夹
cp mv_back.sh /usr/bin
[root@lb1 china5]# cp  mv_back.sh /usr/bin/  复制mv_back.sh到PATH变量的目录下
[root@lb1 china5]#
定义别名
[root@lb1 china5]# alias rm='mv_back.sh' 定义别名
[root@lb1 china5]# ls
guangdong  mv_back.sh  post_var.sh
[root@lb1 china5]# rm guangdong
[root@lb1 china5]# ls /backup
beijing  china  guangdong  luoyawei  shenzhen  yang
2.记录了当时文件的路径,方便恢复–》记录当时的文件的路径到一个文件里,在恢复的时候查询使用
>输出重定向
>输出重定向: 将在屏幕上的输出写到文件里 --》改变了内容的输出方向,将本来往屏幕输出的内容,重新改变方向写到文件里
如果后面接的文件不存在会帮助新建,如果存在就会覆盖原来的内容
2>
表示错误输出重定向,只把错误的结果输入到指定文件中
[root@lier lianxi]# which llasdf
/usr/bin/which: no llasdf in (/usr/local/sbin:/usr/local/bin:/usr/sbin:/usr/bin:/root/bin)
[root@lier lianxi]# which ldfsf 2>/dev/null

[root@lier lianxi]# which ldfsf 1>/dev/null
/usr/bin/which: no ldfsf in (/usr/local/sbin:/usr/local/bin:/usr/sbin:/usr/bin:/root/bin)
1>
表示正确输出重定向,只把正确的结果输入到指定文件
[root@lier lianxi]# which ip 1>/dev/null
[root@lier lianxi]# which ip
/usr/sbin/ip

[root@lier lianxi]# which ip 2>/dev/null
/usr/sbin/ip
&>
无论结果是否成功都输入到指定文件
[root@lier lianxi]# which ip &>/dev/null
[root@lier lianxi]# which ldfsf &>/dev/null
>>追加输出重定向
>>追加输出重定向: 将在屏幕上的输出写到文件里
如果后面接的文件不存在会帮助新建,如 果存在就不会覆盖原来的内容,只是在文件的末尾追加内容
[root@lwq china5]# echo 12345 >sanchuang.txt
[root@lwq china5]# cat sanchuang.txt
12345
[root@lwq china5]# echo hunan nongda >sanchuang.txt
hunan nongda
直接使用>,清除文件内的内容
[root@lwq china5]# >sanchuang.txt 清空文件sc.txt里的内容,不删除文件
[root@lwq china5]# cat sanchuang.txt
[root@lwq china5]#
[root@lwq china5]# echo 123456 >>sanchuang.txt
[root@lwq china5]# cat sanchuang.txt
123456
[root@lwq china5]# echo hunan nongda >>sanchuang.txt
[root@lwq china5]# cat sanchuang.txt
123456
hunan nongda
wc
wc - print newline, word, and byte counts for
each file
用于计算文件的行数、字数、Byte数
[root@lwq network-scripts]# cat /etc/passwd|wc
     39      61    1780
wc -l
计算文件的行数
[root@lwq network-scripts]# cat /etc/passwd|wc -l
39
wc -w
计算文件的字数
[root@lwq network-scripts]# cat /etc/passwd|wc -w
61
wc -c
计算文件的字节数
[root@lwq network-scripts]# cat /etc/passwd|wc -c
1780
| 管道符
[root@lb1 backup]# cat filepath.txt |grep yunnan    查找包含yunnan的行

/china5/yunnan/
[root@lb1 backup]#
| 管道 pipe : 将前面命令的输出送给后面的命令作为输入 --》中间人,连接2个命令 --》借花献佛
实现进程和进程之间通信的
grep
grep 文本过滤功能
[root@lb1 backup]# cat  /etc/passwd|grep dengchao
dengchao:x:1001:1001::/home/dengchao:/bin/bash
[root@lb1 backup]#
grep -v
过滤出没有指定字符串的指令
[root@lwq network-scripts]# arp -a|grep -v 'incomplete'
? (192.168.1.2) at 00:50:56:f8:df:64 [ether] on eno16777736
? (192.168.1.1) at 00:50:56:c0:00:08 [ether] on eno16777736
? (192.168.1.254) at 00:50:56:f5:ff:5d [ether] on eno16777736
grep -o
只过滤出指定的字符串,并且单独成行
[root@lwq network-scripts]# cat /etc/passwd|grep -o 'bash'
bash
bash
bash
bash
bash
bash
bash
bash
bash
bash
bash
bash
bash
bash
bash
bash
bash
bash
bash
练习
统计/etc/passwd文件中’bash’出现了多少次
[root@lwq network-scripts]# cat /etc/passwd|grep -o 'bash'|wc -l
19
$ 代表以什么结尾 bash$ 以bash结尾的行
^ 代表以什么开头 ^bash 以bash开头的行
[root@master ~]# cat  /etc/passwd|grep ^root
root:x:0:0:root:/root:/bin/bash
root123:x:1010:1010::/home/root123:/bin/bash
[root@master ~]# cat  /etc/passwd|grep "bash$"
root:x:0:0:root:/root:/bin/bash
dengchao:x:1001:1001::/home/dengchao:/bin/bash
duanyouxu:x:1002:1002::/home/duanyouxu:/bin/bash
liuqingtian:x:1003:1003::/home/liuqingtian:/bin/bash
liwenqian:x:1004:1004::/home/liwenqian:/bin/bash
hejin:x:1005:1005::/home/hejin:/bin/bash
cat
cat 查看文件里的内容
cat - concatenate files and print on the standard output
1.concatenate 拼接多个文件
2.输出文件里的内容到屏幕
	standard output  标准输出  输出到屏幕
	standard input  标准输入  从键盘输入


   -n, --number
          number all output lines
ls 查看文件夹里的内容
[root@lb1 china5]# cat -n yangyongjie.txt
     1	yangyongjie
     2	yiyang
     3	pangge
     4
[root@lb1 china5]#
[root@lb1 china5]# cat sc.txt  yangyongjie.txt  mv_back.sh  >3.txt 将多个文件的内容按照顺序读取输出到屏幕 ,然后使用重定向保存到文件3.txt里


[root@lb1 china5]# cat 3.txt
xiaowei
yangyongjie
yiyang
pangge

#!/bin/bash

#新建回收站目录
mkdir  -p  /backup
#剪切功能
mv   $1  /backup
#保存位置变量--》文件或者文件夹的路径
echo $1 >>/backup/filepath.txt
练习
编写一个脚本bigfile.sh 往文件sc.txt里写入1000行内容,具体内容下:
i am learning linux in sanchuang sc1
i am learning linux in sanchuang sc2
i am learning linux in sanchuang sc3
…
i am learning linux in sanchuang sc1000
需求分析:
>>
for
变量的定义和使用
[root@lwq china5]# cat bigfile.sh
#!/bin/bash

mkdir -p /china99
>/china99/sc99.txt

for i in {1..1000}
do
	echo "i am learning linux in sanchuang sc$i" >>/china99/sc99.txt
done
nl
nl 给输出的内容编号
nl - number lines of files
作用与 cat -n 相同
[root@lwq china5]# nl sc.txt
     1	i am learning linux in sanchuang sc1
     2	i am learning linux in sanchuang sc2
     3	i am learning linux in sanchuang sc3
     4	i am learning linux in sanchuang sc4
     5	i am learning linux in sanchuang sc5
more
more - file perusal filter for crt viewing
more命令
用途:全屏方式分页显示文件内容
交互操作方法:
按Enter键向下逐行滚动
按空格键向下翻一屏、按b键向上翻一屏 back
按q键退出 quit
会自动退出
less
less - opposite of more
more和less都是按页查看文件
用途:与more命令相同,但扩展功能更多
交互操作方法:
按Enter键向下逐行滚动
按空格键向下翻一屏、按b键向上翻一屏 back
按q键退出 quit
【page down】【page up】上翻下翻页
不会自动退出
head
默认查看文件的前10行
-5
-n 5
[root@lb1 china99]# head -n 5 sc99.txt
I am learning linux in sanchuang sc1
I am learning linux in sanchuang sc2
I am learning linux in sanchuang sc3
I am learning linux in sanchuang sc4
I am learning linux in sanchuang sc5
tail
默认查看文件的后10行
[root@lb1 china99]# tail -5 sc99.txt
I am learning linux in sanchuang sc9996
I am learning linux in sanchuang sc9997
I am learning linux in sanchuang sc9998
I am learning linux in sanchuang sc9999
I am learning linux in sanchuang sc10000
显示5~20行
[root@lb1 china99]# head -20 sc99.txt|tail -16

[root@lb1 china99]# head -8 sc99.txt|tail -1
I am learning linux in sanchuang sc8
tail -n +3 文件名 : 将文件的第三行到末尾输出
[root@web1 ~]# tail -n +3 /etc/passwd  从第3行开始到末尾
[root@web1 ~]# tail -n 3 /etc/passwd  取文件的最后3行
[root@web1 ~]# tail -n -3 /etc/passwd  取文件的最后3行
[root@web1 ~]# tail -3 /etc/passwd  取文件的最后3行
[root@lwq ~]# df -Th|tail -n +2
/dev/mapper/centos-root xfs        18G  1.8G   16G   10% /
devtmpfs                devtmpfs  903M     0  903M    0% /dev
tmpfs                   tmpfs     913M     0  913M    0% /dev/shm
tmpfs                   tmpfs     913M  8.7M  904M    1% /run
tmpfs                   tmpfs     913M     0  913M    0% /sys/fs/cgroup
/dev/sda1               xfs       497M  125M  373M   25% /boot
tmpfs                   tmpfs     183M     0  183M    0% /run/user/0
tail -f
可以用来动态监控日志文件的变化
日志文件: 记录程序发生了哪些事情的文件 log —》日记
log 日志: 程序发生的事情
linux系统里有很多的日志文件存放在/var/log目录
/var --》 variable 可变化的 --》这个目录里存放经常变化的东西
动态监控文件末尾的变化,如果有新的内容,就会立马显示
先在一个终端中开始监控
[root@lwq siyuxiang]# tail -f siyuxiang.txt
再打开另外一个终端向文件内写入内容,查看监控情况
使用追加输出重定向写东西
[root@lwq siyuxiang]# cat test.sh
#!/bin/bash

for i in {1..10}
do
	echo "duanyouxu$i" >>siyuxiang.txt
done
[root@lwq siyuxiang]# bash test.sh
[root@lwq siyuxiang]# tail -f siyuxiang.txt
duanyouxu1
duanyouxu2
duanyouxu3
duanyouxu4
duanyouxu5
duanyouxu6
duanyouxu7
duanyouxu8
duanyouxu9
duanyouxu10
按ctrl+c强行终止,退出
ps
查看Linux中的进程,ps命令查看的是Linux系统中一瞬间的所有进程
ps 是命令
ps - report a snapshot of the current processes. 将当前所有的进程快照报告给我看看
ps aux
ps aux 是查看当前linux系统里的运行的进程
ps - report a snapshot of the current processes.
a 显示所有用户的进程(show processes for all users) u 显示用户(display the process’s user/owner) x 显示无控制终端的进程(also show processes not attached to a terminal)
[root@lb1 china99]# ps aux  查看当前linux里的进程的信息的
USER       PID %CPU %MEM    VSZ   RSS TTY      STAT START   TIME COMMAND
root         1  0.0  0.2 191056  4104 ?        Ss   3月19   0:31 /usr/lib/systemd/systemd --switched-root --system --deseria
root         2  0.0  0.0      0     0 ?        S    3月19   0:00 [kthreadd]
root         4  0.0  0.0      0     0 ?        S<   3月19   0:00 [kworker/0:0H]
1、USER 哪个用户启动了这个命令
2、PID 进程ID
3、 CPU占用率
4、MEM 内存使用量
5、VSZ 如果一个程序完全驻留在内存的话需要占用多少内存空间
6、RSS 当前实际占用了多少内存
7、TTY: 终端的次要装置号码 (minor device number of tty)
8、STAT 进程当前的状态(“S”:中断 sleeping,进程处在睡眠状态,表明这些进程在等待某些事件发生–可能是用户输入或者系统资源的可用性;“D”:不可中断 uninterruptible sleep;“R”:运行 runnable;“T”:停止 traced or stopped;“Z”:僵死 a defunct zombie process)
9、START 启动命令的时间点
10、TIME 进程执行起到现在总的CPU暂用时间
11、COMMAND 启动这个进程的命令1、USER 哪个用户启动了这个命令
2、PID 进程ID
3、 CPU占用率
4、MEM 内存使用量
5、VSZ 如果一个程序完全驻留在内存的话需要占用多少内存空间
6、RSS 当前实际占用了多少内存
7、TTY: 终端的次要装置号码 (minor device number of tty)
8、STAT 进程当前的状态(“S”:中断 sleeping,进程处在睡眠状态,表明这些进程在等待某些事件发生–可能是用户输入或者系统资源的可用性;“D”:不可中断 uninterruptible sleep;“R”:运行 runnable;“T”:停止 traced or stopped;“Z”:僵死 a defunct zombie process)
9、START 启动命令的时间点
10、TIME 进程执行起到现在总的CPU暂用时间
11、COMMAND 启动这个进程的命令
ps -ef
e 显示所有用户的进程(all processes)此参数的效果和指定"a"参数相同 f 用ASCII字符显示树状结构,表达程序间的相互关系(ASCII art forest)
[root@lier ~]# ps -ef
UID         PID   PPID  C STIME TTY          TIME CMD
root          1      0  0 09:16 ?        00:00:02 /usr/lib/systemd/systemd --switched-root --system --deserialize 22
root          2      0  0 09:16 ?        00:00:00 [kthreadd]
root          4      2  0 09:16 ?        00:00:00 [kworker/0:0H]
root          5      2  0 09:16 ?        00:00:01 [kworker/u256:0]
1、UID 用户号
2、PID 进程ID
3、PPID 父进程号
4、C CPU占用率
5、TTY 终端的次要装置号码 (minor device number of tty)
6、TIME 进程执行起到现在总的CPU暂用时间
7、COMMAND 启动这个进程的命令
[root@lb1 china99]# ps aux|more 翻页查看
[root@master 417]# ps  aux|grep sshd
root     29404  0.0  0.1 161512  6096 ?        Ss   10:43   0:00 sshd: root@pts/1
root     38320  0.0  0.1 112900  4324 ?        Ss   11:13   0:00 /usr/sbin/sshd -D
root     38517  0.0  0.0 112828   988 pts/1    S+   11:13   0:00 grep --color=auto sshd
root     60071  0.0  0.1 161512  6096 ?        Ss   08:52   0:00 sshd: root@pts/0
[root@master 417]# ps  aux|grep chrony
chrony   33948  0.0  0.0 100496  1432 ?        S    10:58   0:00 /usr/sbin/chronyd
root     38566  0.0  0.0 112824   988 pts/1    S+   11:14   0:00 grep --color=auto chrony
[root@master 417]# ps  aux|grep chronyd
chrony   33948  0.0  0.0 100496  1432 ?        S    10:58   0:00 /usr/sbin/chronyd
root     38586  0.0  0.0 112824   988 pts/1    S+   11:14   0:00 grep --color=auto chronyd
[root@master 417]#
sed
[root@lb1 china99]# sed  -n '1p;3p;6p;9p' sc99.txt
I am learning linux in sanchuang sc1
I am learning linux in sanchuang sc3
I am learning linux in sanchuang sc6
I am learning linux in sanchuang sc9
[root@lb1 china99]#
sed 可以实现查找功能
-n 不符合要求的行,不显示
1p 打印第1行 print
; 命令连接符号,先执行前面的命令,然后再执行后面的命令 --》同时在sed里执行多条命令时候,需要接;
显示连续的行
[root@lb1 china99]# sed  -n '5,12p' sc99.txt
I am learning linux in sanchuang sc5
I am learning linux in sanchuang sc6
I am learning linux in sanchuang sc7
I am learning linux in sanchuang sc8
I am learning linux in sanchuang sc9
I am learning linux in sanchuang sc10
I am learning linux in sanchuang sc11
I am learning linux in sanchuang sc12
[root@lb1 china99]#
练习


ln
桌面的qq图标—》“C:\Program Files (x86)\Tencent\QQ\Bin\QQScLauncher.exe”
快捷方式–》替身
ln --》link 链接
一个文件链接到另外一个文件
符号链接=软链接
-s symbol link --》soft link
创建链接文件可以给文件或者文件夹,都可以创建
[root@nfs hunantv]# ls
haiquan  wanghan
[root@nfs hunantv]# ln -s  wanghan    hanhan
                            源文件   链接文件
[root@nfs hunantv]# ls
haiquan  hanhan  wanghan
[root@nfs hunantv]# ls -l
总用量 0
drwxr-xr-x 4 root root 35 3月  22 19:30 haiquan
lrwxrwxrwx 1 root root  7 3月  22 19:35 hanhan -> wanghan
drwxr-xr-x 2 root root 42 3月  22 19:29 wanghan
[root@nfs hunantv]#
pwd -P 查看当前目录的物理地址
-P, --physical
avoid all symlinks 不要显示符号链接的路径,显示真正的物理路径
[root@nfs hanhan]# pwd
/hunantv/hanhan
[root@nfs hanhan]# pwd -P
/hunantv/wanghan
[root@nfs hanhan]#
删除源文件会导致链接文件失效
[root@nfs hunantv]# rm -rf wanghan  删除源文件会导致链接文件失效
[root@nfs hunantv]# ls
haiquan  hanhan
[root@nfs hunantv]# cd hanhan
-bash: cd: hanhan: 没有那个文件或目录
[root@nfs hunantv]#
history
查看使用过的历史命令,只能查看最近的一千条命令,超过一千条会删除前面的命令
[root@lwq siyuxiang]# history
22 cd
23 ip add
24 ls
25 cd /lianxi
26 ls
27 sg=kkk
28 sg1=jjj
29 echo $sg
30 echo $sg1
31 echo $sg $sg1
32 $PS1
33 echo $PS1
34 set
````````````
1006 ls
1007 ln -s passwd pass
1008 ls
1009 cd pass
1010 pwd -P pass
1011 cd
1012 df -Th|tail -n +2
1013 cd /
1014 ls
1015 cd /siyuxiang/
1016 ls
1017 tail -f siyuxiang.txt
1018 rm -rf siyuxiang.txt
1019 touch siyuxiang.txt
1020 tail -f siyuxiang.txt
1021 history
!number 执行第多少条历史命令
!100 执行第100条历史命令
[root@web1 siyuxiang]# !111   --》执行111条历史命令 --》偷懒--》提升效率
bash count_word.sh  /etc/passwd  chen
/etc/passwd文件里 chen 出现了 6 次
[root@web1 siyuxiang]#
!string 执行最近以string开头的命令
!bash 执行最近的一条命令以bash开头的
[root@lwq siyuxiang]# !df
df -Th|tail -n +2
/dev/mapper/centos-root xfs        18G  1.8G   16G   10% /
devtmpfs                devtmpfs  903M     0  903M    0% /dev
tmpfs                   tmpfs     913M     0  913M    0% /dev/shm
tmpfs                   tmpfs     913M  8.7M  904M    1% /run
tmpfs                   tmpfs     913M     0  913M    0% /sys/fs/cgroup
/dev/sda1               xfs       497M  125M  373M   25% /boot
tmpfs                   tmpfs     183M     0  183M    0% /run/user/0
[root@lwq siyuxiang]#
上下方向键–》调到以前的历史命令
$?
显示上一个命令是否执行成功,如果成功就返回0,返回其他值就不成功
[root@lwq lianxi]# ping 192.168.153.1 -c 1 -w 1
PING 192.168.153.1 (192.168.153.1) 56(84) bytes of data.
64 bytes from 192.168.153.1: icmp_seq=1 ttl=128 time=0.318 ms

--- 192.168.153.1 ping statistics ---
1 packets transmitted, 1 received, 0% packet loss, time 0ms
rtt min/avg/max/mdev = 0.318/0.318/0.318/0.000 ms
[root@lwq lianxi]# echo $?
0
[root@lwq lianxi]# ping 192.168.152.1 -c 1 -w 1
PING 192.168.152.1 (192.168.152.1) 56(84) bytes of data.


--- 192.168.152.1 ping statistics ---
1 packets transmitted, 0 received, 100% packet loss, time 0ms

[root@lwq lianxi]#
[root@lwq lianxi]# ping 192.168.152.1 -c 1 -w 1
PING 192.168.152.1 (192.168.152.1) 56(84) bytes of data.

--- 192.168.152.1 ping statistics ---
2 packets transmitted, 0 received, 100% packet loss, time 999ms

[root@lwq lianxi]# echo $?
1
ping
ping, ping6 - send ICMP ECHO_REQUEST to
network hosts
查看网络是否连通,如果连通,linux中默认一直发送数据包,Windows中默认发送4个
[root@lwq lianxi]# ping 192.168.153.1
PING 192.168.153.1 (192.168.153.1) 56(84) bytes of data.
64 bytes from 192.168.153.1: icmp_seq=1 ttl=128 time=0.272 ms
64 bytes from 192.168.153.1: icmp_seq=2 ttl=128 time=0.367 ms
64 bytes from 192.168.153.1: icmp_seq=3 ttl=128 time=0.660 ms
64 bytes from 192.168.153.1: icmp_seq=4 ttl=128 time=2.76 ms
64 bytes from 192.168.153.1: icmp_seq=5 ttl=128 time=1.00 ms
64 bytes from 192.168.153.1: icmp_seq=6 ttl=128 time=2.57 ms
^C
--- 192.168.153.1 ping statistics ---
6 packets transmitted, 6 received, 0% packet loss, time 5005ms
rtt min/avg/max/mdev = 0.272/1.274/2.765/1.016 ms
[root@lwq lianxi]#
-c count
Stop after sending count
ECHO_REQUEST packets.
接-c时发送完指定数量的数据包就停止发送
[root@lwq lianxi]# ping 192.168.153.1 -c 1
PING 192.168.153.1 (192.168.153.1) 56(84) bytes of data.
64 bytes from 192.168.153.1: icmp_seq=1 ttl=128 time=0.311 ms

--- 192.168.153.1 ping statistics ---
1 packets transmitted, 1 received, 0% packet loss, time 0ms
rtt min/avg/max/mdev = 0.311/0.311/0.311/0.000 ms
[root@lwq lianxi]#
-w deadline
设置一个期限,当到达某一个时间期限时停止发包
[root@lwq ~]# ping 101.34.233.230 -w 1 -c 4
PING 101.34.233.230 (101.34.233.230) 56(84) bytes of data.
64 bytes from 101.34.233.230: icmp_seq=1 ttl=128 time=168 ms

--- 101.34.233.230 ping statistics ---
1 packets transmitted, 1 received, 0% packet loss, time 0ms
rtt min/avg/max/mdev = 168.884/168.884/168.884/0.000 ms
-W timeout
Time to wait for a response, in
seconds.
只等待固定时间
-w和-W都是指定发送数据包使用的时间,可以节省时间
[root@lwq ~]# ping 101.34.233.230 -W 1 -c 4
PING 101.34.233.230 (101.34.233.230) 56(84) bytes of data.
64 bytes from 101.34.233.230: icmp_seq=1 ttl=128 time=170 ms
64 bytes from 101.34.233.230: icmp_seq=2 ttl=128 time=36.7 ms
64 bytes from 101.34.233.230: icmp_seq=3 ttl=128 time=219 ms
64 bytes from 101.34.233.230: icmp_seq=4 ttl=128 time=32.1 ms

--- 101.34.233.230 ping statistics ---
4 packets transmitted, 4 received, 0% packet loss, time 3007ms
rtt min/avg/max/mdev = 32.156/114.929/219.847/82.309 ms
-s
设置发送的数据包大小
[root@lwq ~]# ping 101.34.233.230 -s 1000 -c 4
PING 101.34.233.230 (101.34.233.230) 1000(1028) bytes of data.
1008 bytes from 101.34.233.230: icmp_seq=1 ttl=128 time=252 ms
1008 bytes from 101.34.233.230: icmp_seq=2 ttl=128 time=74.2 ms
1008 bytes from 101.34.233.230: icmp_seq=3 ttl=128 time=39.2 ms
1008 bytes from 101.34.233.230: icmp_seq=4 ttl=128 time=147 ms

--- 101.34.233.230 ping statistics ---
4 packets transmitted, 4 received, 0% packet loss, time 3006ms
rtt min/avg/max/mdev = 39.210/128.373/252.526/81.632 ms
[root@lwq ~]# ping 101.34.233.230 -c 4
PING 101.34.233.230 (101.34.233.230) 56(84) bytes of data.
64 bytes from 101.34.233.230: icmp_seq=1 ttl=128 time=297 ms
64 bytes from 101.34.233.230: icmp_seq=2 ttl=128 time=326 ms
64 bytes from 101.34.233.230: icmp_seq=3 ttl=128 time=168 ms
64 bytes from 101.34.233.230: icmp_seq=4 ttl=128 time=334 ms

--- 101.34.233.230 ping statistics ---
4 packets transmitted, 4 received, 0% packet loss, time 3006ms
rtt min/avg/max/mdev = 168.330/281.565/334.290/66.842 ms
ping命令的作用
1.测试网络的连通性
2.测试网络的质量,通过丢包率,响应时间长短判断
arp
将ip地址转换为mac地址
arp -a
查看当前局域网内的ip地址和mac地址
[root@lwq network-scripts]# arp -a
? (192.168.1.2) at 00:50:56:f8:df:64 [ether] on eno16777736
? (192.168.1.1) at 00:50:56:c0:00:08 [ether] on eno16777736
? (192.168.1.254) at 00:50:56:f5:ff:5d [ether] on eno16777736
awk
截取字段
awk ‘{[pattern] action}’ {filenames} # 行匹配语句 awk ” 只能用单引号
字段是被空白分隔开的,所以一个空白就是一个分隔符
输出文本中的1、4项 $ awk ‘{print $1,$4}’ log.txt
字段 field --》一段字符串
分隔符 --》分开,隔离的符号 --》默认的分隔符是空白 --》awk
空白: 空格、tab、回车
1 2 3
1 2 3 4 (字段就有:1、2、3、4)
输入分隔符 --》空白
输出分隔符 --》默认是一个空格
指定输出分隔符是,
print 是awk内部的一个输出命令
awk 是一门语言
[root@lier ~]# df -h|grep "/$"
/dev/mapper/centos-root 18G 3.1G 15G 18% /
[root@lier ~]# df -h|grep "/$"|awk '{print $5}'
18%
```
$5表示截取第5个字段[root@lwq network-scripts]# arp -a|awk '{print $2,$4}'
(192.168.1.2) 00:50:56:f8:df:64
(192.168.1.1) 00:50:56:c0:00:08
(192.168.1.254) 00:50:56:f5:ff:5d
tr
用于转换或删除文件中的字符
tr 是一个字符串的处理命令
-d 指定删除的字符串 delete
[root@lwq network-scripts]# arp -a|awk '{print $2,$4}'|tr -d '()'
192.168.1.2 00:50:56:f8:df:64
192.168.1.1 00:50:56:c0:00:08
192.168.1.254 00:50:56:f5:ff:5d
[root@lier ~]# df -h|grep "/$"
/dev/mapper/centos-root   18G  3.1G   15G   18% /
[root@lier ~]# df -h|grep "/$"|awk '{print $5}'
18%
[root@lier ~]# df -h|grep "/$"|awk '{print $5}'|tr -d "%"
18
top
top - display Linux processes
动态的显示当前系统里的进程的使用情况(cpu,内存,进程信息),类似于Windows系统中的任务管理器
按q退出查看
[root@lier ~]# top
top - 17:10:27 up  7:53,  3 users,  load average: 0.00, 0.01, 0.05
Tasks: 113 total,   1 running, 112 sleeping,   0 stopped,   0 zombie
%Cpu(s):  0.0 us,  0.2 sy,  0.0 ni, 99.8 id,  0.0 wa,  0.0 hi,  0.0 si,  0.0 st
KiB Mem :  1862996 total,  1152184 free,   283440 used,   427372 buff/cache
KiB Swap:  2097148 total,  2097148 free,        0 used.  1408316 avail Mem

   PID USER      PR  NI    VIRT    RES    SHR S  %CPU %MEM     TIME+ COMMAND
 10175 root      20   0  162084   2224   1556 R   0.7  0.1   0:00.03 top
     9 root      20   0       0      0      0 S   0.3  0.0   0:08.35 rcu_sched
    50 root      20   0       0      0      0 S   0.3  0.0   0:41.19 kworker/0:1
  1771 mysql     20   0  971000  88324   7148 S   0.3  4.7   1:10.44 mysqld
  1869 root      20   0   89788   2200   1164 S   0.3  0.1   0:00.68 master
PID — 进程id
USER — 进程所有者
PR — 进程优先级
NI — nice值。负值表示高优先级,正值表示低优先级
VIRT — 进程使用的虚拟内存总量,单位kb。VIRT=SWAP+RES
RES — 进程使用的、未被换出的物理内存大小,单位kb。RES=CODE+DATA
SHR — 共享内存大小,单位kb
S — 进程状态。D=不可中断的睡眠状态 R=运行 S=睡眠 T=跟踪/停止 Z=僵尸进程
%CPU — 上次更新到现在的CPU时间占用百分比
%MEM — 进程使用的物理内存百分比
TIME+ — 进程使用的CPU时间总计,单位1/100秒
COMMAND — 进程名称(命令名/命令行)
htop 有颜色的动态显示 top 命令的内容
yum provides
查看命令是通过哪个软件包安装过来的
[root@lwq ~]# yum provides locate
已加载插件:fastestmirror
Loading mirror speeds from cached hostfile
 * base: mirrors.163.com
 * epel: ftp.iij.ad.jp
 * extras: mirrors.aliyun.com
 * updates: mirrors.ustc.edu.cn
mlocate-0.26-8.el7.x86_64 : An utility for finding files by name
源    :base
匹配来源:
文件名    :/usr/bin/locate


mlocate-0.26-8.el7.x86_64 : An utility for finding files by name
源    :@base
匹配来源:
文件名    :/usr/bin/locate
安装包为mlocate
再使用命令安装
yum install mlocate
locate
模糊查找文件、文件夹
[root@lier lianxi]# locate lwq
/china5/lwq
/home/lwq
/home/lwq/.bash_history
/home/lwq/.bash_logout
/home/lwq/.bash_profile
/home/lwq/.bashrc
/jindafu/lwq
/jindafu/lwq/.bash_history
/jindafu/lwq/.bash_logout
/jindafu/lwq/.bash_profile
/jindafu/lwq/.bashrc
/lianxi/sc_lwq.sh
/lx329/lwq.py
/root/lwq
/root/lwq.txt
/root/lwq/output.sh
/var/spool/mail/lwq
/wuxia/lwq.jpg
特点:
默认是模糊查找,只要文件名里包含某个字符串就可以了
locate 不能查找到实时最新的数据,但是查找速度非常快
文件和文件夹都能查找
locate 不能查找到实时最新的数据,但是查找速度非常快
[root@master /]# locate scfeng
locate: 无法执行 stat () `/var/lib/mlocate/mlocate.db': 没有那个文件或目录
出现这个问题是因为locate命令是从mlocate.db文件中查找文件、文件夹,所以需要先生成、更新mlocate.db文件
mlocate.db 这个文件是locate命令去查找文件的数据库文件–》这个文件里存放了很多文件的路径
db --》database 数据库
精确查找
-b, --basename
Match only the base name against the specified
patterns. This is the opposite of --wholename.
格式:
To search for a file named exactly NAME (not NAME), use
locate -b ‘\NAME’
[root@lier lianxi]# locate -b "\lwq"
/china5/lwq
/home/lwq
/jindafu/lwq
/root/lwq
/var/spool/mail/lwq
updatedb
当创建了新的文件或文件夹时,再使用locate命令需要先使用updatedb命令更新mlocate.db文件
updatedb 背后其实可以理解为将我们整个linux系统里的文件或者文件夹创建了一个索引,存放在mlocate.db文件里
索引: index
相当于书本的目录,起到快速查找的内容的作用 --》帮助可以快速查询
[root@lier lianxi]# touch liwenqian.txt
[root@lier lianxi]# locate liwenqian.txt
[root@lier lianxi]# updatedb	背后其实可以理解为将我们整个linux系统里的文件或者文件夹创建了一个索引,存放在mlocate.db文件里
[root@lier lianxi]# locate liwenqian.txt
/lianxi/liwenqian.txt
stat
status,查看文件、文件夹的状态
有三个时间:
access time --》访问时间 --》atime --》cat、vim
modify time --》更改时间 --》mtime --》追加、vim --》修改文件里的内容,对内容进行增删改等
change time --》改动时间 --》ctime --》修改文件的属性: 文件有名字,大小,权限 、用户、组等 --》chmod、chown
[root@lier lianxi]# stat lier
  文件:"lier"
  大小:6         	块:0          IO 块:4096   目录
设备:fd00h/64768d	Inode:101538768   硬链接:2
权限:(0755/drwxr-xr-x)  Uid:(    0/    root)   Gid:(    0/    root)
环境:unconfined_u:object_r:default_t:s0
最近访问:2022-03-20 02:38:23.961195636 +0800
最近更改:2022-03-20 02:26:16.725174859 +0800
最近改动:2022-03-20 02:26:16.725174859 +0800
创建时间:-
新建文件或者文件夹三个时间都会修改为当前的时间
[root@lier lianxi]# touch lwq.txt
[root@lier lianxi]# stat /lianxi/lwq.txt
  文件:"/lianxi/lwq.txt"
  大小:0         	块:0          IO 块:4096   普通空文件
设备:fd00h/64768d	Inode:790661      硬链接:1
权限:(0644/-rw-r--r--)  Uid:(    0/    root)   Gid:(    0/    root)
环境:unconfined_u:object_r:default_t:s0
最近访问:2022-03-20 06:38:32.985607297 +0800
最近更改:2022-03-20 06:38:32.985607297 +0800
最近改动:2022-03-20 06:38:32.985607297 +0800
创建时间:-
test
-f 是判断文件是否存在
-d 判断目录是否存在
-n 判断字符串的长度是否不为0 nonezero
-n STRING
the length of STRING is nonzero
-z 判断字符的长度是否为0 zero
-z STRING
the length of STRING is zero
-e 判断是否存在 exist
使用test命令后,通过$?命令查看命令是否执行成功,返回0就成功,非0不成功
[root@lier lianxi]# test -f xiejiaxin.txt
[root@lier lianxi]# echo $?
0
[root@lier lianxi]# test -f saflkj
[root@lier lianxi]# echo $?
1

[root@lier lianxi]# test -d lier
[root@lier lianxi]# echo $?
0
[ ]
判断文件、文件夹是否存在
同test命令作用一样
[root@lier lianxi]# [ -f lwq.txt ]
[root@lier lianxi]# echo $?
0
[root@lier lianxi]# [ -d lier ]
[root@lier lianxi]# echo $?
0
[[ ]]
字符串的比较,[[]]和[]都可以进行字符串的比较
[[ ]] -->推荐,因为字符串里有空格也可以比较
[ ]
双中括号比较:
[root@master ~]# sg="wenke"
[root@master ~]# [[ $sg == "wenkeke"  ]]
[root@master ~]# echo $?
1
[root@master ~]#
单中括号比较:
[root@master ~]# [ $sg == "wenke"  ]
[root@master ~]# echo $?
0
[root@master ~]#
[root@master ~]# sg="wenke wenke"
[root@master ~]# [ $sg == "wenke wenke"  ]
-bash: [: 参数太多
[root@master ~]#
[root@master ~]# [[ $sg == "wenke wenke"  ]]
[root@master ~]# echo $?
0
[root@master ~]#
当字符串中有空格时,单中括号就会认为有多个变量
-f FILE		# 文件
          FILE exists and is a regular file
-d FILE		# 文件夹
          FILE exists and is a directory
 -e FILE
              FILE exists
-n STRING
          the length of STRING is nonzero
-z STRING
          the length of STRING is zero
[root@lier ~]# mn='afdafdfa'
[root@lier ~]# [ -n $mn ]	# 判断长度是否不为0
[root@lier ~]# echo $?
0

[root@lier ~]# [ -z $mn ]	# 判断长度是否为0
[root@lier ~]# echo $?
1

[root@lier ~]# [ -e $mn ]	判断文件是否存在
[root@lier ~]# echo $?
1
[root@lier ~]# [ -e /lianxi ]
[root@lier ~]# echo $?
0
find
find命令
用途:用于查找文件或目录
格式:find [查找范围] [查找条件] [动作]
常用查找条件
-name:按文件名称查找
-iname:按文件名称查找,不区分大小写
-size: 按文件大小查找
-user: 按文件属主查找
-type: 按文件类型查找
-perm :按文件权限查找
-mtime :按文件更改时间查找
-newer:按比某个文件更新的查找
特点
既能查找文件也能查找文件夹
能到整个/下查找,而且还是实时的
-name
默认是精确查找
[root@lier lianxi]# find / -name "scfeng"
[root@lier lianxi]# find / -name "scfeng.py"
/lianxi/scfeng.py
[root@lier lianxi]# find / -name "scfeng*"
/lianxi/scfeng.py
-iname
-iname pattern
Like -name, but the match is case insensitive. 大小写不敏感,不区分大小写
[root@lier lianxi]# find / -iname "xiejiaxin.txt"
/lianxi/XIEJIAXIN.TXT
/lianxi/xiejiaxin.txt
[root@lier lianxi]# find / -name "XIEJIAXIN.TXT"
/lianxi/XIEJIAXIN.TXT
-size
通过文件大小查找文件
-size 单位 k–>M–>G–>T
+10M 大于10M -->推荐
-10M 小于10M
10M 等于10M
[root@lier lianxi]# find /lianxi -size +1k
/lianxi
/lianxi/secure
/lianxi/unused_ip.txt
-a
逻辑与 and ,系统默认是与,可不加,表示只有当所给的条件都满足时,寻找条件才算满足。
[root@lier lianxi]# find / -name "lwq*" -size -1k
/var/spool/mail/lwq
/wuxia/lwq.jpg
/lianxi/lwq.txt
[root@lier lianxi]# find / -name "lwq*" -a -size -1k
/var/spool/mail/lwq
/wuxia/lwq.jpg
/lianxi/lwq.txt
-o
逻辑或 or ,只要所给的条件中有一个满足,寻找条件就算满足
[root@lier lianxi]# find / -name "lwq*" -o -size +100M 2>/dev/null/proc/kcore
/sys/devices/pci0000:00/0000:00:0f.0/resource1_wc
/sys/devices/pci0000:00/0000:00:0f.0/resource1
/root/lwq
/root/lwq.txt
/var/spool/mail/lwq
/usr/lib/locale/locale-archive
/home/lwq
/wuxia/lwq.jpg
/jindafu/lwq
/china5/lwq
/lianxi/lwq.txt
/lx329/lwq.py
-not
逻辑非 not ,在命令中可用“!”表示。该运算符表示查找不满足所给条件的文件 -->取反
-not 相当于 !
[root@master boot]# find  /boot ! -size +1M
[root@master boot]# find  /boot ! -name "sanchuang.txt"
优先级
与的优先级高于或
find /boot -name “.txt" -a -size +1k -o -name ".img” 前面两个条件先组合
[root@lier lianxi]# find  /boot  -name "*.txt" -a -size +1k  -o -name "*.img"
/boot/grub2/i386-pc/core.img
/boot/grub2/i386-pc/boot.img
/boot/initrd-plymouth.img
/boot/initramfs-0-rescue-e57b9369a2ce49149016d51c29303550.img
/boot/initramfs-3.10.0-327.el7.x86_64.img
/boot/initramfs-3.10.0-327.el7.x86_64kdump.img
type
-type
File is of type
文件类型:
普通文件 f file
目录 d directory
链接文件 l link
块设备文件 b block : 用来存放数据的文件–》是磁盘(硬盘)对应的文件–》一切皆文件
字符设备文件 c character 用来与字符的显示相关–》字符输入和输出相关的
管道文件 p pipe :实现进程和进程之间通信的–》是内存里的文件
socket文件 s socket 套接字文件 是实现进程和进程之间通信的方式,socket文件可以在磁盘里 --》槽、插线板 、套接字: 将2边的东西连接起来
mysql是一个数据库服务,用来存放数据的
文件socket: /data/mysql/mysql.sock : 实现是同一台机器上的不同进程之间通信
网络socket: 不同的机器上的不同的进程之间通信的 表现形式: ip+port 192.168.2.1.30:3306

端口号和程序的对应关系
对外提供服务的进程
服务(mysql)—》进程mysqld—》占用端口3306
root@shanghai-tea-lian:~# ps  aux|grep mysql
mysql     220607  0.1 11.8 1786444 476880 ?      Ssl  Jan21 168:18 /usr/sbin/mysqld
root      241174  0.0  0.2  21108  8880 pts/0    S+   10:28   0:00 mysql -uroot -px xxxxxxxxxxx
root      241308  0.0  0.0   6300   736 pts/1    S+   10:28   0:00 grep --color=auto mysql
root@shanghai-tea-lian:~#
root@shanghai-tea-lian:~# ll /run/mysqld/mysqld.sock
srwxrwxrwx 1 mysql mysql 0 Jan 21 18:20 /run/mysqld/mysqld.sock=
root@shanghai-tea-lian:~#
fork是一个函数,内核用来产生子进程的,复制父进程的代码产生一个子进程,这个过程就是fork
fork的过程本质上就是复制的过程
()可以提高优先级
[root@master back]# find /home -user root -type f \( -size +2k -o -name "*cali*" \)
括号前面需要有转义字符
/dev 存放设备文件的 device --》一切皆文件 ,也就是所有的硬件都会有一个文件和它对应
[root@master dev]# ll sda
brw-rw---- 1 root disk 8, 0 4月   8 09:26 sda
[root@master dev]# ll tty1
crw--w---- 1 root tty 4, 1 4月   8 09:26 tty1
[root@master dev]#
[root@master pts]# w
 10:22:25 up 13:13,  2 users,  load average: 0.13, 0.33, 0.51
USER     TTY      FROM             LOGIN@   IDLE   JCPU   PCPU WHAT
root     pts/0    192.168.2.104    08:59   41.00s  0.40s  0.40s -bash
root     pts/1    192.168.2.104    10:22    1.00s  0.06s  0.03s w
[root@master pts]# pwd
/dev/pts
[root@master pts]# ll
总用量 0
crw--w---- 1 root tty  136, 0 4月  10 10:21 0
crw--w---- 1 root tty  136, 1 4月  10 10:22 1
c--------- 1 root root   5, 2 4月   8 09:26 ptmx
[root@master pts]#
所有的与远程登录相关的终端,背后就会对应一个字符设备文件
-mmin
Measure times (for -amin, -atime, -cmin, -ctime, -mmin, and -mtime
-mmin n
File’s data was last modified n minutes ago.
以当前的时间作为参照对象
-mmin +5 5分钟之前
-mmin -5 5分钟之内
[root@master find]# find  . -mmin -5 -type f
./liu.txt
-mtime
-mtime n
File’s data was last modified n*24 hours ago.
-mtime +2 48小时前的
-mtime -2 48小时内的
[root@lier lianxi]# find . -mtime +2 -type f
./hosts
./secure
./cali.txt
./sc_lwq.sh
./a.txt
./count_word.sh
./字节一面-黎作文-冯老师讲解.txt
-newer
-newer file
File was modified more recently than file.
查找比指定文件更新的文件
[root@lier lianxi]# find . -newer ylf.txt
.
./410
./410/passwd.zip
./410/passwd
./passwd.zip
./410.zip
./410.rar
./passwd.xz
./sshd_config.gz
./lwq

[root@lier lianxi]# find . -newer ylf.txt -type f
./410/passwd.zip
./410/passwd
./passwd.zip
./410.zip
./410.rar
./passwd.xz
./sshd_config.gz
-user
-user 根据文件夹的拥有者(创建者)来查找
[duanyouxu@master ~]$ ll
总用量 0
-rw-rw-r-- 1 duanyouxu duanyouxu 0 4月  10 11:25 duan.txt
[duanyouxu@master ~]$
[root@master duanyouxu]# useradd yao  新建用户yao
[root@master duanyouxu]# su - yao  切换用户登录
[yao@master ~]$ pwd
/home/yao
[yao@master ~]$ ls
[yao@master ~]$ touch yao.txt dayao.txt
[yao@master ~]$ ll
总用量 0
-rw-rw-r-- 1 yao yao 0 4月  10 11:26 dayao.txt
-rw-rw-r-- 1 yao yao 0 4月  10 11:26 yao.txt
[yao@master ~]$ mkdir sanchuang
[yao@master ~]$ ll
总用量 0
-rw-rw-r-- 1 yao yao 0 4月  10 11:26 dayao.txt
drwxrwxr-x 2 yao yao 6 4月  10 11:27 sanchuang
-rw-rw-r-- 1 yao yao 0 4月  10 11:26 yao.txt
[yao@master ~]$
[root@master duanyouxu]# useradd yao
[root@master duanyouxu]# su - yao
[yao@master ~]$ pwd
/home/yao
[yao@master ~]$ ls
[yao@master ~]$ touch yao.txt dayao.txt
[yao@master ~]$ ll
总用量 0
-rw-rw-r-- 1 yao yao 0 4月  10 11:26 dayao.txt
-rw-rw-r-- 1 yao yao 0 4月  10 11:26 yao.txt
[yao@master ~]$ mkdir sanchuang
[yao@master ~]$ ll
总用量 0
-rw-rw-r-- 1 yao yao 0 4月  10 11:26 dayao.txt
drwxrwxr-x 2 yao yao 6 4月  10 11:27 sanchuang
-rw-rw-r-- 1 yao yao 0 4月  10 11:26 yao.txt
[yao@master ~]$ pwd
/home/yao
[yao@master ~]$ cd /
[yao@master /]$ mkdir dayao
mkdir: 无法创建目录"dayao": 权限不够
[yao@master /]$ cd /find
[yao@master find]$ ls
boot  daydayup  duan.txt  duanyouxu.jpg  hn  hunantv  liu  liu.txt  meinv.jpg  passwd  三创就业信息.jpg
[yao@master find]$ mkdir xiaoyao
mkdir: 无法创建目录"xiaoyao": 权限不够
[yao@master find]$ exit
登出
[root@master duanyouxu]#
[root@master duanyouxu]# find  / -user yao -type  f  2>/dev/null
/var/spool/mail/yao
/home/yao/.bash_logout
/home/yao/.bash_profile
/home/yao/.bashrc
/home/yao/yao.txt
/home/yao/dayao.txt
/home/yao/.bash_history
[root@master duanyouxu]#
-exec
-exec 执行的动作,动作一般都是命令
[root@master duanyouxu]# find /root -name hello.c -type f -exec cp {} /find \;
find /root -name hello.c -type f 查找到文件类型是文件 名字是hello.c 在/root目录下查找
-exec 执行的动作,动作一般都是命令
cp {} /find
源文件 目的地
{} 相当于一个容器,里面存放的是前面的find命令查找到的内容
; 是-exec 执行动作的结束符号 --》不接的话find命令不知道需要执行的命令,是否输入完成
复制过去会覆盖原来的文件的里内容
[root@master find]# find  / -name daydayup  -exec rm -rf  {} \;
	mkdir  /back
[root@master back]# cp /boot/vmlinuz-3.10.0-1160.el7.x86_64 /lianxi
[root@master back]# find /lianxi -type f -size +10k -mmin -180 -exec  mv {} /back  \;
; 和 ; 的区别?
转义字符串 \ ,让有特殊作用的元字符回归到字符本身的意思
; 命令连接符号,无论前面的命令执行成功还是失败都会执行后面的命令
command1 ; command2
[root@master duanyouxu]# mkdir shenjiemi  ; ls
mkdir: 无法创建目录"shenjiemi": 文件已存在
duan.txt  hello.c  shenjiemi
[root@master duanyouxu]#
[root@master duanyouxu]# mkdir shenjiemi;ls
mkdir: 无法创建目录"shenjiemi": 文件已存在
duan.txt  hello.c  shenjiemi
[root@master duanyouxu]#
[root@master duanyouxu]# mkdir shenjiemi\;ls
[root@master duanyouxu]# ls
duan.txt  hello.c  shenjiemi  shenjiemi;ls
[root@master duanyouxu]#
command1 && command2 如果command1执行成功,就执行command2,不成功不执行
command1 || command2 如果command1执行不成功,就执行command2,成功不执行
command1 && command2 || command3 如果command1执行成功,就执行command2,不成功执行command3
[root@master find]# mkdir  sc123 && echo "ok"
ok
[root@master find]# ls
boot      duan.txt       feng.txt  hn       liu      meinv.jpg  sc123
daydayup  duanyouxu.jpg  hello.c   hunantv  liu.txt  passwd     三创就业信息.jpg
[root@master find]# mkdir  sc123 && echo "ok"
mkdir: 无法创建目录"sc123": 文件已存在
[root@master find]# useradd  root
useradd:用户“root”已存在
[root@master find]# useradd  root || echo "failed"
useradd:用户“root”已存在
failed
[root@master find]# useradd  root && echo "ok" || echo "no"
useradd:用户“root”已存在
no
[root@master find]# useradd  root123 && echo "ok" || echo "no"
ok
[root@master find]#
-maxdepth
-maxdepth 查找文件的时候,目录的深度
1 代表当前
2 代表下一级目录
3 下一级的下一级目录,以此类推
[root@master cc]# cd /china
[root@master china]# pwd
/china
[root@master china]# ls
aa  sc.txt
[root@master china]# find  /china  -maxdepth 1 -name sc.txt
/china/sc.txt
[root@master china]# find  /china  -maxdepth 2 -name sc.txt
/china/sc.txt
/china/aa/sc.txt
[root@master china]# find  /china  -maxdepth 3 -name sc.txt
/china/sc.txt
/china/aa/sc.txt
/china/aa/bb/sc.txt
/china/aa/cc/sc.txt
[root@master china]#
练习
1.将/etc/目录下的所有的.conf结尾的文件,不管深度,大小小于5k的,复制到/back目录下
[root@lier china]# find /etc -name "*.conf" -type f -size -5k -exec cp {} /back \;
2.新建一个目录/sc,复制/boot目录到/sc目录下,然后查找/sc目录下的大小大于2M文件名里包含vm的文件,移动到/tmp目录下
[root@lier /]# mkdir sc
[root@lier /]# cp /boot /sc -r
[root@lier /]# find /sc -size +2M -name "*vm*" -type f -exec mv {} /tmp \;
3.查找/sc目录下20分钟内修改过的文件,并且文件名以.txt结尾
[root@lier /]# find /sc -mmin -20 -type f -name "*.txt"
4.查找比/etc/passwd文件更加新的文件,要求这个文件要大于10k,并且用户是root
[root@lier /]# find / -type f -newer /etc/passwd -size +10k -user root
5.将/etc/目录下的所有的.conf结尾的文件,深度为2层(例如:/etc/aa止,/etc/aa/bb不查询了),大小小于5k的,复制到/back目录下
[root@lier /]# find /etc -maxdepth 2 -name "*.conf" -type f -size -5k -exec cp {} /back \;
w
w - Show who is logged on and what they are doing.
w命令用于显示目前登入系统的用户信息
[root@lier ~]# w
 21:46:29 up 4 days, 12:32,  2 users,  load average: 0.00, 0.01, 0.05
USER     TTY      FROM             LOGIN@   IDLE   JCPU   PCPU WHAT
root     tty1                      三09    6:38m  4.08s  4.08s -bash
root     pts/0    192.168.1.1      21:45    5.00s  0.05s  0.03s w
TTY 终端类型 terminate type
pts/0 ~200 每个用户登陆进入系统都会对应一个终端名字 --》远程登陆的类型 --》临时工
tty1~tty6 是本地登陆产生的终端 ,最多6个 --》本地登陆 --》正式员工
ctrl+alt+F1~F6 -->台式机
FN+ctrl+alt+F1~F6 -->笔记本电脑
[root@lier 528]# w
 11:37:54 up 3 days,  2:21,  4 users,  load average: 0.00, 0.01, 0.05
USER     TTY      FROM             LOGIN@   IDLE   JCPU   PCPU WHAT
root     tty1                      三07   18.00s  0.02s  0.02s -bash
root     pts/0    192.168.1.123    03:52    2.00s  0.71s  0.06s w
root     pts/1    192.168.1.123    04:50    6:46m  0.03s  0.03s -bash
root     tty2                      11:37   10.00s  0.10s  0.10s -bash
指定输出字符到终端的屏幕上
[root@node1 ~]# echo hello,pts/8  >>/dev/pts/8
[root@node1 ~]# echo hello,pts/8  >>/dev/pts/14
[root@node1 ~]# echo hello,pts/8  >>/dev/pts/13
[root@node1 ~]# ps aux|grep bash
root      7614  0.0  0.1 115676  2132 pts/0    Ss   16:44   0:00 -bash
root      7699  0.0  0.1 115680  2128 pts/1    Ss+  16:45   0:00 -bash
root      7731  0.0  0.1 115680  2136 pts/3    Ss+  16:45   0:00 -bash
root      7854  0.0  0.1 115804  2248 pts/8    Ss   16:45   0:00 -bash
root      7901  0.0  0.1 115680  2072 pts/10   Ss+  16:45   0:00 -bash
root      7944  0.0  0.1 115680  2072 pts/11   Ss+  16:45   0:00 -bash
root      7979  0.0  0.1 115680  2072 pts/12   Ss+  16:45   0:00 -bash
root      8031  0.0  0.1 115680  2136 pts/13   Ss+  16:45   0:00 -bash
root      8192  0.0  0.1 115680  2076 pts/14   Ss+  16:46   0:00 -bash
root      8413  0.0  0.1 115676  2076 pts/2    Ss+  16:46   0:00 -bash
root      8564  0.1  0.1 115676  2072 pts/4    Ss+  16:47   0:00 -bash
root      8679  0.0  0.1 115676  2076 pts/5    Ss+  16:47   0:00 -bash
root      8750  0.0  0.0 112824   988 pts/8    S+   16:47   0:00 grep --color=auto bash
[root@node1 ~]# kill -9 7854
Connection to 192.168.2.150 closed.
pkill
退出指定的终端
[root@node1 ~]# pkill -t pts/2 -9
# -t 指定终端名字
# -9 信号类型为强制杀死进程的信号
(())
(())双圆括号用来进行整数的运算和比较
shell编程里(命令) 可以创建一个子进程去执行命令的
(( 整数的运算 ))
[root@master back]# a=10
[root@master back]# b=20
[root@master back]# ((a + b))
[root@master back]# c=((a + b))		$引用变量的值,此处没有使用$引用运算后的结果
-bash: 未预期的符号 `(' 附近有语法错误
[root@master back]# c=$((a + b))
[root@master back]# echo $c
30
# 双圆括号中使用变量可以加$也可以不加
[root@master ~]# d=$(($c+$b))
[root@master ~]# echo $d
50
双圆括号(( ))不能进行小数的运算,要想进行小数运算可以使用bc命令
[root@master ~]# abc=$(($d + 5.5 ))
-bash: 50 + 5.5 : 语法错误: 无效的算术运算符 (错误符号是 ".5 ")
[root@master ~]#
[root@master ~]# abc=$(($d + 5 ))
[root@master ~]# echo $abc
55
[root@master ~]# abc=$(($d * 5 ))
[root@master ~]# echo $abc
250
[root@master ~]#
整数的比较
通过$?查看结果是否正确
[root@master ~]# ((80 > 50))
[root@master ~]# echo $?
0
[root@master ~]# ((80 > 500))
[root@master ~]# echo $?
1
[root@master ~]#
()
shell编程中一个圆括号()可以创建一个子进程去执行命令的
==**命令替换 ( ) ∗ ∗ = = : 作 用 优 先 执 行 ()**==: 作用优先执行 ()∗∗==:作用优先执行(命令),然后可以将命令的执行结果赋值给变量
[root@lier ~]# num=$(df -h|grep "/$"|awk '{print $5}'|tr -d "%")
[root@lier ~]# echo $num
18
lrzsz
在linux和Windows中传送文件的一个工具,速度没有xftp快
rz
[root@master ~]# rz linux里接受从windows里上传的文件 receive
sz
[root@master ~]# sz playbook.sh 将linux里的playbook.sh文件传到windows里 sent
练习
1.安装lrzsz
	yum   install  lrzsz
2.安装winrar软件
	http://www.winrar.com.cn/
3.在windows里使用winrar压缩软件,打包一个文件,随便自己找一个或者多个文件打包成.rar结尾的文件,然后上传到linux里/root目录下
4.在linux下下载nginx的源码包文件
	curl  -O  http://nginx.org/download/nginx-1.21.6.tar.gz
然后将这个nginx-1.21.6.tar.gz文件传到windows的桌面
curl
curl - transfer a URL
curl 理解为linux里的字符界面的浏览器–》下载
curl 是默认安装的在centos7的系统里,默认下载的文件存放在当前目录下
-O
-O, --remote-name
不用指定文件需要下载到哪个地方,默认下载到当前目录
curl -O http://nginx.org/download/nginx-1.21.6.tar.gz
-o
指定文件的下载目录并给文件命名
-o /backup/nginx.tar.gz 指定下载到/backup目录下叫nginx.tar.gz文件
[root@master ~]# curl  -o /backup/nginx-1.21.6.tar.gz  http://nginx.org/download/nginx-1.21.6.tar.gz
  % Total    % Received % Xferd  Average Speed   Time    Time     Time  Current
                                 Dload  Upload   Total   Spent    Left  Speed
100 1048k  100 1048k    0     0   572k      0  0:00:01  0:00:01 --:--:--  572k
[root@master ~]# ls /backup
beijing  filepath.txt  hubei  nginx.tar.gz  yunnan
[root@master ~]#
[root@master ~]# curl  -o /backup/nginx-1.21.6.tar.gz  http://nginx.org/download/nginx-1.21.6.tar.gz
将http://nginx.org/download/nginx-1.21.6.tar.gz 文件下载到本地的/backup目录下叫nginx-1.21.6.tar.gz
zip、unzip
zip
zip只能给文件做成一个压缩包,不能对文件夹进行
[root@master 410]# yum  install zip unzip -y

[root@master 410]# zip  passwd.zip         passwd
                        打包压缩文件          原文件
  adding: passwd (deflated 62%)
[root@master 410]# ls
passwd  passwd.zip
unzip
unzip是解压的命令
[root@master 410]# cp passwd.zip /backup
[root@master 410]# cd /backup/
[root@master backup]# unzip  passwd.zip
Archive:  passwd.zip
  inflating: passwd
[root@master backup]#
Archive 附件: 一个压缩包或者压缩文件就称呼为一个附件
存档文件,归档文件
其实就是将一个文件压缩或者很多文件放到一个文件里,把很多东西放到一起–》这个过程就称呼归档,存档
deflated 泄气(压缩)
inflat 解压
gzip、gunzip
gzip
gzip直接在原文件上进行压缩,添加后缀名.gz,不对文件夹进行处理
[root@lier 410]# ls
passwd  passwd.zip
[root@lier 410]# gzip passwd
[root@lier 410]# ls
passwd.gz  passwd.zip
gunzip
[root@lier 410]# gunzip passwd.gz
[root@lier 410]# ls
passwd passwd.zip
zcat
查看.zip和.gz压缩文件的内容
[root@lier 410]# zcat passwd.zip
[root@lier 410]# zcat passwd.gz
xz、unxz
xz 也是linux系统默认安装的压缩工具,只能压缩文件
[root@master backup]# xz passwd
[root@master backup]# xzcat passwd.xz
[root@master backup]# unxz passwd.xz
xzcat
查看.xz压缩文件
xz和gzip的比较
xz的压缩效果比gzip好,压缩后占用的空间比较少,压缩需要的时间长
gzip 压缩速度快,但是效果一般
文件比较小,使用xz或者gzip都可以
如果文件比较大,建议使用xz压缩,可以节约更加多的磁盘空间,但是需要时间比较长
慢工出细活–》xz
[root@master ~]# ll -h bigfile.*
-rw-r--r--. 1 root root 132 3月 28 16:31 bigfile.sh
-rw-r--r-- 1 root root 76M 3月 28 16:32 bigfile.txt
[root@master ~]# time gzip bigfile.txt 查看gzip命令的执行消耗时间
real 0m0.987s
user 0m0.913s
sys 0m0.073s
[root@master ~]# ll -h bigfile.*
-rw-r--r--. 1 root root 132 3月 28 16:31 bigfile.sh
-rw-r--r-- 1 root root 262K 3月 28 16:32 bigfile.txt.gz
[root@master ~]# time xz bigfile.txt
real 0m4.384s
user 0m3.545s
sys 0m0.801s
[root@master ~]# ll -h bigfile.*
-rw-r--r--. 1 root root 132 3月 28 16:31 bigfile.sh
-rw-r--r-- 1 root root 12K 3月 28 16:32 bigfile.txt.xz
bzip2
bzip2 也是linux里的一个压缩工具,压缩文件
[root@master lianxi]# yum install bzip2 -y
[root@master lianxi]# bzip2 feng.yaml
[root@master lianxi]# ls feng.yaml.bz2
feng.yaml.bz2
[root@master lianxi]#
[root@master lianxi]# bzcat feng.yaml.bz2
[root@master lianxi]# bunzip2 feng.yaml.bz2
bzcat
查看.bzip2压缩文件
压缩练习
1.在windows里使用winrar软件压缩2个文件,一个是.rar格式的文件,一个是.zip的文件,具体压缩那个文件,你自己定义
2.将文件传输到linux系统的/lianxi目录下,尝试解压.zip的文件
unzip 410.zip
3.复制/etc/passwd文件到/lianxi目录下,将/lianxi目录下的passwd文件压缩成passwd.xz
xz passwd
4.复制/etc/ssh/sshd_config 文件到/lianxi目录下,然后进行压缩为sshd_config.gz
cp /etc/ssh/sshd_config /lianxi
gzip sshd_config
5.查看passwd.xz里的内容,查看sshd_config.gz里的内容
xzcat passwd.xz
zcat sshd_config.gz
6.新建文件夹/backup_sc,然后复制/lianxi下的passwd.xz和sshd_config.gz到/backup_sc目录里
mkdir /backup_sc
cp /lianxi/passwd.xz /backup_sc/
cp /lianxi/sshd_config.gz /backup_sc/
7.到/backup_sc目录里解压passwd.xz和sshd_config.gz文件
unxz passwd.xz
gunzip sshd_config.gz
8.将/lianxi下的sshd_config.gz传到windows系统里看是否可以解压?
可以
重点提醒:不要直接对/etc/passwd文件进行操作,建议复制到其他目录下操作,不然会导致系统开机启动不了
tar
用途:制作归档文件、释放归档文件
格式:tar [选项]… 归档文件名 源文件或目录
tar [选项]… 归档文件名 [-C 目标目录]
常用命令选项
-c:创建 .tar 格式的包文件 create
-x:解开.tar格式的包文件
-v:输出详细信息
-f:表示使用归档文件 file
-t:列表查看包内的文件 list
-p:保持原文件的原来属性
-P:保持原文件的绝对路径
-z 调用gzip去压缩
-J 调用xz去压缩
-j 调用bzip2去压缩
使用tar命令打的压缩包叫tarball --》tar包–>归档文件:将很多个文件或者文件夹打包到一个文件里,然后可以对归档文件进行压缩
.tar —》其实只是归档,不进行压缩
.tar.gz --》先归档,然后再调用gzip进行压缩–》.tar.gz --》速度快
.tar.xz --》先归档,然后再调用xz进行压缩–》.tar.xz -->压缩效果好
.tar.bz2 --》先归档,然后再调用bzip2进行压缩–》.tar.bz2
Compressed TAR Archive
Compressed 压缩的
TAR Archive tar命令打的压缩文件(归档文件)
bit 位
byte 字节 1B = 8b
100/8=12.5MB/s
1.打压缩包
tar -czf -->.tar.gz
tar czf
tar cjf -->.tar.bz2
tar cJf -->.tar.xz
[root@master 412]# tar xf mysql-5.7.34-linux-glibc2.12-x86_64.tar.gz
czf
归档打包为.tar.gz文件
[root@master luoyawei]# cp /etc/passwd .
[root@master luoyawei]# ls
passwd
[root@master luoyawei]# cp /boot . -r
[root@master luoyawei]# ls
boot passwd
[root@master luoyawei]# tar czf passwd.tar.gz passwd 将当前目录下的passwd文件打包成passwd.tar.gz压缩包
压缩文件 源文件
[root@master luoyawei]# ls
boot passwd passwd.tar.gz
打包格式不正确时会根据命令判断文件类型
cfz命令用来将文件归档打包为.tar.gz文件,如果打包时命名为.tar.xz文件也不会报错,但是文件属性仍然是.tar.gz
[root@master luoyawei]# tar czf passwd.tar.xz passwd
[root@master luoyawei]# ls
boot passwd passwd.tar.gz passwd.tar.xz
[root@master luoyawei]# file passwd.tar.gz
passwd.tar.gz: gzip compressed data, from Unix, last modified: Tue Apr 12 19:55:59 2022
文件和文件夹可以一起打包到一个压缩文件里
[root@master luoyawei]# tar czf /lianxi/luoyawei/boot_passwd.tar.gz /boot /etc/passwd
tar: 从成员名中删除开头的“/”
[root@master luoyawei]# tar czf /lianxi/luoyawei/boot_passwd_log.tar.gz /boot /etc/passwd /var/log
tar: 从成员名中删除开头的“/”
cJf
将文件归档打包为.tar.xz文件
[root@master luoyawei]# tar cJf passwd.tar.xz passwd
[root@master luoyawei]# ls
boot passwd passwd.tar.bz2 passwd.tar.gz passwd.tar.xz
[root@master luoyawei]# file passwd.tar.xz
passwd.tar.xz: XZ compressed data
cjf
将文件归档打包为.tar.bzip2文件
[root@lier tar]# tar cjf hosts_passwd.tar.bz2 hosts passwd
[root@lier tar]# ls
backup_log.sh boot.tar.gz hosts_passwd.tar.bz2 passwd
boot hosts log.tar.gz passwd.tar.gz
如果文件名一样,后面打包的文件会覆盖原来的文件
tf
查看压缩文件
因为-t选项的作用是列表查看包内的文件,所以查看的只是压缩包里有哪些文件,而不会查看具体的文件内容
使用绝对路径打包
因为使用绝对路径时,tar命令会从成员名中删除开头的"/"
[root@lier tar]# tar czf /lianxi/tar/passwd.tar.gz /etc/passwd
tar: 从成员名中删除开头的“/”
[root@lier tar]# ls
backup_log.sh boot hosts log.tar.gz passwd passwd.tar.gz
[root@lier tar]# tar tf passwd.tar.gz
etc/passwd
xf
解压压缩包,.tar.gz 、.tar.xz 、.tar.bz2都是用xf命令解压
xf
Extract all files from archive.tar.
Extract 提取,解压
使用绝对路径打包文件,解压时删除最开头的"/“,并创建”/"后面相应的目录
[root@lier tar]# tar czf /lianxi/tar/passwd.tar.gz /etc/passwd
tar: 从成员名中删除开头的“/”
[root@lier tar]# ls
backup_log.sh boot hosts log.tar.gz passwd passwd.tar.gz
打包时使用绝对路径/etc/passwd,所以解压时会在当前目录生成一个etc文件夹,passwd文件在etc文件下面
[root@lier tar]# tar xf passwd.tar.gz
[root@lier tar]# ls
backup_log.sh boot etc hosts log.tar.gz passwd passwd.tar.gz
[root@lier tar]# cd etc
[root@lier etc]# ls
passwd
使用绝对路径保存压缩包
[root@master luoyawei]# mkdir /weihong
[root@master luoyawei]# pwd
/lianxi/luoyawei
[root@master luoyawei]# tar czf /weihong/passwd.tar.gz /etc/passwd
tar: 从成员名中删除开头的“/”
[root@master luoyawei]# ls /weihong
passwd.tar.gz
解压文件的时候,不指定路径,默认解压到当前
[root@master luoyawei]# tar xf /weihong/passwd.tar.gz
[root@master luoyawei]# ls
boot etc hosts.tar.gz
因为weihong文件夹下的passwd.tar.gz文件是用绝对路径/etc/passwd打包的,所以解压时在当前路径生成了etc文件目录
[root@master luoyawei]# ls etc/
passwd
[root@master luoyawei]# tar tf /weihong/passwd.tar.gz
etc/passwd
-C
解压文件存放的路径
[root@master luoyawei]# ls /nongda_weihong/
[root@master luoyawei]# tar xf /weihong/passwd.tar.gz -C /nongda_weihong/
[root@master luoyawei]# ls /nongda_weihong/
etc
–exclude
排除
–exclude=PATTERN
exclude files, given as a PATTERN
打包文件时排除指定的文件
[root@fengdeyong bak]# tar --exclude=/boot/grub2 -czf /bak/no-grub.tar.gz /boot
[root@lier bak]# tar --exclude=grub2 -czf no_grub2.tar.tar.gz /boot
tar: 从成员名中删除开头的“/”
[root@lier bak]# tar tf no_grub2.tar.tar.gz
boot/
boot/grub/
boot/grub/splash.xpm.gz
boot/.vmlinuz-3.10.0-327.el7.x86_64.hmac
boot/System.map-3.10.0-327.el7.x86_64
boot/config-3.10.0-327.el7.x86_64
boot/symvers-3.10.0-327.el7.x86_64.gz
boot/vmlinuz-3.10.0-327.el7.x86_64
boot/initrd-plymouth.img
boot/initramfs-0-rescue-e57b9369a2ce49149016d51c29303550.img
boot/vmlinuz-0-rescue-e57b9369a2ce49149016d51c29303550
boot/initramfs-3.10.0-327.el7.x86_64.img
boot/initramfs-3.10.0-327.el7.x86_64kdump.img
排除多个文件或文件夹
[root@lier bak]# tar --exclude=/boot/grub2 --exclude=/boot/loader -czf /bak/no-grub.tar.gz /boot
tar: 从成员名中删除开头的“/”
[root@lier bak]# tar tf no-grub.tar.gz
boot/
boot/grub/
boot/grub/splash.xpm.gz
boot/.vmlinuz-3.10.0-327.el7.x86_64.hmac
boot/System.map-3.10.0-327.el7.x86_64
boot/config-3.10.0-327.el7.x86_64
boot/symvers-3.10.0-327.el7.x86_64.gz
boot/vmlinuz-3.10.0-327.el7.x86_64
boot/initrd-plymouth.img
boot/initramfs-0-rescue-e57b9369a2ce49149016d51c29303550.img
boot/vmlinuz-0-rescue-e57b9369a2ce49149016d51c29303550
boot/initramfs-3.10.0-327.el7.x86_64.img
boot/initramfs-3.10.0-327.el7.x86_64kdump.img
[root@lier bak]# tar --exclude=/boot/{grub2,grub,efi} -czf /bak/no_grub2_boot.tar.gz /boot
tar: 从成员名中删除开头的“/”
[root@lier bak]# tar --exclude={grub2,grub,efi} -czf /bak/no_grub2_boot.tar.gz /boot
tar: 从成员名中删除开头的“/”
[root@lier bak]# tar tf no_grub2_boot.tar.gz
boot/
boot/.vmlinuz-3.10.0-327.el7.x86_64.hmac
boot/System.map-3.10.0-327.el7.x86_64
boot/config-3.10.0-327.el7.x86_64
boot/symvers-3.10.0-327.el7.x86_64.gz
boot/vmlinuz-3.10.0-327.el7.x86_64
boot/initrd-plymouth.img
boot/initramfs-0-rescue-e57b9369a2ce49149016d51c29303550.img
boot/vmlinuz-0-rescue-e57b9369a2ce49149016d51c29303550
boot/initramfs-3.10.0-327.el7.x86_64.img
boot/initramfs-3.10.0-327.el7.x86_64kdump.img
打包压缩某个文件–》本质上就是备份
打包文件,里面嵌入当前的日期
格式化输出日期
date 是linux里查看时间的命令
+%Y year 年
%m month 月
%d day 日
%H hour 小时
%M minute 分钟
%S seconde 秒
[root@hunan-wangzhe-5 lianxi]# date +%Y%m%d
20211027
[root@hunan-wangzhe-5 lianxi]# date +%Y-%m-%d
2021-10-27
[root@hunan-wangzhe-5 lianxi]#
[root@hunan-wangzhe-5 lianxi]# date +%Y_%m_%d
2021_10_27
[root@hunan-wangzhe-5 lianxi]#
[root@hunan-wangzhe-5 lianxi]# date +%Y%m%d%H%M%S
20211027162146
[root@hunan-wangzhe-5 lianxi]# w_time=$(date +%Y%m%d%H%M%S) 将date +%Y%m%d%H%M%S命令的执行结果赋值给w_time这个变量
变量名=$( 命令) 优先执行$()里的命令,然后将命令的执行结果赋值给变量名
$( 命令) ---》命令替换
[root@hunan-wangzhe-5 lianxi]# echo $w_time 引用w_time变量的值 $变量名 --》引用变量名的值
20211027162311
获得日期给变量,然后调用变量
[root@master luoyawei]# echo $ctime
20220412
[root@master luoyawei]#
[root@master luoyawei]# tar czf boot-$ctime.tar.gz /boot
[root@master luoyawei]# tar czf boot-$(date +%Y%m%d).tar.gz /boot
练习
练习8:
1.创建一个目录在/lianxi下叫tar
[root@lier lianxi]# mkdir tar
2.进入tar目录,复制/etc/hosts文件和/etc/passwd到tar目录下
[root@lier lianxi]# cd tar
[root@lier tar]# cp /etc/hosts . -r
[root@lier tar]# cp /etc/passwd .
3.复制/boot目录到tar目录下
[root@lier tar]# cp /boot . -r
4.将当前目录下的boot目录打包放在/lianxi/tar目录下叫boot.tar.gz
[root@lier tar]# tar czf boot.tar.gz boot
[root@lier tar]# ls
boot boot.tar.gz hosts passwd
5.查看boot.tar.gz文件里的内容
[root@lier tar]# tar tf boot.tar.gz
6.将hosts文件和passwd文件打包放到host_passwd.tar.bz2文件
[root@lier tar]# tar cjf /lianxi/tar/host_passwd.tar.bz2 /etc/hosts /etc/passwd
tar: 从成员名中删除开头的“/”
[root@lier tar]# ls
boot host_passwd.tar.bz2 passwd
boot.tar.gz hosts
7.查看host_passwd.tar.bz2文件里的内容
[root@lier tar]# tar tf host_passwd.tar.bz2
etc/hosts
etc/passwd
8.将/boot/目录和/etc/passwd、/var/log目录备份到/lianxi目录下叫boot_pw_log.tar.xz
[root@lier tar]# tar cJf /lianxi/boot_pw_log.tar.xz /boot /etc/passwd /var/log
tar: 从成员名中删除开头的“/”
9.新建/bak目录,然后将/lianxi目录下的boot_pw_log.tar.xz解压到/bak目录下
[root@lier lianxi]# mkdir /bak
[root@lier lianxi]# tar xf /lianxi/boot_pw_log.tar.xz -C /bak
[root@lier lianxi]# cd /bak
[root@lier bak]# ls
boot etc var
10.将/boot目录下的除grub目录以外的所有文件都备份到/bak目录下叫no-grub.tar.gz
[root@lier bak]# tar --exclude=/boot/grub -czf /bak/no-grub.tar.gz /boot
tar: 从成员名中删除开头的“/”
[root@lier bak]# ls
boot etc no-grub.tar.gz var
练习9:扩展练习:
编写一个脚本backup_log.sh实现备份/var/log目录下的所有文件到/scback目录下,要求文件名是包含当天日期,精确到秒,文件名例如:20220412200401-log.tar.gz。同时要求删除七天前的备份文件,只保留最近7天的
需求分析:
脚本名字backup_log.sh
date获取日期
tar
find -mtime +7 -name “*.tar.gz” --》exec rm
#!/bin/bash
# 定义一个变量存放时间
ctime=$(date +%Y%m%d%H%M%S)
# 备份文件
tar czf /scback/${ctime}-log.tar.gz /var/log
# 查找scback目录下七天前的备份文件并删除
find /scback -mtime +7 -name "*.tar.gz" -exec rm -rf {} \;
echo "文件备份成功"
在文件夹命名使用变量时最后用大括号括起来,否则容易误将后面的名称一起作为变量名
linux中变量不存在时会返回空
[root@lier lianxi]# echo $ctime_log
[root@lier lianxi]# echo ${ctime}_log
20220418_log
rpm
rpm -qa 是查询本机里安装过的所有的软件
-q query
-a all
rpm 是centos linux里的软件管理的命令,没有yum好用,yum的底层使用的就是rpm
yum 是使用python编写的一个软件管理工具,底层使用rpm命令去管理软件,yum可以自动解决依赖关系
A -->B -->C -->d ABCD
rpm - RPM Package Manager redhat package manager 红帽的系统里的软件包管理工具
[root@lier ~]# rpm -qa|wc -l
405
[root@master 417]# rpm -qa|grep chrony
chrony-3.4-1.el7.x86_64
[root@master 417]# rpm -qa|grep fengdeyong
[root@master 417]#
service sshd restart
老式的启动服务的方式
[root@lier ~]# service ssh restart
Redirecting to /bin/systemctl restart ssh.service
Redirecting 重定向:
/bin/systemctl restart sshd.service 新式的启动服务的命令
if
shell编程里的条件判断
if 条件; then 条件可以是执行的命令--》$? --》if其实背后是看命令执行的返回值的 返回值为0 就执行command1,否则执行command2
command1
else
command2
fi
if (( $num <= 7 ));then
echo "remove file ok"
else
echo "remove file failed"
fi
[root@master 417]# cat if.sh
#!/bin/bash
#if [ -d /fengdeyong ];then
#if [ -d /fengdeyong ]
#then
if mkdir /boot ; then
echo "/fengdeyong is exist"
else
echo "/fengdeyong is not exist"
fi
[root@master 417]#
练习
1.生成一个4.5个G左右的sc.txt的文件,至少需要生成10亿行的文本文件sc.txt
内容如下:
我在三创学习linux,生成一个大文件,至少需要生成10亿行的文本文件
[root@node1 lianxi]# cat bigfile.sh
#!/bin/bash
i=1
while (( i <= 100000000 ))
do
echo "我在三创学习linux,生成一个大文件,至少需要生成1亿行的文本文件" >>/lianxi/sc.txt
((i++))
done
[root@node1 lianxi]#
[root@master 417]# cat bigfile_2.sh
#!/bin/bash
for i in {1..100000000}
do
echo "我在三创学习linux,生成一个大文件,至少需要生成1亿行的文本文件" >>/lianxi/sc.txt
done
[root@master 417]#
[root@master 417]# time bash bigfile_2.sh
已杀死
real 0m35.820s
user 0m3.435s
sys 0m23.036s
[root@master 417]#
内存的使用空间上去思考
[root@master 417]# python
Python 2.7.5 (default, Oct 14 2020, 14:45:30)
[GCC 4.8.5 20150623 (Red Hat 4.8.5-44)] on linux2
Type "help", "copyright", "credits" or "license" for more information.
>>> range(1,10000000000)
已杀死
[root@master 417]#
思考:在内存里分配一个列表–》range(1,100000000) 需要消耗多少的内存空间? --》在python2里是先产生列表去存放整数
python3里不是里产生一个列表,存放整数–》生成器–》惰性求值
此时产生大文件时linux系统会自动杀死进程
[root@master 417]# cat bigfile_2.sh
#!/bin/bash
for i in {1..100000000}
do
echo "我在三创学习linux,生成一个大文件,至少需要生成1亿行的文本文件" >>/lianxi/sc.txt
done
[root@master 417]#
[root@master 417]# time bash bigfile_2.sh
已杀死
real 0m35.820s
user 0m3.435s
sys 0m23.036s
[root@master 417]#
vim和cat 会消耗比较多的内存和cpu资源–》导致系统死机或者卡顿
more和less 不会消耗特别多的内存和cpu资源
glances
glances 是一个用python开发的查看linux性能(cpu,内存,磁盘IO,进程,网络带宽)
安装
epel-release 是centos官方支持的第3方的软件仓库--》存放软件的网站
[root@master ~]# yum install epel-release -y
[root@master ~]# yum install glances -y
[root@lier ~]# glances
lier (CentOS Linux 7.9.2009 64bit / Linux 3.10.0-1160.62.1.el7.x86_64) Uptime: 0:21:52
CPU [||| 7.1%] CPU 7.1% nice: 0.0% MEM 19.7% active: 148M SWAP 0.0% LOAD 2-core
MEM [|||||||| 19.7%] user: 4.2% irq: 0.0% total: 1.78G inactive: 179M total: 2.00G 1 min: 0.00
SWAP [ 0.0%] system: 3.2% iowait: 0.0% used: 359M buffers: 2.06M used: 0 5 min: 0.01
idle: 92.4% steal: 0.0% free: 1.43G cached: 276M free: 2.00G 15 min: 0.08
NETWORK Rx/s Tx/s TASKS 108 (125 thr), 1 run, 107 slp, 0 oth sorted automatically by cpu_percent, flat view
_16777736 136b 944b
lo 0b 0b CPU% MEM% VIRT RES PID USER NI S TIME+ IOR/s IOW/s Command
14.6 0.9 225M 15.5M 8260 root 0 R 0:03.87 0 0 /usr/bin/python /usr/bin/glances
DISK I/O R/s W/s 0.6 0.0 0 0 9 root 0 S 0:03.78 0 0 rcu_sched
dm-0 0 0 0.3 0.3 151M 5.39M 8162 root 0 S 0:01.19 0 0 sshd: root@pts/0
dm-1 0 0 0.3 0.0 0 0 412 root -20 S 0:00.20 0 0 kworker/0:1H
sda 0 0 0.3 0.9 561M 17.0M 1001 root 0 S 0:01.63 0 0 /usr/bin/python2 -Es /usr/sbin/tuned -l -P
sda1 0 0 0.3 0.0 0 0 52 root 0 S 0:03.73 0 0 kworker/0:2
sda2 0 0 0.0 0.0 0 0 29 root -20 S 0:00.00 0 0 watchdogd
sr0 0 0 0.0 0.0 0 0 208 root 0 S 0:00.00 0 0 kworker/1:2
0.0 0.0 0 0 48 root 0 S 0:00.19 0 0 kworker/u256:1
FILE SYS Used Total 0.0 0.0 0 0 26 root -20 S 0:00.00 0 0 kblockd
/ 5.04G 17.5G 0.0 0.0 0 0 21 root -20 S 0:00.00 0 0 writeback
/boot 167M 497M 0.0 1.6 351M 29.0M 684 root 0 S 0:05.56 0 0 /usr/bin/python2 -Es /usr/sbin/firewalld --nofork --nopid
0.0 0.0 0 0 295 root 0 S 0:00.80 0 0 scsi_eh_1
0.0 0.0 0 0 284 root -20 S 0:00.00 0 0 mpt/0
0.0 0.3 101M 5.40M 813 root 0 S 0:00.32 0 0 /sbin/dhclient -d -q -sf /usr/libexec/nm-dhcp-helper -pf /var
0.0 0.0 0 0 27 root -20 S 0:00.00 0 0 md
0.0 0.5 536M 8.73M 686 root 0 S 0:01.12 0 0 /usr/sbin/NetworkManager --no-daemon
2022-04-19 18:03:49 No warning or critical alert detected
split
split - split a file into pieces
分割大文件
分割:
split 分割:
1.根据行数
2.根据大小
使用split命令对文件进行分割。其中:
-b, --bytes=SIZE, 指定每个分割文件的大小,单位有K、M、G、P等
-d, --numeric-suffixes, 指定分割文件的后缀为数字
-a, --suffix-length=N, 指定分割文件数字后缀的长度,如果是1,后缀为0,1,2…;如果是2,则为00,01,02…默认是2
-C, --line-bytes=SIZE, 指定每行最大的字节数
-l, --lines=NUMBER, 指定每个文件最大的行数
[root@hunan-wangzhe-5 lianxi]# split -b 100K -d -a 2 sc.tar.gz sc.tar.gz. 将sc.tar.gz文件按照100K为一个文件进行分割
[root@hunan-wangzhe-5 lianxi]# ls
[root@node1 lianxi]# split -b 1G -a 1 -d sc.txt sc.txt.
[root@master 412]# split -l 100000 -a 4 -d a.txt sanchuang.txt.
合并多个小文件成一个大文件
[root@master 412]# cat sanchuang.txt.000{1..5} >chen.txt
[root@master 412]# cat chen.txt |wc -l
500000
crontab
计划任务: 定时去做某件事情 --》闹钟
-e
-e 编辑 edit
[root@master 417]# crontab -e 创建计划任务的命令
30 3 * * * bash /lianxi/417/backup_log.sh 每天凌晨3:30执行脚本backup_log.sh
[root@master 417]# crontab -l 查看计划任务 list
30 3 * * * bash /lianxi/417/backup_log.sh
[root@master 417]#
默认只能精确到分钟,最短时间间隔是1分钟
[root@master 417]# cat /etc/crontab
SHELL=/bin/bash
PATH=/sbin:/bin:/usr/sbin:/usr/bin
MAILTO=root
# For details see man 4 crontabs
# Example of job definition:
# .---------------- minute (0 - 59)
# | .------------- hour (0 - 23)
# | | .---------- day of month (1 - 31)
# | | | .------- month (1 - 12) OR jan,feb,mar,apr ...
# | | | | .---- day of week (0 - 6) (Sunday=0 or 7) OR sun,mon,tue,wed,thu,fri,sat
# | | | | |
# * * * * * user-name command to be executed
20 8 23 7 * bash /lianxi/417/backup_log.sh
7月23日的早上8点20 执行脚本
/ 频率,间隔多久
, 单个的
-连续的
*/1 * * * * 每分钟去执行
*/5 * * * * 每5分钟去执行
30 8 3,8,10 * * 3号,8号,10号的8点30
30 8 8-18 * * 8号到18号的8点30
30 8-18 * * * 8点30 9点30 … 18点30
-l
[root@master 417]# crontab -l
30 3 * * * bash /lianxi/417/backup_log.sh
*/1 * * * * mkdir /tmp/sc$RANDOM
[root@master 417]#
如何知道我们的计划任务是否执行?
1.直接去看效果
[root@master tmp]# tail -f /var/log/cron
Apr 17 17:18:38 master crontab[15952]: (root) END EDIT (root)
Apr 17 17:18:46 master crontab[16286]: (root) LIST (root)
Apr 17 17:19:01 master crond[680]: (root) RELOAD (/var/spool/cron/root)
Apr 17 17:26:41 master crontab[18578]: (root) BEGIN EDIT (root)
Apr 17 17:27:40 master crontab[18578]: (root) REPLACE (root)
Apr 17 17:27:40 master crontab[18578]: (root) END EDIT (root)
Apr 17 17:27:43 master crontab[18876]: (root) LIST (root)
Apr 17 17:28:01 master crond[680]: (root) RELOAD (/var/spool/cron/root)
Apr 17 17:28:01 master CROND[18970]: (root) CMD (mkdir /tmp/sc$RANDOM)
Apr 17 17:29:01 master CROND[19271]: (root) CMD (mkdir /tmp/sc$RANDOM)
2.看cron的日志 --》/var/log/cron
查看字符串长度
[root@lier 517]# echo $sg
wenke
[root@lier 517]# echo ${#sg}
5
[root@lier ~]# mn='afdafdfa'
[root@lier ~]# echo ${#mn}
8
对字符串进行加密
[root@lier ~]# echo "sc123456"|md5sum
de9492d310d18392cc0c79e8e759b36a -
[root@lier ~]# echo "sc123456"|base64
c2MxMjM0NTYK
dstat
dstat 是一个使用python语言编写的获取linux系统的性能参数的命令(cpu,内存,磁盘,网络带宽)
[root@lier 517]# dstat -am
----total-cpu-usage---- -dsk/total- -net/total- ---paging-- ---system-- ------memory-usage-----
usr sys idl wai hiq siq| read writ| recv send| in out | int csw | used buff cach free
13 35 52 0 0 0| 0 0 | 182B 358B| 0 0 |3003 2994 | 380M 2108k 521M 916M
12 35 53 0 0 0| 0 0 | 60B 1058B| 0 0 |3649 4066 | 380M 2108k 521M 916M
12 35 53 1 0 0| 0 0 | 60B 426B| 0 0 |3236 3230 | 380M 2108k 521M 916M
15 32 53 0 0 0| 0 0 | 60B 426B| 0 0 |2579 2148 | 380M 2108k 521M 916M
15 33 52 0 0 1| 0 0 | 60B 426B| 0 0 |2127 1571 | 380M 2108k 521M 917M
15 33 52 0 0 0| 0 0 | 60B 426B| 0 0 |2227 1633 | 380M 2108k 521M 917M
12 34 53 0 0 1| 0 0 | 60B 426B| 0 0 |2110 1549 | 380M 2108k 521M 916M
13 34 53 0 0 0| 0 0 | 60B 426B| 0 0 |2153 1553 | 380M 2108k 521M 917M
13 34 53 0 0 1| 0 0 | 60B 426B| 0 0 |2120 1539 | 380M 2108k 521M 917M
14 34 52 0 0 0| 0 0 | 120B 516B| 0 0 |2237 1584 | 380M 2108k 521M 916M
seq
seq 用来产生一个数字的序列–》集合
# 产生1-10的序列
[root@master 517]# seq 10
1
2
3
4
5
6
7
8
9
10
# 产生5-10的序列
[root@master 517]# seq 5 10
5
6
7
8
9
10
# 5是起始值 2 是步长 step 10 最后的数字
[root@master 517]# seq 5 2 10
5
7
9
# 产生1-10中的奇数序列
[root@master 517]# seq 1 2 10
1
3
5
7
9
# 产生1-10中的偶数序列
[root@master 517]# seq 2 2 10
2
4
6
8
10
位置变量
位置变量: position variable
给脚本传递参数–》传参
$0:脚本名
$1:第1个位置变量
$2:第2个位置变量 依次类推
KaTeX parse error: Expected 'EOF', got '#' at position 1: #̲、@:给脚本传递的位置变量的个数
$*:所有位置变量的值
$$ : 是当前 终端的pid号
[root@master 517]# cat pos_var.sh
#!/bin/bash
echo "脚本名: $0"
echo "第1个位置变量: $1"
echo "第2个位置变量: $2"
echo "第3个位置变量: $3"
echo "第4个位置变量: $4"
echo "第5个位置变量: $5"
echo "第6个位置变量: $6"
echo "一共有 $# 个位置变量"
echo "它们的值如下所示: $*"
echo "它们的值如下所示: $@"
[root@master 517]# bash pos_var.sh liubang xiangyu songjiang yaolifan yangyongjie lijunlin lisi wangwu
脚本名: pos_var.sh
第1个位置变量: liubang
第2个位置变量: xiangyu
第3个位置变量: songjiang
第4个位置变量: yaolifan
第5个位置变量: yangyongjie
第6个位置变量: lijunlin
一共有 8 个位置变量
它们的值如下所示: liubang xiangyu songjiang yaolifan yangyongjie lijunlin lisi wangwu
它们的值如下所示: liubang xiangyu songjiang yaolifan yangyongjie lijunlin lisi wangwu
$$查看当前的pid进程号
[root@lier 517]# echo $$
56876
[root@lier 517]# ps -aux|grep 56876
root 41849 0.0 0.0 112824 988 pts/3 R+ 16:44 0:00 grep --color=auto 56876
root 56876 0.0 0.1 115800 2228 pts/3 Ss 14:40 0:00 -bash
useradd
新建用户
[root@master ~]# useradd luoyawei
[root@master ~]# echo $?
0
[root@master ~]# id luoyawei
uid=1030(luoyawei) gid=1031(luoyawei) 组=1031(luoyawei)
[root@master ~]# useradd liziying123
[root@master ~]# echo $?
0
[root@master ~]# id liziying123
uid=1031(liziying123) gid=1032(liziying123) 组=1032(liziying123)
新建用户的时候,默认会新建一个同名的组
uid和gid都在前一个用户的基础加1
[root@master ~]# tail -2 /etc/passwd
luoyawei:x:1030:1031::/home/luoyawei:/bin/bash
liziying123:x:1031:1032::/home/liziying123:/bin/bash
[root@master ~]# tail -2 /etc/shadow
luoyawei:!!:19133:0:99999:7:::
liziying123:!!:19133:0:99999:7:::
常用命令选项
useradd命令
格式:useradd [选项]… 用户名
常用命令选项
-u:指定 UID 标记号
-d:指定宿主目录,缺省为 /home/用户名 directory
-e:指定帐号失效时间
-g:指定用户的基本组名(或GID号) group id
-G:指定用户的附加组名(或GID号)
-M:不为用户建立并初始化宿主目录
-s:指定用户的登录Shell shell-c:用户注释描述信息 comment
-r: 新建系统用户,不会有新建家目录
-c
-c comment 注释
[root@lier 521]# useradd wq -c "student"
[root@lier 521]# cat /etc/passwd |grep wq
lwq:x:1002:1002::/home/lwq:/bin/bash
wq:x:7791:7791:student:/home/wq:/bin/bash
-d
-d:指定宿主目录,缺省为 /home/用户名 directory
默认情况下用户的家目录都在/home目录下,和用户名同名
家目录: home directory 用户登录进入linux系统的时候,会进入这个文件夹
~ 用户的家目录
[root@master ~]# su - qiaofeng
[qiaofeng@master ~]$ pwd
/home/qiaofeng
[qiaofeng@master ~]$ exit
登出
[root@master ~]# cd ~qiaofeng
[root@master qiaofeng]# pwd
/home/qiaofeng
[root@master qiaofeng]# cd ~luoyawei
[root@master luoyawei]# pwd
/home/luoyawei
[luoyawei@master ~]$ cd ~qiaofeng
-bash: cd: /home/qiaofeng: 权限不够
[luoyawei@master ~]$ ll -d /home/qiaofeng
drwx------ 2 qiaofeng qiaofeng 83 5月 21 20:34 /home/qiaofeng
[luoyawei@master ~]$ exit
登出
[root@master luoyawei]#
查看使用的是哪种解释器:echo $SHELL
[root@master luoyawei]# echo $SHELL
/bin/bash
-M
使用-M新建用户时不会给用户家目录
[root@master luoyawei]# useradd -M xuzhu
[root@master luoyawei]# cd ~xuzhu
-bash: cd: /home/xuzhu: 没有那个文件或目录
[root@master luoyawei]# tail -1 /etc/passwd
xuzhu:x:5001:5001::/home/xuzhu:/bin/bash
[root@master luoyawei]# cd ~xuzhu
-bash: cd: /home/xuzhu: 没有那个文件或目录
-r
新建的是一个系统用户,没有家目录,也不可以登录
[root@master luoyawei]# useradd -r wuyazi
[root@master luoyawei]# tail -1 /etc/passwd
wuyazi:x:994:991::/home/wuyazi:/bin/bash
[root@master luoyawei]# cd ~wuyazi
-bash: cd: /home/wuyazi: 没有那个文件或目录
-r 用户的uid在1000以内,不新建用户的家目录
-M 用户的uid在上一个用户的基础上加1 ,不新建用户的家目录
-g 基本组(主要组)
-G 附加组(次要组)
一个用户可以加入多个组(主要组,次要组)
一个组里可以有多个用户
练习
新建一个用户weixiaobao,基本组是gov,同时又在组tiandihui,shenlongjiao,注释为ludingji
[root@master luoyawei]# groupadd tiandihui
[root@master luoyawei]# groupadd shenlongjiao
[root@master luoyawei]# groupadd gov
[root@master luoyawei]# useradd -g gov -G tiandihui,shenlongjiao -c "ludingji" -s /bin/bash -d /home/weixiaobao weixiaobao
[root@master luoyawei]# id weixiaobao
uid=5002(weixiaobao) gid=5004(gov) 组=5004(gov),5002(tiandihui),5003(shenlongjiao)
[root@master luoyawei]# su - weixiaobao
[weixiaobao@master ~]$ pwd
/home/weixiaobao
问题
新建一个用户linghuchong,注释为sanchuang master,shell是/bin/sh,uid是2000,指定组为wudang,用户家目录为/huashan/linghuchong
/etc/shells 存放Linux中支持的shell解释器
[root@master luoyawei]# cat /etc/shells 查看linux里支持哪些shell
/bin/sh
/bin/bash
/usr/bin/sh
/usr/bin/bash
[root@master luoyawei]# useradd -c "sanchuang master" -s "/bin/sh" -u 2000 -g wudang -d /huashan/linghuchong linghuchong
useradd:“wudang”组不存在
给用户指定组时必须保证已经存在组,否则需要先新建
[root@master luoyawei]# groupadd wudang
[root@master luoyawei]# useradd -c "sanchuang master" -s "/bin/sh" -u 2000 -g wudang -d /huashan/linghuchong linghuchong
useradd:无法创建目录 /huashan/linghuchong
因为根目录下没有huashan这个文件夹,指定家目录时必须保证指定目录的上一级文件夹存在,即huashan文件夹必须存在,linghuchong可以创建用户时自动创建
[root@master luoyawei]# cd /huashan
-bash: cd: /huashan: 没有那个文件或目录
[root@master luoyawei]# mkdir /huashan
[root@master luoyawei]# useradd -c "sanchuang master" -s "/bin/sh" -u 2000 -g wudang -d /huashan/linghuchong linghuchong
查看用户信息
[root@lier lianxi]# id linghuchong
uid=2000(linghuchong) gid=1044(wudang) 组=1044(wudang)
[root@lier lianxi]# cat /etc/passwd |grep linghuchong
linghuchong:x:2000:1044:sanchuang master:/huashan/linghuchong:/bin/sh
groupadd
新建组
[root@master luoyawei]# groupadd shaolin
[root@master luoyawei]# groupadd wudang
/etc/group 存放Linux中的组
[root@lier lianxi]# head -5 /etc/group
root:x:0:
bin:x:1:
daemon:x:2:
sys:x:3:
adm:x:4:
用户的id号分类:
超级用户 root 0
程序用户/系统用户 没有家目录,不能登录linux系统
系统用户默认编号201~999
1~201 系统里预先建立的用户程序用户--》与操作系统管理相关或者启动某个程序相关的用户
1~999 都是程序用户/系统用户
普通用户: 1000~60000
查看用户编号的默认文件:/etc/login.defs
[root@master luoyawei]# cat /etc/login.defs defaults默认
groupdel
删除组
[root@master luoyawei]# groupdel shaolin
[root@master luoyawei]# groupdel wudang
/etc/passwd
/etc/passwd 存放了linux系统里的所有的用户的信息
[root@lier 521]# cat /etc/passwd|grep root
root:x:0:0:root:/root:/bin/bash
operator:x:11:0:operator:/root:/sbin/nologin
/etc/shadow
/etc/shadow :存放所有用户的密码,密码经过了sha加密
[root@lier 521]# cat /etc/shadow |grep lier
lier:$6$b4qWml6o$WXHp0DuupvgP1JOPY7589cnLlvMX1bRxtCCDq.RWZKHA7YYP/VbJBggR2ygp6D.lrMKkmKk6yOcSQhSa/tKSu1:19051:0:99999:7:::
/etc/shadow文件中每条信息的第二个字段表示用户的密码
!! --》普通用户,没有设置密码
*–》系统用户,没有设置密码
linux系统默认情况下,没有设置密码的用户,不允许远程登录;但是可以使用su 切换本地登录
linux里一切皆文件
命令很多都是对文件进行操作(读/写)
kill
NAME
kill - terminate a process
kill -l
查看系统中的信号
[root@lier ~]# kill -l
1) SIGHUP 2) SIGINT 3) SIGQUIT 4) SIGILL 5) SIGTRAP
6) SIGABRT 7) SIGBUS 8) SIGFPE 9) SIGKILL 10) SIGUSR1
11) SIGSEGV 12) SIGUSR2 13) SIGPIPE 14) SIGALRM 15) SIGTERM
16) SIGSTKFLT 17) SIGCHLD 18) SIGCONT 19) SIGSTOP 20) SIGTSTP
21) SIGTTIN 22) SIGTTOU 23) SIGURG 24) SIGXCPU 25) SIGXFSZ
26) SIGVTALRM 27) SIGPROF 28) SIGWINCH 29) SIGIO 30) SIGPWR
31) SIGSYS 34) SIGRTMIN 35) SIGRTMIN+1 36) SIGRTMIN+2 37) SIGRTMIN+3
38) SIGRTMIN+4 39) SIGRTMIN+5 40) SIGRTMIN+6 41) SIGRTMIN+7 42) SIGRTMIN+8
43) SIGRTMIN+9 44) SIGRTMIN+10 45) SIGRTMIN+11 46) SIGRTMIN+12 47) SIGRTMIN+13
48) SIGRTMIN+14 49) SIGRTMIN+15 50) SIGRTMAX-14 51) SIGRTMAX-13 52) SIGRTMAX-12
53) SIGRTMAX-11 54) SIGRTMAX-10 55) SIGRTMAX-9 56) SIGRTMAX-8 57) SIGRTMAX-7
58) SIGRTMAX-6 59) SIGRTMAX-5 60) SIGRTMAX-4 61) SIGRTMAX-3 62) SIGRTMAX-2
63) SIGRTMAX-1 64) SIGRTMAX
常见的信号
SIGHUP signal hup 挂起信号,告诉一组进程的leader(session的第一个进程),如果leader挂了,会给下面的进程发HUP信号,收到HUP信号的进程都会被kill掉
SIGIN signal interrupt 中断信号,终止正在运行的进程
SIGKILL signal kill 强制杀死进程的信号
SIGTERM signal terminate 自我终结信号 --》信号可以被屏蔽的 --》默认的信号
[root@lier ~]# su - lyl
上一次登录:三 6月 1 08:44:41 CST 2022pts/0 上
[lyl@lier ~]$ vim sc.txt
再另起一个终端查看进程
[root@lier ~]# ps aux|grep sc.txt
lyl 10769 0.1 0.2 149576 5256 pts/0 S+ 09:20 0:00 vim sc.txt
root 10771 0.0 0.0 112824 1000 pts/1 S+ 09:20 0:00 grep --color=auto sc.txt
使用kill -9 强制杀死10769这个进程
[root@lier ~]# kill -9 10769
已杀死
[lyl@lier ~]$
默认kill直接接进程使用的是15信号,让进程自我终结
[lyl@lier ~]$ vim sc.txt
[root@lier ~]# ps aux|grep sc.txt
lyl 10780 0.2 0.2 149576 5256 pts/0 S+ 09:37 0:00 vim sc.txt
root 10784 0.0 0.0 112824 1000 pts/1 S+ 09:37 0:00 grep --color=auto sc.txt
[root@lier ~]# kill 10780
[lyl@lier ~]$ vim sc.txt
Vim: Caught deadly signal TERM
Vim: Finished.
已终止
实验
在 lyl 用户中创建一个脚本
[lyl@lier ~]$ cat while.sh
#!/bin/bash
trap "echo i am busy" 15 2 1 9 # 当捕捉到15、2、1信号时输出i am busy
i=1
# while :
while true
do
echo $i
((i++))
sleep 1
done
[lyl@lier ~]$ bash while.sh
另起一个终端
[root@lier ~]# ps aux|grep while.sh
lyl 10885 0.0 0.0 113284 1436 pts/0 S+ 09:43 0:00 bash while.sh
root 10891 0.0 0.0 112824 1004 pts/1 S+ 09:43 0:00 grep --color=auto while.sh
[root@lier ~]# kill -1 10885
#
57
58
59
60
i am busy
61
62
63
64
[root@lier ~]# kill -2 10885
#
118
119
120
121
122
123
i am busy
124
125
126
127
[root@lier ~]# kill -15 10885
#
170
171
172
i am busy
173
174
175
176
177
[root@lier ~]# kill -9 10885
#
198
199
200
已杀死
trap
捕捉信号的命令
[lyl@lier ~]$ cat while.sh
#!/bin/bash
trap "echo i am busy" 15 2 1 9
i=1
# while :
while true
do
echo $i
((i++))
sleep 1
done
当捕捉到 15、2、1信号时输出 i am busy
但是设置捕捉9这个信号的时候没有用,因为9信号会强制杀死进程
nohup
NAME
nohup - run a command immune to hangups, with output to a non-tty
nohup 运行的程序可以屏蔽hup信号
[lyl@lier ~]$ cat while.sh
#!/bin/bash
trap "echo i am busy" 15 2 1 9
i=1
# while :
while true
do
echo $i
((i++))
sleep 1
done
[lyl@lier ~]$ cat nohup.out
[lyl@lier ~]$ nohup bash while.sh
nohup: 忽略输入并把输出追加到"nohup.out"
已杀死
先尝试使用1信号杀死进程,再用9信号强制杀死进程
[root@lier ~]# ps aux|grep while.sh
lyl 11327 0.0 0.0 113284 1440 pts/0 S+ 10:01 0:00 bash while.sh
root 11335 0.0 0.0 112824 1000 pts/1 S+ 10:01 0:00 grep --color=auto while.sh
[root@lier ~]# kill -1 11327
[root@lier ~]# kill -9 11327
查看nohup.out文件中的内容
[lyl@lier ~]$ cat nohup.out
1
2
3
4
5
6
7
8
9
10
11
12
13
14
15
16
17
18
19
20
21
22
23
24
文件中没有i am busy ,说明没有捕获到1信号,使用nohup执行脚本时1信号被屏蔽了
刚刚是在两个终端中进行操作,现在在一个终端中操作
[lyl@lier ~]$ nohup bash while.sh &
[1] 11357
[lyl@lier ~]$ nohup: 忽略输入并把输出追加到"nohup.out"
[lyl@lier ~]$ ps aux|grep while.sh
lyl 11357 0.0 0.0 113284 1436 pts/0 S 10:07 0:00 bash while.sh
lyl 11374 0.0 0.0 112824 1004 pts/0 S+ 10:07 0:00 grep --color=auto while.sh
[lyl@lier ~]$
& 将这条命令在后台执行,不需要占前端的终端,进程仍然存在
cut
cut 命令从文件的每一行剪切字节、字符和字段并将这些字节、字符和字段写至标准输出。
如果不指定 File 参数,cut 命令将读取标准输入。必须指定 -b、-c 或 -f 标志之一
-b:仅显示行中指定直接范围的内容;
-c:仅显示行中指定范围的字符;
-d:指定字段的分隔符,默认的字段分隔符为“TAB”;
-f:显示指定字段的内容;
-n:与“-b”选项连用,不分割多字节字符;
–complement:补足被选择的字节、字符或字段;
–out-delimiter=<字段分隔符>:指定输出内容是的字段分割符;
–help:显示指令的帮助信息;
–version:显示指令的版本信息。
-f
显示指定的字段
[root@lier 528]# cat test.txt
No Name Mark Percent
01 tom 69 91
02 jack 71 87
03 alex 68 98
[root@lier 528]# cut -f 2 -d ' ' test.txt
Name
tom
jack
alex
-d
定义分隔符
[root@lier 528]# cat test.txt
No;Name;Mark;Percent
01;tom;69;91
02;jack;71;87
03;alex;68;98
[root@lier 528]# cut -f 2 -d ';' test.txt
Name
tom
jack
alex
mkpasswd
功能说明:生成随机密码
注意:要使用此命令,需要安装expect软件包
[外链图片转存失败,源站可能有防盗链机制,建议将图片保存下来直接上传(img-VnH34TVB-1654504369574)(https://cdn.nlark.com/yuque/0/2022/png/21706579/1654503163001-47945e31-3c58-4519-8f03-ef1aa67756da.png)]
[root@lier 528]# mkpasswd -l 10
JfaoiJk(57
[root@lier 528]# mkpasswd
jnagGB$60
[root@lier 528]# mkpasswd -d 3
ph9z|X99D
示例:生成25位的随机密码,其中大写字母5位,小写字母5位,特殊字符5位,数字5位
[root@lier 528]# mkpasswd -l 25 -s 5 -c 5 -C 5 -d 5
&P=jFllk498Yl?N36F'vs|xph


 793
793


 被折叠的 条评论
为什么被折叠?
被折叠的 条评论
为什么被折叠?
 到【灌水乐园】发言


