


零、文章目录
JavaScript高级三、深入面向对象
1、编程思想
(1)面向过程介绍
- 面向过程:分析出解决问题所需要的步骤,然后用函数把这些步骤一步一步实现,使用的时候再一个一个的依次调用就可以了。
(2)面向对象介绍
- 面向对象:把事务分解成为一个个对象,然后由对象之间分工与合作。
- **优点:**面向对象编程具有灵活、代码可复用、容易维护和开发,更适合多人合作的大型软件项目。
- 面向对象的特性:
- 封装性
- 继承性
- 多态性
(3)面向过程VS面向对象
- 面向过程编程
- **优点:**性能比面向对象高,适合跟硬件联系很紧密的东西,例如单片机就采用的面向过程编程。
- **缺点:**没有面向对象易维护、易复用、易扩展
- 面向对象编程
- **优点:**易维护、易复用、易扩展,由于面向对象有封装、继承、多态性的特性,可以设计出低耦合的系统,使系统 更加灵活、更加易于维护
- **缺点:**性能比面向过程低
2、构造函数
(1)构造函数实现面向对象
- 封装是面向对象思想中比较重要的一部分,js面向对象可以通过构造函数实现封装。
- 同样的将变量和函数组合到了一起并能通过 this 实现数据的共享,所不同的是
借助构造函数创建出来的实例对象之间彼此不影响
(2)构造函数存在的问题
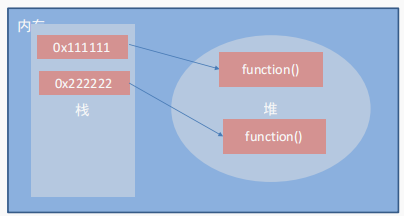
- 对象中的函数都是
引用的不同的堆地址,浪费内存
案例如下:
<!DOCTYPE html>
<html lang="en">

<head>
    <meta charset="UTF-8">
    <meta http-equiv="X-UA-Compatible" content="IE=edge">
    <meta name="viewport" content="width=device-width, initial-scale=1.0">
    <title>构造函数实现面向对象</title>
</head>

<body>
    <script>
        // 构造函数实现面向对象
        // 公共的属性和方法封装到构造函数里面
        function Star(uname, age) {
            this.uname = uname
            this.age = age
            this.sing = function() {
                console.log('唱歌')
            }
        }
        const ldh = new Star('刘德华', 55)
        const zxy = new Star('张学友', 58)
        console.log(ldh.sing === zxy.sing) //false 说明两个函数地址不同,浪费内存空间

        //公共的方法写到原型对象身上
        Star.prototype.sing2 = function() {
            console.log('唱歌')
        }
        console.log(ldh.sing2 === zxy.sing2) //true 说明两个函数地址相同,节省内存空间
    </script>
</body>

</html>
3、原型对象
(1)原型对象
-
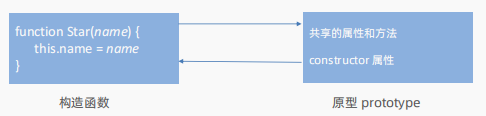
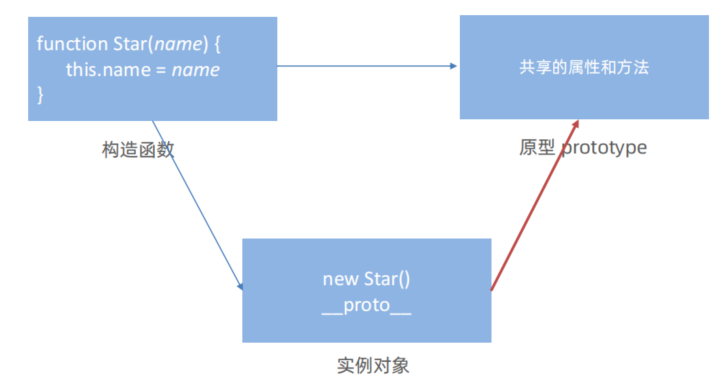
**原型对象:**JavaScript 规定,
每一个构造函数都有一个prototype 属性,这个prototype 属性是一个对象,这个对象称为原型对象。 -
原型对象作用:
原型对象可以挂载函数,对象实例共享原型上函数,可以直接用实例对象调用挂载的函数,函数对象引用相同的堆地址,节约内存。可以把那些不变的方法,挂载在 prototype 对象上。
-
原型对象this指向:
构造函数和原型对象中的this都指向实例化的对象。
案例如下:
<!DOCTYPE html>
<html lang="en">
<head>
<meta charset="UTF-8">
<meta http-equiv="X-UA-Compatible" content="IE=edge">
<meta name="viewport" content="width=device-width, initial-scale=1.0">
<title>原型对象及this指向</title>
</head>
<body>
<script>
{
// 构造函数实现面向对象
function Star(uname, age) {
this.uname = uname
this.age = age
}
//公共的方法写到原型对象身上
Star.prototype.sing = function() {
console.log('唱歌')
}
const ldh = new Star('刘德华', 55)
const zxy = new Star('张学友', 58)
console.log(ldh.sing === zxy.sing) //true 说明两个函数地址相同,节省内存空间
}
{
//原型对象this指向
let that
function Star2(uname) {
this.uname = uname
}
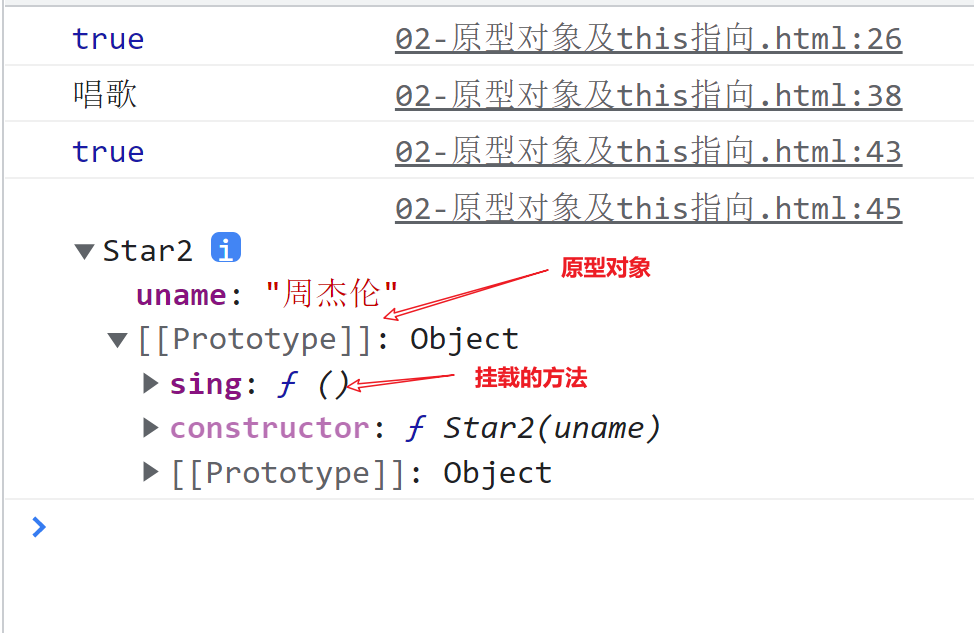
Star2.prototype.sing = function() {
that = this
console.log('唱歌')
}
//实例对象zjl
const zjl = new Star2('周杰伦')
zjl.sing()
console.log(that === zjl) //true 原型对象里面的函数this指向的还是实例对象zjl
console.log(zjl) //打印对象
}
</script>
</body>
</html>
数组扩展
<!DOCTYPE html>
<html lang="en">

<head>
    <meta charset="UTF-8">
    <meta http-equiv="X-UA-Compatible" content="IE=edge">
    <meta name="viewport" content="width=device-width, initial-scale=1.0">
    <title>数组扩展</title>
</head>

<body>
    <script>
        // 自己定义数组扩展方法
        // 1. 我们定义的这个方法,任何一个数组实例对象都可以使用
        // 2. 自定义的方法写到  数组.prototype 身上

        // 1.最小值
        Array.prototype.max = function() {
            // 展开运算符
            return Math.max(...this)
                // 原型函数里面的this 指向谁? 实例对象 arr
        }

        // 2.最小值
        Array.prototype.min = function() {
            // 展开运算符
            return Math.min(...this)
                // 原型函数里面的this 指向谁? 实例对象 arr
        }

        // 3. 求和
        Array.prototype.sum = function() {
            return this.reduce((prev, item) => prev + item, 0)
        }

        const arr = [1, 2, 3]
        console.log(arr.max()) //3
        console.log(arr.min()) //1
        console.log(arr.sum()) //6
    </script>
</body>

</html>
(2)constructor 属性
- **位置:**每个
原型对象里面都有个constructor 属性 - **作用:**该属性
指向该原型对象的构造函数
- 使用场景:
- 如果同时要添加多个方法,我们可以给原型对象采取
对象形式赋值 - 但是这样
原型对象原来的内容就会被覆盖,这样原型对象.constructor!=构造函数 - 所以赋值的时候,还需要指定
原型对象.constructor=构造函数
- 如果同时要添加多个方法,我们可以给原型对象采取
案例如下:
<!DOCTYPE html>
<html lang="en">

<head>
    <meta charset="UTF-8">
    <meta http-equiv="X-UA-Compatible" content="IE=edge">
    <meta name="viewport" content="width=device-width, initial-scale=1.0">
    <title>constructor属性</title>
</head>

<body>
    <script>
        // constructor 构造函数
        function Star(name) {
            this.name = name
        }
        //对象形式赋值
        Star.prototype = {
            sing: function() {
                console.log('唱歌')
            },
            dance: function() {
                console.log('跳舞')
            },
        }
        console.log(Star.prototype.constructor) //指向Object

        //对象形式赋值
        Star.prototype = {
            // 重新指回创造这个原型对象的构造函数
            constructor: Star,
            sing: function() {
                console.log('唱歌')
            },
            dance: function() {
                console.log('跳舞')
            },
        }
        console.log(Star.prototype.constructor) //指向Star
    </script>
</body>

</html>
(3)对象原型
__proto__是JS非标准属性对象.__proto__===构造函数.prototype原型对象。对象__proto__.constructor===构造函数.prototype原型对象.constructor===构造函数
案例如下:
<!DOCTYPE html>
<html lang="en">

<head>
    <meta charset="UTF-8">
    <meta http-equiv="X-UA-Compatible" content="IE=edge">
    <meta name="viewport" content="width=device-width, initial-scale=1.0">
    <title>对象原型</title>
</head>

<body>
    <script>
        function Star() {

        }
        const ldh = new Star()

        // 对象.__proto__===构造函数.prototype原型对象
        console.log(ldh.__proto__ === Star.prototype) //true

        // 对象__proto__.constructor===构造函数.prototype原型对象.constructor===构造函数
        console.log(ldh.__proto__.constructor === Star) //true
    </script>
</body>

</html>
(4)原型继承
- 继承是面向对象编程的另一个特征,通过继承进一步提升代码封装的程度,JavaScript 中大多是借助原型对象实现继承的特性。
- 继承实现
- **封装父类:**抽取
公共部分到父类 - **创建子类:**子类的原型指向
父类对象,然后子类的原型的构造函数指回自己的构造函数 - **子类特有方法属性:**添加子类
特有方法属性 - **子类使用:**既能调用父类的方法属性,也能使用自己特有的方法属性
- **封装父类:**抽取
案例如下:
<!DOCTYPE html>
<html lang="en">
<head>
<meta charset="UTF-8">
<meta http-equiv="X-UA-Compatible" content="IE=edge">
<meta name="viewport" content="width=device-width, initial-scale=1.0">
<title>原型继承</title>
</head>
<body>
<script>
// 构造函数 父类Person
function Person() {
this.eyes = 2
this.head = 1
}
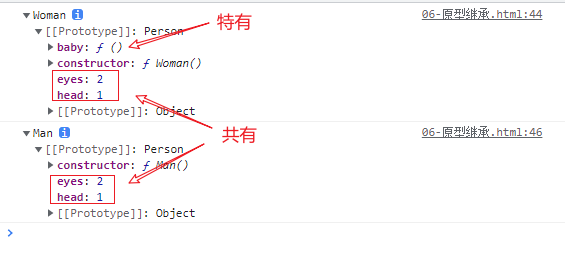
// 构造函数 子类Woman
function Woman() {
}
// 通过原型来继承 父类Person
Woman.prototype = new Person() // new 出来每次都是新对象
// 指回原来的构造函数
Woman.prototype.constructor = Woman
// 给女人添加一个方法 生孩子
Woman.prototype.baby = function() {
console.log('宝贝')
}
// 构造函数 子类Man
function Man() {
}
// 通过原型来继承 父类Person
Man.prototype = new Person()
// 指回原来的构造函数
Man.prototype.constructor = Man
//构建Woman和Man的实例
const red = new Woman()
console.log(red)
const pink = new Man()
console.log(pink)
</script>
</body>
</html>
(5)原型链
基于原型对象的继承使得不同构造函数的原型对象关联在一起,并且这种关联的关系是一种链状的结构,我们将原型对象的链状结构关系称为原型链
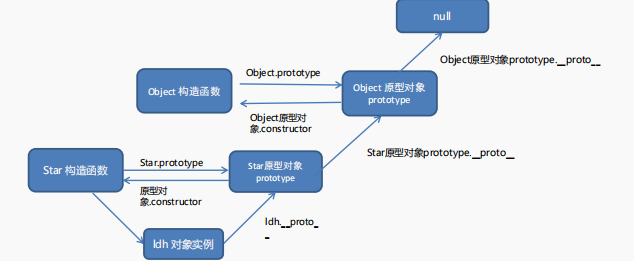
- 原型链-查找规则
- 当访问一个对象的属性(包括方法)时,首先查找这个对象自身有没有该属性
- 如果没有就查找它的原型(也就是
__proto__指向的 prototype 原型对象) - 如果还没有就查找原型对象的原型(Object的原型对象)
- 依此类推一直找到 Object 为止(null)
__proto__对象原型的意义就在于为对象成员查找机制提供一个方向,或者说一条路线- 可以使用
instanceof运算符用于检测构造函数的 prototype 属性是否出现在某个实例对象的原型链上
案例如下:
<!DOCTYPE html>
<html lang="en">

<head>
    <meta charset="UTF-8">
    <meta http-equiv="X-UA-Compatible" content="IE=edge">
    <meta name="viewport" content="width=device-width, initial-scale=1.0">
    <title>原型链</title>
</head>

<body>
    <script>
        function Person() {

        }
        const ldh = new Person()

        console.log(ldh instanceof Person) //true
        console.log(ldh instanceof Object) //true
        console.log(ldh instanceof Array) //false
        console.log([1, 2, 3] instanceof Array) //true
        console.log(Array instanceof Object) //true
    </script>
</body>

</html>
4、综合案例
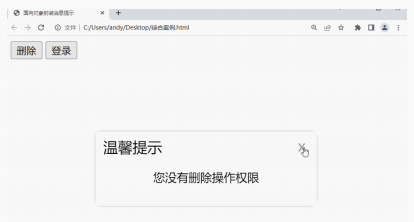
- 需求:实现一个面向对象的模态框
- 分析需求:
- 定义模态框 Modal 构造函数,用来创建对象
- 模态框具备 打开功能 open 方法 (按钮点击可以打开模态框)
- 模态框 具备关闭功能 close 方法
-
实现细节
-
Modal 构造函数 制作,需要的公共属性: 标题(title)、提示信息内容(message) 可以设置默认参数
- 创建div标签可以命名为:modalBox
- div标签的类名为 modal
- 标签内部添加 基本结构,并填入相关数据
-
open方法
-
写到构造函数的原型对象身上
-
把刚才创建的modalBox 添加到 页面 body 标签中
-
open 打开的本质就是 把创建标签添加到页面中
-
点击按钮, 实例化对象,传入对应的参数,并执行 open 方法
-
-
close方法
-
写到构造函数的原型对象身上
-
把刚才创建的modalBox 从页面 body 标签中 删除
-
需要注意,x 删除按钮绑定事件,要写到open里面添加
-
因为open是往页面中添加元素,同时顺便绑定事件
-
-
代码如下:
<!DOCTYPE html>
<html lang="en">

<head>
    <meta charset="UTF-8" />
    <meta http-equiv="X-UA-Compatible" content="IE=edge" />
    <meta name="viewport" content="width=device-width, initial-scale=1.0" />
    <title>面向对象封装消息提示</title>
    <style>
        .modal {
            width: 300px;
            min-height: 100px;
            box-shadow: 0 0 10px rgba(0, 0, 0, 0.2);
            border-radius: 4px;
            position: fixed;
            z-index: 999;
            left: 50%;
            top: 50%;
            transform: translate3d(-50%, -50%, 0);
            background-color: #fff;
        }

        .modal .header {
            line-height: 40px;
            padding: 0 10px;
            position: relative;
            font-size: 20px;
        }

        .modal .header i {
            font-style: normal;
            color: #999;
            position: absolute;
            right: 15px;
            top: -2px;
            cursor: pointer;
        }

        .modal .body {
            text-align: center;
            padding: 10px;
        }

        .modal .footer {
            display: flex;
            justify-content: flex-end;
            padding: 10px;
        }

        .modal .footer a {
            padding: 3px 8px;
            background: #ccc;
            text-decoration: none;
            color: #fff;
            border-radius: 2px;
            margin-right: 10px;
            font-size: 14px;
        }

        .modal .footer a.submit {
            background-color: #369;
        }
    </style>
</head>

<body>
    <button id="delete">删除</button>
    <button id="login">登录</button>

    <!-- <div class="modal">
    <div class="header">温馨提示 <i>x</i></div>
    <div class="body">您没有删除权限操作</div>
  </div> -->


    <script>
        // 1.  模态框的构造函数
        function Modal(title = '', message = '') {
            // 公共的属性部分
            this.title = title
            this.message = message
                // 因为盒子是公共的
                // 1. 创建 一定不要忘了加 this
            this.modalBox = document.createElement('div')
                // 2. 添加类名
            this.modalBox.className = 'modal'
                // 3. 填充内容 更换数据
            this.modalBox.innerHTML = `
        <div class="header">${this.title} <i>x</i></div>
        <div class="body">${this.message}</div>
      `
        }
        // 2. 打开方法 挂载 到 模态框的构造函数原型身上
        Modal.prototype.open = function() {
            if (!document.querySelector('.modal')) {
                // 把刚才创建的盒子 modalBox  渲染到 页面中  父元素.appendChild(子元素)
                document.body.appendChild(this.modalBox)
                    // 获取 x  调用关闭方法
                this.modalBox.querySelector('i').addEventListener('click', () => {
                    // 箭头函数没有this 上一级作用域的this
                    // 这个this 指向 m
                    this.close()
                })
            }
        }

        // 3. 关闭方法 挂载 到 模态框的构造函数原型身上
        Modal.prototype.close = function() {
            document.body.removeChild(this.modalBox)
        }

        // 4. 按钮点击
        document.querySelector('#delete').addEventListener('click', () => {
            const m = new Modal('温馨提示', '您没有权限删除')
                // 调用 打开方法
            m.open()
        })

        // 5. 按钮点击
        document.querySelector('#login').addEventListener('click', () => {
            const m = new Modal('友情提示', '您还么有注册账号')
                // 调用 打开方法
            m.open()
        })
    </script>
</body>

</html>


 3万+
3万+


 被折叠的 条评论
为什么被折叠?
被折叠的 条评论
为什么被折叠?
 到【灌水乐园】发言


